1
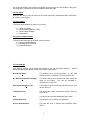
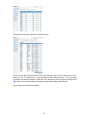
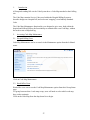
VEDA USER GUIDE
Proprietary Information - This document contains information that shall be
distributed, routed or made available only within Healthcode
except with written permission of Healthcode
Version 2
1. VEDA DIAGRAM PROCESS
PROCESSING CLAIMS, REMITTANCES AND RESPONSES THROUGH
VEDA
IN TER N ET
W orkstation
HO SP ITA L
CO M P UTE R
SU BM IT BILLIN G FILE
FILE
FA ILE D
UP LO AD
C LA IM S FILE
FILE R EJEC TED
FILE S UCCE SSFU LLY
U P LO A DE D
A M END E D CLA IM S
U PLO A D ED C LA IM S
FILE
R E S P O NS E S
P RO CE S S E D
BY V E DA
CLAIM S IN FILE
U NDER G O V A LIDA TIO N
PRO CE S S
REM ITS
P R O CE S S E D
B Y V E DA
C LA IM S FA ILE D
V A LID A TIO N
C LA IM S P A S S E D
V A LID A TIO N
PR O C ESSIN G
W ITH IN
H EALTH C O D E'S
VED A SYSTEM
IN SURE R
RECE IP TS
VA LID C LA IM S
R SA
PR IM E
C LAIM S AW AITIN G
C O LLEC TIO N BY
IN SU R ER
BU PA
PPP
S erver
NU
2
I
N
S
U
R
E
R
S
2.0 How to use the VEDA system
2.1 Introduction.
In order to ensure that the user opens the most recently stored pages and not cached pages,
whilst accessing the VEDA secure site, a very specific configuration option needs to be selected
in the browser properties. (See APPENDIX 1.)
2.2 Accessing the Internet
Switch on the PC and ensure modem is connected and switched on, Log into windows as you
normally would, when your PC boots up a screen appears with icons. This is called the desktop.
(NB: The Icon you would normally access EDI Billing through is now only for accessing
archive claim information. Should you try to send claims through this an error message
will appear. The description may differ.)
JEDI Claim System.pif
Ensure you have created your electronic bill on your Hospital Billing System and are ready to
upload the claims onto the new VEDA system. Point your cursor on one of the following Internet
icons and double click with the left hand button on the mouse.
This will open up your Web page. With the mouse, highlight the information displayed in the
address field. Type in
NB: Logging off the system and using the Internet Explorer icons
The following must be noted whilst using the Healthcode HTMLUS and Veda System.
Performing any of the actions below will cause you to lock your user account & be logged out of
the Healthcode website. Please do not use any of your usual browser buttons (below) while
logged into any Healthcode system
The refresh icon on your Internet Explorer should not be used to refresh / reload the page.
The close
icon, or the File, Exit command from your menu options should also not be used to
close the browser window.
Do not type in another www address or select a website from your favourites without using the
button to logoff first.
3
3.0 Logging onto the Secure Site
This will be the first page displayed when you log into www.healthcode.co.uk
Click on the Secure Access button. The following screen will appear.
Please check the VEDA Status box on the left hand side of the screen to check that the VEDA
system is fully functional and is displaying the green tick as above.
Please enter your User Name and Password, both of these are case sensitive and are very
different from what you are used to, so care should be taken. Once you have input this
information click the submit button. On the first time of accessing this page the following screen
may appear
4
This will appear every three months, as this is the life span of your password. Complete the
required fields and click the
the Provider Status page appears.
button. Once you have completed this Password change
3.1 The Provider Status Page
5
On the left hand side of the screen are a number of options which are covered later in this guide.
We are going to concentrate on the sub-headings within this page.
3.2 File Status
Here you are able to view the files that have been previously uploaded and have either been
successful or have failed.
3.3 Claim Status
This shows the breakdown of claims in four areas:
Claims in Process
Claims passed Validation Today
Claims Failed Validation
Failed Claims
3.4 Insurer Feedback Status
This shows the information given back from the insurers:
Unprocessed Remittances
Remittances for Download
Unread Responses
3.5 User Settings
User Settings enables you to change the settings to your own personal preference.
stated otherwise these settings only remain for the current session.
Unless
Access Key Guide:
This enables you to use the quick keys, i.e. “ALT” and
whichever letter is underlined. This can be Off or On.
No. Results Output On List Pages:
This option allows you to choose how many claims are
listed on List Pages.
This can be increased or
decreased to suit the user.
Help Screen Always On Top:
This relates to the 6 icons at top right hand corner. This
can be Off or On
Full Screen View:
This option takes away your browser buttons. This can
be Off or On
Site:
This will be your exclusive Healthcode site number
Change Password:
This will allow you to change your password
Access & Permissions
This sets the level of access and permission within
VEDA
6
Personal Details:
Should any of your details change this is where it should
be modified.
Set Directories
This can be used to set the archive directory on your
local system for files uploaded to VEDA. When you
submit a file it will be copied to this location. This setting
does not change.
Messages
This will allow you to send messages to Insurers and
users. (In Development)
3.6 Help Screen Icons
On all pages of the VEDA system there are 6 important Icons at the top right hand side of each
page. The
and
are greyed out until you can use them.
To move back to the previous page
To print the page
This icon will reload the current page with updated information (refresh); you can also
use the F5 key
This icon must be used to log out of the VEDA system at any time.
This icon will automatically propagate an email to the healthcode helpdesk
This icon will offer any help that is available to you and will also give you a brief
explanation
7
4.0 Submitting Billing Files
To submit a file from your hospital billing system you need to click on Submit Billing File and this
will take you to the following screen
Click the first browse button. The first time you upload claims you will have to specify the path for
the file to be submitted. (Your Hospital billing system provider will be able to give you this
information and see example below).
8
Once you have selected the correct file path click on open and this information will appear in your
first line. Then click on submit. (The file name should have the extension of “.snd”, anything
else is incorrect and will cause problems).
9
You will receive this message if the claims files have uploaded successfully.
NB. A screen will also appear with a Security Warning.
(See Appendix 2)
If you have set the archive directories but wish to change them you can click on “click here”, this
will take you to the following screen.
This places the files uploaded in a separate folder on your PC in an effort to stop duplication of
the process, this is an optional function. (See Appendix 3).
5.0 Uploaded Files
Click on Uploaded Files and this will show you the files, which have uploaded successfully, and
those that have failed.
10
The above screen shows the successful files that have been uploaded today. You are able to
view by clicking on the magnifying glass and print by clicking on the printer.
NB: Those files successfully uploaded today will appear on the following page and
although they have successfully uploaded to VEDA there may still be errors on the claims
within these files.
To view all claims uploaded since commencement of VEDA you need to click on All in top right of
screen and this will show you the following screen.
This screen shows all files that have been successfully uploaded. You are able to view and print
this screen and sort the files by date, file name and the number of claims.
Those files, which have failed validation, need to be corrected within the hospital billing system
and resubmitted.
11
12
6.0 Claims
Within the Claims section are a number of sub-headings:
6.1 Completed Today
These claims have completed validation today and are awaiting collection from the Insurer. These
will include claims, which have been corrected, and also claims that have successfully passed
through the VEDA validation without requiring correction. Within this screen you can view these
claims but no work is necessary.
To view all completed claims you need to click on the Insurer whose data you wish to view. This
is the total completed claims. (The same as Sent Claims on JEDI.) At the top of the list of
Validated Claims is a Search facility. Click on the calendar next to the Date and the following will
appear.
You should then select the date you wish to view. The following screen will appear. Each claim
will be receipted by insurer with the receipt date. If the insurer has sent a Response or
Remittance they are also shown against each claim. Claims collected by the insurer will change
to BLACK and will show date received.
13
You can search by Last Name, Registration No., Claim Unique Identifier, Invoice No and
Authorisation Code and if you wish to span all dates you will need to tick the “All Dates” box.
Once you have input the request, you then click the Search button.
6.3 Failed Validation
Claims, which have failed validation, will appear here.
To view the claims in detail click on either the insurer name or icon under “View”.
14
The detailed list of claims will appear as below.
Once again you can search by Last Name, Registration No, Claim Unique Identifier, Invoice No
and Authorisation Code. Once you have input the request, you then click the Search button.
You can also see in the display the first 25 claims and there are 25 claims per page. To view the
next page click on
. This will take you to the next page and you can continue with this
method. All claims that have failed validation will appear here. Each claim will have to be
manually corrected. To view the details of the claims click on the edit button this will take you into
the failed claim.
15
The first error will be highlighted with a suggested fix, which can be found at the top of the claim.
On entering this highlighted field will automatically delete the incorrect information. If there is
more than one error on a claim you can view the other error messages using the drop down
arrow. The user will then go onto the next error by using the drop down arrow in Error Message.
button and they will be prompted to save the changes. Click
The user must click on the
on OK.
in the top right hand
If the error appears on the charge lines you will need to click on
side of the page. This will take you into the charge lines. Once corrected and updated the claim
then passes through more validation checks and there is a possibility that it may need further
work.
6.4 Charge lines
All the areas in grey cannot be changed. All other fields can be edited. Any errors on the charge
line will appear in the box with a drop down arrow at the bottom of each charge line. Should there
be more than one error on each charge line, simply by clicking on the drop down arrow the other
errors will appear. Once you have corrected the charge line errors you will click on OK, each
charge line with an error will require you to click on OK. Should you input incorrect data in these
fields by clicking the cancel button these changes will be cancelled.
16
This page shows you the charge lines. You can use the scroll down facility at the side to show
more charge lines. Any error messages will appear below each individual charge line.
Once any change is made click on
, at this point you will be prompted by a grey box
asking you to click on the
button on the Claim Header details. Once again click on
. To leave the charge line click on the blue cross in the top right hand corner.
Once all of the errors are amended click on
claim will now run through the validation process.
button on the Claim Header screen. The
When you leave the Claim Header details another box will remind you that the changes will be
.
saved. Click on
NB: Should an error still show on this claim once it has passed through validation it will
appear back in Claims Failed Validation and you will need to edit this error.
If your user access level allows you can cancel claims at this stage.
processed through VEDA has to mirror that of your hospital billing system.
All the information
6.5 Cancelled Claims
If you have submitted claims incorrectly and have the level of access you will be able to cancel
claims. These can be cancelled either on Claims Failed Validation or on the Claim Header.
These claims will then appear in Cancelled Claims and will be part of an audit trail. These can be
.
viewed by clicking on the
17
7.0 Insurer Feedback
7.1 Remittances
7.1.1 Remittances By Insurer
If it has been agreed for you to receive Electronic Remittances, these can be collected via VEDA
according to the frequency of your payment cycle with the Insurer. The remittances are split by
Insurer and show the number of unprocessed remittance files. “All Files” include both processed
and unprocessed files. To collect a remittance file from the insurer you must click on
.
This will take you through to view, print and process the unprocessed file for each insurer.
The information in here shows date file created, your Hospital Provider ID, Amount, View, Print,
Process and Processed. If your hospital billing system can download the remittance file you can
view the file, print the file and then process the file.
18
If your hospital billing system is unable to download this file you can view and print the file for
manual input onto your system.
To Process an individual file click on the Healthcode icon under Process. This will then “tick” the
box under Processed. To Process all tick “Select All” box. This will move the remittance file to
Remittance Files for Download.
Both of these options will put the remittance file onto Remittance Files For Download.
7.2 Remittance Files For Download
Once you have processed the remittance file it then appears in this section. It appears with a File
Name, the date it was created, which Insurer, the amount of the remittance file and an option to
Download. If you are able to download your remittance file directly onto your hospital billing
.
system you have to click on
A grey box will appear asking you whether you want to open from this location or save to disk,
click on save to disk, you will now need to tell the pc where this file needs to be saved to (your
hospital billing system administrator will tell you this information). If you never save anything else
using this option it will always take you back to the correct place at future downloads, but
windows only remembers the last place you saved to. Remember it may not always be in the
correct place. You will now receive a grey message box saying download complete. Click close.
The remittance file will now have downloaded onto your billing system and you will be able to
print a detailed report, which will include the mismatches and unmatched invoices which will need
to be completed.
Users unable to automatically download this file will see these files remain here and Healthcode
will clear this data every six months.
7.3 Unread Responses
These are split by Insurer, the number of responses and the options to view and print. Printing
options are summary or detailed. This is the same function as on the JEDI system.
19
Selecting the view option will load the following screen.
Listed here are all unread responses showing the date sent, name, amount and status of claim.
enables you to view the details of the outstanding claim. This gives claim
Clicking on the
information and details the status of claim and users are able to print this page by clicking on the
. Once you have viewed these responses a green tick will appear under “Read.”
Shown below are the Response details.
20
To return to the Unread Response page click on the X. Clicking on the
refreshes and when
the screen reappears this response will have archived into All Responses.
To print the summary of responses just click on the
all responses and printing this summary.
7.4 All Responses
21
and the following page will appear listing
This will be Insurer specific and users will be able to view All Responses, print a summary and
also a detailed report.
When selecting the view option the following page will appear.
By using the search facility you can access the response just viewed and printed, this will also
access any other responses for this person. The green tick in the read box shows this response
has been viewed.
22
8.0 Reports
Within this section are Provider Reports. You can select which report you request by using the
drop down arrow. It will also show the number of Reports in Progress and the Reports Available.
These are broken down with File Name, From and To Date User Description and the View option.
23
These will be available for you to view and print provided you have the correct User Access
. This will be information specific to your
Level. To view the detailed report click on the
hospital and detailed per insurer.
9.0 Search Codes
Search Codes gives you the facility to search for Diagnoses Codes (ICD9), Procedure Codes
(OPCS) and Industry Standard Codes.
Type the area you require a code for within “Search For”. Click on the drop down arrow and
select either 1. Diagnoses Codes 2.Procedure Codes or 3.Industry Standard Codes.Then click on
.
A list of codes will be displayed that are available for the description you have requested. An
example of the codes and descriptions are shown below and this will be the format for all search
facilities. Not all of these codes will be valid for each insurer and may show on the
individual claim as not being valid.
24
10. Maintenance
Within the Maintenance section are a number of sub-headings.
25
11. Code Map Maintenance
The following section describes the functionality within Code Map Maintenance
1.
Introduction
2.
Accessing Code Map Maintenance
2.1
2.2
Hospital Billing Users
Head Office Users
3.
Code Map Maintenance Functions
4.
Searching / Viewing the Code Map
4.1
4.2
To search for a mapping
To search for all codes mapped to an Industry Standard
4.3
To search for all codes within a Category
Code
5.
Amending, Adding & Deleting Code Maps
5.1
5.2
5.3
Adding a Code Map
To edit an existing code map
Deleting Code Maps
26
1.
Introduction
All hospitals sending bills via the Veda System have a Code Map attached to their billing
site.
The Code Map contains Service Codes used within the Hospital Billing System to
describe charges on a hospital bill, and a relevant “mapping” to an Industry Standard
Code.
The Code Map Maintenance functionality was designed to give users, both within the
hospital and at Head Offices the functionality to maintain their own Code Map, without
the need to raise a Helpdesk log.
2.
Accessing Code Map Maintenance
2.1
Hospital Billing Users
Code Map Maintenance can be accessed via the Maintenance option from the left hand
menu.
Click on Code Map Maintenance
2.2
Head Office Users
Head office users can access the Code Map Maintenance option from their Group Status
page.
If a group has more than 1 code map set-up, users will need to select which code map
they wish to maintain.
Click on the Code Map from the drop down list to begin.
27
3.
Code Map Maintenance Functions
Once accessed, users will then be presented with the Maintenance page
From here you can
Search to view the code maps
Edit existing mapping
Add a new code mapping
Delete a mapping(s)
In order to add, amend or delete, users must first “Check Out” the code map to ensure no
other users are amending the code map at the same time.
If the “Check Out” option is not available you will need to request access to edit the code
maps.
This can be done by contacting the Helpdesk.
28
29
4.
Searching / Viewing the Code Map
You can search and view:
A single mapping (using full or partial search characters)
All codes mapped to a particular Industry Standard Code
The first 1000 codes within a Category
4.1
To search for a mapping
Enter the search characters within the Find field and click on
This will then display all service codes and Industry Standard codes containing the search
characters.
If you wish to search only in a particular category of Industry Standard Code, select the
category from the drop down list.
The system searches for the search characters in Service Code, Industry Standard Code
and ISC description.
30
4.2 To search for all codes mapped to a particular Industry Standard Code (ISC)
Enter the Industry Standard Code in the Find field and click on
This will then display all service codes mapped to the ISC
If there are more than 1000 results only the first 1000 will be displayed
31
4.3
To search for all codes within a Category
Select the category from the drop down listing and click on
If there are more than 1000 results only the first 100 will be displayed.
5.
Amending, Adding & Deleting Code Maps
To perform any edit functions on the code map you must first “check out” the code map.
This ensures that no others are able to edit the code map once you are making changes.
Once checked out the New Update & Delete options become active.
5.1
Adding a Code Map
icon.
To enter a new mapping, select the
32
Enter the service code and the ISC you wish it to be mapped to.
And select Add.
You will receive confirmation the update has been successful.
Once you have completed editing the code map you need to check the code map back in
so the changes take affect.
To do this select
Any changes will now be applied.
33
5.2
To edit an existing code map
To edit an existing code map first search to display the mapping.
To do this enter the service code in the Find field and click on
Select
to amend the mapping
Enter search characters to find the Industry Standard Code or alternatively enter the exact
Industry Standard Code and click on
The ISC displayed in blue is the current mappings for the service code.
34
Scroll through the list and select the ISC you wish the service code to be mapped to.
Click
to save the mapping
Select
5.3
to complete the update and return to Code Map Maintenance page.
Deleting a Code Map
To delete a mapping, first search for the mapping you wish to delete.
35
Select the code maps you wish to delete by ticking the check box at the end of each
mapping.
Once you have the all the mappings selected you wish to delete, click on
You will receive a prompt to confirm the deletion of the specified code maps
To continue click
If you wish to cancel or amend the code maps for deletion click on
36
Once you have finished editing the code map, you will need to “check in” the code map.
If you try to logout of the system without checking back in the Code Map you will
receive a warning before you logout.
Error Logs
These can be accessed either when you have selected Secure Access or prior to logging onto
the system.
Non-Secure Side
Click on Fault Logs. This is where you will log all calls regarding faults. The following screen will
appear.
You will then need to select your site from the drop down arrow and complete all the fields then
click on submit.
Once you have accessed the Logs the following screen will appear.
37
This list will show all Pending Logs and the headings are self-explanatory. If you wish to add a
log you will click on Add Log in right hand side of screen. The following screen will appear.
This should be completed in the normal way. Ensuring you complete all fields. Selecting the
Severity and given a detailed description or request.
Once completed click on Add Log.
The following screen will appear.
You can then select from one of the options in the right hand upper corner of the page. If you
wish to view all Completed Logs you should select this and the list of completed claims will
appear. If you know the ID of the log you can also search for this. The following screen will
appear.
38
To go back you click on <<back.
You can also Search for a specific Organisation, User, Description or other specific data by typing
in the Search field and clicking on the button with two arrows.
Once this request has been input the following screen will appear.
Error Logs – Secure Access
When in Maintenance click on Error Logs and follow steps from Page 28.
DATA PROTECTION
In order to comply with the Data Protection Act 1998 it is important that all insured members sign
the Declaration and Consent on all Registration Forms and or Claim Forms. Failure to comply
with this will contravene the Data Protection Act and could lead to your prosecution or that of your
organisation.
Healthcode Contacts
Name
Healthcode
Helpdesk
Email
[email protected]
39
Phone
01784 263
150
Fax
01784 263
155
Address
Oak House
Littleton
Road
Ashford
Middlesex
TW15 1US
Insurer Contacts
Name
BUPA
Phone
08457
553333
Fax
Address
0161 877 4385
Provider Services
Anchorage 3
Anchorage Quays
Salford
Manchester
M50 3XL
AXA-PPPh
Refer to
Remittance
Advice
Norwich Union Healthcare Limited
02380
372241
02380 372479
Standard Life Healthcare
0845
6023453
0845 6020660
Royal & SunAlliance
Not
Applicable
01273
323563
Not Applicable
BUPA International
40
01273 820517
Phillips House
Crescent Road
Tunbridge Wells
Kent
TN1 2PL
The EDI Claims Payment
Team
Dept 9
Norwich Union Healthcare
Limited
Chilworth House
Hampshire Corporate Park
Templars Way
Eastleigh
Hampshire. SO53 3RY
Wey House
Farnham Road
Guildford
Surrey
GU1 4XS
Not Applicable
Russell Mews
Brighton
Sussex
BN1 2NR