1
Dolphin Computer Access
EasePublisher
Version 2.1
044FMANP210
End User License Agreement
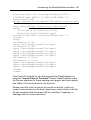
Please read this carefully before you install or use the software.
By installing the software you accept to be bound by the terms of this licence agreement. Such
acceptance is either on your own behalf or on behalf of any corporate entity which employs you or
which you represent ("corporate licencee") in this licence agreement. "You" and "Your" include
both the reader and any corporate licencee.
Your right to use this software product is subject to the terms set out in this licence agreement.
Installing or using this software product indicates your acceptance of these terms. If you do not
accept or understand then, you may not use it and if this software package is installed on your
device and can be deleted you must delete it.
1. Grant of licence.
Under copyright law you are not permitted to install or run the software product (‘the Software’) or
use the user manuals and other documentation (‘the Documentation’) supplied to you without the
permission of Dolphin Computer Access Limited (“the Owner”) or a member company of the
Dolphin Computer Access Group of companies and payment of the licence fee. In consideration
of your agreement to the terms of this Agreement the Owner grants you a non-exclusive right (‘the
Licence’) to install and run the Software and use the Documentation as permitted by this
Agreement. All references to the Software mean the object code only of the program(s) comprising
the Software (but include all upgrades and updates provided by the Owner).
You are permitted to:
1.1 use the Software and Documentation in connection with a single computer under your control
but you must obtain a separate licence for another copy of the Software if you wish the Software to
be used simultaneously by multiple people ;
1.2 transfer the Software from one computer to another provided that the Software is installed
and used on only one computer at a time;
1.3 make a back-up copy of the Software in support of your permitted use of the Software
provided you label the back-up copy with the Owner’s copyright notice; any other copies of the
whole or any part of the Software are unlawful;
1.4 use the Software for your personal use or in your business or profession; permitting
unauthorised access to, copying or use of the Software and Documentation is a breach of this
Agreement;
1.5 transfer the Software and Documentation and your Licence on a permanent basis to another
person only if that person agrees to accept the terms of this Agreement and you either transfer all
copies (including the most recent update and all prior versions) to that person or destroy any
copies not transferred. If you transfer possession of any copy of the Software to another person,
your Licence is automatically terminated.
You may not nor permit others to:
1.6 use, copy or transfer the Software except as permitted by this Agreement;
1.7 distribute, rent, loan, lease, sub-licence or otherwise deal in the Software and Documentation;
1.8 copy the Documentation in any manner;
1.9 alter, adapt, merge, modify or translate the Software or the Documentation in any way for any
purpose, including, without limitation, for error correction save as permitted by the law of this
Agreement;
1.10 reverse-engineer, disassemble or decompile the Software save as permitted by the law of
this Agreement.
1.11 remove, change or obscure any product identification or notices of proprietary rights and
restrictions on or in the Software and Documentation.
1.12 undo, circumvent or defeat any of the copy protection, time out features and restrictions
incorporated in the Software.
2.
Term and termination.
2.1 The Licence is granted to You by the Owner for a SPECIFIED period depending whether: You
have paid the Full purchase price or are purchasing the Software at a discounted rate by means of
Daisy consortium membership and providing the terms of this agreement are complied with.
2.1.1 The specified period for non Daisy Consortium member paying the list price will be an
unlimited period if the terms of this agreement are complied with. You may terminate it at any time
by destroying the Software and Documentation together with all copies in any form.
2.1.2 The specified period for Daisy Consortium members will be for one year (an annual licence)
unless terminated earlier. You may terminate it at any time by destroying the Software and
Documentation together with all copies in any form. You may renew the Licence for further
periods of one year by payment of the then current renewal fee and acceptance of the then current
Licence Agreement
2.2 Your Licence to use the Software and Documentation will terminate automatically if you fail to
comply with any term of this Agreement. The Licence will also terminate without further action or
notice by the Owner if you become bankrupt, go into liquidation, suffer or make any winding up
petition, make an arrangement with your creditors, have an administrator, administrative receiver or
receiver appointed or suffer or file any similar action in consequence of debt.
2.3 Upon termination of the Licence for any reason you will destroy the Software and
Documentation together with all copies in any form, including copies on your hard and back-up
disks and return to the Owner any copy protection device that was under licence to you . Any use
of any copies of the Software Product or Documentation after termination of the Licence is
unlawful.
3. Warranty.
3.1 The Owner warrants only to you as the original licensee for the term of the licence given in
section 2 that:
3.1.1 the Software when used properly will provide the functions and facilities and will perform
substantially as described in the Documentation supplied for the Software; and
3.1.2 the media on which the Software is recorded will be free from defects in material and
workmanship under normal use.
3.2 The Owner’s entire liability and your exclusive remedy under the warranties given in this
section 3 will be, at the Owner’s option to either:
3.2.1 repair or replace the Software or media which does not conform with the warranty or
3.2.2 refund the price paid for the Software and terminate the Licence.
This remedy is subject to the return of the Software with a copy of your payment receipt to your
supplier (or the Owner, if you were supplied directly from the Owner) not later than 5 days after the
end of a period of 30 days from the date of your receipt of the Software.
4.
Exclusion of other warranties.
Except for the express warranties in section 3 and subject to Section 8.2 the Owner and its
suppliers make and you receive no other warranties, conditions or representations, express or
implied, statutory or otherwise, and without limitation the implied terms of satisfactory quality and
fitness for a particular purpose are excluded. The Owner does not warrant that the operation of the
Software will be error free or uninterrupted. It is your responsibility to ensure that the Software is
suitable for your needs and the entire risk as to the performance and results of the Software and
Documentation is assumed by you.
5.
Disclaimer.
5.1 In no event will either the Owner or its suppliers be liable for any direct, consequential,
incidental, or special damage or loss of any kind (including without limitation loss of profits, loss of
contracts, business interruptions, loss of or corruption to data) however caused and whether arising
under contract, tort, including negligence or otherwise.
5.2 If any exclusion, disclaimer or other provision contained in this Agreement is held invalid for
any reason and the Owner becomes liable for loss or damage that could otherwise be limited, such
liability, whether in contract, negligence or otherwise, will not exceed the amount actually paid by
you for the Software.
5.3 The Owner does not exclude or limit liability for
5.3.1 death or personal injury resulting from an act or negligence of the Owner or
5.3.2 damage caused by a defect in the Software within the meaning of the Consumer Protection
Act 1987 Part I.
5.4 You acknowledge that the allocation of risk in this Agreement reflects the price paid for the
Software and also the fact that it is not within the Owner’s control how and for what purposes the
Software is used by you.
5.5 It is your responsibility to ensure that you have all necessary consents or licences in relation
to any material or data or other programs you may use in conjunction with the Software
5.6 The Owner shall not be liable to you if the Software and Documents fail to operate in
accordance with the warranties in Section 3 as a result of any modification variation or addition to
the Software and/or Documents not performed by the Owner or caused by any abuse corruption or
incorrect use of the Software and/or Documents including use of the Software and/or Documents
with equipment or other software which is incompatible. If you wish to use the Software and/or
Documents with other software or equipment it is your responsibility to check compatibility.
6.
Copyright.
6.1 All right title and interest in and to the Software and the Documentation belongs to the Owner.
6.2 All right and licence to use and distribute the recorded output from any 3rd party synthesiser
that is not distributed as part of the Software as a whole must be obtained by you from the
appropriate person and is your responsibility.
6.3 All right and licence to use and distribute the recorded output from any 3rd party encoder that
is not distributed as part of the Software as a whole must be obtained by you from the appropriate
person and is your responsibility.
6.4 All right and licence to use and distribute the recorded output from any 3rd party must be
obtained by you from the appropriate person and is your responsibility.
6.5 All right and licence to use and distribute any textual or graphical information must be
obtained by you from the appropriate person and is your responsibility.
7.
Updates.
7.1 The Owner may update or upgrade the Software but shall not be obliged to furnish such
updates or upgrades to you unless a maintenance contract has been entered into and then the
terms and conditions of this contract will come in to force.
8.
Export.
8.1 You will comply with all applicable laws rules and regulations governing export of goods and
information including the laws of the country in which the Software and Documents were created.
In particular you will not export or re-export directly or indirectly separately or as part of a system
the Software and Documents to any country for which an export licence or other approval is
required without first obtaining such licence or approval.
9.
General.
9.1 This Agreement is the entire agreement between you and the Owner and supersedes any
other oral or written communications, agreements or representations with respect to the Software
and Documentation.
9.2 This Agreement gives you specific legal rights and you may also have other rights that vary
from country to country. Some jurisdictions do not allow the exclusion of implied warranties or
certain kinds of limitation of exclusions of liability so the above exclusions and limitations may not
apply to you. Other jurisdictions allow limitations and exclusions subject to certain conditions. In
such a case the above limitations and exclusions shall apply to the fullest extent permitted by the
laws of the applicable jurisdictions. If any part of the limitation or exclusion is held to be void or
unenforceable such part shall be deemed to be deleted from this Agreement and the remainder of
the limitation or exclusion shall continue in full force. Nothing in this Agreement will affect the
statutory rights which you may have as a consumer under any applicable statute.
9.3 If any part of this Agreement is held by a court of competent jurisdiction to be unenforceable
the validity of the remainder of the Agreement will not be affected.
9.4 This Agreement is governed by the laws of England and Wales.
9.5 Should you have any questions concerning this Agreement please contact (Dolphin Computer
Access Limited, Technology House, Blackpole Estate West, Worcester, WR3 8TU, United
Kingdom.)
9.6 The provisions of the Contracts (Rights of Third Parties) Act 1999 shall not apply to this
Agreement.
Contents
1. Introduction
1.1 Notices
1.2 Minimum System Requirements
1.3 What's New?
2. Product activation
3. Getting help with EasePublisher
3.1 On-line manual
3.2 Product Support
3.3 Your Serial Number
4. Introducing the EasePublisher Interface
4.1 Project wizard
4.1.1 Create a new project
4.1.2 Open project
4.1.3 Recently used projects
4.1.4 Sample projects
4.2 Main Screen
4.2.1 The Main Screen Menu Bar
4.2.2 Upper Toolbar
4.2.3 The Recording Rollup
4.2.4 The Track Edit Rollup
4.2.5 The Peak Meter Rollup
4.2.6 The Waveform Area
4.2.7 The Lower Toolbar
4.2.8 The Statusbar
4.3 The HTML Editor
4.3.1 The HTML View Menu Bar
4.3.2 The Upper Toolbar
4.3.3 The Lower Toolbar
4.4 General Options
4.4.1 General General Options
4.4.2 Playback General Options
4.4.3 Folders General Options
4.4.4 Markup General Options
4.5 Display Options
4.5.1 General Display Options
4.5.2 Highlight Display Options
4.5.3 Track View Display Options
4.5.4 Peak Meter Display Options
4.6 Recording Options
4.6.1 General Recording Options
4.6.2 Audio Format Recording Options
4.6.3 Phrase Detection Recording Options
4.6.4 Devices Recording Options
4.7 Build Options
4.7.1 Validation Build Options
4.7.2 Cleanup Build Options
4.7.3 Encoding Build Options
4.7.4 Protect Build Options
4.7.5 Unlock Build Option
4.7.6 Folders Build Options
4.7.7 Document Build Options
4.8 Audio Processing Options
4.8.1 Resample WAVE audio format
4.8.2 Fade In Audio Processing Options
4.8.3 Fade Out Audio Processing Options
4.8.4 Amplify Audio Processing Options
4.8.5 Normalize Audio Processing Options
4.8.6 Filter Audio Processing Options
4.8.7 Silence Audio Processing Options
4.9 The Table of Contents Editor
4.9.1 Nav Clips view
4.9.2 Headings View
4.9.3 Pages View
4.9.4 Optional Content View
4.10 The Document Source Viewer
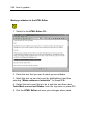
4.10.1 Viewing the NCC File
4.10.2 Viewing the SMIL file
4.10.3 Viewing the source XHTML document
4.10.4 Viewing the NCX File
4.10.5 Viewing the OPF File
4.11 Meta Data
4.12 SMIL event information
4.13 Document Properties
4.14 Import Table of Contents
4.15 Load book in QA player
4.16 Go to...
4.17 Markup definition
4.18 Book project information
4.19 Multi Volume Announcements
4.20 Remote Control Options
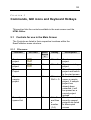
5. Commands, GUI icons and Keyboard Hotkeys
5.1 Controls for use in the Main Screen
5.1.1 File menu
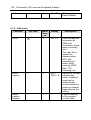
5.1.2 Edit menu
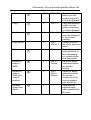
5.1.3 View menu
5.1.4 Navigate menu
5.1.5 Options menu
5.1.6 Project menu
5.1.7 Tools menu
5.1.8 Help menu
5.1.9 Wave Form Area
5.2 Controls for use in the HTML Editor
5.3 Remote control unit commands and usage
6. How to guides...
6.1 Creating a new project
6.1.1 Creating a 'Simple Project'
6.1.2 Creating a project 'From documents'
6.1.3 Creating a project 'From Audio Files'
6.2 Adding audio to a project
6.2.1 Importing existing digital recordings
6.2.2 Recording live audio
6.2.3 Text-To-Speech (TTS) Encoding
6.3 Deleting audio from a project
6.3.1 Deleting all audio from the current section
6.3.2 Deleting all audio after a certain position in the current
section:
6.3.3 Manually deleting a section of audio
6.4 Document editing
6.4.1 Adding text and documents to a project
6.4.2 Text events
6.4.3 Skippable content
6.5 Inserting an image into the document
6.6 Export NCC items
6.7 Import NCC from other folder
6.8 Inserting a 'pop-up' image into the project
6.9 Inserting a 'producer stop' into the project
6.10 Synchronising imported audio files with existing text "Sync as you hear"
6.11 Synchronising text with audio during live recording "Sync as you speak"
6.12 Using session backup
6.12.1 How to make a session backup
6.12.2 How to perform a session undo
6.13 Validating a project
6.13.1 Validation settings
6.13.2 Validate project
6.13.3 Validation report view
6.14 Building a project
6.15 Creating Protected Digital Talking Books (PDTB's)
6.15.1 Creating a User Access Key (UAK)
6.15.2 Creating the DAISY PDTB
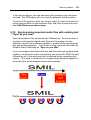
6.15.3 Summary of SMIL files needed for PDTB's
7. Index
11
CHAPT
ER
1
Introduction
About EasePublisher
"Total authoring power, in one solution"
EasePublisher is the revolutionary authoring solution from Dolphin
Audio Publishing for creating multimedia content that unites text, audio
and images.
EasePublisher empowers publishers and content providers to use the
latest standards and technologies for delivering richer, more powerful
content for education, leisure, information provision and access
markets.
12
Introduction
Whilst text, audio, and images used in isolation to each other will
always have a use, there are areas that currently utilise these
elements in isolation to each other that can benefit greatly by
combining them. Anyone learning a new language benefits
significantly when an association is made between the spoken word
and the associated text, speeding up the learning process.
EasePublisher is the only authoring solution to allow the easy creation
of multimedia content that conforms to recognised worldwide
standards such as the Digital Accessible Information System (DAISY)
format. DAISY books provide the option of reading the text and
listening to the audio independently or simultaneously - you decide!
EasePublisher is the most efficient means of creating DAISY books.
From automatically formatting text for synchronising with audio to
automatically generating synthesised speech and synchronising with
text, EasePublisher is the one-stop solution for creating, editing and
distributing powerful multimedia content.
EasePublisher has been developed as a result of almost 10 years
experience in creating multimedia authoring and conversion tools and
combining all this into one simple to use powerful software solution.
Compliant with the latest standards
EasePublisher complies with the latest standards as defined by the
DAISY Consortium. It is important that content created as "DAISY"
adheres to the specific standards so that publishers can be sure that
their content will play in all DAISY playback and delivery devices.
Creating content with EasePublisher… It's so easy…
Creating fully synchronised text and audio content in EasePublisher is
simple. Whether you already have your text and audio in another
format or have not yet recorded your audio or created your text,
EasePublisher has the flexibility to create powerful multimedia content
from existing or new sources.
EasePublisher can import and structure existing HTML and TXT files
directly into the production using a simple to use wizard.
EasePublisher also has an HTML editor. This allows text that has been
imported and structured to be edited further if required. Text may be
Introduction
13
added or deleted, images and video embedded or colours and fonts
altered.
The HTML editor also allows the creation and structuring of new
documents directly within it. This dispenses with the need to use third
party HTML editors to create content.
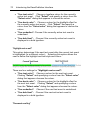
"Sync as you hear"
Wave files or MP3 files can be imported into the production and
synchronised with the text using EasePublisher's unique and
revolutionary "Sync as you hear" method that is unavailable in any
other text and audio synchronisation software. No need to "cut" the
audio stream up, just listen to the audio and press the synchronisation
command at the appropriate point. In tests, this proved at least 4 times
faster than using conventional products to synchronise text and audio
together and it is so efficient that an experienced user can synchronise
text and audio, virtually in real-time.
"Sync as you speak"
EasePublisher is also a professional recording programme. By
connecting a microphone to the PC system, it is possible to record live
audio directly into the production and simultaneously synchronise this
with the on-screen text using the "Sync as you Speak" method.
Simply narrate the on-screen text and press the synchronisation
command at the appropriate point.
Text to DAISY - In an instant!
Need full text and audio content in a hurry? No time or resources to
use a human narrator or do not have pre-recorded audio to import?
EasePublisher is the solution.
EasePublisher has a Text to Speech (TTS) Encoder that allows full
DAISY productions to be created by automatically generating fully
synchronised and synthesised recordings of the on-screen text, in a
fraction of the time that it takes to use a human narrator. To
demonstrate just how efficient this is, a production that when recorded
by a narrator takes 30 minutes to record and synchronise can be
produced in about 15 seconds on an average specification desktop PC
using the TTS Encoding option - Ideal for creating content to tight
deadlines or content not requiring the higher quality human narration
provides.
14
Introduction
Key features
• HTML Editing - Create documents directly in EasePublisher and
easily edit existing productions.
• Automatic "Mark-up" of documents - Synchronisation structure is
automatically created through the recognition of punctuation in
the documents.
• "Synch as you hear" - Synchronise imported audio files with the
corresponding text in real-time.
• "Synch as you speak" - Synchronise text with audio as you narrate.
• Audio Processing - Resample, amplify, add silences, fade in, fade
out, import, and export.
• Text to Speech (TTS) encoder. Automatically generate audio by
synthesising the on screen text. The text and audio are
automatically synchronised.
• Validator - Scans the completed production to ensure that the final
output complies with specific standards
• Build and Protect - Compress the output into alternative formats
and copy protect the content..
Delivery of DAISY books
Content created using EasePublisher can be delivered using
EasyReader, the DAISY audio eBook software player from Dolphin
Audio Publishing or any other DAISY compatible readers.
1.1 Notices
Dolphin EasePublisher is a product developed and published by
Dolphin Computer Access Ltd. and the copyright is with Dolphin
Computer Access Ltd. and is published under license by Dolphin
Computer Access Ltd.
MPEG Layer-3 audio coding technology licensed from Fraunhofer IIS
and Thompson.
Copyright ©2007 Dolphin Computer Access Ltd.
All rights reserved
Introduction
15
Trademarks.
Microsoft, Windows logo and Word are registered trademarks of
Microsoft Corporation.
Pentium is the registered trademark of Intel Corporation.
Other product names mentioned in this User Guide may be
trademarks or registered trademarks of their respective companies
and are hereby acknowledged.
Warranty.
The information provided within this User Guide is supplied as a guide.
Dolphin Computer Access Ltd. makes no warranty as to its accuracy
or use. Any use of the information supplied herein is at risk of the user.
Documentation may include technical or other inaccuracies. There
may also be typographical errors. Dolphin Computer Access Ltd.
retains the right to make changes without prior notice.
No part of this user guide may be copied or reproduced without the
express permission of Dolphin Computer Access Ltd.
The screenshots and dialogs included in this documentation are
intended to illustrate procedures within EasePublisher and may differ
slightly from those in the current software release.
1.2 Minimum System Requirements
The minimum system requirements shown below are to be used as
guidelines only. The actual performance of your PC will vary according
to the application software, memory, sound and video hardware that
you use.
We recommend that if using a "desktop" PC, for optimum performance
the PC does NOT have "on-board" sound and graphics i.e. the mother
board of the PC does not have the sound chip and graphics chip built
directly into it.
Note: Laptop PC's are usually specifically designed to optimise the use
of their built in sound and video, thus the not "on-board"
recommendation does not generally apply to Laptops.
16
Introduction
Minimum requirement:
• Pentium III 750 MHz is minimum, we recommend Pentium III 1
GHz.
• One free USB Port.
• Microsoft Windows 2000 or XP.
• Internet Explorer 6.
• 256 Mb RAM is minimum, we recommend 512 MB
• 125MB of hard-disk space for installation.
• Several GB of free diskspace to store the productions
(multimedia productions needs plenty of diskspace)
• CD-ROM Drive. Access to a CD-writer is recommended
• 16 bit (65536 colors) graphic resolution.
• 1024 x 768 monitor resolution.
• Multimedia soundcard and speakers. It is recommended to use a
separate soundcard i.e. not on-board
• Microphone and necessary external devices for recording
1.3 What's New?
These are the major feature changes in this version release.
• NISO Z39.86-2005 output support.
EasePublisher now supports the latest standard (Z39.86-2005)
as type 1 and 2 DTBs.
• Word documents input support.
If Microsoft Word 2003 exists on the machine, EasePublisher is
now able to convert DOC and RTF files when the user adds new
documents to the DTB.
• TTS pronouncement lexicon.
A simple pronouncement lexicon and editor is now included
together with the TTS feature.
• Improved output file names.
Introduction
17
To improve the naming of the DTB's audio file names, the user
can now easily tell EasePublisher to translate certain local
characters to valid characters for a DTB. E.g. the Swedish letters
"ö" and "ä" can be translated to "o" and "a". This will make the
file names more understandable when e.g. displaying the file
names in a MP3 player.
• Record over headings.
Before this release, when the narrators reached the end of a
heading, they had to press stop, navigate to next heading and
then press record again to continue the narration. In this release
this "next heading" navigation is done automatically when
pressing the "synch text" button at the end of a heading.
EasePublisher will take care of the navigation and automatically
start the recording. This is very convenient for the narrator, as
he/she is now able to narrate the whole DTB, without
unnecessary navigations and stops.
• Import audio dialog.
The audio files in the list can now be moved up/down.
• Product activation.
EasePublisher will run as a 30 day trial version until such time as
it is activated. Product activation is required in order to obtain a
software licence and upon activation your product will
automatically become a full unlimited version. You can activate
your product at anytime during the first 30 days, by selecting
"Activate now".
Product activation can be achieved automatically by using the
Internet activation process or by obtaining an activation code
from your Dolphin dealer.
19
CHAPT
ER
2
Product activation
After installing your licensed copy of Dolphin EasePublisher, it is then
necessary to activate the product. Product activation is required in
order to obtain a software licence. Without a software licence Dolphin
EasePublisher will only run for 30 days.
WARNING - please ensure you review the End User Licence
Agreement before activating. Once Dolphin EasePublisher has been
activated a refund is not available.
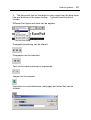
If product activation remains outstanding then you will be informed
regularly that product activation is required and of the number of days
remaining before Dolphin EasePublisher expires. When you are
presented with the product activation dialog you can choose "Activate
now" or "Remind me later".
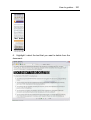
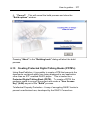
Activate now.
Product activation can be done in 3 ways: Internet activation, manual
activation or via the entering of a multi user licence code.
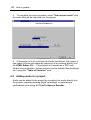
• Internet activation.
Internet activation is the simplest procedure because activation is
automatic. This will require you to have an Internet connection.
The procedure will connect to the Dolphin server where
EasePublisher will be automatically allocated an activation code.
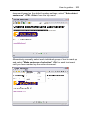
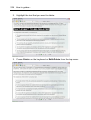
• Manual activation.
The manual process will require you to enter an activation code
that is based upon your unique product key. Your product key
value is shown during the manual activation process.
To obtain an activation code you should contact your local
Dolphin dealer and report to them your product key. From this
key they will be able to issue you with an activation code.
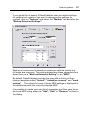
• Multi user licence.
20
Product activation
If you have purchased a multi user or network licence then you
can enter in your unique multi user licence code. This is printed
on your multi user licence software certificate.
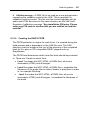
Remind me later.
If you choose "Remind me later" you will then be informed regularly
that activation is still required and of the number of days remaining to
perform this task.
To re-commence the activation process you should restart Dolphin
EasePublisher or select the "Activate" button found in the "About
Dolphin EasePublisher" dialog. This dialog can be opened via the
EasePublisher menu in Microsoft Word.
Uninstalling and re-installing EasePublisher onto the same computer
does not result in an additional licence being required. If you require
an additional licence then please contact your Dolphin dealer.
During the activation process Dolphin does not obtain any personal information
from your computer besides your product licence key.
21
CHAPT
ER
3
Getting help with EasePublisher
There are a variety of ways to get help with EasePublisher. The
product comes with a print manual and all of the documentation is
available in an on-line help file.
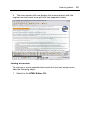
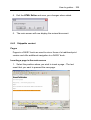
3.1 On-line manual
To access the full on-line manual from within EasePublisher:
1. Start EasePublisher.
2. Press <F1> or select Help>Help from the top menu.
3.2 Product Support
Full Technical support is available for a period of 12 months. After
this period, a maintenance contract must be taken out in order to
continue receiving technical support.
For web-based technical support on your product visit
www.yourdolphin.com where a variety of technical services can be
obtained that may prove useful especially outside working hours. They
include:
• An on-line Knowledge Base with search capabilities.
• Product information.
• Links to mailing lists where clients can share articles, questions,
tips and tricks.
• Product news and services.
• Information about available updates and upgrades.
• Occasionally downloadable enhancements.
Technical Support in the UK can be contacted directly via:
E-mail: [email protected]
22
Getting help with EasePublisher
Telephone: Support Desk : +44 (0)1905 754765
Telephone: Support Desk (local rate, UK only) : 0845 130 5454
Telephone: Dolphin Switchboard : +44 (0)1905 754577
Telephone: Dolphin switchboard (local rate, UK only) : 0845 130 5353
Fax: +44 (0)1905 754559
Telephone support in the UK is normally available on standard working
days from 9am to 5:30pm, Monday to Friday. E-mail and Fax
messages sent outside these hours may not be responded to until the
next working day. Before calling the help desk, please make sure you
know your serial number. Your serial number is displayed in
EasePublisher's About box.
Postal address:
Technical Support
Dolphin Computer Access Ltd.
Technology House
Blackpole Estate West
Worcester
WR3 8TJ
United Kingdom
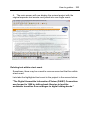
3.3 Your Serial Number
You may be asked to quote your product serial number in order to
obtain support so make sure that you have registered your product
first.
You can find your serial number in the following places:
• Printed on a sticker on the top of the box.
• Printed on the surface of the product CD.
• From within the About box of your software.
23
CHAPT
ER
4
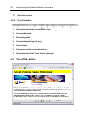
Introducing the EasePublisher Interface
EasePublisher has been designed with an easy to use interface.
However, the sheer amount of features that the software provides
means that some explanation of the layout is needed for a first time
user. Once you are familiar with the functions that each menu or
button performs, you will find it very easy to create dynamic projects.
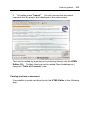
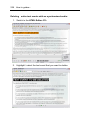
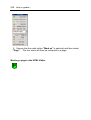
4.1 Project wizard
The "Project wizard" appears whenever the producer selects "Create
a new project", "Open project", "Recently used projects" or
"Sample projects" when EasePublisher is launched or each time the
producer chooses to create a new project or open an existing project
from the main screen of EasePublisher.
The following sections explain each of the four categories in the
"Project wizard".
24
Introducing the EasePublisher Interface
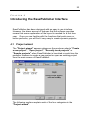
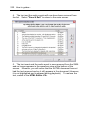
4.1.1 Create a new project
The "New" category gives the producer three options. These are:
• "Simple" - Create a new project and add the text and audio later.
• "Create from documents" - Create a new project by importing
existing documents.
• "Create from audio files" - Create a new project by importing
pre-recorded audio files.
To begin the creation of a new project, select which type of project to
create and then "OK". For further information about creating a new
project, please refer to the later section "Creating a new project".
Introducing the EasePublisher Interface 25
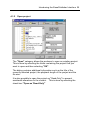
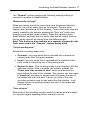
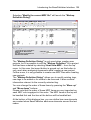
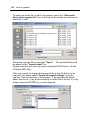
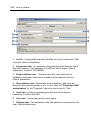
4.1.2 Open project
The "Open" category allows the producer to open an existing project.
This is done by selecting the folder containing the project that you
want to open and then selecting "OK".
The dialog contains additional information such as the title of the
currently selected project, the playback length of the project and the
file size.
It is also possible to open the project as "Read-Only" to prevent
accidental alterations to the content. This is done by selecting the
check box "Open as 'Read-Only'"
26
Introducing the EasePublisher Interface
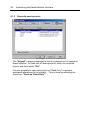
4.1.3 Recently used projects
The "Recent" category displays the last four projects to be opened in
EasePublisher. To open one of these projects, select the required
project and then select "OK".
It is also possible to open the project as "Read-Only" to prevent
accidental alterations to the content. This is done by selecting the
check box "Open as 'Read-Only'"
Introducing the EasePublisher Interface 27
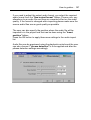
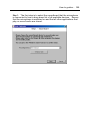
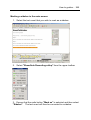
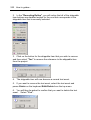
4.1.4 Sample projects
The "Samples" category allows the producer to open a sample project
that is shipped with EasePublisher. To open one of these projects,
select the required project and then select "OK".
A dialog will then ask if you want to extract the sample project.
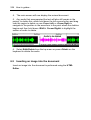
28
Introducing the EasePublisher Interface
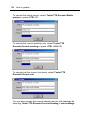
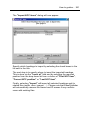
Selecting "OK" will then launch the "Select a folder for the sample
project" dialog. Here, the producer selects where to extract the
sample project to.
Select "OK" and the sample project will be extracted and opened in
EasePublisher.
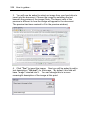
Introducing the EasePublisher Interface 29
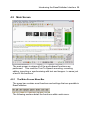
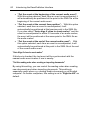
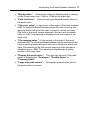
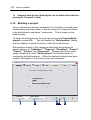
4.2 Main Screen
The main screen is where all of the audio-based functions are
performed. This could be Text-To-Speech encoding, recording,
editing, importing or synchronising with text and images - to name just
a few of the functions.
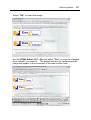
4.2.1 The Main Screen Menu Bar
The menu bar contains most functions and settings that are possible in
EasePublisher.
The following sections detail the functions within each menu.
30
Introducing the EasePublisher Interface
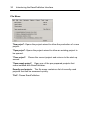
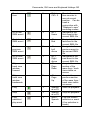
File Menu
"New project": Opens the project wizard to allow the production of a new
project.
"Open project": Opens the project wizard to allow an existing project to
be opened.
"Close project":
screen.
Closes the current project and returns to the start-up
"Open sample project": Open one of the pre-prepared projects that
come installed with EasePublisher.
Recently used projects: The file menu contains a list of recently used
projects that can be accessed quickly.
"Exit": Closes EasePublisher.
Introducing the EasePublisher Interface 31
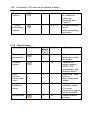
Edit Menu
"Undo": Undo the last action performed.
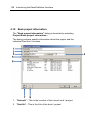
"Session backup": Create backup of files excluding audio or restore a
backup file.
>"Undo Session":
backup.
Undo the current project state to a previous
>"Make session backup now":
Backup the current project state.
"Cut": Cut a section of audio to the clipboard.
"Copy":
Copy a section of audio from the project to the clipboard.
"Paste": Paste the copied or cut audio from the clipboard to the current
position in the heading.
"Copy to file": Copy a section of audio from the project and output as a
new audio file.
"Delete":
Delete a section of audio from the project.
32
Introducing the EasePublisher Interface
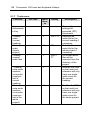
"Remove audio": Automatically delete a large section of audio.
>"All audio in heading":
heading.
Deletes all audio from the current
>"From position to end in heading": Deletes audio from the
current position to the end of the current heading.
>"All audio in book":
Deletes all audio from the book.
>"From position to end in book": Deletes all audio from the
current position in the heading to the end of the book.
"External wave form editor": Open the selected audio event in an
external waveform editor for further editing.
"Insert audio marker": Insert an audio marker (navigation point) at the
current position in the heading.
"Remove audio marker(s)": Deletes the currently selected audio markers
(navigation points) from the heading.
"Skippable content": Adds elements that may be played or skipped
during playback.
>"Insert New":
Add a new skippable element.
> "Page(s)": Add page(s) to the project.
> "Footnote": Add a footnote to the project.
> "Sidebar": Add a sidebar note to the project.
> "Producer note": Add a producer note to the project.
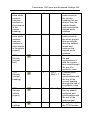
>"Mark as":
Mark the selected event as a skippable element.
> "Page(s)":
> "Footnote":
> "Sidebar":
Mark as a page.
Mark as a footnote.
Mark as a sidebar.
> "Producer note": Mark as a producer note.
>"Remove": Remove the currently selected "skippable" event.
Introducing the EasePublisher Interface 33
"Make current as 'Heading navigation' point": Adds a new heading
navigation point to the 'Table of Contents' at the current position.
"Create new heading(s) in Table of Contents: Add a new heading / new
document to the NCC file / Table of Contents.
"Move text event":
heading.
Moves a text event to the current position in the
>"Next available": Move the subsequent text event (from the right)
to the current position in the heading.
>"Previous available": Move the previous text event (from the
left) to the current position in the heading.
"Synchronization order": Launches the "Edit synchronization order"
dialog.
"Insert popup image":
in the heading.
Inserts a "pop-up" image at the current position
"Insert producer stop":
text event.
Inserts a "producer stop" marker at the current
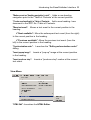
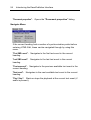
View Menu
"HTML Edit": Launches the HTML Editor.
34
Introducing the EasePublisher Interface
"Open Table of Contents view": Launches the Table of Contents window
to allow the addition of, movement and removal of "NCC" items.
"Zoom in": Zooms into the waveform view up to a maximum of
050msec visible on screen at one time.
"Zoom out": Zooms out from the waveform..
"Zoom to normal (30s) / full": Toggles between adjusting the waveform
visible to the default of 30 secs on screen at one time and zooming to
the full length of the current heading.
"View SMIL Information": Launches the "SMIL event information" window
to allow the user to view information specific to the current SMIL event.
"View SMIL links": Launches the "SMIL references" window to allow the
deleting of SMIL references from the project.
"View MDF": Launches the "Mark-up Definition Dialog" to allow the
viewing and editing of the projects MDF file.
"View source": Opens the projects source documents to allow viewing
in the source code.
>"Daisy 2.02"
>"Project NCC.HTML": Opens the NCC file in the
"Document source viewer" window.
>"Source SMIL":
source viewer window.
Opens the SMIL file in the "Document
>"Source document": Opens the current document file in
the "Document source viewer window.
>"Z39.86-2002"
>"Navigation NCX": Opens the NCX file in the
"Document source viewer window.
>"OPF file":
viewer window.
Opens the OPF file in the "Document source
"Rollup window": Show/hide the floating rollup windows for…
Introducing the EasePublisher Interface 35
>"Recording": Show/hide the "Recording" controls rollup.
>"Track": Show/hide the "Track edit" rollup.
>"Peak meter":
Show/hide the "Peak meter".
"Document properties": Opens the "Document properties" dialog.
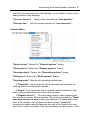
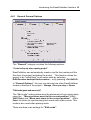
Navigate Menu
"By headings": Navigate by headings through the project…
>"First heading":
Go to the first heading in the project.
>"Last heading":
Go to the last heading in the project.
>"Previous heading":
>"Next heading":
"By pages":
Go to the previous heading in the project.
Go to the next heading in the project.
Navigate by pages through the project…
>"First page": Go to the first page in the project.
>"Last page": Go to the last page in the project.
>"Previous page": Go to the previous page in the project.
36
Introducing the EasePublisher Interface
>"Next page":
"By event":
Go to the next page in the project.
Navigate by event through the project…
>"First event in heading": Go to the first event in the current
heading.
>"Last event in heading": Toggles between going to the last
event and the last audio event in the current heading.
>"Previous event": Go to the previous event in the current
heading.
>"Next event": Go to the next event in the current heading. Also, if
the current position is on the last event, this command toggles
between start and end of that event (valid for audio events only).
"Play / Stop": Starts and stops the playback of the project.
"Play one event": Plays only the current audio event.
"Rewind": Rewinds the playback of the audio at the speed set in the
"General options" dialog.
"Forward": Forwards the playback of the audio at the speed set in the
"General options" dialog.
"Record": Record audio through the selected input device from a
microphone, tape or CD.
"Synch text":
SMIL file.
Moves the next text event to the current position in the
"Go to event": Launches the "Go to…" window to allow navigation to
a specific event.
"Go to heading time": Launches the "Go to…" window to allow
navigation to a specific time in the heading.
"Go to book time": Launches the "Go to…" window to allow navigation
to a specific time in the project.
"Go to last known position": When moving from one heading to another,
EasePublisher memorises the current position in the heading, so the
Introducing the EasePublisher Interface 37
next time the user returns to that heading, it is possible to return to the
exact position in the heading.
"Go to user time zero": Jump to the user defined "zero position".
"Reset user time":
Set the current position as "user time zero".
Options Menu
"General options": Opens the "General options" dialog.
"Display options": Opens the "Display options" dialog.
"Recording options": Opens the "Recording options" dialog.
"Build options": Opens the "Build options" dialog.
"Recording modes": Selects the recording modes from…
>"Overwrite": Any new audio that is recorded will overwrite the
existing audio from that point onwards.
>"Insert": Any new audio that is recorded will be inserted at that
point, without overwriting any of the existing audio.
>"Replace to zero": This recording mode is used together with
the user time counter. After a mistake, the narrator presses the "Reset
user time counter to zero" button and rewinds to a place before the
start of the mistake. The narrator can then make a "punch-in"
recording to replace what is between the start of the retake and user
time zero. It does not matter if the new recording contains more or less
38
Introducing the EasePublisher Interface
audio than the mistake - it will always replace everything between the
start of the retake and user time zero.
"Phrase detection": Determines if phrase detection is used during
recording.
>"On":
Turns phrase detection on.
>"Off":
Turns phrase detection off.
"Voice activation": Determines if the recording function waits for a
detected audio signal (i.e. narrator begins speaking) before starting to
record.
>"On":
Turns voice activation on.
>"Off":
Turns voice activation off.
"Editing modes": Determines the editing mode.
> "Before":
The event is inserted before the current event.
> "Current position":
position in the SMIL file.
The event is inserted at the current
> "Current position (With Auto Align): Same as "Current
position" except that if the current position is close (+/- 0.5 seconds)
to an event marker, the event will automatically be inserted at that
point instead.
>"After":
The event is inserted after the current event.
"Audio Calibration":
Launches the "Audio calibration" dialog.
"Windows Volume control": Launches Windows® "Volume/Recording
Controls" window.
"Remote communication": Commands for controlling a remote control unit,
e.g. Plextor's RE-11.
> "Remote options":
dialog.
Launches the "Remote Control Options"
> "Open / Close communication": Opens or closes the
communication with the remote control unit.
Introducing the EasePublisher Interface 39
Project Menu
"Book project information": Opens the "Book project information"
dialog.
"Modify meta data": Launches the "Meta data" dialog to enable the
editing of the meta data of the project.
"Import":
Import elements into the project.
>"Import audio file(s)": Launches the "Import audio" dialog to
allow the importing of audio files into the project.
>"Import document(s)": Launches the "Import document(s)"
dialog to allow the importing of text and html documents into the
project.
>"Import Table Of Contents": Launches the "Import Table Of
Contents" dialog to allow the importing of a Table Of Contents.
>"Import NCC from other folder": Launches the "Import NCC
items" dialog to allow the importing of headings from other DAISY
books.
"Export":
Export elements from the project.
>"Export Master SMIL":
>"Export NCC Items":
to a specific location.
Exports the Master SMIL.
Export headings from the current project
40
Introducing the EasePublisher Interface
"Multi Volume Announcements": Launches the "Multi Volume
Announcements" dialog, where you can define text and audio
announcements when performing a multi volume build.
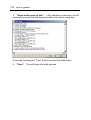
"Validation": Scans the project to ensure that the final output complies
with specific standards.
>"Validate project": Runs the validation process.
>"View report": Opens the "Validation report view" window to
view the findings of the validation process.
"Build project": Opens the "Build options" dialog to allow the build
settings to be specified and begins the build process.
Tools Menu
"Cleanup audio": Removes redundant audio clips, audio files and
backup files from the project and ensures that each heading only
refers to one audio file.
>"In current heading": If needed, EasePublisher rebuilds the
audio in the current heading to ensure that it refers to a single audio
file.
>"Whole project": Searches the entire project and rebuilds the
audio for any headings that require it. This process ensures that each
heading refers to a single audio file.
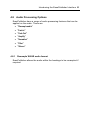
"Cleanup unused audio files": Removes redundant audio files from the
entire project.
Introducing the EasePublisher Interface 41
"Cleanup extra audio markers": Removes additional audio markers that
might not be needed.
>"One audio event per text": Ensures that each text event has
only one audio event attached to it (1 text event = 1 audio event) .
>"Current heading": Removes additional audio markers to
ensure that each text event has only one audio event attached to it (1
text event = 1 audio event) in the current heading.
>"Whole project": Removes additional audio markers to
ensure that each text event has only one audio event attached to it (1
text event = 1 audio event) throughout the entire project.
>"Remove markers in short events": This process ensures that
no audio clips will be shorter than the defined setting.
>"Current heading": Performs this process in the current
heading only.
>"Whole project": Performs this process throughout the
entire project.
>"Options": Launches the "Recording options" dialog and
where you can define the minimum length of short audio clips.
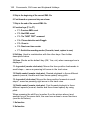
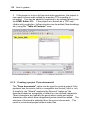
"TTS Encode": Synchronizes the on-screen text with a synthetically
generated voice.
>"Current text": Synchronizes the on-screen text with a
synthetically generated voice for the current text only.
>"Current heading": Synchronizes the on-screen text with a
synthetically generated voice for the current heading only.
>"Current heading + sub headings": Synchronizes the
on-screen text with a synthetically generated voice for the current
heading and its sub headings (if any exists).
>"Whole project": Synchronizes the on-screen text with a
synthetically generated voice for the entire project.
>"Settings": Opens the "TTS Settings" dialog.
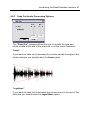
"Audio processing": A selection of audio effects and functions:
42
Introducing the EasePublisher Interface
>"Resample audio": Opens the "Resample WAVE audio format"
to alter the sample rate and choose between mono and stereo for one
or more sections of the project.
>"Fade in": Fade in the currently selected audio. The degree of
fade can be set using the "Audio processing options" dialog.
>"Fade out": Fade out the currently selected audio. The
degree of fade can be set using the "Audio processing options" dialog.
>"Amplify":
project.
Amplify either the current selection or the entire
>"Normalize":
project.
>"Filter":
Normalize either the current selection or the entire
Filter either the current selection or the entire project.
> "Insert silence":
Insert a silence at the current position.
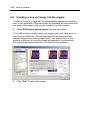
"Generate source HTML": This feature is only available on headings that
do not have any text synchronization, i.e. all text events available in
the SMIL file link to the NCC.HTML file and the text events can be
headings, pages, sidebars, producer notes and foot notes. This type of
book is called a "ToC-only" book or an "audioNcc" book. To be
able to add content into a heading (to create a full text heading),
EasePublisher needs to automatically generate a source document for
the heading. When a source document is available on a heading, the
HTML Editor can be used.
>"For current heading": Generates a source document for the
current heading.
>"For all 'audioNcc' headings:
options:
The user chooses from two
>"One source HTML for the whole project":
source document for the entire project is generated.
One single
>"One source HTML per heading": One single source
document for each heading is generated.
"User Authorization Key…": Opens the “User Authorization Key”
dialog.
Introducing the EasePublisher Interface 43
"Load book in QA player…": Preview the project in a user defined
external player.
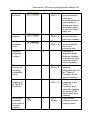
Help Menu
Help:
Launches the online Help file.
Dolphin Web site: Visit the Dolphin Computer Access and Dolphin
Audio Publishing website.
About EasePublisher:
EasePublisher.
Display information about your version of
44
Introducing the EasePublisher Interface
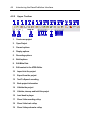
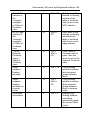
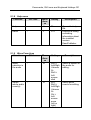
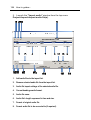
4.2.2 Upper Toolbar
1.
Create new project
2. Open Project
3. General options
4.
Display options
5.
Recording options
6.
Build options
8. Edit Meta Data
9. Edit content in the HTML Editor
10.
Import into the project
11.
Export from the project
12.
Text-To-Speech encoding
13.
Book project information
14.
Validate the project
15.
Validate, cleanup and build the project
16.
Load book in player
17.
Show / hide recording rollup
18.
Show / hide track rollup
19.
Show / hide peak meter rollup
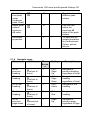
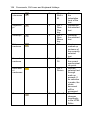
Introducing the EasePublisher Interface 45
20.
Open Table of Contents view
21.
Current heading number / Go to heading number
22.
Current heading title
23.
Go to first heading
24.
Go to previous heading
25.
Go to next heading
26.
Go to last heading
27.
Current page / Go to page
28.
Go to first page
29.
Go to previous page
30.
Go to next page
31.
Go to last page
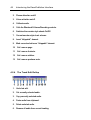
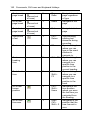
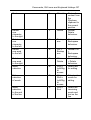
4.2.3 The Recording Rollup
1.
Recording mode - "Overwrite", "Insert" or "Replace to zero".
46
Introducing the EasePublisher Interface
2. Phrase detection on/off.
3. Voice activation on/off.
4.
Calibrate audio.
5.
Calls the Windows® Volume/Recording controls.
6. Switches the narrator style sheets On/Off.
7.
Current narrator style sheet scheme.
8.
Insert "skippable" element.
9. Mark current selection as "skippable" element.
10.
Set / remove page.
11.
Set / remove footnote.
12.
Set / remove sidebar.
13.
Set / remove producer note.
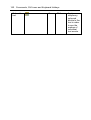
4.2.4 The Track Edit Rollup
1.
Undo last edit.
2.
Cut currently selected audio.
3.
Copy currently selected audio.
4. Paste audio from clipboard.
5.
Delete selected audio.
6.
Remove all audio from current heading.
Introducing the EasePublisher Interface 47
7.
Remove all audio from current position to the end of the current heading.
8.
Import audio file(s).
9. Link to external user defined WAVE editor.
10.
Insert "popup" image at current text event.
11. Insert producer stop at current text event.
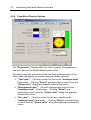
4.2.5 The Peak Meter Rollup
1.
Adjust dB scale.
2. Switch between the three different styles of peak meter.
3. Switch between normal size or double size of the peak meter.
48
Introducing the EasePublisher Interface
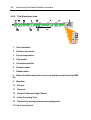
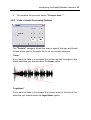
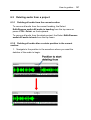
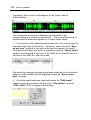
4.2.6 The Waveform Area
1. Time information.
2. Producer note marker.
3. Pop-up image marker.
4. Page marker.
5.
Current time position.
6. Footnote marker.
7. Sidebar marker.
8. Status information about the current event and the current view of the SMIL
file.
9. Waveform.
10.
Zoom in.
11.
Zoom out.
12.
Zoom to Full/normal length (30secs).
13.
Audio Processing Tools.
14.
Edit mode for moving text events and pasting audio.
15. Text of current event.
Introducing the EasePublisher Interface 49
16.
Text marker.
17.
Slider bar.
18.
Audio marker with audio event number.
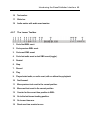
4.2.7 The Lower Toolbar
1. Go to first SMIL event.
2. Go to previous SMIL event.
3. Go to next SMIL event.
4. Go to last audio event or last SMIL event (toggle).
5.
Rewind.
6. Stop.
7.
Record.
8. Play.
9. Play selected audio, or audio event, with or without loop playback.
10.
Fast forward.
11.
Move previous text event to the current position.
12.
Move next text event to the current position.
13.
Counter for the current time position in SMIL.
14.
Go to the last known heading position.
15.
Go to user time zero.
16.
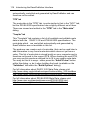
Reset user time counter to zero.
50
17.
Introducing the EasePublisher Interface
User time counter.
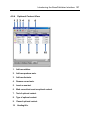
4.2.8 The Statusbar
1.
Information about the current SMIL event.
2.
Current edit mode.
3.
Recording mode.
4.
Current skippable type (if any).
5.
Audio format.
6. Free space on the current hard drive.
7.
Information about the Track View's clipboard.
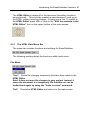
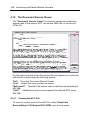
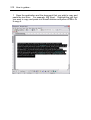
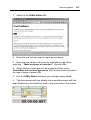
4.3 The HTML Editor
Introducing the EasePublisher Interface 51
The HTML Editor is where all of the document formatting functions
are performed. This could be creating a new document, mark-up of
the HTML, editing, inserting images - to name just a few. To switch to
the HTML Editor, press <F6> or click on the "Edit the contents in the
HTML Editor" icon on the upper toolbar of the main screen:
4.3.1 The HTML View Menu Bar
The menu bar contains functions and settings for EasePublisher.
The following sections detail the functions within each menu.
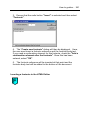
File Menu
"Save": Saves the changes temporarily that have been made in the
HTML Editor.
Note! It does not save the changes to your project. Instead, it
saves the document to a temporarily file that later on can be
loaded back again by using the "Undo to saved" command.
"Exit":
Closes the HTML Editor and returns to the main screen.
52
Introducing the EasePublisher Interface
Edit Menu
"Undo to saved": Undo all actions performed in the HTML Editor since
the last saved point.
"Undo all changes": Undo all actions performed in the HTML Editor.
"Cut":
Cut the current selection to the clipboard.
"Copy":
Copy the current selection to the clipboard.
"Paste": Paste the copied or cut selection from the clipboard to the
current position in the document.
"Delete":
Delete the current selection.
"View source HTML": Switches the view to display the HTML source
code of the document to allow further editing.
"View MDF": Launches the "Mark-up Definition Dialog" to allow the
viewing and editing of the projects MDF file.
Introducing the EasePublisher Interface 53
Format Menu
"Font…": Launches the font dialog to allow the selection of font styles
and sizes.
"Align":
Allows the alignment of the currently paragraph to be set.
>"Left":
Align paragraph to the left.
>"Centre":
Align paragraph in the centre.
>"Right":
Align paragraph to the right.
"Indent": Allows the indenting of the current paragraph.
>"Increase":
>"Decrease":
"Superscript":
"Subscript":
Increase the indentation (Move to the right).
Decrease the indentation (Move to the left).
Make the currently selected text "Superscript".
Make the currently selected text "Subscript".
"Insert new heading": Launches the "Insert a new heading" dialog to
allow a new heading to be inserted into the document.
54
Introducing the EasePublisher Interface
"Document properties": Opens the "Document properties" dialog.
Navigate Menu
If the current heading had a number of synchronization points before
entering HTML Edit, these can be navigated through by using this
menu.
"First SMIL event": Navigates to the first text event in the current
heading.
"Last SMIL event": Navigates to the last text event in the current
heading.
"Previous event": Navigates to the previous available text event in the
current heading.
"Next event":
heading.
Navigates to the next available text event in the current
"Play / Stop": Starts or stops the playback at the current text event (if
audio is present).
Introducing the EasePublisher Interface 55
Tools Menu
"Make sentence": Mark the currently selected text as one "Text Event".
If you have made a selection, a new synchroization point will be
created for the selection. If you have made no selection in the text, a
synchronization point will be created for the current text's element.
Please note that there is a limitation when making sentences
inside tables.
"Unmark sentence":
Removes the current text's synchronization point.
"Auto-detect new sentences": Automatically search the document (or
the selected text) and "mark-up" the text with logical breaks.
"Mark current as": Marks-up the currently selected text and as a
skippable element.
>"Page break":
Mark-up as a page.
>"page-normal": Mark currently selected text as
page-normal.
>"page-front": Mark currently selected text as page-front.
>"page-special": Mark currently selected text as page
special.
>"Sidebar":
Mark-up as a sidebar.
56
Introducing the EasePublisher Interface
>"Producer note":
Mark-up as a producer note.
>"Footnote reference":
"Insert image":
"Image alt-text":
Mark-up as a footnote reference.
Insert an image into the document.
Add a text description to the selected image.
"Hyperlink": Make the currently selected text a "hyperlink" (e.g. link to
WebPages, files or email recipients).
"Color the text": A coloured block will highlight each text event on
screen to allow easy identification.
4.3.2 The Upper Toolbar
1. Save your changes temporarily. Note that this Save feature does not
save your changes to your book. It is saving the document temporarily
so you can use it with HTML Edit's Undo feature.
2.
Create sentence of the currently selected text.
3.
Auto-detect sentences.
4. Mark-up the currently selected text and as a "skippable" element.
5.
Insert image into the document.
Introducing the EasePublisher Interface 57
6.
Create/remove hyperlink.
7.
Colour the text to identify separate text events.
8. Select font face for the selected text.
9. Select font size for the selected text.
10.
Insert new heading.
11.
Select the font to bold type for the selected text.
12.
Select the font as italic type for the selected text.
13.
Select the font as underlined type for the selected text.
14.
Left justify the current or selected paragraph.
15.
Centre the current or selected paragraph.
16.
Right justify the current or selected paragraph.
17. Decrease the indentation for the current or selected paragraph (Move to
the left).
18. Increase the indentation for the current or selected paragraph (Move to the
right).
19.
Make the currently selected text "Superscript".
20.
Make the currently selected text "Subscript".
4.3.3 The Lower Toolbar
1. Go to first SMIL event in current heading.
2. Go to previous SMIL event in current heading.
3. Stop.
4. Play events in current heading.
58
Introducing the EasePublisher Interface
5. Go to next SMIL event in current heading.
6. Go to last SMIL event
in current heading.
7.
Current event (Current No. of Total No.)
8.
Info about current object in HTML.
9. “Caps Lock” key indicator.
10.
“Insert” key indicator.
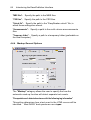
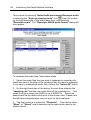
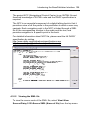
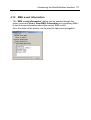
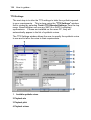
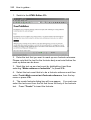
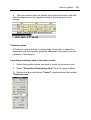
4.4 General Options
The "General options" dialog allows the user to determine settings
relating to "General", "Playback", "Folders" and "Mark-up". This
dialog can be viewed by selecting Options>General options from the
top menu or by pressing <Ctrl + G>.
Each of the 4 option categories is accessed from a tab at the top of the
dialog.
Introducing the EasePublisher Interface 59
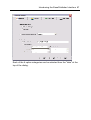
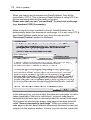
4.4.1 General General Options
The “General” category contains the following options:
“Create backup zip when opening project”
EasePublisher can automatically create a zip file that contains all the
files from the project (excluding the audio). This function allows the
project to be “rolled back” to an earlier state by selecting
Edit>Session backup>Undo session… or by pressing <Ctrl+Shift+Z>.
In “General Options”, the user can choose how often EasePublisher
creates a backup of the project – Always, Once per day or Never.
"Edit mode (paste and move text)"
The “Edit mode” setting determines the placement of text events when
using the “Move previous event to the current position” <Ctrl +
Shift + Enter> and “Move next event to the current position” <Ctrl +
Enter> functions for synchronising text events with audio events. This
mode is also used when pasting audio.
There are three main settings for "Edit mode":
60
Introducing the EasePublisher Interface
• “Put the event at the beginning of the current audio event”:
With this option selected, each time an event is moved/pasted, it
will automatically be positioned at the point in the SMIL file at the
beginning of the current audio event.
• “Put the event at the current time position”: With this option
selected, each time an event is moved/pasted, it will
automatically be positioned at that precise point in the SMIL file.
If you also select “Auto align if close to event marker” and the
event is moved/pasted to within 0.5 seconds of an audio marker,
the event will be positioned at the same point in the SMIL file as
the audio marker.
• “Put the event at the end of the current audio event”: With
this option selected, each time an event is moved/pasted, it will
automatically be positioned at the point in the SMIL file at the end
of the current audio event.
"Auto Align if close to event marker"
If this box is checked, the text event will be synchronised with the
nearest audio event marker if one is nearby.
"Set this reading order when creating or importing documents"
By using this setting, you can control the reading order when creating
new documents and when importing documents. This setting is
especially useful when e.g. creating Arabic documents on an English
computer. On Arabic computers, this setting is set to "Right-to-left" as
default.
Introducing the EasePublisher Interface 61
4.4.2 Playback General Options
The "Playback" category contains the following options:
“Playback speed settings”
The playback speed when using the Play, Fast Forward and Rewind
controls in the lower toolbar in the main screen is determined using the
first three slider bars in the playback options dialog. These can be
set from a speed of 75% up to 300%. This feature uses a technology
called "Intelligent Time Compression" (ITC), which means that it
cuts out small parts of the audio stream to increase the speed –
without changing the voice’s pitch. When slowing the speed down, it
adds new audio into the audio stream without changing the voice’s
pitch.
The “Pitch” of the audio can also be adjusted in the input fields next to
the slider bars. These can be set from half speed up to three times
speed. Pitch does not modify the audio at all - it plays the audio faster
or slower through the sound board. Please note that this feature may
not work on all sound boards.
"Automatically start playback after edit commands"
62
Introducing the EasePublisher Interface
If selected, EasePublisher will start the playback directly after an edit
command that is performed in the wave display. For example if the
user has pasted in some audio the following audio will then be played.
"Automatically reset user time counter after recording"
This option determines if the "User time counter" in the main screen
is automatically reset after recording. If this option is de-selected, the
counter will continue from the previous reading each time the
"Record" button is pressed.
"Loop audio when playing selection"
This determines if the audio event is repeated continuously when
"Play selected audio event" is selected from the lower toolbar in the
main screen.
"No selection playback settings"
If no selection is made in the wave display this setting determines what
should be played when “Play selected audio event” is selected from
the lower toolbar in the main screen.
If “Play current event from start to end” is selected the current
audio event will be played. If “Loop audio when playing selection”
is selected the current audio event will be played repeatedly.
If “Play at current position” is selected, only a certain amount of
audio will be played. If “Loop audio when playing selection” is
selected the specified / selected amount of audio will be played
repeatedly. The amount is set with the “Play length” slider bar.
Introducing the EasePublisher Interface 63
4.4.3 Folders General Options
The "Folders" category allows the user to assign external applications
for use with EasePublisher.
User defined external applications:
"Wave editor": Specify an external application for audio editing.
"DTB player": Specify an additional DAISY software player for
previewing productions. To be able to automatically open the
production in the player it must be able to accept the book path as a
command line parameter. Otherwise the book has to be opened
manually. By default, EasyReader is available from the toolbar.
User defined folders:
User defined folders: These folders and files are as default stored on
the local computer. If you are using EasePublisher on a network, these
folder and files can be stored on a server location, so these common
files can be shared.
"MDF files":
Specify the path to the MDF files.
64
Introducing the EasePublisher Interface
"MBS files":
Specify the path to the MBS files.
"CSS files":
Specify the path to the CSS files.
"Unlock file": Specify the path to the "EasyReader unlock" file, in
which those settings are stored.
"Announcements": Specify a path to the multi volume announcements
files.
"Temporary folder": Specify a path to a temporary folder (preferable on
the local computer).
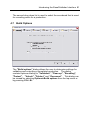
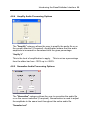
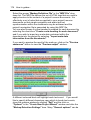
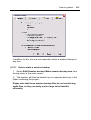
4.4.4 Markup General Options
The "Markup" category allows the user to specify the how the
automatic mark-up function will detect separate text events.
"Encapsulate each detected sentence with the following tag information"
This setting determines how a text event in the HTML source will be
identified. Most DAISY book producers use <span
Introducing the EasePublisher Interface 65
class="sentence">. EasePublisher will use this definition by default.
If required, this may be changed to another tag and class name.
"Minimum sentence length"
This setting determines how much text there must be within a text
block before it can be defined as a marked up sentence.
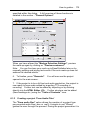
"Use this mark up break settings"
Mark-up of a document is based on certain pre-defined criteria (e.g.
full stops and commas). This setting determines these characters and
saves them as a "Mark-up Break Setting" or an "MBS". The MBS
file is saved in the MBS sub-folder of EasePublisher.
By default, EasePublisher provides the user with a choice of three
markup templates called "default", "default(no comma)" and "word
markup". The criteria for each of these MBS settings is displayed in
the window beneath the currently selected MBS.
It is possible to create your own list of characters and then save those
as a new MBS using either the "Add", "Edit" or "Remove" buttons in
the dialog.
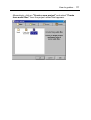
To add a new setting, press the ADD button and the "Add new
characters" dialog will be shown.
In here, enter the character(s) you wish to detect. For example, if you
want to detect a character followed by a empty space, you simply type
in the character in the "Search for:" text box and tick the check box
called "space character". You may also want to detect the
character(s) in combination with carriage return (CR), line feed (LF) or
the null (NULL) characters. If this is the case, the "break character"
check box must also be selected.
Example 1) You want to detect the period sign followed by a space,
CR, LF or a NULL character. In this case, you type in the "." character
in the text box and tick both check boxes.
66
Introducing the EasePublisher Interface
Example 2) You want to detect the period sign only. In this case, you
type in the character "." in the text box and leave both check boxes
unchecked.
Example 3) You want to detect the name "Dolphin". In this case, you
type in the characters "Dolphin" in the text box and leave both check
boxes unchecked.
Example 4) You want to detect words only. In this case, you type in the
character " " in the text box and leave both check boxes unchecked.
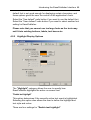
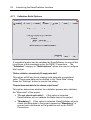
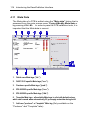
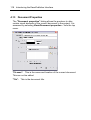
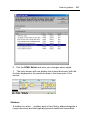
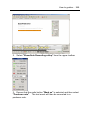
4.5 Display Options
The "Display Options" dialog allows the user to determine settings
relating to "General", "Highlight", "Track view", and "Peak meter".
This dialog can be viewed by selecting Options>Display options
from the top menu or by pressing <Ctrl + D>.
Introducing the EasePublisher Interface 67
Each of the 4 option categories can be selected from the "tabs" at the
top of the dialog.
68
Introducing the EasePublisher Interface
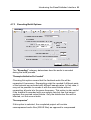
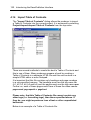
4.5.1 General Display Options
The "General" category allows the user to alter the appearance of the
display to suit the user.
"Toolbar buttons style"
This option determines if the icons on the tool bar are displayed in
"Standard 3D style" or an alternative "Flat style".
"Apply a narrator style sheet"
Gives the option to apply a style sheet to the material for the narrator.
The style sheet is only applied whilst using EasePublisher and will not
affect the stored document. Narrator style sheets can also be selected
from the floating "Recording" toolbar on the Main Screen.
"Font options"
By using these font options, the user can use other fonts in
EasePublisher that the default one. In some cases, the computers
Introducing the EasePublisher Interface 69
default font is not good enough for displaying certain characters, and
these options gives the user the control of the application's fonts.
Select the "Use default" radio button if you want to use the default font.
Select the "User defined" radio button if you want to select another font
setting for EasePublisher.
Please note that you cannot use too large fonts as the texts may
not fit into existing buttons, labels, text boxes etc.
4.5.2 Highlight Display Options
The "Highlight" category allows the user to specify how
EasePublisher highlights the active on-screen text.
"Enable text highlight"
This option determines if the currently active text event is highlighted.
Selecting this option also allows the user to define the highlight and
text style and colour.
There are four settings for "Enable text highlight"
70
Introducing the EasePublisher Interface
• "Use text color": Choose a typeface colour for the currently
active text event. Click "Select" and specify a colour from the
"Select color" dialog that appears to choose the colour.
• "Use back color": Choose a colour for the highlight effect for
the currently active text event. Click "Select" and specify a
colour from the "Select color" dialog that appears to choose the
colour.
• "Use underline": Choose if the currently active text event is
underlined.
• "Use bold text": Choose if the currently active text event is
displayed in a bold typeface.
"Highlight next as well"
This option determines if the next text event after the current text event
is highlighted (In a different colour). Selecting this option allows the
user to define the highlight and text style and colour.
There are four settings for "Highlight next as well":
• "Use text color": Choose a colour for the next text event.
Clicking "Select" and specifying a colour from the "Select color"
dialog that appears chooses the colour.
• "Use back color": Choose a colour for the highlight effect for
the next text event. Clicking "Select" and specifying a colour
from the "Select color" dialog that appears chooses the colour.
• "Use underline":
Choose if the next text event is underlined.
• "Use bold text": Choose if the next active text event is
displayed in a bold typeface.
"Document scrolling"
Introducing the EasePublisher Interface 71
There are three scroll options that determine the position of the current
text event on the screen during playback or recording. These options
are:
• "Scroll when outside of page": The screen will not scroll with
the highlighting. When the highlight reaches the bottom of the
screen, the next section of the document will be displayed from
the top of the screen and highlighting will resume.
• "Scroll to top": The screen scrolls so that the highlighted focus
is always at the top of the screen.
• "Scroll to middle": The screen scrolls so that the highlighted
focus is always in the middle of the screen.
4.5.3 Track View Display Options
The "Track view" category allows the user to specify the appearance
of the track view / waveform area on screen.
72
Introducing the EasePublisher Interface
At the bottom of the dialog is a preview of how the track view will
appear on screen using the chosen settings.
Colour schemes
The user can select a colour scheme for the track view / waveform
area from the following options:
• "Wave fill color":
that is displayed.
Determines the fill colour of the waveform
• "Wave background": Determines a background colour to
contrast with the waveform.
• "Wave border": Determines the border colour of the waveform
that is displayed.
• "Display background": Determines a background colour to
contrast with the rest of the elements in the track view area.
• "Text": Determines the colour of the text events that are
displayed in the track view area.
• "Borders": Determines the colour of the event markers, and
the border that surrounds the waveform.
• "Time line":
Determines the colour of the timeline.
• "Zoom highlight": This colour is used if the track view is
selected in the upper part (on the time line). The selected part of
the audio will then be zoomed in.
• "Event border": Determines the colour of the border
surrounding the "T" symbol that is used to mark a text event in
the track view.
• "Event inner": Determines the colour of the "T" symbol that is
used to mark a text event in the track view.
• "Event focus": Determines the colour of the "T" symbol that is
used to mark a text event in the track view when the user selects
the symbol/ event.
"Show synchronized text in the track view"
This setting allows the user to choose if the text of the event is
displayed beneath the waveform in the track view. This allows the
Introducing the EasePublisher Interface 73
user to clearly see the relationship between the text and the
corresponding position in the waveform.
"Num texts in view"
The slider bar allows the user to specify a maximum number of text
events that will display the synchronized text in the track view.
"Draw border (clip marker colour)"
This setting allows the user to choose if a border is drawn around the
"Waveform background".
"Show event numbers"
This setting allows the user to decide if event numbers are displayed in
the waveform / track view.
"Draw max audio length"
If the current track view length is greater than the setting, the
waveform appears as "boxes". If less than the specified setting, the
waveform will be displayed. If this is set to "Disabled", the waveform
will always be drawn.
"Load wave data timeout"
If the waveform data takes more time to load than the specified setting,
the rest of the waveform display will be drawn as “boxes”.
74
Introducing the EasePublisher Interface
4.5.4 Peak Meter Display Options
The "Peak meter" settings allow the user to specify the appearance
and the values of the EasePublisher peak meter.
The dialog also has a preview of how the three different views of the
Peak meter will appear on screen using the chosen settings.
• "Text color": Choose a colour for text on the "analogue view"
Peak meter. Clicking "Select" and specifying a colour from the
"Select color" dialog that appears chooses the colour.
• "Background color": Choose a background colour for the
"analogue view" Peak meter. Clicking "Select" and
specifying a colour from the "Select color" dialog that appears
chooses the colour.
• "Pin color": Choose a colour for the pin / needle on the
"analogue view" Peak meter. Clicking "Select" and specifying
a colour from the "Select color" dialog that appears chooses the
colour.
Introducing the EasePublisher Interface 75
• "Min db value": Choose the minimum decibel value to display
on the Peak meter from -10db to -70db on the slider bar.
• "Peak hold time":
the peak value.
Choose how long the peak needle stays at
• "Clip error value": A clip occurs in the audio if the level reached
0dB. To avoid this EasePublisher allows the user to set up two
warning levels that gives the user a chance to avoid real clips.
Clip error is the most severe warning of the two and a suitable
value is -1dB. This warning is displayed as a red marker in the
track view.
• "Clip warning value ": A clip occurs in the audio if the level
reached 0dB. To avoid this EasePublisher allows the user to set
up two warning levels that gives the user a chance to avoid real
clips. Clip warning is the less severe warning of the two and a
suitable value is -3dB. This warning is displayed as a yellow
marker in the track view.
• "Display this peak meter": The user can choose if the peak
meter is displayed as "Analogue", "Double Peaks" or
"Pumping Heart".
• "Large size peak meters":
the peak meter on screen.
This option increases the size of
76
Introducing the EasePublisher Interface
4.6 Recording Options
The "Recording Options" dialog allows the user to determine
settings relating to "General", "Audio format", "Phrase detection",
and "Devices". This dialog can be viewed by selecting
Options>Recording options from the top menu or by pressing <Ctrl +
R>.
Each of the 4 option categories can be selected from the "tabs" at the
top of the dialog.
4.6.1 General Recording Options
Introducing the EasePublisher Interface 77
The "General" options contains the following settings relating to
mainly live narration in EasePublisher.
"Minimum audio clip length"
When you narrate and at the same time have the phrase detection
turned on, very short audio clips can be created. This can often
happen when narrating a full text heading. These short audio clips are
usually created by the narrator pressing the "Next text" button very
close to a new phrase (audio marker). When the narration stops,
EasePublisher analyses the new audio clips and will modify them so
that no audio clips will be shorter than this defined length.
Note! This feature is also available as a separate command in the
Tools menu and in the "Cleanup" section during build.
"Current recording mode"
Selects the recording modes from…
• Overwrite - Any new audio that is recorded will overwrite the
existing audio from that point onwards.
• Insert - Any new audio that is recorded will be inserted at that
point, without overwriting any of the existing audio.
• Replace to zero - This recording mode is used together with the
user time counter. After a mistake, the narrator presses the
"Reset user time counter to zero" button and rewinds to a
place before the start of the mistake. The narrator can then make
a "punch-in" recording to replace what is between the start of
the retake and user time zero. It does not matter if the new
recording contains more or less audio than the mistake - it will
always replace everything between the start of the retake and
user time zero.
"Voice activation"
Determines if the recording function waits for a detected audio signal
(i.e. narrator begins speaking) before starting to record.
78
Introducing the EasePublisher Interface
4.6.2 Audio Format Recording Options
The "Audio format" options contains the following settings relating to
the format of any recordings that are made in EasePublisher. Please
note - It is only possible to alter these settings if audio has not yet
been added to the current heading. If audio is already present, it is
not possible to alter these settings.
"Audio quality"
This setting allows the user to select the audio format using a slider
bar. It is possible to choose a format from 5000Hz up to 48000Hz.
Please note that not all these sampling frequencies are available on all
sound boards.
"Audio channels"
This setting allows the user to choose if recordings are made in
"Mono" or "Stereo".
Introducing the EasePublisher Interface 79
4.6.3 Phrase Detection Recording Options
The "Phrase detection" settings are used to configure the phrase
detection that EasePublisher will use during import or recording of
audio in a project. Phrase detection should be used in situations
when the user wants EasePublisher to automatically create audio
events by detecting pauses in the audio stream. Using this feature
makes talking books much easier to navigate, both for the producer
and the listener of the book.
"Use phrase detection while recording"
This option should be selected if the user wants audio events to be
automatically created during the recording of audio. EasePublisher
divides the audio data into segments and phrases while recording.
"Record before phrase"
This is the time in milliseconds that the recording engine steps back in
the audio when detecting a new phrase. The user can specify from
70ms up to 250ms by adjusting the slider bar.
"Noise threshold"
There is always some background noise during a recording session
and to be able to detect pauses in the recording the amplitude of this
noise needs to be identified. The calibration process identifies the
amplitude of the background noise and stores that value as the noise
80
Introducing the EasePublisher Interface
threshold. If phrases aren’t detected correctly this value might need to
be adjusted manually. The user can specify from -50.3db to -35.1db by
adjusting the slider bar.
"Pause length"
This is the time in seconds of silence that is needed for the recording
engine to determine that a pause has taken place. The user can
specify from 0.100secs up to 5.000secs by adjusting the slider bar.
4.6.4 Devices Recording Options
The "Devices" category allows the user to select the soundcard to use
for playback and recording. EasePublisher automatically detects all
compatible devices, which are installed on the system, and allows the
user to select one from the two drop down lists.
"Playback devices"
The first drop down list is used to select the soundcard that is used
for playback of a production.
"Recording devices"
Introducing the EasePublisher Interface 81
The second drop down list is used to select the soundcard that is used
for recording audio for a production.
4.7 Build Options
The "Build options" dialog allows the user to determine settings for
validating and outputting a completed production. The dialog
contains options relating to "Validation", "Clean up", "Encoding",
"Protect", "Unlock", "Folders" and “Document”. This dialog can
be viewed by selecting Options>Build options from the top menu or
by pressing <Ctrl + B>.
82
Introducing the EasePublisher Interface
4.7.1 Validation Build Options
A completed project can be validated by EasePublisher to ensure that
it conforms to the standards set by the DAISY Consortium. The
"Validation" category in "Build options" allows the user to configure
this function.
"Before validation, automatically fill empty meta data"
This option will fill any found missing meta data with a predefined
value. These meta data can be defined in the "Meta Data" dialog.
Press the "Settings" button to launch that dialog.
"Require these meta data for the chosen output format"
This option determines whether the validation process also validates
the "Meta data" of the project.
• "Do not check meta data": If this option is selected,
EasePublisher will not validate the Meta data of the project.
• "Mandatory": If this option is selected, EasePublisher will only
check that Meta data in the project classed as "Mandatory" is
present and valid based on the guidelines set by the DAISY
Consortium.
Introducing the EasePublisher Interface 83
• "Mandatory + Recommended": If this option is selected,
EasePublisher will only check that Meta data in the project
classed as "Mandatory" and "Recommended" is present and
valid based on the guidelines set by the DAISY Consortium.
• "Mandatory + Recommended + Optional": If this option is
selected, EasePublisher will check that all Meta data in the
project is present and valid based on the guidelines set by the
DAISY Consortium.
"Report error on text event with no audio synchronized to it"
If this option is selected, an error will be reported for any text event
that has no audio corresponding to it in the SMIL file.
4.7.2 Cleanup Build Options
The "Cleanup" category determines if unused files and markers are
removed during the build process.
Master book cleanup only
"Remove all audio markers without aligned text event"
84
Introducing the EasePublisher Interface
If this option is selected, during "Cleanup", any "additional" audio
markers that fall between text events will be removed. This will result
in one audio event equalling one text event. This feature is specially
made for "FullText" books, where you need one single audio event for
each text event. Running this feature on "audioNcc" headings is
usually not good, as you will loose all audio events within those
headings.
"Remove audio markers in short audio events"
If this option is selected, during "Cleanup", any audio events with a
duration of less than the defined value will be joined together with
other aligned audio events. The result will be that the book will not
contain any audio events shorter that this defined length. You may
also press the "Settings" button to alter that minimum length.
"Remove unused wave files"
During recording and editing of a project a number of wave files can
often be generated that are not referenced in the SMIL file and are not
required in the final "build". If "Remove unused WAVE files" is
selected, any redundant audio files will be removed.
"Normalize all WAVE files"
This setting will ensure that all wave files are "Normalized" during the
build process to ensure consistent audio volume. By selecting the
"Settings" button, the "Audio processing" dialog will appear and it
will be possible to configure the normalization of the audio.
Distribution book cleanup only
Note! This option is a cleanup process for the distribution book only.
Any defined producer stops in your master book can be removed from
the distribution book by using this cleanup option.
Keep any producer stop in the distribution book
Any defined producer stop will be kept in the distribution book as well.
Remove all producer stops in the distribution book
Any defined producer stop will be removed from the distribution book.
Introducing the EasePublisher Interface 85
4.7.3 Encoding Build Options
The "Encoding" category determines how the audio is encoded
during the build process.
"Resample distribution file if needed"
Choosing this option means that the finalised audio file will be
resampled if necessary. Resampling might be needed if different parts
of the material are recorded with different sample rates. In that case, it
may not be possible to encode it with the same bitrate without
resampling all parts into the same frequency. This option is also useful
if the material is recorded with one sample rate but one that cannot
produce the required output bitrate. Only the distribution files will be
effected, not the source audio.
"No compression"
If this option is selected, the completed project will contain
uncompressed audio files (WAVE files) as opposed to compressed
86
Introducing the EasePublisher Interface
(MP3 etc.) files. If the master book contains headings with MP3 files,
then those MP3 files will be copied to the distribution book. Note that
EasePublisher will not create WAVE files from those MP3 files.
"Compress audio files using Fraunhofer IIS MPEG Layer 3"
If this option is selected, all audio files in the final project will be
converted to MP3 format. The user can choose the compression
format from a drop down list that contains all available encoding
bitrates (Based on compatibility with the original recorded audio). A
higher bitrate means higher quality of audio but will also result in a
larger file size.
"MP3 quality mode"
This option allows the user to specify the quality of the MP3 that is
produced.
• "Good" - Fast encoding.
• "Medium" - Higher quality but slower to encode.
• "High" - Highest quality but longest time to encode.
If the audio quality (the PCM wave file) is good, it is likely that no
difference between the three settings will be apparent. However, if the
audio quality is quite low (e.g. distorted "s" sounds, annoying
background hiss, etc...), you can use the "High" setting to make the
MP3 audio sound as good as possible. However, the performance of
the encoder is much slower as it processes/filters the audio to a
greater extent.
"Rename all audio files"
If this option is selected, all audio files will be given a logical name
based on the name of the project, with a number (Track number) at the
start to enable the audio files to be displayed in the correct order if
they are to be played in isolation (e.g. in an MP3 player).
"Max length of audio name"
This slidebar is used in conjunction with the "Rename all audio files"
option. If "Rename all audio files" is selected, the user can specify
a maximum number of characters that the file name can have.
Minimum of 8 characters up to an unlimited number.
Introducing the EasePublisher Interface 87
"Protect audio file names"
To assure interoperability between various locales and platforms, the
audio file names can only contain characters in the range
[A-Za-z0-9._-].
The textbox contain the new character, which will replace any found
invalid characters in the audio file names.
"Do a Multi Volume build"
By using this option, the distribution book will be devided into several
parts. These separate parts can then be put on separate medias, such
as CD-ROMs. How many parts will be built is depedant on the volume
size, master book size, compression choice and DTB output type You
may do a estimated calculation of the multi volume book, by typing in
the media size in the "Volume size" text box (e.g. 650 for CD-ROM)
and then press the "Show Volumes" button. You may also view or edit
your multi volume announcements by pressing the "Edit
announcements" button near by.
Show Volumes
Based upon your settings in the "Build Options" dialog, EasePublisher
calculates how many volumes it will be and that's presented in this
"Multi Volumes View".
The top most list view shows how many volumes it became. For each
volume, you can see which headings each volume contains and the
volume size, expressed in MB and time.
If a single heading will not fit on your predefined volume size,
EasePublisher will inform the user and colour each of those volumes
red. You will not be able to build a multi volume book as long as this
criteria is not met.
88
Introducing the EasePublisher Interface
The lower list view is just a simple list of those headings the currently
selected volume contains.
4.7.4 Protect Build Options
Introducing the EasePublisher Interface 89
For information about configuring the "Protect" category, please refer
to the later section "Creating Protected Digital Talking Books
(PDTB's)".
4.7.5 Unlock Build Option
The "Unlock" category contains some options to unlock a branded
EasyReader.
To make it possible to ship EasyReader on each distributed media
(CD, DVD, etc), this unlock key must be generated. The unlock key
contains producer specific information that will allow EasyReader to
only open the books that are distributed by the specific producer. This
requires a special branded version of EasyReader and a producer ID,
which are both available from Dolphin AudioPublishing.
As default, these options are blocked so you cannot access them. If
you do not have access rights to them and are interested in shipping
EasyReader together with your book, please contact Dolphin
AudioPublishing for more information.
"Yes, generate an unlock file for the distributed book"
90
Introducing the EasePublisher Interface
When selected, the distributed book will also contain the special
unlock file that will make sure that your branded EasyReader will open
the book. The unlock file will be created based upon the producer ID
specified in the text box in this dialog.
"Unlock key name"
This is the name of the currently selected unlock key. You may create
new ones or remove it by pressing the "Create new key" or "Remove
current key" buttons.
"Producer ID"
This is the unique ID that must match the branded EasyReader.
4.7.6 Folders Build Options
The "Folders" category allows the user to specify the distribution
folders that EasePublisher will output to during the Build process.
"Put the distribution books in the sub folder of:"
This option allows the user to specify where the outputted project will
be distributed:
Introducing the EasePublisher Interface 91
• "The current project":
of the current project.
The output will be located in a subfolder
• "The specified path": The user can specify a folder to
distribute outputted projects to. Selecting "Browse…" allows an
existing folder to be chosen or a new folder created.
"Sub folder name of each distribution type"
Here you can type in your own sub folder name for each distribution
type.
"Complete distribution folder name"
This text box contains the complete path to the distribution folder and
the path name is created based upon your folder settings above.
4.7.7 Document Build Options
The "Document" category allows the user to alter general distribution
settings for the distribution copy of the documents in the project during
the Build process.
92
Introducing the EasePublisher Interface
"Apply this style sheet to all documents"
If selected the given style sheet will be added to the distribution copy
of all documents in the project. Select “Browse” to designate the CSS
file to use.
"Add 'Linkbacks' in the whole book for all text references"
If selected, EasePublisher will add 'Linkback' links info the distributed
book for all text references. These links are only added into the source
documents and will improve the usability of the book in full text DTB
players. When the user clicks with the mouse on a text that have this
'Linkback', the DTB player can simply follow that link. Please note that
this navigation method may not be supported by all DTB players.
You also have some options were you define how these links should
be created in the documents.
• "Normal links (no style)" - 'Linkback' links will be added, but no
styling will be added to the source document. This kind of styling
can be added in a separate CSS file.
• "Hidden links" - The 'Linkback' links are as default hidden set to
hidden, which means that the link's underlining will not be visible
in the DTB player. The link colour options are available for this
option.
• "Hidden links (normal on active link)" - Same as above, but when the
user moves the mouse pointer over such a text reference, the
link's underlining will become visible as long as the mouse pointer
is over that text reference.
Colour options for the two "Hidden links" options:
• "Link text color" - Choose a text colour for the all added links.
• "Link hover text color" - Choose a text colour when the mouse
pointer is over such a text reference.
"Convert to other character encoding in the destination book"
Whilst working with you project inside EasePublisher, UTF-8 is used
throughout the whole project. If the producer wants to use a different
character encoding for the distributed book, this option can be used.
You can also press the "Preview" button to temporarily convert the
current document to the selected code page.
Introducing the EasePublisher Interface 93
4.8 Audio Processing Options
EasePublisher have a range of audio processing features that can be
applied on the audio. These are:
• "Resample audio"
• "Fade In"
• "Fade Out"
• "Amplify"
• "Normalize"
• "Filter"
• "Silence"
4.8.1 Resample WAVE audio format
EasePublisher allows the audio within the headings to be resampled if
required.
94
Introducing the EasePublisher Interface
This is done by selecting Tools>Audio processing>Resample audio
from the toolbar
or selecting the "Audio processing tools" icon
on the right-hand side of the audio wave form, and selecting
"Resample audio". The "Resample WAVE audio format" dialog will
then appear.
To resample the audio files, follow these steps:
1. Select the audio files that you wish to resample by selecting the
check box next to the titles of the headings that you want to resample.
If you want to resample all audio files, choose the "Select All" button.
2. On the right hand side of the dialog, the user then chooses the
"sampling rate" that the new audio files will be resampled to. This
varies through a range from 5000 Hz up to 48000 Hz. Select the
desired rate via the radio button next to the chosen rate. Please note
that all these sampling rates may not work on all soundcards.
3. The final option is to select the "Channels". This can be either
"Mono" or "Stereo" and is selected via the radio button next to the
chosen format.
Introducing the EasePublisher Interface 95
4. To complete the process, select "Convert now...".
4.8.2 Fade In Audio Processing Options
The "Fade In" category allows the user to specify the type and levels
of fade at the start of the audio file or on the current selection.
"Linear"
If you want the fade in to increase the volume equally throughout the
whole selection you should select the linear option.
"Logarithmic"
If you want the fade in to increase the volume more at the end of the
selection you should select the logarithmic option.
96
Introducing the EasePublisher Interface
"Sine"
If you want the fade in to increase the volume more at the end of the
selection but with a smoother touch than with the logarithmic formula
you should select the sine option.
"Start %"
This is the volume level at the starting point of the Fade. This is set
as a percentage from the slider bar.
"End %"
This is the volume level at the end point of the Fade. This is set as a
percentage from the slider bar.
Introducing the EasePublisher Interface 97
4.8.3 Fade Out Audio Processing Options
The "Fade Out" category allows the user to specify the type and
levels of fade at the end of the audio file or on the current selection.
"Linear"
If you want the fade out to decrease the volume equally throughout the
whole selection you should select the linear option.
"Logarithmic"
If you want the fade out to decrease the volume more at the end of the
selection you should select the logarithmic option.
98
Introducing the EasePublisher Interface
"Sine"
If you want the fade out to decrease the volume more at the end of the
selection but with a smoother touch then with the logarithmic formula
you should select the sine option.
"Start %"
This is the volume level at the starting point of the Fade. This is set
as a percentage from the slider bar.
"End %"
This is the volume level at the end point of the Fade. This is set as a
percentage from the slider bar.
Introducing the EasePublisher Interface 99
4.8.4 Amplify Audio Processing Options
The "Amplify" category allows the user to amplify the audio file or on
the current selection (If required). Amplification means that the audio
amplitude is increased or decreased with the given percentage.
"Amplify %"
This is the level of amplification to apply. This is set as a percentage
from the slider bar from -100% up to +200%.
4.8.5 Normalize Audio Processing Options
The "Normalize" category allows the user to normalize the audio file
or on the current selection (If required). Normalization is used to adjust
the amplitude to the same level throughout the entire audio file.
"Normalize level"
100 Introducing the EasePublisher Interface
This is the normalize level to apply. The highest value in the file is set
to the given percentage of the maximum audio value a computer can
handle; all other values are then adjusted accordingly. This is set as a
percentage from the slider bar from 0% up to 100%.
"Lower noise threshold"
To make sure that only audio and not silence nor background noise is
volume adjusted it is important to set the lower noise threshold to a
correct value. The lower noise threshold to use is set by adjusting the
slider bar. This covers a range of -78.3db up to -0.0db.
4.8.6 Filter Audio Processing Options
The "Filter" category allows the user to apply filters to the audio file or
on the current selection (If required). Filters are used to remove
unwanted high or low frequency noise. To remove index tones (50Hz)
for example, requires a low pass filter that is set to 50 or higher.
"Low pass"
This is a filter that removes all frequencies below the given value of the
slider.
"High pass"
This is a filter that removes all frequencies above the given value of
the slider.
"Band pass"
This is a combined low pass and high pass filter that removes all
frequencies below and above the given values of the sliders.
Introducing the EasePublisher Interface 101
"Low"
Adjusting the slider bar sets the setting for low and band pass filter.
This covers a range of 15Hz up to 20000Hz.
"High"
Adjusting the slider bar sets the setting for high and band pass filter.
This covers a range of 15Hz up to 20000Hz.
4.8.7 Silence Audio Processing Options
The "Silence" category allows the user to add silence in the audio file
(If required). The amount of silence to add is given by the slider.
"Silence type"
• "Absolute silence": Add the given amount of absolute silence
(0 dB) at a given position in the file.
• "White noise": Add the given amount of "white" silence at a
given position in the file. The amplitude for the white noise is
given by adjusting the slider.
4.9 The Table of Contents Editor
The "Table of Contents Editor" is a virtual index of the project. It
displays all headings (chapters); pages and "optional content"
(Footnotes, producer notes and sidebars) contained within the project
102 Introducing the EasePublisher Interface
and allows further editing of the structure and navigational elements.
The "Table of Contents Editor" is viewed by selecting View>Open
Table of Contents View from the top menu or by pressing <F4>.
Introducing the EasePublisher Interface 103
4.9.1 Nav Clips view
1.
Import audio from the heading's audio clips.
2.
Remove audio clip from current navigation point.
3.
Remove all audio clips from the whole navigation view.
4. Navigation type (book title, book author, headings, pages, sidabars, foot
notes and producer notes).
5. The text in the current navigation point.
6. Audio clip length for the current navigation point.
7. Minimum imported audio - when importing audio from your headings, the
imported audio will be at least the length of this setting.
8. Maximum imported audio - when importing audio from your headings, the
imported audio will have a maximum length of this setting.
104 Introducing the EasePublisher Interface
4.9.2 Headings View
1.
Add new heading(s).
2.
Import into this project (documents, other NCC, other Table of Contents).
3.
Remove selected headings.
4.
Join headings.
5. Move selected heading(s) up.
6. Move selected heading(s) down.
7. Move selected heading(s) left (decrease level).
Introducing the EasePublisher Interface 105
8. Move selected heading(s) right (increase level).
9.
Heading title.
10.
Heading level.
11.
Heading playback time duration.
4.9.3 Pages View
106 Introducing the EasePublisher Interface
1.
Add new page(s).
2. Modify current page(s).
3.
Remove current page break(s).
4.
Insert new page.
5. Mark current text event as page.
6. Text of page.
7. Type of page.
8.
Class of page.
9.
Chapter / Heading title.
Introducing the EasePublisher Interface 107
4.9.4 Optional Content View
1.
Add new sidebar.
2.
Add new producer note.
3.
Add new footnote.
4.
Remove current note.
5.
Insert as new text.
6. Mark current text event as optional content.
7. Text of optional content.
8. Type of optional content.
9.
10.
Class of optional content.
Heading title.
108 Introducing the EasePublisher Interface
4.10 The Document Source Viewer
The "Document Source Viewer" is used for viewing the underlying
source code of the project NCC, the source SMIL file, or the source
HTML file.
On the right hand side of the Document Source Viewer are a collection
of buttons for performing the following actions:
"Exit": Close the Document Source Viewer.
"Print": Output the source code to a printer.
"Well formed?": Checks if the source code is well-formed according to
MS XML.
"Valid?": Validates the source code against the defined DTD using
MS XML .
4.10.1 Viewing the NCC File
To view the source code of the NCC file, select View>View
Source>Daisy 2.02>Project NCC.HTML from the top menu.
Introducing the EasePublisher Interface 109
The project NCC (Navigational Control Centre) is an XHTML file and
therefore knowledge of XHTML code and the DAISY specification is
required.
The NCC is an essential component of a digital talking book in that it
provides a view of all the points in the production to which a user may
navigate. Each navigation point in the NCC is linked through a SMIL
file to the corresponding location in the audio and the text, and
provides navigation to a specific point in the book.
For detailed information about NCC file, please read the full DAISY
specification by visiting
http://www.daisy.org/publications/specifications.asp
http://www.daisy.org/publications/specifications.asp.
4.10.2 Viewing the SMIL file
To view the source code of the SMIL file, select View>View
Source>Daisy 2.02>Source SMIL (Name of file) from the top menu.
110 Introducing the EasePublisher Interface
The SMIL file of a DAISY project is a SMIL 1.0 compliant document
that provides the text and audio synchronisation functionality for all
defined segments of the productions content. A SMIL file is always in
continuous sequence, and contains one or several parallel time groups
or synchronisation units referring to text and/or audio media objects.
For detailed information about SMIL files, please read the full DAISY
specification by visiting
http://www.daisy.org/publications/specifications.asp
http://www.daisy.org/publications/specifications.asp.
4.10.3 Viewing the source XHTML document
To view the source code of the XHTML file, select View>View
Source>Daisy 2.02>Source document (Name of file) from the top
menu.
The NCC file only contains text information that is limited to headings,
pages, and simple references to other content.
Introducing the EasePublisher Interface 111
For fully synchronised text and audio DTB's, additional text files are
required. These files must be XHTML 1.0 compliant.
For full information about the source XHTML document, please visit
http://www.daisy.org/publications/specifications/daisy_202.html#textdo
c
http://www.daisy.org/publications/specifications/daisy_202.html#textdo
c.
4.10.4 Viewing the NCX File
To view the source code of the NCX file, select View>View
Source>Z39.86-2002>Navigation NCX from the top menu.
The NCX file is an essential component of a Z39.86-2002 digital
talking book in that it provides a view of all the points in the production
to which a user may navigate. Each navigation point in the NCX is
linked through a SMIL file to the corresponding location in the audio
and the text, and provides navigation to a specific point in the book.
For detailed information about NCX file, please read the full
Z39.86-2002 specification by visiting
112 Introducing the EasePublisher Interface
http://www.daisy.org/publications/specifications.asp
http://www.daisy.org/publications/specifications.asp.
4.10.5 Viewing the OPF File
To view the source code of the OPF file, select View>View
Source>Z39.86-2002>OPF File from the top menu.
The OPF (Open eBook Forum Package File) file is an essential
component of a Z39.86-2002 digital talking book that contains
administrative information about the digital talking book, files that
comprise it, and how these files interrelate.
Introducing the EasePublisher Interface 113
For detailed information about the OPF file, please read the full
Z39.86-2002 specification by visiting
http://www.daisy.org/publications/specifications.asp
http://www.daisy.org/publications/specifications.asp.
114 Introducing the EasePublisher Interface
4.11 Meta Data
The Meta data of a DTB is edited using the "Meta data" dialog that is
accessed from the main screen menu, Project>Modify Meta data or
by pressing <Ctrl + M>. In order to pass the DTB validation tools, it is
important that the Meta data is correct.
1.
Dublin core Meta tags ("dc:")
2.
DAISY 2.02 specific Meta tags ("ncc:").
3. Producer specific Meta tags ("prod:").
4. Z39.86-2002 specific Meta tags ("ncx:").
5. Z39.86-2002 specific Meta tags ("dtb:").
6. Template Meta tags - all available Meta tags in a list with default values,
which can be used when automatically fill you empty meta data during build.
7. Add new "producer" or "template" Meta tag (Only available on the
"Producer" abd "Template" tabs).
Introducing the EasePublisher Interface 115
8. Edit selected Meta tag.
9.
Duplicate selected Meta tag.
10.
Remove selected Meta tag.
11.
Import meta data from a XHTML file.
12.
Import all meta data.
13.
Import only DAISY 2.02 specific meta data ("dc:", "ncc:" and "prod:").
On the right hand side of this screen, is an area were detailed
information about the current meta data is shown. It will also tell you if
the current meta data is "required", "mandatory" or "optional"
according to the DAISY 2.02 and/or Z39.96-2002 specifications.
"Dublin Core" tab
For bibliographic metadata, the DTB uses the Dublin Core (DC)
Metadata Initiative element set, an internationally approved and
broadly accepted standard necessary for the description of document
resources. These are viewed and edited in the "Dublin Core" tab in
the "Meta data" dialo.
"NCC" tab
Although the Dublin Core element set covers a wide range of
bibliographic descriptions for DTB's, there is some important
information that is not adequately covered in these 15 data categories.
Additional elements specific to DAISY 2.02 DTB´s have been
developed. These are viewed and edited in the "NCC" tab in the
"Meta data" dialog.
"Producer" tab
In addition, a producer can also add any meta data that is needed by
them or their audiences. These are added, viewed and edited in the
"Producer" tab in the "Meta data" dialog.
"NCX" tab
The Z39.86-2002 specification have a set of meta data that contains
important information about the DTB. These are viewed in the "NCX"
tab in the "Meta data" dialog. Please note that all these meta data are
116 Introducing the EasePublisher Interface
automatically controlled and generated by EasePublisher and can
therefore not be edited.
"DTB" tab
The meta data in the "DTB" tab, is quite similar to that in the "NCC" tab,
but the Z39.86-2002 specification has a slightly different set of them.
These are viewed and edited in the "DTB" tab in the "Meta data"
dialog.
"Template" tab
This "Template" tab contains a list of all available and editable meta
data in both the DAISY 2.02 and Z39.86-2002 specifications. The
meta data which are controlled automatically and generated by
EasePublisher are not available in this list.
The producer can create a set of meta data, that can be used later to
add information to any found meta data which does not yet have a
value. This list of meta data is stored locally on your computer and is
therefore not bound to the current DTB. When creating the next DTB,
you may use this producer-defined list to fill in any empty meta data.
You may do this in to ways - either press the "AutoFill now" button
within this dialog, or do it when building the book (available on the
"Validation" tab within the "Build Options" dialog).
For full information about DAISY 2.02 Meta Data, please visit
http://www.daisy.org/publications/specifications/daisy_202.html#ncc
http://www.daisy.org/publications/specifications/daisy_202.html#ncc
For full information about Z39.86-2002 Meta Data, please visit
http://www.niso.org/standards/resources/Z39-86-2002.html
http://www.niso.org/standards/resources/Z39-86-2002.html
Introducing the EasePublisher Interface 117
4.12 SMIL event information
The "SMIL event information" dialog can be opened through the
menu command View > View SMIL information or by pressing <Ctrl +
I> and it shows information about the current SMIL event.
Also, the slider at the bottom can be used for fast event navigation.
118 Introducing the EasePublisher Interface
4.13 Document Properties
The "Document properties" dialog allows the producer to alter
certain visual elements of the current document in the project. It is
accessed by selecting View>Document properties... from the top
menu.
"File name": This is the name and location of the current document.
This can not be edited.
"Title":
This is the document title.
Introducing the EasePublisher Interface 119
"Background color": This sets the background colour of the document
from a pop-up colour selector. The colour can be selected by
selecting a "Named Color" or by adjusting the slider bars until the
required colour appears in the "Preview".
"Text color": This sets the body text colour of the document from a
pop-up colour selector. The colour can be selected by selecting a
"Named Color" or by adjusting the slider bars until the required colour
appears in the "Preview".
"Background picture": This allows an image to be set as the
background of the document. The image is selected by clicking
"Browse" and locating the image on the drive. If the check box
"Fixed" is selected, the image will not scroll with the page, but will
remain fixed in position.
"CSS files": This allows one or more pre-created style sheets to be
applied to the document. The style sheet is selected by clicking
"Browse" and locating the CSS file on the drive.
"Reading order": This allows you to change the reading order of the
current document.
120 Introducing the EasePublisher Interface
4.14 Import Table of Contents
The "Import Table of Contents" dialog allows the producer to import
a Table of Contents into the current project. It is accessed by selecting
Project>Import>Import Table of Contents from the top menu.
There are several methods to create the book's Table of Contents and
this is one of them. Many producers prepare a book by creating a
Table of Contents in a separate HTML file and this can be done in a
simple HTML editor or even Notepad.
It is important that this file contains only headings and page numbers
in a very specified manner. The headings must use the tag name Hn
(h1, h2, h3, h4, h5 and h6) and the pages must use the tag name span.
Further on, each of these pages must have of these the class names:
page-normal, page-special or page-front.
Please note, that this Table of Contents file cannot contain any
other tags (i.e. formatting tags), than those specified above. If
they do, you might experience loss of text or other unpredicted
behaviour.
Below is an example of a Table of Contents file:
Introducing the EasePublisher Interface 121
<?xml version="1.0" encoding="windows-1252"?>
<!DOCTYPE html PUBLIC "-//W3C//DTD XHTML 1.0
Transitional//EN"
"http://www.w3.org/TR/xhtml1/DTD/xhtml1-transitional
.dtd">
<html xmlns="http://www.w3.org/1999/xhtml">
<head>
<title>Table of Contents</title>
<meta http-equiv="Content-type"
content="text/html; charset=windows-1252" />
</head>
<body>
<h1>Chapter 1</h1>
<span class="page-normal">1</span>
<h1>Chapter 2</h1>
<span class="page-normal">2</span>
<span class="page-normal">3</span>
<span class="page-normal">4</span>
<span class="page-normal">5</span>
<h2>Chapter 2.1</h2>
<h2>Chapter 2.2</h2>
<span class="page-normal">6</span>
<span class="page-normal">7</span>
<span class="page-normal">8</span>
</body>
</html>
This Table of Contents file can then imported by EasePublisher by
using the "Import Table of Contents" feature. EasePublisher scans
the file and searches for these headings and pages, and then imports
this Table of Contents structure into the book.
Please note that it will not import the actual source file, it will only
create a new structure in the book, based upon what it finds in the file.
All new headings after the import will be "audioNcc" headings, i.e.
headings with no source document.
122 Introducing the EasePublisher Interface
4.15 Load book in QA player
It is possible to preview the current project in a specified software
player the "Load book in QA player..." dialog. This is accessed by
selecting Tools>Load book in QA player or by pressing <Ctrl + E>.
By default, EasyReader is the selected playback device but the user
may also specify an alternative player if required by selecting another
player in the "Folders" category of "General options" <Ctrl + G>.
This additional player can then be selected from the drop down list
"Use this player".
When the "Load book in QA player..." dialog is launched, the
producer can choose to load the currently opened book/project in the
player or it is possible to browse for another book/project to load by
selecting either "Load current book in the player" or "Browse for
book to load in the player" and selecting the folder containing the
relevant files.
To launch the book in your chosen player, select "OK".
Introducing the EasePublisher Interface 123
4.16 Go to...
The "Go to..." dialog allows the producer to quickly navigate to a
specific section in the project. It can be accessed by selecting
Navigate>Go to event... <F3>, Navigate>Go to heading time... <Ctrl +
F3>, or Navigate>Go to book time... <Ctrl + Shift + F3>.
The producer has three modes of navigation:
"Go to event"
Pressing <F3> launches the "Go to..." dialog with the "Go to event"
radio button selected. The producer can then either enter a specific
event number or adjust the slider bar to reach a specific event. To go
to that position, press the "Navigate" button.
"Go to heading time"
Pressing <Ctrl + F3> launches the "Go to..." dialog with the "Go to
heading time" radio button selected. The producer can then either
enter a specific time or adjust the slider bar to reach a specific time
position in the current heading. To go to that position, press the
"Navigate" button.
"Go to book time"
Pressing <Ctrl + Shift + F3> launches the "Go to..." dialog with the "Go
to book time" radio button selected. The producer can then either
enter a specific time or adjust the slider bar to reach a specific time
position in the current book / project. To go to that position, press the
"Navigate" button.
124 Introducing the EasePublisher Interface
4.17 Markup definition
The "Markup Definition" (MDF) dialog defines the set of HTML/XML
tags that are used to apply structure to the content of a project's
source documents. It is effectively a set of rules that are applied to
your project's source documents so that simple navigation and audio
and text synchronization within the documents may be achieved and
the project's NCC file generated.
During the process of creating a new project from existing documents
using the "Create new project wizard", it is possible to select the
"Markup Definition" to use from the list box "MDF file:". It is also
possible to edit or import an existing "Markup Definition", or create
a new one. If you have chosen to run the AutoMarkup, it is generally
suitable to use the default MDF setting as all text will be marked-up
appropriately by this.
Introducing the EasePublisher Interface 125
Selecting "Modify the current MDF file" will launch the "Markup
Definition Dialog":
The "Markup Definition Dialog" is only used when creating new
projects, but it is possible to edit the "Markup Definition" for a project
that has been created by selecting View>View MDF... from the top
menu. In this case, the import button is grayed out, as this button is
only used when analyzing documents while creating a new project.
Further more, it is only possible to create new MDF files when creating
new projects.
The "Markup Definition Dialog" allows you to modify existing tags,
new tags to be added or for others to be removed. It also contains
information relevant to the currently selected tag.
You can change the order of these items by pressing the "Move up"
and "Move down" buttons.
Please note that the order of these MDF items are very important as
each MDF rule is applyed in this order. The MDF items at the top will
be handled first and the item at the bottom will be handled last.
At the bottom of this dialogue box, you can define how new elements
are created when EasePublisher adds new elements around the text
nodes
126 Introducing the EasePublisher Interface
When adding a new MDF item, or when editing an existing one, this
dialogue box is shown:
By using this dialogue box, you control how your synchronization
points are created when new documents are added into your project.
• Element name
This is the name of the HTML tag.
• Attribute name
This is the name if the attribute (e.g. "class").
• Attribute value
The name of the contents of the defined attribute name.
• Namespace
You may define a specific namespace for the interested tag item.
This is especially useful when you several namespaces are used
within the same source document. In those cases, a tag may
have different meanings, dependant on the specific tag's
namespace.
If you do not need this detailed information (e.g. when the source
document is only using one namespace), you can type in an
asterisk (*) in this text box. That means that any namespace is
allowed for this MDF rule.
• Add this item to the Table of Contents
By selecting this check box, a navigation point will be created in
the book's Table of Contents. If you choose to do this, then you
Introducing the EasePublisher Interface 127
also must define to which navigation list it will be added to.
Further more, if you choose "0 - Heading", then you must also
define the heading's indentation level and if you select "3 Footnote", then you also have to define the name of a special
attribute. That attribute name must be typed into the "Next item"
text box and the attribute's value must contain the ID of the
footnote's body text element. See the example below:
Foot note reference:
<span class="noteref"
bodyref="fn_0002">3</span>
Foot note body text:
<span class="notebody"
id="fn_0002">Note 3: This is the body text of foot note
3.</span>
By using this example, the "Next item" text box must contain the
text "bodyref".
• New SMIL
This check box will force EasePublisher to create a new SMIL file
when the specified element occurs.
• Skippable
This is where you tell EasePublisher if the specified element is a
skippable element or not.
• Recursive
This check box tells EasePublisher not to synchronise on the
element itself. Instead, it will synchonise on the element's childs
and create new elements for any found text nodes. E.g. a sidebar
element might contain a couple of span-tags and text nodes, and
all these will be synchonised automatically.
• Description
Free text to explain your specific MDF item.
Why do we need to go into the MDF dialog when a project is loaded
into EasePublisher? This is because "Markup Definition" information is
used when analyzing the document when exiting the HTML Editor. It
analyses all tags in the document and only those tags in the document
that match the information in the "Markup Definition" file, are
synchronised into the SMIL. So, if adding a new tag in the HTML
Editor, EasePublisher will only create a SMIL text event if that tag and
class name is in the MDF.
128 Introducing the EasePublisher Interface
4.18 Book project information
The "Book project information" dialog is launched by selecting
Project>Book project information...
The dialog contains specific information about the project and the
individual files that it contains.
1. "Book path" - This is the location of the current book / project.
2. "Book title" - This is the title of the book / project.
Introducing the EasePublisher Interface 129
3. "Total time" - This is the total playback time of the book / project.
4. "Total size" - This is the file size of the book / project.
5. File type tabs - The "Referenced files" are those file referenced
within the SMIL. the "Other files" are other files that are contained in
the project but are not referenced in the SMIL.
6. List of files - This is a list of the files in the book / project. This list
contains useful information such as the file name, type of file, date is
was created and the file size.
7. "View" - This allows the selected file to be viewed.
not be viewed, this button is disabled.
If the file can
8. "Play" - This allows the selected file to be played (If it is an audio
file). If the file can not be played, this button is disabled.
4.19 Multi Volume Announcements
The "Multi Volume Announcements" dialog allows the producer to
define what is going to be announced in the DTB player when the
listener navigates outside the scope of the current volume. An audio
clip could say "Please insert volume number 3.". This dialog is
accessed by selecting Project>Multi Volume Announcements from
the top menu.
130 Introducing the EasePublisher Interface
1. Add an audio clip. This one lets you import a WAVE file and use the
whole or part of it as a new announcement. Added announcements
are always inserted last in the list.
2. Remove the select audio clip.
3. Adjust current audio clip. This opens up the "Adjust announcement
audio clip" dialog. Here, you can define where the current audio clip
starts and ends. See further down for more information.
4. Move selected audio clip up in the list.
5. Move selected audio clip down in the list.
6. Listen to the selected audio clip
7. Volume text. This text is used when generating the announcements
headings in each volume. The text in this box will be displayed when
the DTB user is navigating outside the scope of the current volume.
Please note that the "%"-sign represents the volume number and must
be present in the text.
Adjust announcement audio clip
This dialog is used when adding new audio clips to the
announcements list, or when adjusting an existing audio clip.
1. These graphical bars represents the current audio clip's start and
end positions within the file. These are a nice help to graphically show
you where your original audio clips were before the dialog was
opened.
2. Move the current view to the beginning of the file.
Introducing the EasePublisher Interface 131
3. Move the current view one step backward.
4. Move the current view one step forward.
5. Move the current view to the end of the file.
6. Play the current view, or the current selection.
7. Zoom in
8. Zoom out.
9. Audio selection. Used when using "zoom in", and when defining a
new audio clip.
10. This "Apply" button is enabled when you have a selection in the
audio display. When pressing "Apply", the selected audio will be the
audio clip's new start and end positions.
4.20 Remote Control Options
To view the "Remote Control Options" dialog, select
Options>Remote communication>Remote options from the top
menu.
1. "Speed": Current speed (baud rate)
2. "Port": Communications port number
3. "Data Bits": Data bits value
132 Introducing the EasePublisher Interface
4. "Parity": Parity value
5. "Stop Bits": Stop bits
6. "Flow Control": Current hardware handshaking protocol
7. "Check these settings": Press the "Check these settings" button to
test the communication with the remote control unit.
8. "Operating mode": The operating mode setting determines if the
remote is allowed to "send and receive", "send only", or "receive only".
9. "Send welcome message": If this check box is ticked, EasePublisher
will send a "welcome" text to the remote control unit when the
communication opens.
10. "Send goodbye message": If this check box is ticked, EasePublisher
will send a "goodbye" text to the remote control unit when the
communication closes.
11. "Do not send NCC text, only numeric values": If this check box is ticked,
EasePublisher will not send any text to the remote control unit. This is
because Plextor's RE-11's display cannot display characters other
than plain ASCII. EasePublisher will instead send the NCC information
as numbers.
133
CHAPT
ER
5
Commands, GUI icons and Keyboard Hotkeys
This section lists the controls available in the main screen and the
HTML Editor.
5.1 Controls for use in the Main Screen
The Controls are listed in their respective locations within the
EasePublisher menu structure.
5.1.1 File menu
Function
GUI Icon
Create new
project
Open
project
Close
Project
Menu
Acces
s
Y
Hotkey
Description
Ctrl + N
Create a new
project
Open an existing
project
Close the opened
project and switch
to the start screen
Extracts and
opens a sample
project. If sample
project has
already been
extracted, it will
be opened as a
normal project
instead
The four most
recently opened
projects are listed
to allow quick
access
Y
Ctrl + O
-
Y
-
Open
sample
project
-
Y
Ctrl +
Shift + O
Recently
opened list
-
Y
Alt + F
and then
a
number
(1-4)
134 Commands, GUI icons and Keyboard Hotkeys
Exit
-
5.1.2 Edit menu
Function
GUI Icon
Undo
Y
Alt + F4
Close
EasePublisher
Menu
Acce
ss
Y
Hotkey
Description
Ctrl + Z
Undo the last edit
command (all
SMIL edit
commands, insert
wave, recording,
etc.).
The undo list is
cleared on
cleanup audio,
NCC edit,
resampling of
audio, when
entering HTML
Edit, TTS
Encoding, etc
Reverts to the last
backup copy
made. A backup
copy can be
automatically
created when the
project is opened,
depending on the
setting.
Create a backup
of the projects
current state.
Undo
session
-
Y
Ctrl +
Shift + Z
Make
session
backup
-
Y
-
Commands, GUI icons and Keyboard Hotkeys 135
Cut
Y
Ctrl + X
Copy
Y
Ctrl + C
Paste
Y
Ctrl + V
Y
Ctrl +
Shift + C
Delete
Y
Delete
Delete all
audio in
SMIL
Y
Ctrl +
Delete
Delete all
audio in
SMIL from
current
position
Y
Ctrl +
Shift +
Delete
External
Wave form
Editor
Y
-
Copy to file
-
Cut the selected
audio from the
project and place
it on the clipboard.
Copy the selected
audio from the
project and place
it on the clipboard.
Paste the audio
from the clipboard
to the current
position.
Create a WAVE
file of the selected
audio.
Delete the
selected audio or
text (depending
on current mode)
from the project
Delete all audio
references within
the current
section
Delete all audio
references within
the current
section from the
current position
until end of file
Launches the
external wave
editor specified by
the user
136 Commands, GUI icons and Keyboard Hotkeys
Insert audio
marker
-
Y
Ctrl + S
Remove
audio
marker(s)
-
Y
Ctrl + J
Insert new
page(s)
Y
Ctrl + 1
Insert new
footnote
Y
Ctrl + 2
Insert new
sidebar
Y
Ctrl + 3
Insert new
producer
note
Y
Ctrl + 4
Mark as
page
Y
Ctrl +
Shift + 1
Insert a new audio
marker at the
current position in
the audio, i.e. the
current audio
phrase is split into
two phrases.
Remove the
current audio
marker, i.e. the
current audio
phrase is joined
with the previous
one.
Add one or more
pages of specified
type at the current
position.
Insert a skippable
footnote into the
source document
with a
superscripted
number and
footnote body text
at the end of the
document.
Insert a skippable
sidebar into the
source document.
Insert a skippable
producer note into
the source
document.
Marks the current
synchronisation
point as a page
reference.
Commands, GUI icons and Keyboard Hotkeys 137
Mark as
footnote
Y
Ctrl +
Shift + 2
Mark as
sidebar
Y
Ctrl +
Shift + 3
Mark as
producer
note
Y
Ctrl +
Shift + 4
Remove
skippable
content
-
Y
-
Make
current as
'heading
navigation'
point
-
Y
Ctrl +
Shift + S
Create new
heading(s)
in Table of
Contents
-
Y
Ctrl +
Shift + N
Y
Ctrl +
Return
Move next
available
text event to
current
position
Marks the current
synchronisation
point as a
footnote reference
and displays a
dialog box where
the author types
in the foot note’s
body text
Marks the current
synchronisation
point as a sidebar.
Marks the current
synchronisation
point as a
producer note.
Removes a
skippable page,
footnote, sidebar
or producers note
from the current
event if present.
Adds a new
heading
navigation point to
the 'Table of
Contents' at the
current position.
Adds one or more
headings in the
'Table of
Contents' and
optionally creates
an empty HTML
file for each new
heading.
Synchronise
existing text with
existing audio
138 Commands, GUI icons and Keyboard Hotkeys
Move
previous
available
text event to
current
position
Synchroniz
ation order
Y
Ctrl +
Shift +
Return
Synchronise
existing text with
existing audio
Y
-
Insert
popup
image
Y
-
Insert
producer
stop
Y
-
Change order of
synchronisation
points within a
document. Any
synchronised
audio will be
moved as well.
Inserts a popup
image at the
current
synchronized text
event.
Inserts a producer
stop at the current
text event.
-
5.1.3 View menu
Function
GUI Icon
HTML Edit
Open Table
of Contents
view
Close Table
of Contents
view
-
Menu
Acce
ss
Y
Hotkey
F6
Y
F4
Y
F4
Description
Open the HTML
Editor
Display the Table
of Contents as a
floating window
Close the floating
window and dock
the Table of
Contents list to
the toolbar
Commands, GUI icons and Keyboard Hotkeys 139
Go to NCC
selector in
the
“compact
navigator”
or Table of
Contents
view
Go to Page
selector in
the
“compact
navigator”
or Table of
Contents
view
Go to
Optional
Contents
view in
Table of
Contents
view
Jump
between
floating
windows
-
N
Ctrl + F4
Sets focus in the
docked or floating
window of the
table of contents
with focus on the
NCC selector.
-
N
Shift +
F4
Sets focus in the
docked or floating
window of the
table of contents
with focus on the
page selector.
-
N
Ctrl +
Shift +
F4
If the Table of
Contents view is
open, then the
focus is set on the
Optional Contents
view.
-
N
Ctrl + F6
Jump
between
floating
windows (in
reverse
order)
View SMIL
information
-
N
Ctrl +
Shift +
F6
-
Y
Ctrl + I
If any floating
window is shown,
this command
jumps between
them.
If any floating
window is shown,
this command
jumps between
them in reverse
order.
Displays the
floating window
containing
information about
the current SMIL
event.
140 Commands, GUI icons and Keyboard Hotkeys
View SMIL
links
-
Y
-
View MDF
-
Y
-
View source
of
NCC.HTML
View source
of
synchronise
d HTML
document
View source
of current
SMIL
View source
of
Navigation
NCX
View source
of OPF file
-
Y
-
-
Y
-
-
Y
-
-
Y
-
-
Y
-
Y
-
Y
-
Display a floating
toolbar with wave
display tools
Y
-
Display a floating
window with a
peak meter
Open/close
Rollup
window
(recording)
Open/close
Rollup
window
(track)
Open/close
Rollup
window
(peak
meter)
Shows all SMIL
links
(synchronisation
points) in entire
project.
Displays the
information in the
Markup Definition
File (MDF)
Shows the HTML
source code for
NCC.HTML
Shows the HTML
source code for
current document
Shows the source
code for the
current SMIL file
Shows the source
code for the
current NCX file.
Show the source
code for the
current OPF file.
Display a floating
toolbar with
recording tools
Commands, GUI icons and Keyboard Hotkeys 141
Switch to
next peak
meter
(analogue,
peak, heart)
Adjust peak
meter's
minimum
dB value.
Document
properties
-
5.1.4 Navigate menu
Function
GUI Icon
Go to
previous
heading
Go to next
heading
Go to first
heading
Go to last
heading
Go to
previous
page break
N
-
Toggle between 3
different peak
meters
N
-
Y
-
Lets the user
define the
minimum dB
value of the peak
meters.
To view and set
certain properties
for the document.
Colour, picture,
title etc.
Menu
Acces
s
Y
Description
Ctrl +
Page
Up
Ctrl +
Page
Down
Navigate to
previous heading
regardless of level
Navigate to next
heading
regardless of level
Y
Ctrl +
Home
Navigate to first
heading
Y
Ctrl +
End
Navigates to last
heading
Y
Page
Up
Navigate to
previous page
regardless of type
(First set of
icons)
Y
(First set of
icons)
(First set of
icons)
(First set of
icons)
(Second set
of icons)
Hotkey
142 Commands, GUI icons and Keyboard Hotkeys
Go to next
page break
Go to first
page break
Go to last
page break
Y
Page
Down
Y
Home
Y
End
Navigate to last
page
Y
Ctrl +
Return
Synchronising
existing text
elements during
recording
Open a dialog box
where you can
type in the event
number to
navigate to.
Open a dialog box
where you can
navigate to a
specific time
position in the
current heading.
Open a dialog box
where you can
navigate to a
specific time
position in the
book.
Navigate to the
time position
where you were
the last time you
navigated from
the heading.
Navigates to the
position that the
user has set to
zero.
(Second set
of icons)
(Second set
of icons)
(Second set
of icons)
Synchronis
e text
Go to event
-
Y
F3
Go to
heading
time
-
Y
Ctrl + F3
Go to book
time
-
Y
Ctrl +
Shift +
F3
Go to last
known
position
Y
Ctrl +
Shift +
Home
Go to user
time zero
Y
Right
Ctrl +
Shift + 0
Navigate to next
page regardless
of type
Navigate to first
page
Commands, GUI icons and Keyboard Hotkeys 143
Reset user
time
Y
Right
Ctrl + 0
Go to first
SMIL event
Y
Alt +
Home
Go to last
SMIL event
Y
Alt +
End
Go to
previous
SMIL event
Y
Alt +
Left
Arrow
Go to next
SMIL event
Y
Alt +
Right
Arrow
Alt +
Page
Down
Skip one
track view
window
forward
-
N
Skip one
track view
window
backwards
-
N
Alt +
Page
Up
Play
Y
Stop
Y
Play
selection /
play event
Y
Spaceb
ar or F5
Spaceb
ar or F5
Shift +
Spaceb
ar
Resets the user
time counter to
zero at current
position. Can be
used in
conjunction with
"Replace to zero"
recording modes.
Navigate to the
first event in the
current SMIL file
Navigate to the
last event in the
current SMIL file
Navigate to the
previous event in
the current SMIL
file
Navigates to the
next event in the
current SMIL file
Jump to the next
section of the
wave form / track
view visible on
screen
Jump to the
previous section
of the wave form /
track view visible
on screen
Start the playback
Stop the playback
Play the current
selection or event
(if no selection is
made)
144 Commands, GUI icons and Keyboard Hotkeys
Rewind
Playback
Y
Fast
forward
playback
Y
Record
Y
5.1.5 Options menu
Function
GUI Icon
Switch
recording
modes
(Overwrite,
Insert and
Replace to
zero)
Phrase
detection
(on/off)
Menu
Acce
ss
Y
Y
Right
Ctrl +
Shift +
Spaceb
ar
Right
Ctrl +
Spaceb
ar
Right
Ctrl +
Insert
Or Ctrl +
F5
Rewind in the
current SMIL file
Hotkey
Description
Ctrl +
F11
F11
Fast forward in
the current SMIL
file.
Start recording.
Toggle between 3
recording modes.
Overwrite
behaves like an
analogue tape
recorder. Insert
moves all audio
that follows in that
heading forward.
Replace to zero
will replace all
audio between
two pointers.
Toggle phrase
detection on and
off
Commands, GUI icons and Keyboard Hotkeys 145
Voice
activation
(on/off)
Y
Shift +
F11
Audio
Calibration
Y
-
Windows
Volume /
Recording
Control
Remote
options
Y
-
-
Y
-
-
Y
-
General
options
Y
Ctrl + G
Display
options
Y
Ctrl + D
Recording
options
Y
Ctrl + R
Open /
close
communicat
ion
Toggle between
voice activation
on and off. If on,
the recording will
not start until
voice is detected.
Starts the
calibrator to
calibrate the
background noise
and DC offset
value.
Open standard
Windows volume /
recording control
Opens the
"Remote Options"
dialog.
Opens or closes
the
communication
with the remote
control unit.
Contains general
settings for;
Backup, Edit
mode, Playback,
External modules
and Mark-up.
Contains settings
for the visual
appearance of
Highlight, Wave
display and Peak
meter.
Contains settings
for Audio format,
Phrase detection
and Devices.
146 Commands, GUI icons and Keyboard Hotkeys
Build
options
Y
Ctrl + B
Audio
processing
options
Y
Ctrl + A
5.1.6 Project menu
Function
GUI Icon
Book project
information
Validate
project
Multi
Volume
Announcem
ents
View
validation
report
Build project
Menu
Acces
s
Y
Hotkey
-
Y
F8
-
Y
-
-
Y
Ctrl + F8
Y
F9
Contains settings
for Validation,
Clean-up,
Encoding and
Folders.
Contains settings
for all
audio-processing
functions.
Description
System
information about
the project.
Validate the
project against
DAISY 2.02
specification and
integrity issues
Opens the "Multi
Volume
Announcements"
dialog.
Displays the
validation report.
If no error
occurred no report
will be available.
Starts the build
process
Commands, GUI icons and Keyboard Hotkeys 147
Import audio
files
Import
document(s)
Import Table
of Contens
Import
headings
from other
book
Export
Master SMIL
Export
headings
Y
-
Y
-
Y
-
Y
-
Y
-
Y
-
(Select from
pop-up that
appears)
(Select from
pop-up that
appears)
(Select from
pop-up that
appears)
(Select from
pop-up that
appears)
(Select from
pop-up that
appears)
(Select from
pop-up that
appears)
Opens the Import
dialog for one or
more audio files.
The audio format
can be altered as
part of the import
process.
Opens the Import
dialog for one or
more documents.
Opens the Import
dialog for a HTML
document that
contains "Table of
Contents"
information.
Opens the Import
dialog for
importing one or
more headings
from other DAISY
2.02 materials.
Create the Master
SMIL file.
Export one or
more headings
into a new project.
148 Commands, GUI icons and Keyboard Hotkeys
5.1.7 Tools menu
Function
GUI Icon
Menu
Acce
ss
Y
Hotkey
User
Authorizatio
n Key
-
Cleanup
audio
(current
heading)
Cleanup
audio
(whole
project)
Cleanup
unused
audio files
-
Y
Ctrl + F7
-
Y
F7
-
Y
Shift +
F7
Cleanup
extra audio
markers
(one audio
event per
text in
current
heading)
Cleanup
extra audio
markers
(one audio
event per
text in the
whole
project)
-
Y
-
-
Y
-
-
Description
To configure
settings for
protected (IPP)
documents.
Rebuilds the
audio file for the
current heading if
necessary.
Rebuilds the
audio file for the
whole project if
necessary.
All unused audio
files will be
removed from the
directory of the
project.
Modifies the SMIL
so that each text
reference will only
have one single
audio event for
the current
heading.
Modifies the SMIL
so that each text
reference will only
have one single
audio event for
the whole project.
Commands, GUI icons and Keyboard Hotkeys 149
Cleanup
extra audio
markers
(remove
markers in
short events
in the
current
heading).
Cleanup
extra audio
markers
(remove
markers in
short events
in the whole
project).
-
Y
-
Y
-
TTS
Encode
(current
text)
Y
-
TTS
Encode
(current
heading)
Y
Ctrl +
Shift + T
TTS
Encode
(whole
project)
Y
Ctrl + T
TTS
settings
Y
-
-
Searches for
audio events in
the current
heading that are
shorter than the
defined length
and removes the
aligned audio
markers.
Searches for
audio events in
the whole project
that are shorter
than the defined
length and
removes the
aligned audio
markers.
Creates an audio
file and
synchronises it
with the current
text event through
the use of a
synthetic voice.
Creates audio
files and
synchronises with
the text of the
current heading
through the use of
a synthetic voice.
Generates audio
files by speech
synthesis and
synchronises with
the text of the
entire project.
Settings dialog for
the TTS Encoder
150 Commands, GUI icons and Keyboard Hotkeys
Audio
processing
(resample
audio)
Audio
processing
(insert
silence)
Audio
processing
(amplify)
Audio
processing
(normalize)
Audio
processing
(fade in)
Audio
processing
(fade out)
Audio
processing
(filter)
Load book
in QA
player
Y
-
Y
-
Y
-
Amplify currently
selected audio.
Y
-
Normalise
currently selected
audio.
Y
-
Fade in currently
selected audio.
Y
-
Fade out currently
selected audio.
Y
-
Filter currently
selected audio.
Y
Ctrl + E
Loads the a book
into EasyReader
or any other
defined player.
(Select from
pop-up that
appears)
(Select from
pop-up that
appears)
(Select from
pop-up that
appears)
(Select from
pop-up that
appears)
(Select from
pop-up that
appears)
(Select from
pop-up that
appears)
(Select from
pop-up that
appears)
Changes format
of the audio in
one or more
headings. Both
sample rate and
mono/stereo can
be set.
Insert silence at
current position.
Commands, GUI icons and Keyboard Hotkeys 151
5.1.8 Help menu
Function
GUI Icon
Help
-
About
-
5.1.9 Wave Form Area
Function
GUI Icon
Make
selection in
the audio
-
Select
whole audio
event(s)
-
Menu
Acce
ss
Y
Y
Menu
Acce
ss
N
N
Hotkey
F1
F12
Description
Opens the help
file.
Displays a dialog
containing
information about
the installed
version
EasePublisher.
Hotkey
Description
Shift +
Left/Righ
t Arrows
Or
Shift +
Left
mouse
click
Alt +
Shift +
Left/Righ
t Arrows
Or
Ctrl +
Left
mouse
move
(left or
right)
Select a section of
the audio for
editing.
Select audio
events for editing.
152 Commands, GUI icons and Keyboard Hotkeys
Select all
audio in
current
heading
Make
selection
during
playback
Select
audio from
position to
beginning of
heading
Select
audio from
position to
end of
heading
Set current
time
position
-
N
Ctrl + A
Selects all audio
events in the
current heading.
-
N
Shift
Selecting the
audio for editing
during playback.
-
N
Shift +
Alt +
Home
-
N
Shift +
Alt +
End
-
N
Left
mouse
click
Move in
time (+/- 3
pixels)
-
N
Left /
Right
arrow
Move in
time (+/- 20
pixels)
-
N
Ctrl +
Left /
Right
arrow
Ctrl + Up
Arrow
Selects all audio
from the current
position to the
beginning of the
current heading.
Selects all audio
from the current
position to the end
of the current
heading.
Set the current
time position to
where you click
with the mouse.
Move backwards
or forwards in the
audio by small
steps.
Move backwards
or forwards in the
audio by large
steps.
Zoom into the
audio / waveform
display.
Zoom out of the
audio / waveform
display.
Zoom in
Y
Zoom out
Y
Ctrl +
Down
Arrow
Commands, GUI icons and Keyboard Hotkeys 153
Zoom to
normal (30
sec), or to
full length.
Y
Ctrl +
Shift +
Down
Arrow
Switch edit
mode
(before,
current,
current with
auto align,
after)
Y
Ctrl +
Shift +
F11
Display 30
seconds of audio /
waveform display,
or full length of
SMIL.
Determines the
behaviour of
“Move
next/previous
available text
event to current
position” and
“Paste”
commands.
5.2 Controls for use in the HTML Editor
Function
Font
GUI Icon
Menu
Acces
s
Y
Hotkey
Description
Ctrl +
Shift + F
Set font type
and size on
the selected
text
Align the
text to left
margin
Align the
text to
centre
Align the
text to right
margin
Increase the
indentation
level of the
text
Align left
Y
Ctrl + L
Align
centre
Y
Ctrl + E
Align right
Y
Ctrl + R
Indent
(increase)
Y
Ctrl + M
154 Commands, GUI icons and Keyboard Hotkeys
Indent
(decrease
)
Y
Ctrl +
Shift +
M
Superscri
pt
Y
Subscript
Y
Make
sentence
Y
Ctrl +
Num
Plus
key
Ctrl +
Num
Minus
key
F4
Unmark
sentence
-
Y
Ctrl +
F4
Auto-dete
ct
sentences
Y
Ctrl +
Return
Save
Y
Ctrl + S
Decrease
the
indentation
level of the
text
Superscript
the selected
text
Subscript
the selected
text
Create a
marked up
sentence of
the currently
selected
text.
Removes
the current
synchronisat
ion point.
Run the
selected text
through
mark up
process. If
no selection
is made, the
whole
document
will be
processed.
Save the
changes
temporarily
in the HTML
Editor.
Commands, GUI icons and Keyboard Hotkeys 155
Insert new
heading
Y
Ctrl +
Shift +
N
Insert a new
heading in
the
document.
Mark the
current text
as a page
normal
Mark text
as page
break
(page-nor
mal)
Mark text
as page
break
(page-fron
t)
Mark text
as page
break
(page-spe
cial)
Mark text
as sidebar
-
Y
F6
-
Y
Shift +
F6
Mark the
current text
as a page
front
-
Y
Ctrl +
F6
Mark the
current text
as a page
special
-
Y
F7
Mark text
as
producer
note
-
Y
F8
Mark text
as foot
note
reference
-
Y
F9
Y
Ctrl +
Shift +
Insert
-
Mark the
current text
as a sidebar
Mark the
current text
as a
producer
note.
Mark the
current text
as a foot
note
reference.
Insert image
in document
Insert
image
Image
alt-text
-
Y
Set the
image's alt
text
attribute.
156 Commands, GUI icons and Keyboard Hotkeys
Hyperlink
Y
Ctrl + K
Bold
N
Ctrl + B
Italic
N
Ctrl + I
Underline
N
Ctrl + U
Undo to
saved
-
Y
Ctrl + Z
Undo all in
HTML Edit
mode
-
Y
Ctrl +
Shift + Z
Cut
-
Y
Ctrl + X
Copy
-
Y
Ctrl + C
Create a
hyperlink
Set current
text as Bold
Set current
text as Italic
Set current
text as
Underlined
Undo to
previously
saved
document.
Undo all
changes
made since
entering
HTML Edit
mode
Cuts the
selected text
from the
project and
puts it on
the
Windows
clipboard
Copies the
selected text
from the
project and
puts it on
the
Windows
clipboard
Commands, GUI icons and Keyboard Hotkeys 157
Paste
-
Y
Ctrl + V
Pastes the
content from
the
Windows
clipboard to
the current
position
Normal
Delete
behaviour
Delete
one
character
to the right
Delete
one
character
to the left
Delete
one word
to the left
-
Y
Delete
-
N
Backsp
ace
Normal
Backspace
behaviour
-
N
Ctrl +
Backsp
ace
Delete
one word
to the right
Make
selection
-
N
Ctrl +
Delete
-
N
Make
selection
of words
-
N
Make
selection
to the end
of the line
-
N
Shift +
Left/Rig
ht
arrows
Ctrl +
Shift +
Left/Rig
ht
arrows
Shift +
End
Normal Ctrl
+
Backspace
behaviour
Normal Ctrl
+ Delete
behaviour
Select text
for editing
Select entire
words for
editing
Select the
remaining
words and
text on the
line
158 Commands, GUI icons and Keyboard Hotkeys
Make
selection
to the
beginning
of the line
Make
selection
line by line
-
N
Shift +
Home
-
N
Make
selection
paragraph
by
paragraph
Make
selection
screen by
screen
-
N
-
N
Select all
text
-
N
Shift +
Up/Dow
n
arrows
Ctrl +
Shift +
Up/Dow
n
arrows
Ctrl +
Shift +
Page
Up/Dow
n
Ctrl + A
Play /
Stop
Go to first
SMIL
event
Y
F5
Y
Alt +
Home
Go to last
SMIL
event
Y
Alt +
End
Select the
preceding
words and
text on the
line
Select entire
lines for
editing
Select entire
paragraphs
for editing
Select all
text on view
for editing
Select the
entire
document
text for
editing
Start or stop
the playback
Navigate to
the first
event in the
current
SMIL file
Navigate to
the last
event in the
current
SMIL file
Commands, GUI icons and Keyboard Hotkeys 159
Go to
previous
SMIL
event
Y
Alt +
Left
Arrow
Go to next
SMIL
event
Y
Alt +
Right
Arrow
Save
-
Y
Ctrl + S
Exit
-
Y
Alt + F4
Y
-
Y
-
Y
-
View
source
-
View MDF
-
Document
properties
-
Navigate to
the previous
event in the
current
SMIL file
Navigate to
the next
event in the
current
SMIL file
Save the
source
document
temporarily
(used in the
Undo
feature).
Exit HTML
Edit mode
Opens the
HTML
source code
in the
Source View
dialog.
View the
Markup
Definition
File of the
project
To view and
set certain
properties
for the
document.
Colour,
picture, title
etc.
160 Commands, GUI icons and Keyboard Hotkeys
Colour the
text
Y
F11
Apply
temporary
coloured
blocks to the
text in order
to see the
markup of
individual
text events.
Commands, GUI icons and Keyboard Hotkeys 161
5.3 Remote control unit commands and usage
EasePublisher can now be controlled by Plextor’s RE-11 remote
control (or any other device that supports the same communication
protocol). To use the remote control, please first attach the remote
control unit properly to the computer's serial port and turn on the unit's
power. Next, check your remote settings by selecting
Options>Remote communication>Remote Options from the top
menu. When these settings are OK, you can turn on or off the
communication with the remote control by selecting Options>Remote
communication>Open/Close communication.
Here is a short description of the RE-11's layout and how it works
together with EasePublisher:
1. Record
2. Stop
3. Play
4. Rewind on press and stop on release.
162 Commands, GUI icons and Keyboard Hotkeys
5. Skip to the beginning of the current SMIL file.
6. Fast forward on press and stop on release.
7. Skip to the end of the current SMIL file.
8. Function keys (F1 to F7)
• F1 - Previous SMIL event
• F2 - Next SMIL event
• F3 - The "NEXT TEXT" command
• F4 – Phrase detection on/off toggle
• F5 – Zoom in
• F6 - Reset user time counter
• F7 - Switch the recording modes (Overwrite, insert, replace to zero)
9. Shift key. Used in combination with the other keys. See further
description below.
10. Done. Works as the default key (OK, Yes, etc) when message box is
displayed.
11. Jog control (counter clock-wise). Moves the time position backwards in
small steps – same as pressing left arrow in the track view.
12. Shuttle control (counter clock-wise). Rewind playback in three different
speeds (normal, double and three times speed) using pitch.
13. Jog control (clock-wise). Moves the time position forwards in small
steps – same as pressing right arrow in the track view.
14. Shuttle control (counter clock-wise). Fast forward playback in three
different speeds (normal, double and three times speed) by using
pitch.
When pressing the shift key (number 9 on the picture above) and
another key at the same time, the user has access to more functions
(see the list below).
1. No function
2. No function
Commands, GUI icons and Keyboard Hotkeys 163
3. Rewind playback in normal playback speed.
4. No function
5. No function
6. No function
7. No function
8. Function keys (F1 to F7)
• F1 - Previous NCC item
• F2 - Next NCC item
• F3 - The "Move PREV TEXT" command
• F4 - Voice activation on/off toggle
• F5 - Zoom out
• F6 - Go to user time zero
• F7 - No function
9. This key.
10. Escape. Works as an Escape key when a message box is displayed.
11. Jog control (counter clock-wise). Moves the time position backwards in
larger steps – same as pressing Ctrl+left arrow in the track view.
12. Shuttle control (counter clock-wise). Rewind playback in three different
speeds (normal, double and three times speed) using ITC.
13. Jog control (clock-wise). Moves the time position forwards in larger
steps – same as pressing Ctrl+right arrow in the track view.
14. Shuttle control (counter clock-wise). Fast forward playback in three
different speeds (normal, double and three times speed) by using ITC.
Special message box behaviour
When EasePublisher displays a message box, that information is also
displayed in RE-11’s screen. If the message box contains Yes, No and
Cancel buttons, that will also be displayed in the RE-11’s screen. See
164 Commands, GUI icons and Keyboard Hotkeys
the list below of the message box behaviour of the above mentioned
button example:
• DONE (button 10). Acts as if pressing <Enter> on the keyboard and
will press the default button (usually the "OK" or "Yes" button).
• Shift + DONE (buttons 9 and 10). Acts as if pressing <Esc> on the
keyboard and will cancel the message box.
• Yes (button F1).
Activates the “Yes” button
• No (button F2).
Activates the “No” button
• Cancel (button F3). Activates the “Cancel” button
165
CHAPT
ER
6
How to guides...
This section contains a collection of guides to commonly used
functions in EasePublisher. It is recommended that first time users of
EasePublisher read through these guides in order to get the most out
of the features that EasePublisher provides.
6.1 Creating a new project
EasePublisher offers three alternative methods of creating a new
project:
• Simple project
• From documents
• From audio files
6.1.1 Creating a 'Simple Project'
The "Simple project" option allows the creation of a project without
any pre-prepared text or pre-recorded audio files. When you create a
Simple project, EasePublisher will automatically generate a project
that has only one structure element - the title. Further structure, text
and audio can then be added to the production. The idea of the
Simple project is to effectively give the producer a clean "canvas" to
create the text and audio content directly in EasePublisher.
166 How to guides...
1. Launch EasePublisher and from the main screen, click on "Simple
project".
Alternatively, click on "Create a new project" and select "Simple"
from the project wizard that appears.
How to guides... 167
2. On the next screen, you will be asked to give a title to your project.
Enter the title of your project. You will notice that a destination folder
is automatically created based on the name of your title. To select
another destination, press "Select folder" and choose another
location. Please note that no folder with the same name as the title will
be created automatically when another location is selected.
When you have done this, click "Next".
168 How to guides...
3. If the project is to be a full text and audio production, the project is
now ready to have audio added by importing TTS encoding or
recording. Text can be added by importing or by entering directly into
the HTML Editor <F6>. If the project is to remain as a TOC-only
(Audio only) production, further structure can be added (New headings
etc.) using the "Table of Contents" view.
6.1.2 Creating a project 'From documents'
The "From documents" option can be used to create a project if the
producer has the source text in a compatible text format (.html or .txt).
A simple to use "Wizard" analyses the files and "marks-up" the
document based on recognition of default or user defined characters.
These characters are typically the punctuation marks and similar
characters after which new navigational points should be added. The
structure of the book is extracted from the source documents. The
result is a structured project without audio files.
How to guides... 169
1. Launch EasePublisher and from the main screen, click on "From
documents".
Alternatively, click on "Create a new project" and select "Create
from documents" from the project wizard that appears.
170 How to guides...
2. On the next screen, you will be asked to give a title to your project.
Enter the title of your project. You will notice that a destination folder
is automatically created based on the name of your title. To select
another destination, press "Select folder" and choose another
location. Please note that no folder with the same name as the title will
be created automatically when another location is selected.
When you have done this, click "Next".
How to guides... 171
3. Next you will be asked to select the document(s) that you would
like to use to create your DAISY project.
Click on the "Add one or more files to the list" icon and
select the file(s) that you wish to use in your production.
If you need to remove a file, click on the "Remove the
selected file from the list" icon.
If you need to view or change the code page of the selected
file, click on the "View the selected file in the document preview
window" icon.
The order that the documents are presented in the list is the
order that the documents will appear in the project. To alter the order,
click on the "Move the selected file up the list" button to move the
file up or "Move the selected file down the list" to move the file
down.
172 How to guides...
When you import text documents into EasePublisher, they will be
converted to UTF-8. This is because EasePublisher is using UTF-8 as
the text encoding when working with you project.
Please note that you can "convert back" to your local code page
(e.g. windows-1252) if necessary.
When a new document is added to the list, EasePublisher tries to
automatically detect the document's code page. It it is not using UTF-8,
then EasePublisher needs some input from the user and this
"Document Preview" window is displayed:
In this dialogue box, you can modify the detected code page. In some
cases (especially if the text is really short), incorrect code page is
detected and the user have to manually select the correct code page.
This is done by selecting the proper code page in the drop down list
called "Source document's code page". When you select a new
code page in the list, EasePublisher temporarily converts the text and
outputs it to the preview window. In there, you can see the result after
How to guides... 173
the UTF-8 conversion. If any characters are displayed incorrectly, then
you probably have to choose another code page.
By using the "Set detected code page" button, the detected code page
is automatically selected in the code page drop down list.
If you need to view the selected file, click on the "View the
selected file in a dedicated viewer" icon.
Press the "OK" button when you are satisfied with the selected code
page.
Now, you may add more documents to your import list.
When you have done this, click "Next" to proceed to the next stage.
5. At the next stage, you are asked if you would like EasePublisher to
automatically mark-up the text in the document with logical breaks
(Such as new sentences etc.) To enable this, ensure that the check
box is selected next to the file(s) that you wish to mark-up.
174 How to guides...
Select the proper "Markup Definition File" in the "MDF File" drop
down list. The MDF file defines the set of HTML tags that are used to
apply structure to the content of a project's source documents. It is
effectively a set of rules that are applied to your project's source
documents so that simple navigation and audio and text
synchronization within the documents may be achieved and the
project's navigation file is generated by using this MDF file.
You can also choose if a new heading is created for each document by
selecting the check box "Create a new heading for each document"
and if you wish to import any meta data contained within the
documents into the project by selecting "Import meta data
information from the documents".
If you want to preview the result of the mark-up, click on the "Preview
sentences" button to view the "Preview output" window.
A different coloured block will highlight each text event. If you would
like to specify different characters upon which to break text events,
close the preview window by clicking "Exit" and the click on
"Options" in the "Create New Project Wizard" window and alter the
"Markup Detection Settings" here. Many "General options" can be
How to guides... 175
specified within this dialog. A full overview of these functions is
detailed in the section - "General Options".
When you have altered the "Markup Detection Settings", preview
the mark-up again by clicking on "Preview sentences".
Note: You can fine-tune your mark-up in EasePublisher later on by
manually splitting and joining text events if the auto-mark-up does not
achieve the desired results.
6. To finalise, press "Generate".
opened in the main screen.
You will now see the project
7. If the project is to be a full text and audio production, the project is
now ready to have audio added by importing TTS encoding or
recording. Further text can be added by importing or by entering
directly into the HTML Editor <F6>. Further structure can be added
(New headings etc.) using the "Table of Contents" view.
6.1.3 Creating a project 'From Audio Files'
The "From audio files" option allows the creation of a project from
pre-recorded audio files (.wav or .mp3). A simple to use "Wizard"
guides the user through the process. During the project generation it is
176 How to guides...
possible to convert one or more of the selected audio files into an
alternative format. This conversion includes re-sampling and decoding
of encoded material into PCM format. Use of phrase detection to index
the audio, i.e. break it up into navigable segments can also be applied
at this point. The result is a project with the title as a structured
element together with indexed audio if phrase detection was used.
Further structuring, the addition of text and importing or recording of
audio can then be added to the project.
1. Launch EasePublisher and from the main screen, click on "From
audio file(s)".
How to guides... 177
Alternatively, click on "Create a new project" and select "Create
from audio files" from the project wizard that appears.
178 How to guides...
2. On the next screen, you will be asked to give a title to your project.
Enter the title of your project. You will notice that a destination folder
is automatically created based on the name of your title. To select
another destination, press "Select folder" and choose another
location. Please note that no folder with the same name as the title will
be created automatically when another location is selected. If the
project should be generated in another character set then the default
language used by the computer, check the “Set character set
manually” check box and select from the drop down list box. Please
note this option should be handled with care since it might give an
unwanted effect text content within the project. When you have done
this, click "Next".
How to guides... 179
3. On the next screen you will be asked to add one or more audio
files that you wish to use to create the project.
Click on the "Add one or more files to the list" icon and
select the audio file(s) that you wish to use in your production.
If you need to remove a file, click on the "Remove the
selected file from the list" icon.
The order that the audio files are presented in the list is the
order that they will appear in the project. To alter the order, click on
the "Move the selected file up the list" button to move the file up or
"Move the selected file down the list" to move the file down. When
you have done this, click "Generate".
4. The "Import audio" window will now appear:
180 How to guides...
1.
Add audio files to the import list.
2.
Remove selected audio file from the import list.
3.
Audio file import settings of the selected audio file.
4.
Current headings audio format.
5.
Audio file name.
6.
Audio file's length expressed in time and size.
7. Format of original audio file.
8. Format audio file to be converted to (if required).
9. Position where the file will be imported.
How to guides... 181
10.
Stop playback of selected audio file.
11.
Playback the selected audio file.
12.
Playback position slider bar.
13.
Audio file location.
14.
Total running time and file size of selected audio file.
15.
Import the audio files into the project.
16.
Cancel the import process.
17.
Open the EasePublisher help file.
18.
Choose if phrase detection is to be applied during the import process.
19.
Alter phrase detection settings.
At this stage, it is possible to add further audio files or remove from the
import process. There are also a number of other settings that can
be made. If the user needs to change the format of the audio file that
is to be imported, this can be done by selecting the required audio
format from the drop down list that appears beneath "Out format".
Please note, any alterations to an audio file can have an unwanted
effect on the audio quality. If the format is changed while importing
please make sure the quality of the source audio files are as good as
possible. The user can also specify the position where the audio file
will be imported to in the project. Audio files can be previewed using
the playback controls and the user can also choose if "phrase
detection" is to be applied and alter the phrase detection settings
accordingly.
182 How to guides...
5. To complete the import process, select "Start import audio" and
the audio files will be imported into the project.
6. If the project is to be a full text and audio production, the project is
now ready to have text added by importing or by entering directly into
the HTML Editor <F6>. If the project is to remain as a TOC-only
(Audio only) production, further structure can be added (New headings
etc.) using the "Table of Contents" view.
6.2 Adding audio to a project
Audio can be added to the project by recording live audio directly into
the project, importing existing digital recordings, or generating a
synthesised voice using the Text-To-Speech Encoder.
How to guides... 183
6.2.1 Importing existing digital recordings
1. Open the project that you wish to import the audio files into.
184 How to guides...
2. Launch the "Import audio" window from the top menu
Project>Import>Import audio file(s).
1.
Add audio files to the import list.
2.
Remove selected audio file from the import list.
3.
Audio file import settings of the selected audio file.
4.
Current headings audio format.
5.
Audio file name.
6.
Audio file's length expressed in time and size.
7. Format of original audio file.
8. Format audio file to be converted to (if required).
How to guides... 185
9. Position where the file will be imported.
10.
Stop playback of selected audio file.
11.
Playback the selected audio file.
12.
Playback position slider bar.
13.
Audio file location.
14.
Total running time and file size of selected audio file.
15.
Import the audio files into the project.
16.
Cancel the import process.
17.
Open the EasePublisher help file.
18.
Choose if phrase detection is to be applied during the import process.
19.
Alter phrase detection settings.
The "Import audio" window allows the user to select one or more
audio files to add to the project. There are also a number of other
settings that can be made.
186 How to guides...
To select an audio file to add to the project, select the "Add audio
file(s) to the import list" icon at the top of the screen and choose an
audio file to add:
Select the required file(s) and click "Open". The selected file(s) will
be added to the "Import audio" list.
Please note that you can only import standard WAVE files in 16 bits
PCM and MP3 files.
If the user needs to change the format of the audio file that is to be
imported, the dialog called "Audio file import settings" must be
opened. This can be done in three ways: 1) by pressing the button
above the file list, 2) by double-clicking on audio file in the list, 3) or by
simply using the ENTER key on the keyboard.
How to guides... 187
If you need to adjust the output audio format, you select the required
audio format from the "New output format" listbox. Please note, any
alterations to an audio file can have an unwanted effect on the audio
quality. If the format is changed while importing please make sure the
source audio files are as good quality as possible.
The user can also specify the position where the audio file will be
imported to in the project and that can be done using the "Insert
position" listbox.
Press the OK button to apply these new settings to the audio import
list.
Audio files can be previewed using the playback controls and the user
can also choose if "phrase detection" is to be applied and alter the
phrase detection settings accordingly.
188 How to guides...
3. To complete the import process, select "Start import audio" and
the audio files will be imported into the project.
4. If the project is to be a full text and audio production, the text and
the audio can now be synchronised together.
6.2.2 Recording live audio
To record live audio, an appropriate sound recording device and
microphone needs to be connected to the sound card of the PC
workstation.
1. Before you start to record your audio, the audio needs to be
calibrated. We recommend calibrating the audio whenever you have
changed anything in the audio chain, e.g. new mixer settings or
changed settings on the audio amplifier.
Select Options>Audio Calibration… from the Toolbar, or
"Calibrate" from the Recording Rollup menu. The Audio Calibration
dialog will appear:
How to guides... 189
Step 1: The first step is to select the soundboard that the microphone
is connected to from a drop down list of all available devices. Ensure
that the microphone is switched on and that all other applications that
play or record audio are closed.
190 How to guides...
Step 2: The second step is to set the volume level for recording.
This is a manual process. Speak into the microphone and adjust the
recording volume level on your PC’s mixer and on any external audio
device until the peak meter displays the top levels in the yellow region.
How to guides... 191
Step 3: The third step is the audio calibration. EasePublisher
measures the background noise level and the DC offset of the
soundboard. Switch on the microphone and be silent for 10 seconds
during this process.
192 How to guides...
Step 4: The final step displays the results of the audio calibration.
Select "Finish" if you are satisfied with the results or "Back" if you
would like to run the calibration process again.
2. Now that the audio is calibrated, you may begin recording. First,
select the recording mode from the top menu Options>Recording
modes, or from the "Recording rollup", or by pressing <CTRL + F11>
to toggle through the options. Choose from:
• "Overwrite": Any new audio that is recorded will overwrite the
existing audio from that point onwards.
• "Insert": Any new audio that is recorded will be inserted at that
point, without overwriting any of the existing audio.
• "Replace to zero": This recording mode is used together with
the user time counter. After a mistake, the narrator presses the
'Reset user time counter to zero' button and rewinds to a place
before the start of the mistake. The narrator can then make a
'punch-in' recording to replace what is between the start of the
retake and user time zero. It does not matter if the new recording
contains more or less audio than the mistake - it will always
replace everything between the start of the retake and user time
zero.
How to guides... 193
3. Next, select if you want to use voice activation to begin recording.
If this setting is chosen, pressing record will not begin recording until
an input is heard (i.e. the narrator begins speaking). This is selected
mode from the top menu Options>Voice activation, or from the
"Recording rollup", or by pressing <Shift + F11> to toggle on or off.
4. To begin recording, press the "Record" button in the lower toolbar
or press <Right CTRL + Insert> or <Ctrl + F5>. During narration, to
synchronise the text that is being narrated with the recorded audio,
press the "Create synchronisation point" button:
5. If a mistake is made during narration, the audio that is not required
can be selected in the waveform and deleted by pressing the <Delete>
key. Alternatively, navigate back to the last correct point, select
"Overwrite" as the recording mode and then continue recording.
6.2.3 Text-To-Speech (TTS) Encoding
EasePublisher has a Text to Speech (TTS) Encoder that allows full
DTB productions to be created by automatically generating fully
synchronised and synthesised recordings of the on-screen text, in a
fraction of the time that it takes to use a human narrator. To
demonstrate just how efficient this is, a production that when recorded
by a narrator takes 30 minutes to record and synchronise can be
produced in about 15 seconds on an average specification desktop PC
using the TTS Encoding option - Ideal for creating content to tight
deadlines or content not requiring the higher quality human narration
provides.
TTS Encoding a DTB production is easy. The first step is to create a
project containing the text that you wish to generate the synthesised
audio from. Once you have created and structured your project, you
will be ready to TTS encode. No post processing is necessary to
create fully synchronised text and audio DTB material.
194 How to guides...
TTS Settings
The next step is to alter the TTS settings to tailor the synthetic speech
to your requirements. This is done using the "TTS Settings" window
that is viewed by selecting Tools>TTS Encode>Settings, from the top
menu. EasePublisher can use any SAPI 4 or SAPI 5 compliant
synthesisers. If these are installed on the users PC, they will
automatically appear in the list of synthetic voices.
The TTS Settings window allows the user to specify the synthetic voice
to use and to tailor the voice to their requirements.
1.
Available synthetic voices.
2. Playback rate
3. Playback pitch
4. Playback volume
How to guides... 195
5. Quality
By default, EasePublisher uses the voice's default sampling rate, but
by pressing the 'Get' button, EasePublisher will ask the current voice
for supported sampling frequencies. Those frequencies will then be
listed in the quality drop down list box.
6. Preview the TTS settings using the current settings and the text in this text
box.
7. Set the current TTS settings as the default voice, or voice for heading tags.
Please note! When EasePublisher is running the TTS, the setting for
the default voice is used all the time, except when the text event
synchronises on a heading tag. A heading tag in the source document
is e.g. <h1>, <h2>, etc and the TTS will in those cases use your TTS
setting for heading tags.
8. Overwrite existing audio - If this option is selected, EasePublisher will
TTS encode all text. If the project already contains partial audio and
you only want EasePublisher to generate audio for the missing parts,
de-select this option.
Please note! EasePublisher does not allow different audio formats in
the same heading. Therefore, if the TTS is generating audio in
different audio formats, the TTS will resample the audio to the highest
quality. Also, if you are adding TTS audio to a heading with
pre-existing audio, EasePublisher may resample the generated audio
so it fits the current heading's audio format.
Running the TTS Encoder
Once the user is satisfied with the settings of the TTS Encoder, the
project can be encoded.
196 How to guides...
To encode the entire project, select Tools>TTS Encode>Whole
project or press <CTRL + T>.
To encode the current heading only, select Tools>TTS
Encode>Current heading or press <CTRL + Shift +T>.
To encode just the current text event, select Tools>TTS
Encode>Current text.
You can also encode the current heading and its sub headings be
selecting Tools>TTS Encode>Current heading + sub-headings
How to guides... 197
6.3 Deleting audio from a project
6.3.1 Deleting all audio from the current section
To remove all audio from the current heading, the Select
Edit>Remove audio>All audio in heading from the top menu or
press <CTRL + Delete> on the keyboard.
To remove all audio from the whole project, the Select Edit>Remove
audio>All audio in book from the top menu.
6.3.2 Deleting all audio after a certain position in the current
section:
1. Navigate to the position in the waveform where you want the
deletion of the audio to begin.
198 How to guides...
2a. To remove the audio to the end of the current heading, select
Edit>Remove audio>From position to end in heading from the top
menu or press <CTRL + Shift + Delete> on the keyboard.
2b. To remove the audio to the end of the whole book, select
Edit>Remove audio>From position to end in book from the top
menu.
6.3.3 Manually deleting a section of audio
1. Select the section of the waveform that you wish to delete. To do
this selection, either hold down the left mouse button and drag over
the region, or use <Shift> in combination with <Cursor Left> or <Cursor
Right>.
2. Select Edit>Delete from the top menu or press <Delete> on the
keyboard to delete the selected audio.
6.4 Document editing
This section explains the various forms of text creation and editing
features that EasePublisher has.
6.4.1 Adding text and documents to a project
Creating documents using EasePublisher
It is possible to create XHTML documents directly in EasePublisher by
adding text to a "Simple Project".
How to guides... 199
1. Create a "Simple Project".
2. Switch to the HTML Editor <F6>. You will be informed that a
source document needs to be generated. Click "OK" to continue.
200 How to guides...
3. A new document will be generated and you will then switch to the
HTML Editor <F6>. By default, EasePublisher will generate the
heading and will also generate a text template - "Please add text
here...". This text can be deleted by highlighting it and pressing
<Delete> on the keyboard or Edit>Delete from the top menu.
4. The HTML Editor works in a very similar way to most word
processors. To begin creating your document, press <Enter> if you
need to create a new paragraph and begin entering your text.
How to guides... 201
5. The document can be formatted in many ways from the drop down
lists and buttons on the upper toolbar. Typically used functions
include:
Different font styles and sizes can be applied:
Paragraph positioning can be altered:
Paragraphs can be indented:
Text can be made subscript or superscript:
Images can be inserted:
Hyperlinks to email addresses, web pages and other files can be
created:
202 How to guides...
Colour schemes can be specified:
Examples of formatting…
6. Once the text has been entered and formatted to the users
satisfaction, the text needs to be marked up to allow navigation and
synchronisation with audio. To automatically markup the entire
How to guides... 203
document based on the default markup settings, select "Auto-detect
sentences" <CTRL + Enter> from the top menu.
Alternatively manually select each individual group of text to mark up
and select "Make sentence of selection" <F4> for each text event
until you have marked up the entire document.
204 How to guides...
7. When the document has been created and marked up, exit the
HTML Editor and save the changes when asked.
8. The text will then be ready to have audio added to it.
Importing documents into a project
It is possible to import .html or .txt documents directly into an existing
project.
How to guides... 205
1. With a project open, select Project>Import>Import document(s)
from the top toolbar.
2. Next you will be asked to select the document(s) that you would
like to use to create your DAISY project.
Click on the "Add one or more files to the list" icon and
select the file(s) that you wish to use in your production.
If you need to remove a file, click on the "Remove the
selected file from the list" icon.
206 How to guides...
If you need to view the selected file, click on the "View the
selected file in a dedicated viewer" icon.
The order that the documents are presented in the list is the
order that the documents will appear in the project. To alter the order,
click on the "Move the selected file up the list" button to move the
file up or "Move the selected file down the list" to move the file
down. When you have done this, click "Next".
3. EasePublisher will automatically mark-up the text in the
document with logical breaks (Such as new sentences etc.) To
enable this, ensure that the tick box is selected next to "Detect and
markup sentences in HTML files".
Please note! TXT files will always be marked up as this is part of
the TXT to HTML conversion process.
How to guides... 207
If you would like to specify if EasePublisher uses the default settings
for splitting text events or you want to determine the settings for
yourself, click on "Options" and select the "Markup" tab and alter the
"Markup Detection Settings".
Mark-up of a document is based on certain pre-defined criteria (e.g.
full stops and commas). This setting determines these characters and
saves them as a "Mark-up Detection Setting" or an "MDS".
By default, EasePublisher provides the user with a choice of three
markup templates called "default", "default(no comma)" and "word
markup". The criteria for each of these MDS settings is displayed in
the window beneath the currently selected MDS.
It is possible to create your own list of characters and then save those
as a new MDS using either the "Add", "Edit" or "Remove" buttons in
the dialog.
208 How to guides...
To add a new setting, press the ADD button and the "Add new
characters" dialog will be shown.
In there, you type in the character(s) you wish to detect. For example,
if you want to detect a character followed by a empty space, you
simply type in the character in the "Search for:" text box and tick the
check box called "space character". You may also want to detect the
character(s) in combination with carriage return (CR), line feed (LF) or
the null (NULL) characters. If this is the case, the "break character"
check box must also be selected.
Example 1) You want to detect the period sign followed by a space,
CR, LF or a NULL character. In this case, you type in the "." character
in the text box and tick both check boxes.
Example 2) You want to detect the period sign only. In this case, you
type in the character "." in the text box and leave both check boxes
unchecked.
Example 3) You want to detect the name "Dolphin". In this case, you
type in the characters "Dolphin" in the text box and leave both check
boxes unchecked.
Example 4) You want to detect words only. In this case, you type in the
character " " in the text box and leave both check boxes unchecked.
Note: You can fine-tune your mark-up in EasePublisher later on by
manually splitting and joining text events in the HTML Editor if the
auto-mark-up does not achieve the desired results. Select "OK"
when you have chosen your setting.
4. The next step is to decide where to import the text in the project.
Choose from "First NCC item", "Current NCC position" or "last
NCC item".
How to guides... 209
5. To finalise press "Import". You will now see the document
imported into the project and displayed in the main screen.
Text can be added by importing or by entering directly into the HTML
Editor <F6>. Further structure can be added (New headings etc.)
using the "Table of Contents" view.
Pasting text into a document
It is possible to paste text directly into the HTML Editor in the following
way:
210 How to guides...
1 Open the application and the document that you wish to copy and
paste the text from. For example, MS Word. Highlight the text that
you want to copy and paste into EasePublisher and press <CTRL + C>
to copy it.
How to guides... 211
2
In EasePublisher, switch to the HTML Editor <F6>.
3. Press <Enter> to create a new paragraph in the HTML Editor at
the point where you want to insert the text and press <CTRL + V> to
paste the text into that position.
212 How to guides...
4. Pressing the "Auto-detect sentences" button from the upper
toolbar will markup the document. Exit the HTML Editor and save
the changes when asked.
5. The project will then be ready to have audio added to it.
"Drag & Drop" text from another application
You can "Drag and Drop" text directly into the HTML Editor in the
following way:
1. Open the application and the document that you wish to copy and
paste the text from. For example, MS Word.
2. Switch to the HTML Editor <F6> in EasePublisher.
How to guides... 213
3. Arrange EasePublisher and the application that you are going to
"Drag and Drop" from, so that you can see both applications on your
desktop.
4. Hold down the left mouse button and highlight the text that you
want to copy over. Without releasing the mouse button, drag the
selected text over into the HTML Editor of EasePublisher.
5. To automatically markup the text, press the "Auto-detect
sentences" button from the upper toolbar. Exit the HTML Editor and
save the changes when asked.
214 How to guides...
6. The project will then be ready to have audio added to it.
"Drag & Drop" and paste problems
When you "Drag & Drop" or paste text from an external application,
there is a risk that the source text contains invalid characters, HTML
code or any other invalid formatting. EasePublisher will make sure that
all documents are saved as valid XHTML documents and will try to
convert any dropped/pasted text to valid XHTML.
How to guides... 215
When the message box below is displayed, this means that
EasePublisher has detected some invalid code in the dropped/pasted
text. To be able to continue to work with the added text, EasePublisher
needs to remove that invalid code. This may result in that some text
formatting may be lost.
How can you avoid this in the future? The main reason for this to
happen is that the external application does not convert the text to
valid XHTML when the drag & drop or paste is made. To avoid this, we
recommend you to use a tool that have the ability to drop or paste
valid XHTML code. Or, use a tool that converts your documents to
valid XHTML and then create the content from those converted
documents.
Creating a new heading as a new document
1. Select Edit>Create new heading(s) in Table of Contents from
the top menu or press <CTRL + Shift + N>.
2. This will launch the "Add new heading(s) in Table of Contents"
dialog. Enter a name for the new heading in the input field "New
heading title".
216 How to guides...
3. Next, the user can choose how many additional headings to add.
Entering an amount in the input field specifies how many headings to
add.
4. Selecting the check box "Create as sub heading" will insert the
new heading at one level less than the preceding heading.
5. The final checkbox specifies if a new document is to be created for
each of the new headings. Select the checkbox to do this. Selecting
"OK" will then insert the new heading into the project.
Creating a new heading within an existing document
It is possible to create a new heading within an existing document in
the following way.
How to guides... 217
1. Navigate to the event in the document where you want to create a
new heading.
2. Select Edit>Make current as 'Heading Navigation' point from
the top menu or press <CTRL + Shift + S>.
3. Next, you will be asked to confirm that you want to make a
'Heading navigation' point at this position. Select "Yes".
4. You will then be asked if you want to insert a new heading into the
document. Select "Yes" to do this or "No" to just split the SMIL and
create a heading point but without adding a new heading title .
218 How to guides...
5. The heading will then be inserted. The heading can be renamed
by pressing the key <F2>, or by renaming it using the HTML Editor.
6.4.2 Text events
Adding a new text event
1. To add a new text event you must be in the HTML Editor <F6>.
2.
If you want to add a new paragraph, select the end of the
preceding text event and press <ENTER> to create a new paragraph.
If you want to add a new text event within an existing paragraph, just
select the position where the text will be added in the paragraph.
3. Enter the new text.
4. To markup text, either select "Auto-detect sentences" <CTRL +
Return> from the top menu or select the text to mark up and select
"Make sentence of the selection" <F4>.
5. Exit the HTML Editor and save the changes when asked.
How to guides... 219
6. The text will then be ready to have audio added to it.
Adding or editing text within an existing text event
1. To add or edit text in an existing text event you must be in the
HTML Editor <F6>.
2. Select the text event that you want to edit and select within it
where you wish to add or edit the text.
3. Edit the text as you would with any word processor.
4. Exit the HTML Editor and save the changes when asked.
5. The text will then be ready to have audio added to it.
Splitting text events
In the screenshot below, the text event that is currently highlighted
needs to be split into two separate events:
1. Switch to the HTML Editor <F6>.
220 How to guides...
2. Highlight the part of the event that you want to make one separate
event and select “Make sentence of selection” or press <F4> on the
keyboard or right click on the mouse and select "Make sentence of
selection" from the menu that appears.
3. Exit the HTML Editor and save your changes when asked.
How to guides... 221
4. The main screen will now display the revised project with the
original one text event now split into two separate events:
Joining text events
To join two or more separate text events into just one single event,
take the following steps:
1. Switch to the HTML Editor <F6>.
222 How to guides...
2. Highlight the text events that you want to join into one single event
and select “Make sentence of selection”, or press <F4> on the
keyboard or right click on the mouse and select "Make sentence of
selection" from the menu that appears:
3. Exit the HTML Editor and save your changes when asked.
How to guides... 223
4. The main screen will now display the revised project with the
original separate text events now joined into one single event:
Deleting text within a text event
Sometimes, there may be a need to remove some text that lies within
a text event.
Lets take the highlighted text event in the project in the screen below:
"The Digital Accessible Information SYstem (DAISY) Consortium
was formed in 1996 by talking-book libraries to lead the
worldwide transition from analogue to digital talking-books."
224 How to guides...
We are going to delete "by talking-book libraries to lead the
worldwide transition from analogue to digital talking-books" from
this text event.
1. Switch to the HTML Editor <F6>.
2. Highlight / select the text that you want to delete:
How to guides... 225
3. Press <Delete> on the keyboard or Edit>Delete from the top menu.
4. Exit the HTML Editor and save your changes when asked.
5. The main screen will now display the revised document.
226 How to guides...
Deleting entire text events with no synchronised audio:
1. Switch to the HTML Editor <F6>.
2. Highlight / select the text event that you want to delete:
How to guides... 227
3. Press <Delete> on the keyboard or Edit>Delete from the top menu:
4. Exit the HTML Editor and save your changes when asked.
5. The main screen will now display the revised document.
Deleting entire text events which are synchronised with audio
228 How to guides...
1. The first step is to remove the text event and the corresponding
audio event from the project's SMIL. Select Edit>Synchronization
order from the top menu.
2. From the list, select the text event that you want to delete and then
select "Remove text event and synchronized audio" button:
How to guides... 229
3. You will then be asked if you want to remove the selected text
event together with the referenced audio. Press "OK" to delete or
"Cancel" to abort.
230 How to guides...
4. The text and the audio events will now have been removed from
the list. Select "Save & Exit" to return to the main screen.
5. The text event and the audio event is now removed from the SMIL
and no longer appears in the waveform view at the bottom of the
screen. However, you will notice that the XHTML document has not
had the text removed and so it still appears in the document (However,
it is not highlighted and is skipped during playback). To remove the
text, switch to the HTML Editor <F6>.
How to guides... 231
6. Highlight / select the text that you want to delete from the
document:
232 How to guides...
7. Press <Delete> on the keyboard or Edit>Delete from the top menu:
8. Exit the HTML Editor and save your changes when asked.
9. The main screen will now display the revised document.
How to guides... 233
Deleting entire text events without deleting the synchronised audio
If you want to delete a text event that is synchronised with an audio
event but you do not want to delete the audio event from the project,
follow these steps:
1. To remove the text event, switch to the HTML Editor <F6>.
234 How to guides...
2. Highlight the text that you want to delete:
3. Press <Delete> on the keyboard or Edit>Delete from the top menu:
How to guides... 235
4. Exit the HTML Editor and save your changes when asked.
5. The main screen will now display the revised document.
6.4.3 Skippable content
Pages
Pages in a DAISY book are used to mirror those of a traditional print
version and offer additional navigation to a DAISY book.
Inserting a page in the main screen
1. Select the position where you wish to insert a page - The text
event that you want to preceed the new page.
236 How to guides...
2. Select "Show/hide Recording rollup" from the upper toolbar.
3. Ensure that the radio button "Insert" is selected and then select
"Page".
4. The "Add page(s)" dialog will now appear. Here the user
specifies the page number and also the type of page from a choice of
three different types:
• "page-front": Pages at the front of the book before the page
numbering sequence for the body of the book begins.
• "page-normal": Pages that have a normal scheme that starts at
1 and continues to the back matter or to the end of the book.
• "page-special": Pages that are not front matter and do not
follow a traditional sequential numbering system, or, that are
separate and apart from the sequential numbering system used
throughout the book.
How to guides... 237
5. Optionally, check the option "Add a continuation element after
the page(s)". The continuation element is used to define where the
page ends.
Note! This option is always checked when inserting pages into a
heading with no source document.
6. Select "Add" and the page will be inserted into the project.
7. If required, this page can then be edited by using the HTML Editor
<F6> and editing the event.
Marking a page in the main screen
1. Select the text event that you wish to mark as a page.
2. Select "Show/hide Recording rollup" from the upper toolbar.
238 How to guides...
3. Ensure that the radio button "Mark as" is selected and then select
"Page". The text event will then be converted to a page.
Marking a page in the HTML Editor
How to guides... 239
1. Switch to the HTML Editor <F6>.
2. Enter the text that you want to mark up as a page.
3. Mark this text up as a text event by highlighting it and then
selecting “Make sentence of selection”, or press <F4>.
4. Select the text event that is to be a page and then select
Tools>Mark current as>Page break, from the top menu and select
the type of page or press <F6>.
5. Exit the HTML Editor and save your changes when asked.
6. The main screen will now display the revised document with the
page displayed in the waveform area in the lower part of the screen:
240 How to guides...
Footnotes
A footnote is otherwise known as an addendum or an annotation to a
document. It contains a reference to a designated part of the text to a
body of text containing additional information at the "foot" of the
document.
Inserting a footnote in the main screen
1. Select the position where you wish to insert a footnote reference.
2. Select "Show/hide Recording rollup" from the upper toolbar.
How to guides... 241
3. Ensure that the radio button "Insert" is selected and then select
"Footnote".
4. The "Create new footnote" dialog will then be displayed. Here,
the user must insert a footnote reference and the footnote body text.
If you need a continuation element for this footnote, check the "Add a
continuation element after the footnote". Once this has been
entered, select "OK".
5. The footnote reference will be inserted at that point and the
footnote body text will be added to the bottom of the document.
Inserting a footnote in the HTML Editor
242 How to guides...
1. Switch to the HTML Editor <F6>.
2. Enter the text that you want to mark up as a footnote reference.
Please note that the text for the footnote body must exist before the
mark up below can be done.
3. Mark this text up as a text event by highlighting it and then
selecting “Make sentence of selection”, or press <F4>.
4. Select the text event that is to be a footnote reference and then
select Tools>Mark current as>Footnote reference, from the top
menu or press <F9>.
5. The create footnote dialog box will now appear. You must now
select the text event from the list that forms the body of the footnote
text. Press "Create" to insert the footnote.
How to guides... 243
6. Exit the HTML Editor and save your changes when asked.
7. The main screen will now display the revised document with the
footnote displayed in the waveform area in the lower part of the
screen:
Sidebars
A sidebar is a short, auxiliary body of text that is added alongside a
longer document and that typically presents additional information.
244 How to guides...
Inserting a sidebar in the main screen
1. Select the position where you wish to insert the sidebar.
2. Select "Show/hide Recording rollup" from the upper toolbar.
3. Ensure that the radio button "Insert" is selected and then select
"Sidebar". A new sidebar, with a default text, will be inserted at that
point.
4. This sidebar can then have text added to it by using the HTML
Editor <F6> and editing the event.
How to guides... 245
Marking a sidebar in the main screen
1. Select the text event that you wish to mark as a sidebar.
2. Select "Show/hide Recording rollup" from the upper toolbar.
3. Ensure that the radio button "Mark as" is selected and then select
"Sidebar". The text event will then be converted to a sidebar.
246 How to guides...
Marking a sidebar in the HTML Editor
1. Switch to the HTML Editor <F6>.
2. Enter the text that you want to mark up as a sidebar.
3. Mark this text up as a text event by highlighting it and then
selecting “Make sentence of selection”, or press <F4>.
4. Select the text event that is to be a side bar and then select
Tools>Mark current as>Sidebar, from the top menu or press <F7>.
5. Exit the HTML Editor and save your changes when asked.
How to guides... 247
6. The main screen will now display the revised document with the
side bar displayed in the waveform area in the lower part of the
screen:
Producer notes
A Producer note is a short, auxiliary body of text that is added to a
document and that typically presents additional information from the
producer of the content.
Inserting a producer note in the main screen
1. Select the position where you wish to insert the producer note.
2. Select "Show/hide Recording rollup" from the upper toolbar.
3. Ensure that the radio button "Insert" is selected and then select
"Producer note".
248 How to guides...
A new producer note, with a default text, will be inserted at that point.
4. This producer note can then have text added to it by using the
HTML Editor <F6> and editing the event.
Marking a producer note in the main screen
1. Select the text event that you wish to mark as a producer note.
How to guides... 249
2. Select "Show/hide Recording rollup" from the upper toolbar.
3. Ensure that the radio button "Mark as" is selected and then select
"Producer note". The text event will then be converted to a
producer note.
250 How to guides...
Marking a producer note in the HTML Editor
1. Switch to the HTML Editor <F6>.
2. Enter the text that you want to make a producer note.
3. Mark this text up as a text event by highlighting it and then
selecting “Make sentence of selection”, or press <F4>.
4. Select the text event that is to be a producer note and then select
Tools>Mark current as>Producer note, from the top menu or press
<F8>.
5. Exit the HTML Editor and save your changes when asked.
6. The main screen will now display the revised document with the
producer note displayed in the wave form area in the lower part of the
screen:
How to guides... 251
Deleting Skippable content
It is possible to remove "skippable" items (Pages, sidebars, producer
notes and foot notes) in the following ways:
Deleting skippable content using the main screen
1. Ensure that the "Recording Rollup" is visible. Select the text
event containing the skippable item that you want to delete by clicking
on it in the main screen:
252 How to guides...
2. In the "Recording Rollup", you will notice that all of the skippable
item buttons are disabled except for the one that corresponds to the
skippable item that is currently selected.
3. Click on the button for the skippable item that you wish to remove
and then select "Yes" to remove the reference to the skippable item
from the project.
4. The skippable item will now become a normal text event.
5. If you want to remove the text event, select the text event and
press <Delete> on the keyboard Edit>Delete from the top menu.
6. You will then be asked to confirm that you want to delete the text
event. Select "Yes".
How to guides... 253
8. The text event is now removed from the SMIL and no longer
appears in the waveform view at the bottom of the screen.
9. Any audio that accompanied the text will also still remain in the
project, to delete this, either hold down the left mouse button and drag
over the region to delete or use <Cursor Left> or <Cursor Right> to
navigate to the position in the waveform to the point where the deletion
begins and then hold down <Shift + Cursor Right> to highlight the section
of audio to delete.
Select Edit>Delete from the top menu or press <Delete> on the
keyboard to delete the audio.
10. However, you will notice that the XHTML document has not had
the text removed and so it still appears in the document (However, it is
not highlighted and is skipped during playback). To remove the text,
switch to the HTML Editor <F6>.
11.
Highlight the text that you want to delete:
12. Press <Delete> on the keyboard or Edit>Delete from the top
menu:
13. Exit the HTML Editor and save your changes when asked.
14. The main screen will now display the revised document.
Deleting skippable content using the HTML Editor
1. Switch to the HTML Editor <F6> and highlight the skippable text that
you want to delete.
2. Press <Delete> on the keyboard or Edit>Delete from the top menu.
3. Exit the HTML Editor and save your changes when asked.
254 How to guides...
4. The main screen will now display the revised document.
5. Any audio that accompanied the text will also still remain in the
project, to delete this, either hold down the left mouse button and drag
over the region to delete or use <Cursor Left> or <Cursor Right> to
navigate to the position in the waveform to the point where the deletion
begins and then hold down <Shift + Cursor Right> to highlight the
section of audio to delete.
6. Select Edit>Delete from the top menu or press <Delete> on the
keyboard to delete the audio.
6.5 Inserting an image into the document
Insert an image into the document is performed using the HTML
Editor.
How to guides... 255
1. From the main screen, press the HTML Editor to switch to the
HTML Editor or select the "Edit the content in the HTML Editor"
button on the top toolbar.
2. Select the position where you want the image to be inserted in the
document and press the "Insert image into HTML button":
Alternatively, select Tools>Insert image or press <CTRL + Shift + Insert>
on the keyboard or right click on the mouse and select "Insert image"
from the menu that appears.
256 How to guides...
3. You will now be asked to select an image from your hard drive to
insert into the document. Choose the image by selecting the text
beneath the preview of the image (Note: The aspect ratio of the
preview is different to how the image will appear in the document.
The preview has been resized to fit in the preview window):
4. Click "Yes" to insert the image. Next you will be asked to add a
text description ("Alt-text") for the image. By default, this field will
have "image" inserted into it. You can change this to a more
meaningful description of the image at this point.
How to guides... 257
Select "OK" to insert the image.
Exit the HTML Editor <ALT + F4> and select "Yes" to save the changes
when asked if you want to. The project will then be updated and the
image will appear in the document in the main screen view.
258 How to guides...
6.6 Export NCC items
The "Export NCC items" dialog is accessed by selecting
Project>Export>NCC items... from the top menu. EasePublisher
will create a complete DAISY book based on the exported headings.
i.e. EasePublisher creates a new NCC.HTML and copies any files that
the headings are using (audio, documents, images...).
By using this dialog, you can create a new project from one or several
headings. When the dialog is launched, each heading from the current
project is listed together with relevant information such as time
duration, audio format and whether or not a cleanup of the audio is
required ("No" means that the audio has been cleaned up, "Yes"
means that the audio will be cleaned up before the heading is
exported).
The NCC items to be exported are chosen by selecting the
checkboxes next to each title.
How to guides... 259
Once the NCC items to be exported have been selected, click on
"Export" to begin the process. You will then need to specify a
location to export to from the dialog that will then appear.
Choose a folder or select "New Folder" to create one. Click "OK" to
complete the process.
Please note! This Export NCC feature does not remove the headings
from your source project - it will only copy the headings (and its files)
to a new location. The source project remains intact.
6.7 Import NCC from other folder
This feature imports headings from other projects. To do this it is
neccessary to specify a "NCC.HTML" from another project and
EasePublisher will then list all headings in that project.
260 How to guides...
To Import an NCC from another folder, select Project>Import>Import
NCC from other folder... from the top menu. This will launch a
dialog that requires the user to specify the NCC.HTML file that will be
used. Locate the folder and the NCC.HTML file and then select
"Open".
How to guides... 261
The "Import NCC items" dialog will now appear.
Specify which headings to import by selecting the check boxes in the
list next to the title.
The next step is to specify where to insert the imported headings.
This is done via the "Insert at" field and by selecting the required
position from the drop down list from a choice of "First NCC item",
"Current NCC position" or "Last NCC item".
Finally, selecting "Import" will import all selected headings and its
related files (audio, docs, images, ...). Please note that EasePublisher
will automatically rename file names and ID names if any conflicts
occur with existing files.
262 How to guides...
6.8 Inserting a 'pop-up' image into the project
1. Insert a 'Pop-up' image that will automatically appear at a specific
point in the playback of the production by selecting the text event that
you wish to accompany the pop-up image in the main screen.
2. Select Edit>Insert popup image from the top toolbar.
3. You will now be asked to select an image from your hard drive to
insert into the SMIL file. Choose the image by selecting the text
beneath the preview of the image (Note: the aspect ratio of the
preview is different to how the image will appear in the document.
The preview has been resized to fit in the preview window):
4. Click "Yes" to insert the image.
How to guides... 263
5. The image will then be inserted. An orange marker on the
waveform view gives a visual indication where the image will appear if
the playback software supports pop-up images:
When played back in EasyReader, the image will appear in
synchronisation with audio and text as shown in the screenshot below:
264 How to guides...
6.9 Inserting a 'producer stop' into the project
The producer stop is a special marker in the SMIL file that will tell the
DTB player to automatically stop the continuous playback at a certain
point. For the moment, only EasyReader version 2 supports producer
stops.
Please note that this marker is something that is out of the scope of
the current specifications of Daisy 2.02 and Z39.86-2002. The
distributed book may therefore not appear as valid in current validators,
but it is also worth noting that the producer stop will not cause any
problems in todays DTB players. There is also an option in the build
process that tells EasePublisher to remove producer stops from the
distributed book.
If using EasyReader 2, the producer stop is of great benefit when the
producer needs to control playback. Some books for the print impaired
may find this feature useful as the producer can make the player
automatically stop at particular points.
To insert a new producer stop, you need to select the text event you
want the DTB player to stop at, and then select the menu item
Edit>Insert producer stop.
Now you need to decide where this producer stop is going to be
inserted. If you want to stop the playback before this text event, press
the "Before" button. If you want the DTB player stop after this text
event has finished, then press the "After" button.
How to guides... 265
In this picture above, you can see where the producer stop has been
inserted. The DTB player will now stop the playback at that position.
To remove the producer stop, you simply select the text event which is
at the same position as the producer stop, and then choose the menu
item Edit>Remove producer stop.
6.10 Synchronising imported audio files with existing text
- "Sync as you hear"
Once the producer has structured and "Marked-up", the documents in
a project and imported digital audio files into the project, the two
elements need to be combined together to create a fully synchronised
text and audio production. This is done using a method described by
Dolphin Audio Publishing as "Sync as you hear".
If you can imagine that before the text and the audio are synchronised
together, the first text events is located at one end of the SMIL file and
followed by all of the audio and this is followed by the remaining text
events. We need to combine the corresponding elements together in
the production as the diagram below demonstrates:
266 How to guides...
In practice, this is how it would appear in the Track View of
EasePublisher:
The continuous waveform is displayed and beneath it, the
corresponding text events are positioned. The most efficient way to
synchronise the elements together is to follow these steps:
1. If you have not yet added and structured your text in the project or
imported audio files, do this now. Generally, when using the "Sync
as you hear" method of text and audio synchronisation, we would
recommend that when the audio is imported using the "Import audio"
window, it be inserted at the front of the SMIL file so that the text is at
the end of the SMIL file, after the audio.
We would also suggest not applying phrase detection to the imported
audio as audio markers will be assigned during the "Sync as you
hear" process.
2. Once the audio has been imported ensure the "Edit mode"
setting next to the waveform view is set to "At position" or press
<CTRL + SHIFT + F11> to toggle to that setting.
How to guides... 267
3. If you press the play button, the audio will begin to play. However,
you will notice that throughout the playback, only the first text event
remains highlighted on screen. To rectify this, we will now
synchronise all text and the audio together.
4. To begin the "Sync as you hear" process, press play. If the
audio that you have imported corresponds exactly to the text, the first
piece of audio will match up with the currently (First) highlighted text
event or heading. As soon as the audio for the first text event finishes,
press <CTRL + ENTER> or press the "Move next text event to the
current position" button on the lower toolbar:
This will move the next text event to the current position in the SMIL
file at the same point as the corresponding audio if the text event was
moved at the correct position. If the text event is not at the desired
position, stop the playback and move the Text Marker (Signified as a
"T" symbol beneath the waveform) to the required position.
Alternatively, move the "current position" marker to the correct
position using the <Cursor Left> or <Cursor Right> keys and press the
"Move previous text event to the current position" button <CTRL +
SHIFT + ENTER> or press the "Move next text event to the current
position" button <CTRL + ENTER> on the lower toolbar to move the text
event to the correct position.
With practice, a producer will find that this method of synchronisation
is very effective and will find that there will be little need to stop
playback and adjust the position of the synchronisation - Effectively
synchronising the text and the audio in real time.
6.11 Synchronising text with audio during live recording "Sync as you speak"
Once the producer has structured and "Marked-up", the documents in
a project. A narrator can then record the audio directly in
EasePublisher and synchronise this with the corresponding text as
they narrate it to create a fully synchronised text and audio production.
268 How to guides...
This is done using a method described by Dolphin Audio Publishing as
"Sync as you speak".
1. First, calibrate the audio. Select Options>Audio Calibration…
from the Toolbar, or "Calibrate" from the Recording Rollup menu.
The Audio Calibration dialog will appear, follow the on-screen
instructions.
2. After the calibration has been performed, the user should select
the recording mode to be used by toggling <CTRL+F11> or clicking the
appropriate button on the "Recording rollup" to toggle through the
3 modes - "Overwrite", "Insert" or "Replace to zero".
3. To begin recording, press the "Record" button in the lower toolbar
or press <Right CTRL + Insert>. During narration, to synchronise the
text that is being narrated with the recorded audio, press <CTRL +
ENTER> or press the "Create synchronisation point" button:
4. This will move the next text event to that position in the SMIL file.
5. Continue this process until the entire production is narrated and
synchronised.
6.12 Using session backup
"Session backup" is a feature that creates a backup of the project
files so that the production may be restored to an earlier incarnation in
the event of any mistakes or errors occurring.
Please note that these session backup files do not contain any
audio files, as they normally are to large to be handled efficiently.
The user can specify how often a backup is made in the "General
options" dialog <CTRL + G>. This can be automatically done each
time a project is opened (Always), Once per day or Never.
How to guides... 269
In addition to this, the user can manually create a session backup at
any time.
6.12.1 How to make a session backup
1. Select Edit>Session backup>Make session backup now from
the top menu in the main screen.
2. The session will then be backed up in a separate directory in the
folder containing the project.
Please note that these session backup files do not contain any
audio files, as they normally are too large to be handled
efficiently.
270 How to guides...
6.12.2 How to perform a session undo
1. Select Edit>Session backup>Undo session from the top menu,
or press the key <Ctrl + Shift + Z>.
2. The "Project Session Undo" dialog will now appear. This lists
all available states that the project can be "rolled back" to. Please note
that this list will be cleared when the project is cleaned up.
3. Select the time of the state that you want to revert back to and the
select "Make session undo".
You will then be asked to confirm that you want to undo the session.
Select "Yes" to complete the process.
How to guides... 271
6.13 Validating a project
EasePublisher complies with the latest standards as defined by the
DAISY Consortium. It is important that content created as "DAISY"
adheres to the specific standards so that publishers can be sure that
their content will play in all DAISY playback and delivery devices.
EasePublisher contains a validator which scans the completed project
to ensure that the final output is correct.
6.13.1 Validation settings
The "Validation" category in the "Build options" allows the user to
configure the validation settings. The Validation settings are viewed by
selecting Options>Build options from the top menu or by pressing
<Ctrl + B>.
"Before validation, automatically fill empty meta data"
This option will fill any found missing meta data with a predefined
value. These meta data can be defined in the "Meta Data" dialog.
Press the "Settings" button to launch that dialog.
272 How to guides...
"Require these meta data for the chosen output format"
This option determines whether the validation process also validates
the "Meta data" of the project.
• "Do not check meta data": If this option is selected,
EasePublisher will not validate the Meta data of the project.
• "Mandatory": If this option is selected, EasePublisher will only
check that Meta data in the project classed as "Mandatory" is
present and valid based on the guidelines set by the DAISY
Consortium.
• "Mandatory + Recommended": If this option is selected,
EasePublisher will only check that Meta data in the project
classed as "Mandatory" and "Recommended" is present and
valid based on the guidelines set by the DAISY Consortium.
• "Mandatory + Recommended + Optional": If this option is
selected, EasePublisher will check that all Meta data in the
project is present and valid based on the guidelines set by the
DAISY Consortium.
"Report error on text event with no audio synchronized to it"
If this option is selected, an error will be reported for any text event
that has no audio corresponding to it in the SMIL file.
6.13.2 Validate project
Once the user is satisfied that the project is ready for validation and
the validation settings have been chosen, the validation process can
begin. From the top menu, select Project>Validation>Validate
project or press <F8>.
If any errors are found, they will be displayed in the "Validation report
view".
How to guides... 273
6.13.3 Validation report view
The "Validation report view" lists all detected errors and provides
information to help the user rectify any problems.
1. Go to the location of the error in the project.
2. Edit the selected error's comment text.
3. View the invalid source location in the "Document source viewer"
4. View the selected error's reference file in the "Document source viewer"
5. Print the report.
6. Save the report.
7. Validate the project again.
8.
Remove the selected error from the list.
9.
Delete the report.
10.
Report list number.
11.
Information about the type of error.
12.
Location of error.
13.
Reference id of error.
274 How to guides...
14. Comments about the error (Added by the user via double-click in the list or
pressing the "Comments" button).
6.14 Building a project
Once a production has been completed (i.e. all editing, recording and
synchronising has been done), it can be output into a required format
to be distributed to end-users / consumers. This is known as the
build process.
To begin the build process, from the top menu select Project>Build
project or press <F9>.
This will display the "Build options" dialog,
with the addition of some functions to start the build process.
Build options consist of five categories that allow the producer to
specify options for "Validation", "Clean-up", "Encoding", "Protect",
"Unlock", "Folders" and "Document". Please refer to the earlier
section detailing all of the "Build options" for full information on
configuring the build process. When the desired settings have been
made in build options, the build process can be started.
How to guides... 275
As previously mentioned, the "Build options" dialog that appears when
Project>Build project or <F9> is selected, contains additional
functions:
1. "Build options": There are three options to choose from that
are selected from the drop-down list.
The first build options are "Validate project". This will just validate
the project in the same way that selecting
"Project>Validation>Validate project" <F8> from the top menu will do
so.
The next option "+ cleanup audio" will, in addition to validating the
project, also remove any unused audio files that were created during
the recording and editing of the production.
The final option "+ build/encode" will, in addition to validating the
project and performing a cleanup of the audio, build the project based
on the users build process settings and distribute the file to a specific
location and format. If the producer has selected to protect the
content, this will be done when the “+ build/encode” option is
selected.
2. "Build distribution as": Here, the producer has the option to
build the project as either a "DAISY 2.02 (AudioFullText)" book,
"DAISY 2.02 (AudioNcc)" book, or a "Z39.86-2002 (AudioNcx)" book.
276 How to guides...
3. "Show build report at end": If this checkbox is selected, a build
report will be produced and displayed when the build is completed.
If required, pressing the "Print" button can print the build report.
4. "Start":
This will begin the build process.
How to guides... 277
5. "Cancel": This will cancel the build process and close the
"Build options" window.
Pressing "Abort" in the "Building book" dialog will abort the build
process.
6.15 Creating Protected Digital Talking Books (PDTB's)
Using EasePublisher, it is possible to create a DTB that prevents the
documents contained within from being displayed in any application
other than an IPP* enabled DAISY player. This is known as a
Protected Digital Talking Book (PDTB). To create a PDTB, the
producer needs to encrypt the project and create a "User Access
Key" (UAK) as part of the "Build" process.
*Intellectual Property Protection - A way of encrypting DAISY books to
prevent unauthorised use, developed by the DAISY Consortium.
278 How to guides...
6.15.1 Creating a User Access Key (UAK)
A PDTB uses something called a User Access Key (UAK) to unlock
the content in a DAISY player that supports the system. Therefore,
the first step is to create a UAK.
Generally, an organisation will use either one UAK for all content or
several UAK's that are predefined for different types for materials.
The UAK contains organisation specific information; that are both
required and optional. The UAK can be delivered together with the
book, be predefined in the player or (if the player supports it) loaded
separately into the player. The dialog box in EasePublisher contains a
brief description of each item, visible in the bottom of the "User
Authorization Key" dialog. To launch the UAK dialog, select
Tools>User Authorization Key.
Required Data:
1. Open an existing UAK.
2. Save current UAK.
How to guides... 279
3. Location and name of currently open UAK file.
4. Exit the UAK dialog.
5. Issuer ID – A string that uniquely identifies the issuing organisation
(Max 16 characters).
6. Collection ID – A numerical string, identifying the collection of books
distributed by the issuer that is covered by this authorisation key (Max
8 characters).
7. Date of issue – A numerical string identifying the date of issue of this
User Authorization Key. (Max 8 characters, Format YYYYMMDD).
8. Decryption key data – A random hexadecimal value of your choice.
This is a hex string that is the "bitwise" complement of the decryption
key data necessary to decrypt Book Keys. (Max 64 characters).
9. Persistent UAK authorization – Identifies whether the UAK should be
stored by the reading system or not. Non-persistent UAK's must be
distributed on the same media as the PDTB.
10.
Description of current field.
11. Issuer name – A string giving the full name of the issuing
organisation.
12. Announcement message – A SMIL file to be used as an
announcement when the UAK is processed. This file must be located
together with its audio and HTML document in the same directory as
the UAK itself. Example of announcement message “Processing the
user access key.”
13. Failure message – A SMIL file to be used as an announcement
when the processing of the UAK fails. This file must be located
together with its audio and HTML document in the same directory as
the UAK. Example of failure message “Incorrect access key. The
authorization of the access key has failed. The copyright
protected content will not be played.”
Optional Data:
280 How to guides...
1. User ID – A string that uniquely identifies the user to whom this UAK
is issued. (Max 8 characters)
2. Set expiration date – A numerical string identifying the date on which
this UAK expires. If not selected, the UAK will never expire. (Max 8
characters, Format YYYYMMDD)
3. Require validation code - Determines if the user must enter a
validation code when the book is loaded into the playback device.
(Max 8 characters)
4. Store validation code - Determines if the validation code must be
stored by the reading system or not. If 'yes', then the "Persistent UAK
authorization" in the "Required" tab must also be set to "Yes".
5. Issuer data – A string containing any data the issuer deems
necessary to add to the UAK.
6.
User name – A string giving the user's name.
7. Validation code - The validation code that needs to be entered by the
user. (Max 8 characters)
How to guides... 281
8. Validation message – A SMIL file to be used as a user prompt when
requesting the validation code for the UAK. This is required if a
validation code is present. This file must be located together with its
audio and HTML document in the same directory as the UAK itself.
Example of validation message “Key installation PIN entry. Please
enter your PIN code to confirm that you are entitled to read this
material.”
6.15.2 Creating the DAISY PDTB
The PDTB protection is unique for each book. It is created during the
build process and is dependent on the UAK file used. The UAK
directory must be located in the root of the directory of the completed
book for it to play on IPP compatible DAISY players such as
EasyReader.
The PDTB level determines which level the book should be protected
to. There are 3 levels to select from:
• Level 1 encodes the NCC.HTML, all SMIL files, all source
documents (HTML) and all images.
• Level 2 encodes the NCC.HTML, all SMIL files + scrambles the
filenames of the audio files to make it harder to play them in order
in, for example WinAmp.
•
Level 3 encodes the NCC.HTML, all SMIL files, all source
documents (HTML) and all images + scrambles the filenames of
the audio
282 How to guides...
files.
PDTB also requires the following information:
1. "Yes, I want to protect the distributed book using 'DAISY
Protected Digital Talking Book Specification'"'- Determines if PDTB
is to be used in the build process.
2. "PDTB Level" – Determines the level of protection.
3. "User Access Key" – Select a UAK to be used for the PDTB.
4. "Protected content notice" – Determines the SMIL file that will
be played if the player is unable to handle the protected content. Will
be copied together with its audio and HTML file to the book folder.
Example of content message “Unable to play content. This
playback system is unable to unlock and play the current
copyright protected content.”
5. "Use validation code" – If the UAK file is locked with a PIN code,
the producer can select to have the book locked (with the same key)
too. If a validation code is used, a SMIL file has to be selected in order
to play back a validation message. This file must be located together
with its audio and HTML document in the same directory as the book.
Example of validation message “Key installation PIN entry. Please
How to guides... 283
enter your PIN code to confirm that you are entitled to read this
material.”
6. "Set expiration date" – A numerical string identifying the date on
which this PDTB expires. If not selected, the PDTB will never expire.
(Max 8 characters, Format YYYYMMDD)
7. "Restrict text export" – It is possible to restrict how much text
can be exported from the book. This requires that the playback device
support this. The restriction can be set in bytes or percentage.
8. "Create a UAK" - Launches the "User Access Key" dialog.
9. "Export unit" - Selects the value for the "Restrict text export"
setting.
10. "Amount" - Allows a value to be added for the "Export Unit".
11. "Issuer data" – Field for additional information in the PDTB.
When protecting, the NCC.HTML will be named NCC.PDTB and a new,
un-encoded NCC.HTML will be created that points out the first audio in
the book and the “Protected content notice” SMIL file, so in a
playback system which does not support PDTB, this is the only thing
that will be played.
Note! The installation program has installed some example files in a
sub folder of EasePublisher. The sub folder is called
"PDTBMessages_mp3" and contains templates for the BKA and UAK.
You may load them into EasePublisher and see how they are
constructed, but do not build any IPP books with these files. These
files are only templates, to make it easier for you to create your own
messages and IPP settings.
6.15.3 Summary of SMIL files needed for PDTB's
In order to function, a PDTB will need to be accompanied by the
following SMIL files:
Protected content message
Consists of an HTML, SMIL and audio file. Used by the PDTB. The
files are located in the same folder as the book. This message is part
284 How to guides...
of the substitute NCC.HMTL. This will only be played if the playback
device cannot handle the encoded book.
The HTML file typically consists of a statement such as “Unable to
play content. This playback system is unable to unlock and play
the current copyright protected content.”
Announcement message
Consists of an HTML, SMIL and audio file. Used by the UAK. The files
are located in the same folder as the UAK file. This message will be
played when the UAK is processed (when opening the book). The
HTML file typically consists of a statement such as "Processing the
user access key.”
Failure message
Consists of an HTML, SMIL and audio file. Used by the UAK. The files
are located in the same folder as the UAK file. This message will be
played when the UAK is incorrect or not consistent with the PDTB files.
The HTML file typically consists of a statement such as “Incorrect
access key. The authorization of the access key has failed. The
copyright protected content will not be played.”
Validation message
Consists of an HTML, SMIL and audio file. Used by the UAK. The files
are located in the same folder as the UAK file. This message will be
played when the PIN code needs to be entered.
The HTML file typically consists of a statement such as “Key
installation PIN entry. Please enter your PIN code to confirm that
you are entitled to read this material.”
285
Index
A
Adding a new text event, 221
Adding audio to a project, 185
Adding or editing text within an existing
text event, 222
Adding text and documents to a project,
201
Amplify Audio Processing Options, 100
Audio Format Recording Options, 79
Audio Processing Options, 94
B
Book project information, 129
Build Options, 82
Building a project, 234
C
Cleanup Build Options, 84
Commands, GUI icons and Keyboard
Hotkeys, 135
Controls for use in the HTML Editor, 155
Controls for use in the Main Screen, 135
Create a new project, 24
Creating a new heading as a new document,
218
Creating a new heading within an existing
document, 219
Creating a new project, 167
Creating a project 'From Audio Files', 179
Creating a project 'From documents', 170
Creating a 'Simple Project', 167
Creating a User Access Key (UAK), 234
Creating documents using EasePublisher,
201
Creating Protected Digital Talking Books
(PDTB's), 234
Creating the DAISY PDTB, 234
D
Deleting entire text events with no
synchronised audio:, 229
Deleting all audio after a certain position
in the current section:, 200
Deleting all audio from the current section,
200
Deleting audio from a project, 200
Deleting entire text events which are
synchronised with audio, 230
Deleting entire text events without deleting
the synchronised audio, 234
Deleting Skippable content, 234
Deleting skippable content using the
HTML Editor, 234
Deleting skippable content using the main
screen, 234
Deleting text within a text event, 226
Devices Recording Options, 81
Display Options, 67
Document Build Options, 92
Document editing, 201
Document Properties, 119
E
Edit menu, 136
Edit Menu, 31, 52
Encoding Build Options, 86
End User License Agreement, 3
Export NCC items, 234
F
Fade In Audio Processing Options, 96
Fade Out Audio Processing Options, 98
File menu, 135
File Menu, 30, 52
Filter Audio Processing Options, 101
Folders Build Options, 91
Folders General Options, 64
Footnotes, 234
Format Menu, 53
G
General Display Options, 69
General General Options, 60
General Options, 58
General Recording Options, 77
Getting help with EasePublisher, 21
Go to..., 124
H
Headings View, 105
Help menu, 153
Help Menu, 43
286 Index
Highlight Display Options, 70
How to guides..., 167
How to make a session backup, 234
How to perform a session undo, 234
I
Import NCC from other folder, 234
Import Table of Contents, 121
Importing documents into a project, 208
Importing existing digital recordings, 186
Inserting a footnote in the HTML Editor,
234
Inserting a footnote in the main screen, 234
Inserting a page in the main screen, 234
Inserting a 'pop-up' image into the project,
234
Inserting a producer note in the main
screen, 234
Inserting a 'producer stop' into the project,
234
Inserting a sidebar in the main screen, 234
Inserting an image into the document, 234
Introducing the EasePublisher Interface, 23
Introduction, 11
J
Joining text events, 224
L
Load book in QA player, 123
M
Main Screen, 29
Manually deleting a section of audio, 201
Marking a page in the HTML Editor, 234
Marking a page in the main screen, 234
Marking a producer note in the HTML
Editor, 234
Marking a producer note in the main
screen, 234
Marking a sidebar in the HTML Editor,
234
Marking a sidebar in the main screen, 234
Markup definition, 125
Markup General Options, 65
Meta Data, 115
Minimum System Requirements, 16
Multi Volume Announcements, 131
N
Nav Clips view, 104
Navigate menu, 143
Navigate Menu, 35, 54
Normalize Audio Processing Options, 100
Notices, 15
O
On-line manual, 21
Open project, 25
Optional Content View, 108
Options menu, 146
Options Menu, 37
P
Pages, 234
Pages View, 106
Pasting text into a document, 212
Peak Meter Display Options, 75
Phrase Detection Recording Options, 80
Playback General Options, 62
Producer notes, 234
Product activation, 19
Product Support, 21
Project menu, 148
Project Menu, 39
Project wizard, 23
Protect Build Options, 89
R
Recently used projects, 26
Recording live audio, 191
Recording Options, 77
Remote Control Options, 133
Remote control unit commands and usage,
163
Resample WAVE audio format, 94
Running the TTS Encoder, 198
S
Sample projects, 27
Sidebars, 234
Silence Audio Processing Options, 102
Skippable content, 234
SMIL event information, 118
Splitting text events, 222
Summary of SMIL files needed for
PDTB's, 234
Index 287
Synchronising imported audio files with
existing text -, 234
Synchronising text with audio during live
recording -, 234
T
Text events, 221
Text-To-Speech (TTS) Encoding, 196
The Document Source Viewer, 109
The HTML Editor, 51
The HTML View Menu Bar, 51
The Lower Toolbar, 49, 58
The Main Screen Menu Bar, 29
The Peak Meter Rollup, 48
The Recording Rollup, 46
The Statusbar, 50
The Table of Contents Editor, 103
The Track Edit Rollup, 47
The Upper Toolbar, 56
The Waveform Area, 48
Tools menu, 150
Tools Menu, 40, 55
Track View Display Options, 72
TTS Settings, 197
U
Unlock Build Option, 90
Upper Toolbar, 44
Using session backup, 234
V
Validate project, 234
Validating a project, 234
Validation Build Options, 83
Validation report view, 234
Validation settings, 234
View menu, 140
View Menu, 33
Viewing the NCC File, 109
Viewing the NCX File, 112
Viewing the OPF File, 113
Viewing the SMIL file, 110
Viewing the source XHTML document,
111
W
Wave Form Area, 153
What's New?, 16
Y
Your Serial Number, 22