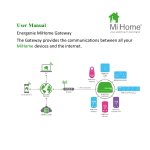
Transcript
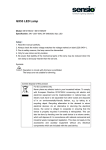
Custom Fit
LED Lighting
complete kit for DIY installation4m with 3x connector sets, dimmer & driver
The LED strip may be cut up into 4 separate segments and connected
in series to the power supply using the pre-wired connector sets.
1. Setting up
Connect the LED strip to the dimmer and then connect the dimmer to
the AC adapter as shown below. Then plug the driver into a mains
power source. The LED strip will illuminate.
Dimmer
AC adaptor/
Driver
2. Using the dimmer
There are 3 buttons on the dimmer:
• Flash - 5 flash modes - press to choose from slow to fast
• Dim - 8 dimming levels - press to choose from dim to bright
• Cancel - exit Flash mode by pressing the Cancel button
3. Cutting and connecting the LED strip
Technical Information
• Voltage: 12V DC
• IP20: Suitable for bathrooms
Moisture & water resistant
• LED / roll: 240
• LED colour: warm white 3000K
• Wattage: 19.2W / roll
• LED type: SMD3528
• Beam angle: 120˚
• Working temperature: -20˚ to +75˚
Contents
• 4m LED strip roll IP65 with
adhesive tape
• 1 x mains AC adapter delivering
12V DC to the strip
• 3 x pre-wired connector sets
• 1 x dimmer unit
• Measure out each section and cut carefully by the cutting mark on
the strip with sharp scissors. Cut as close to the copper pads as
possible to ensure better connectivity.
Model No:
ENER271
• Carefully use a sharp knife to remove the protective gel from around
the metal soldering joint
• Insert the LED strip into the connector as shown below.
The cable contacts should sit centrally on the copper pads.
• The correct contacts need to be at the correct polarity. This is
marked on the strip with the markings ‘+’ and ‘-’ These need to be
connected to the same markings on the cable connector.
• Close the connector lid and press firmly to seal. Repeat at other end.
www.energenie4u.co.uk
Energenie is a trading name of Sandal plc
Claremont House, Deans Court
Bicester, Oxon, OX26 6BW
Made in China