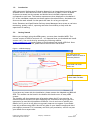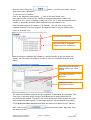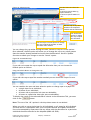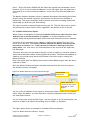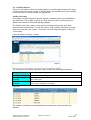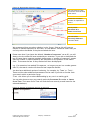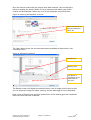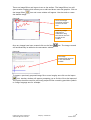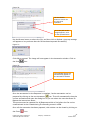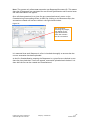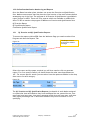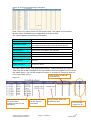
1
ePEN Supervisor User Guide
ePEN 4.6.2
Issue 3
Edexcel Limited. Registered in England and Wales No. 4496750
Registered Office: One90 High Holborn, London WC1V 7BH
Contents
1.0 Introduction
2
2.0 Getting started
2
3.0 How to log into ePEN (Live Marking Site)
4
4.0 Validity Items
6
5.0 View Progress and Reports – Updated from November 2009
13
6.0 Backreading
28
7.0 Review
33
8.0 Marking Pulled Papers
36
9.0 Online Standardisation Activities
39
10.0 Online Standardisation Monitoring and Reports
52
11.0 ERA
55
12.0 Frequently Asked Questions and Trouble Shooting
56
Appendix 1 Sequence of Events
58
Appendix 2 Using Filters on Exported Reports in Excel
59
Note: This guidebook should be read in conjunction with the following documents:
ePEN Marker User Guide
ePEN Marker Activity Flow Charts
ePEN Supervisor Activity Flow Charts
Online E38-39
Edexcel is one of the leading examining and awarding bodies in the UK and
throughout the world. We provide a wide range of qualifications including academic,
vocational, occupational and specific programmes for employers.
Through a network of UK and overseas offices, Edexcel’s centres receive the support
they need to help them deliver their education and training programmes to learners.
For further information, please call our GCE line on 0844 576 0025, our GCSE team on
0844 576 0027, or visit our website at www.edexcel.com
October 2010
All the material in this publication is copyright
© Edexcel Ltd 2010
1
Prepared by Online Assessment
Authorised By Peter Challinor
Company Confidential
v1.0
October 2010
1.0
Introduction
ePEN (electronic Performance Evaluation Network) is an image-based marking system
available online. ePEN allows the user to mark sections of papers, known as items.
Scripts are scanned into the system and divided into individual responses which
correspond to each item. The student responses are then displayed on the Marker’s
PC. As the candidate responses are shown against the selected item, the Marker can
focus on the mark scheme for that particular item for as long as required.
Senior Examiners and Qualification Delivery Award Managers have access to real time
monitoring, quality control, reporting and other functionality to help with the
supervision of marking.
2.0
Getting Started
Before you can begin using the ePEN system, you must have installed ePEN. The
current version of ePEN is version 4.6.2. It is essential that you download and install
version 4.6.2. You can do this by accessing the following website
(www.exam2score.com) and clicking on the Download and Install ePEN link. Once
you have clicked on this link, please follow the onscreen instructions.
Figure 1: ePEN Homepage
You must enter the
website address of ePEN as
advised by Edexcel.
‘Download and Install
ePEN’ link.
Helpdesk telephone
number 0800 169 9202.
If you have any issues with the installation, please contact the helpdesk on 0800 169
9202. This number can be found in the bottom left hand corner of many ePEN
screens.
The installer will also capture some information about the PC you are using. An
internet explorer window will open displaying this information and giving you the
opportunity to send this information to Edexcel. You do not have to submit your
details, but if you do it will allow us to greatly improve our support if you should
have any problems using ePEN. We will only pass on your details to approved third
part support personnel if it is necessary and with your permission; we will not pass
your details on to anyone else.
2
Prepared by Online Assessment
Authorised By Peter Challinor
Company Confidential
v1.0
October 2010
Once you have installed the components for ePEN and have established an Internet
connection, you are ready to log into ePEN.
To log into ePEN or the Online Training Site or the Practice Site you will need the
following information:
Internet Address (URL)
Username
Password
These will be sent to you by email and letter before you are asked to start marking.
Your email provider’s spam filter might occasionally hold the email with your login
details in your Junk email folder. We would therefore advise you to check this email
folder.
2.1 Online Training Site and Practice Site
When you access www.exam2score.com you will be presented with the ePEN landing
page/ homepage as shown below:
Figure 2: ePEN Landing Page or Homepage
Link to Online Training
Link to Practice Site
containing historical Items.
Online Training Site
When you click on the Online Training Site link on the landing page you will be asked
to provide your Edexcel Gateway username and password. Your username will be
your email address. If you cannot remember your password, you can regenerate it by
clicking on the 'Forgotten your password?' link on the login page at
www.edexcelgateway.com. If you are a new examiner and have not used Edexcel
Gateway before, you will be emailed a username and password shortly after
accepting your contract.
Once you have logged in you will be in the ePEN Information and Training Site. By
clicking on the link, you will have access to both the ePEN marker and supervisor
courses. It is essential that you complete the marker course and the online
standardisation course (if appropriate). Supervisors will also need to complete the
additional ePEN supervisor’s training course(s).
These online training courses will enable you to familiarise yourself with ePEN
functionality relating to marking and also the online standardisation process. The
online training courses are available for use throughout the marking period. Once you
have completed the course(s), return to the Homepage and click on “Here” to
confirm, a short questionnaire will appear for you to complete and submit.
3
Prepared by Online Assessment
Authorised By Peter Challinor
Company Confidential
v1.0
October 2010
Marking In The Practice Site
When you click on the Practice Site link on the landing page you will be taken to the
Practice Site login page. The username and password provided and the initial login
details for the Practice Site will be sent to you prior to the marking period. When you
login successfully to this site, you will be prompted to change your password.
Please be aware that any password change is site specific and will not be carried
forward to any other site. Therefore you will be required to enter the username and
password provided twice, once for each site (Practice and Live).
A sample of non subject specific responses from a previous series is available for
marking on the Practice Site. This site should be used to test if ePEN has been
installed correctly on your PC and also to familiarise yourself with the functionality
within the ePEN system. This site is available throughout the marking period.
3.0
How to Log into ePEN (live marking)
Open Internet Explorer and enter the internet address assigned to you. This will take
you to the Landing or Home Page. From here, first select the level of qualification
you wish to mark (GCE/GCSE). The page will then display the administration (subject
group) associated with that level. Select the relevant administration (subject group)
and click the “Enter ePEN” button.
Figure 3: ePEN Landing Page or Homepage
First select the Level of
Qualification e.g. GCE or
GCSE.
Then select the
Administration (subject
group).
Enter button.
You will then be taken to the ePEN login screen (see Figure 4 ePEN Login Screen).
Instructions and details on how to use these pages are provided with your user
account details that will be sent to you prior to the examination series.
Please note that your user name and password are case sensitive.
4
Prepared by Online Assessment
Authorised By Peter Challinor
Company Confidential
v1.0
October 2010
Figure 4: ePEN Login Screen
Edexcel will assign you a user
name and password. You
must enter this here.
Password reminder link.
Once you have entered your details, click on the
your user name and password are case sensitive.
button. Please note that
Changing Passwords
Please note that you will need to change your password the first time you log into
any ePEN site and that you may be required to change your password during the
marking period to maintain security. If you have forgotten your password, you can
click on the link on the Password Reminder Link to receive details of your password
via email.
If you enter your login details incorrectly 3 times, the system will lock your account.
If this happens, please contact the helpdesk to re-activate your account.
The Welcome Screen
Once you have successfully logged into ePEN, you will be taken to a welcome screen
as follows:
Figure 5: Welcome Screen
The Items available
to you are displayed
in a drop down
menu.
Your available tasks
are displayed in the
drop down menu.
Message of the Day
and Administration
details displayed.
5
Prepared by Online Assessment
Authorised By Peter Challinor
Company Confidential
v1.0
October 2010
From this screen you can select an item from the drop down list of ‘Available Items’
as well as the task you want to undertake from the list of ‘Available Tasks’.
This welcome screen may contain a ‘Message of the Day’ for all users of the system.
Each time you log into ePEN, you should check for any new messages.
4.0 Validity Items
‘Validity Items’ are copies of candidate responses that have been selected and
marked by the Principal Examiner (or designated senior examiner) which are included
in the normal marking allocation, and are marked by Markers.
Validity responses are sent to Markers automatically at a predetermined rate
(typically 1 in every 25) within the marking allocation. The Marker does not know
which items are the validity responses and hence these are used as another means of
sampling the marking and inbuilt quality control.
The Markers’ score on the Validity response is then compared with the ‘True Score’
pre-assigned by the Principal Examiner. A record of the level of agreement or
variance is available through a set of reports on ePEN. These reports indicate the
performance of each Marker on the validity responses and therefore the quality of
marking.
This version of ePEN allows you to select and escalate Validity Items by choosing
either the ‘Frontreading’ or ‘Commissioning Frontreading’ option from your available
tasks. For details on how to select Validity Items from the Commissioning screens
please see Section 9.
4.1 Selecting Validity Items (Frontreading)
As a senior examiner, you may be asked to help with selecting candidate responses
that may be used for validity. The selection of Validity Items is a two stage process.
Figure 6
Frontreading and Escalating
Approving or Commissioning
By Frontreading and escalating responses for an item a ‘validity pool’ is created. This
contains the suggested responses with the provisional True Scores. Once the final
mark scheme has been agreed, the Principal Examiner makes a final selection of the
responses from the validity pool and verifies the marks for these responses. These
responses are then commissioned into the live marking and will be used as validity
responses.
4.2 How many Validity Items are required per item?
The Principal Examiner and/or any nominated senior examiners will be notified of
the number of validity responses required per item by the QDAM for each unit. The
number of validity responses required for each item may vary as it depends on the
entry and the number of Markers with access to each item.
The Validity Calculator report within ePEN can be used to track how many items are
in the proposed or commissioned state. More information on the reports available in
ePEN is contained in Section 5 of this document.
6
Prepared by Online Assessment
Authorised By Peter Challinor
Company Confidential
v1.0
October 2010
The general/Type 3 items on a paper also require Validity Items (approximately 1015 on each item). The Marking Centre Manager will commission these into the live
marking.
4.3 How to Select Validity Items
From the Welcome Screen, select ‘Frontreading’ from the ‘Available Tasks’ menu.
Figure 7: The Frontreading Sample Selection Screen
1 Select the item from the
drop down list.
2 Enter a % sign into one of
the empty rectangular
boxes. Eg in the Batch ID
box.
4 Click on ‘Query’.
3 Enter the number of
responses you want to
choose from. (Default is 20)
Note: To refine your search you can enter a % sign followed by a number into one of
the ID boxes e.g. %4 in the Document ID field. This will return all the documents with
a number 4 in the DOC ID. This may be of use where there are more than one person
selecting validity responses on the same item.
Once you have made your selection and clicked ‘Query’, a table showing a list of
responses will be displayed:
Figure 8: How to select responses to view
1 To select all of the
responses click ‘Select All’.
2 Then select
Or select Items individually
Please note that if you revisit this function for a second time for the same item, you
should change your search parameters otherwise the system will return the same
sample of items as before. For example if you select 20 items for the first search and
20 for the second search for an item, the second search will list the same 20
responses as in the first search. Therefore we advise that you search for a larger
sample on subsequent searches on the same item, for example 40, and not select the
first 20 for review.
7
Prepared by Online Assessment
Authorised By Peter Challinor
Company Confidential
v1.0
October 2010
Copies of the candidate responses will then be displayed for you to select validity
responses from. Typically a validity response should: –
clearly demonstrate the application of the mark scheme;
be an example of a commonly seen candidate response;
not be difficult to read;
and should not be ‘out of clip’.
If the response displayed is not suitable for use as a validity response, you should
click on
to view the next response. If the response is suitable, you
should award a provisional score and click on
.
Figure 9: Escalating a suitable validity response
Provisional marks.
Click ‘Escalate’ to put
the response into the
validity pool.
Once you have clicked ‘Escalate’ a pop up box asking you to confirm your decision
will be displayed. Click either ‘Yes’ or ‘No’ as appropriate.
8
Prepared by Online Assessment
Authorised By Peter Challinor
Company Confidential
v1.0
October 2010
Once this is confirmed, categorise the response as ‘validity’ from the drop down list
in the screen below:
Figure 10: Validity Escalation Dialogue Screen
It is not necessary to
enter text for validity
responses.
Note: You can also
escalate from the Review
or Backreading tasks if
you see a suitable
response for the Validity
Pool.
Then click on
to send the item to the Validity Pool. You will then
return to the candidate response screen.
To view the next candidate response you must click on
.
Note : the “Reserve for future use” classification should only be used by Principal
Examiners to select responses for ERA (Examiners’ Report Assistant). For more details
on this process, please refer to ERA user guidelines.
4.3 How to Commission
The Commissioning Frontreading task is used to approve the Frontread items and
make them available during the live marking. This means that the candidates’
responses must have already been selected and escalated into the Validity Pool as
described in 4.2 How to Frontread and Escalate.
From the Welcome screen, select ‘Commission Frontreading’ from the ‘Available
Tasks’ menu.
Searching for Validity Samples
Once you have accessed the ‘Commission Frontreading’ screen you need to search
the ‘Validity Pool’ for the frontread responses by selecting the item from the
‘Current Items’ menu.
9
Prepared by Online Assessment
Authorised By Peter Challinor
Company Confidential
v1.0
October 2010
Figure 11: Commissioning Item Select Screen
1 Click on QC
pools.
When you click on QC Pools, the following panel will be displayed. Select the item
from the list, select QC pool as ‘Validity’ and the Commission State should be
‘Proposed’. Note: you can select ‘All’ in theses search parameters if you need your
search results to be less specific.
Figure 12: Searching for Proposed items
1 Select the item or ‘Select All’
2 Select the QC Pool as Validity,
(Practice/Qualification) or ‘Select All’ if
applicable.
3 Select ‘Proposed’ for the Commission
State or ‘Select All’ for a search for all
states.
Once all your search parameters have been selected the
will become available.
button
Note: The options in the ‘Commission State’ drop down menu can be defined as
shown below.
Responses that have been submitted into the Validity Pool for consideration
Proposed
as Validity Items.
Approved
Responses that have previously been approved or commissioned into the
Validity Pool.
Deleted
Responses that have been deleted from the Validity Pool
Retired
Responses which have been retired from the Validity Pool responses.
10
Prepared by Online Assessment
Authorised By Peter Challinor
Company Confidential
v1.0
October 2010
Once you have clicked the
item name under ‘QC Pools’.
button, you will see a folder with the
To view the list of contents:
click on the magnifier glass symbol ‘ ’ next to the Item folder icon,
then again on the
next to the ‘Validity (n approved responses)’ folder icon,
icon ‘Proposed’ folder icon. (The ‘(n)’ in this case represents the
and then on the
number of responses that have been escalated into the Validity Pool).
Each proposed response is listed as a ‘QC number’. You can click on any of the
responses listed to view that response and approve them it into the Validity Pool.
Figure 13: Proposed items
QC Pools folders expanded
Responses ready to commission
/approved into the Validity Pool
After clicking on a response (QC number), a window similar to the one below will
appear. You can resize the window in order to view the candidate response more
easily.
Figure 14: Commissioning to Approved
Selected response displayed in
marking window that can be
resized.
Proposed True Score is
displayed
‘Submit Score’ and
‘Commission’ buttons
The selected candidate response and the suggested ‘True Score’ are displayed. The
True Score is the mark given through Frontreading and is usually based on the
provisional mark scheme. Therefore, this score needs to be reviewed after the final
mark scheme has been agreed. At this stage the score can be changed if necessary.
If you agree with the True Score allocated and want the response to be a Validity
Item; click on the
the drop down list.
button and then select ‘Approved’ from
11
Prepared by Online Assessment
Authorised By Peter Challinor
Company Confidential
v1.0
October 2010
To change the True Score, you must remark the item. Enter your new mark in the
marking grid and then click on the
button. This will change the
‘True Score’, and you will then need to click on the ‘Commission’ button and select
‘Approved’.
If you decide not to use the response as a validity response because it is unsuitable,
you can click on ‘Commission’ and then select ‘Deleted’ or simply click on the next
response (QC number) you wish to view.
The next candidate response will be displayed in the window.
12
Prepared by Online Assessment
Authorised By Peter Challinor
Company Confidential
v1.0
October 2010
5.0 Supervisor View Progress and Reports
Supervisors can access all of the View Progress functions available to Markers as
described in the ePEN Marker User Guide. However, they also have access to
additional information.
Therefore a Supervisor can view the following areas in View Progress:
Marking Progress – Progress Through Contract and Marking Progress By Item. This is
the View Progress default page.
Note: Markers can only see details about themselves. Supervisors can see the details
of their team.
Allocations - View/amend details of the caps of individuals.
Reports – View statistical reports for an individual Marker/item, team or paper.
Help – View an electronic copy of the activity flow charts and link to Ask Edexcel and
Edexcel Gateway.
To access the View Progress screen you must select ‘View Progress’ from the drop
down list of available tasks in the Welcome Screen.
5.1 Marking Progress
Figure 15: Accessing View Progress
Select View Progress
The following screen will be displayed. It is divided into two sections:
- Progress Through Contract
- Marking Progress By Item
Note: the data displayed on this screen is updated on a regular basis.
13
Prepared by Online Assessment
Authorised By Peter Challinor
Company Confidential
v1.0
October 2010
Figure 16: View Progress screen
To minimise/
expand the menu
To return to the
Welcome Page
From this screen, you can view your own marking progress, the cap, the total
allocation and the overall progress of marking on the paper for each item you have
been assigned to. As a supervisor, you can also access this information for an
individual in your team or on a team level by selecting ‘All’ from the drop down
menu.
By selecting team members from the drop down list, you can see what the individuals
have marked to date, their percentage Contract Completion, as well as the overall
progress of marking against the number of responses scanned for each item.
Progress Through Contract
The default view will show your contract and allocation values. This information is
available as soon as ePEN is live. Supervisors can also monitor their team by using the
dropdown list to select individuals.
Figure 17: Monitoring an Examiner: Progress Through Contract
The individual
contracted allocation is
displayed
The Contract Completion
Date for the paper is
displayed (dd-mm-yyyy)
This displays the number of
responses the individual has
marked so far
Marking Progress by Item
This area of the screen shows the number of responses you have marked for each
item and should be used to help with planning your marking. This screen also
displays your allocation per item. The sum of your allocation per item will be the
same as your contracted responses for that paper. You can view a marker’s details by
selecting them from the dropdown list.
14
Prepared by Online Assessment
Authorised By Peter Challinor
Company Confidential
v1.0
October 2010
Figure 18: Monitoring an Examiner: Marking Progress By Item
The item type is
displayed.
Note:
Expert = Type 1
Graduate = Type 2
Clerical = Type 3
Individual’s
marking
progress
for each
item.
Allocation
per item.
Number if items
marked in
Backreading and
Frontreading.
For a marker, this
will always be 0.
The marking
progress for the
whole paper is also
displayed. i.e. the
total number of
responses marked by
all markers against
the total number of
scanned responses
available (when you
first log in, this
number will be low,
it will increase as
more scripts are
scanned in).
The ‘Progress Through Cap’ column shows the number of responses marked against
the cap. Normally the cap should equal the allocation. If the cap is less than the
allocation it has been amended by a supervisor.
In addition to the marker view of Marking Progress, supervisors can also see how
many supervisory marks they have submitted in the Supervisory Marking column. This
number includes Frontreading scores and Backreading where the marks have
changed.
Note: The number of responses available will update as more scripts are scanned into
ePEN. Therefore the “Overall Responses Completed By Item” percentage complete
will also update.
5.1.1 Allocation of Items Before Standardisation (Familiarisation Marking)
After the examination has been sat, a small number of scripts are scanned to enable
you to view candidates’ responses prior to pre/standardisation. At this stage all
available markers will have the default allocation of 10000 and a cap of 10000 for
each item to allow them to mark using the provisional mark scheme to note any
issues.
e.g.
5.1.2 On the day of the Standardisation activity
All the marks in ePEN are reset. This means that any marking undertaken prior to the
reset is deleted. Your Progress Through Cap and overall responses completed column
will be reset to display 0% until marking starts. Please note that any items sent to
review will not be reset. Supervisors are required to mark these items.
5.1.3 Allocation of Items After Standardisation
After the reset has taken place and once a sufficient number of candidates’ scripts
have been scanned into ePEN , the allocation and cap values will be amended
automatically. The value of the allocation will add up to the number of responses
that a Marker/Supervisor has been contracted to mark. The cap will automatically be
set at the value of the allocation unless it has been amended manually.
e.g.
15
Prepared by Online Assessment
Authorised By Peter Challinor
Company Confidential
v1.0
October 2010
Most supervisors will automatically be given an allocation of every item on a paper.
Please refer to your contract and/or for guidance given at the pre-standardisation
regarding the marking you are expected to undertake.
5.1.4 marking period
During the marking period, you should check the Marking Progress screen to monitor
the progress of your team against their allocation and the overall item completion.
A supervisor’s allocation of items should be primarily used to mark responses in
Review, Pulled Paper and for Backreading. See section 6, 7 and 8 of the booklet for
more details on Backreading, Review and Pulled Paper.
As a marker completes marking on a particular item, a default message asking them
to contact their supervisor will appear. It is advisable that you check the Marking
Progress By Item and see if Progress Through Cap is 100% and if the cap has not been
set at a different value to the allocation.
If the marker is showing 100% against their allocation for that item, they should mark
a different item until all items show 100%.
When markers have scored all items assigned to them, they have completed their
contract. At this point the system may allocate additional responses that have not
been allocated to other markers. This reallocation of responses, from the unallocated
pool, will occur every 60 minutes once the markers has completed their contract.
(This is a default setting and may be changed during a series). Once the reallocation
takes place, the Marking Progress screen will show a new item allocation which will
be larger than the original allocation. They will now be able to continue marking any
additional responses. This may occur before the contract completion date as long as
the contracted items have been marked.
Note: The Progress Through Contract is not updated with the new allocation values.
5.1.5 Allocation of Items After the Contract Completion Date
On the day after the contract completion date (00.01hrs) the allocation of any
marker who has not managed to mark all of their assigned items will be available for
the rest of the marking team.
Marking progress is reset to display a default allocation of 10000.
5.2 Allocations
The Allocations area displays information about the cap (limit) of marking that can
be undertaken by a marker as well as the number of items allocated.
The capping function must only be used if you have concerns over a Marker’s
marking quality and you wish to prevent the Marker from accessing any further items.
If this is the case you must also notify your Principal Examiner and QDAM. The cap
can be changed either item by item or for all items for a particular Marker.
The capping function should not be used as a workflow tool as this could prevent a
Marker from fulfilling their contractual obligations.
16
Prepared by Online Assessment
Authorised By Peter Challinor
Company Confidential
v1.0
October 2010
Figure 19: Allocation tab
Use the filters to refine the
search:
to select a specific Role eg
Expert Examiner;
to select a specific Marker or
“All”
Edit the cap to any value
between the responses
marked and the allocation.
Use the Default
option to change
the cap to equal
the allocation.
Use the Cap at Current Option to change
the cap to equal the number of Items
that have been marked.
You can change the cap either through the Edit, Default or Cap at Current options.
Once selected, the Edit option will allow you to change the cap to any value greater
than the amount already marked but lower than the Allocation. Use the ‘Update’
function to submit your change or use the ‘Cancel’ option.
Figure 20: An Amended Cap
If you wish to increase the cap to equal the Allocation then you can choose the
Default option as follows.
Using the Default Button to Change the Cap
If you wish the cap to equal the number marked you can choose the Cap at Current
option.
You can combine the user and item selection option to change caps on a paper for:
• a single item for an individual;
• all items for an individual;
• all users with a particular role (use not advisable);
• all users on a particular item type (use not advisable).
To display the result of the selected search criteria in the Allocations Tab, you must
click on the
button.
Note: The use of the ‘All’ options in the drop down menus is not advised.
Where you wish to cap a single item for all individuals, or all items for all individuals
you must do so in consultation with your Principal Examiner and QDAM. Allocations
can not be amended by Supervisors and any issues with the allocation for a particular
individual should be directed to the helpdesk (0800 169 9202).
17
Prepared by Online Assessment
Authorised By Peter Challinor
Company Confidential
v1.0
October 2010
5.3 Reports
In order to monitor your teams’ performance, you will need to access the statistical
evidence gathered on each Marker throughout the marking period. To do this you
need to select Reports within the View Progress screen. We also recommend that you
maximise the viewable screen by minimising the menu on the left.
There are 5 reports that will assist you in carrying out this task which are described
in more detail below. Please note that there are many reports available but these
are only used for monitoring Online Standardisation activity and are described in
detail in Section 10 of this document.
Marker Statistics Summary
Marker Differences
Validity Calculator
Validity Item Monitor
Reviews, Pulls and Adjudications
5.3.1 Marker Statistics Summary
This report will help you to monitor the quality of the marking for an individual or
group by displaying statistical information on the accuracy of both Validity Items and
Backreading. From View Progress, select the Reports tab. The Reports default page
will then be displayed.
To run a report you must first select the paper, the role (AA or Non-AA), the Marker
and item required. You may choose to select ‘All items’ or ‘All Markers’ for a paper.
Figure 21: Marker Statistics Summary Settings
To generate a Marker Statistics Summary Report:
1 Select Paper
2 Select Role Type – optional; selecting AA role will exclude non-marking roles
3 Select Team Leader – optional; allows you to limit the list of Markers to your
team
4 Select Marker or ‘All’
5 Select Item Type – e.g. Expert or ‘All’ for all item types
6 Select the Item
7 Click on the View Report button.
18
Prepared by Online Assessment
Authorised By Peter Challinor
Company Confidential
v1.0
October 2010
Figure 22: Marker Statistics Report
Use this arrow to
maximise the
screen
Once generated,
the report will
be displayed.
Note: You may
need to use the
Previous and
Next page
arrows to view
all the results.
You can also
export this
report in several
formats.
When you first run this report, at the beginning of the marking period, we
recommended that you initially select all Markers for an item on this report. This
report will help you to monitor the quality of the marking for an individual or
group by displaying accuracy on Validity Items as well as Backreading.
The report displays the following information:
Marker
Examiner Name or ‘Team Total’ or ‘Item Total’
ID
Assessment Associate number
Trait
Name of the trait (if applicable) or item
Total Read
Total marked including validity
Total Time
Total marking time in decimals e.g. 1.75 is one hour forty
five minutes
Average Rate
Overall number of responses marked per hour
Total
Validity
Validity
Total
Backreading
Perfect
Reads
Number of Validity Items marked
Non Adj
Low
% responses scoring lower than the true score
Adj Low
% responses scoring lower than the true score but within
adjacency
Perfect
Agree
% responses agreeing with the true score
High Adj
% responses scoring higher than the true score but within
adjacency
Non Adj
High
% responses scored higher than the true score
Read #
The number of items backread
Low
% responses marked lower than Supervisor mark
Agree
% responses agreed with Supervisor
High
% responses marked higher than the Supervisor
19
Prepared by Online Assessment
Authorised By Peter Challinor
Company Confidential
v1.0
October 2010
Case Study 1: Interpreting the Validity columns in a Marker Statistic Summary Report
Total
Marker
A Team
Leader
A Marker
B Marker
C Marker
D Marker
E Marker
F Marker
Nonadj
Low
Validity
Reads
53
13
1
38
37
6
4%
8%
0%
3%
11 %
0%
Validity
Adjacent Perfect
Adjacent
Low
Agree
High
Nonadj
High
0%
0%
0%
0%
0%
0%
96 %
92 %
100 %
97 %
86 %
100 %
0%
0%
0%
0%
0%
0%
0%
0%
0%
0%
3%
0%
A Marker – has marked 53 Validity Items. 96% or 50 items (50/53 x100 = 96%) were in
complete agreement with the True Score. 4% (or 3 Validity Items) were marked
below the True Score and outside of adjacency (Non-Adj Low column).
E Marker – has marked 37 Validity Items. 86% or 32 items (32/37x100 = 86%) were in
complete agreement with the True Score. 11% (or 4 Validity Items) were marked
below the True Score and outside of adjacency (Non-Adj Low column). 3% or 1
Validity Item was marked higher than the True Score and outside of adjacency (NonAdj High column).
There is no indication on this report as to how many marks the Marker is away from
the True Score. This information can be found on the Marker Differences Report.
This report does tell you the % that the Marker is within Adjacency (Adj).
Case Study 2: Interpreting the Backreading columns in a Marker Statistic Summary
Report
The report above shows the backreading results for 3 Markers (A to C) on an item
which has 2 traits (i and ii).
Backreading
Total
Marker
Perfect
Trait
Read #
Low
Agree
High
A Marker
i
22
0%
95 %
5%
A Marker
ii
22
0%
100 %
0%
B Marker
i
22
0%
95 %
5%
B Marker
ii
22
5%
90 %
5%
C Marker
i
22
0%
100 %
0%
C Marker
ii
22
0%
100 %
0%
A Marker – has been backread on 22 responses (made up of part i and part ii).
Part i - 95% or 21 times (22x95%=21) the Supervisor agreed with the Marker’s score
for part i. 5% or on one occasion the Marker’s score was higher than the mark
awarded by the Supervisor.
Part ii – 100% of the Marker’s scores were agreed by the Supervisor.
B Marker – has also been backread on 22 responses.
Part i - 95% or 21 times (22x95%=21) the Supervisor agreed with the Marker’s score
for part i. 5% or on one occasion the Marker’s score was higher than the mark
awarded by the Supervisor.
20
Prepared by Online Assessment
Authorised By Peter Challinor
Company Confidential
v1.0
October 2010
Part ii - 90% or 20 times (20x90%=20) the Supervisor agreed with the Marker’s score.
However, 5% or on one occasion the Marker’s score was higher than the Supervisor’s
score and 5% or on one occasion the Marker’s score was lower than the Supervisor’s
score.
The Marker Statistics Summary report is updated throughout the marking period and,
as more items are marked, the more the statistics can indicate how a Marker is
performing. This report should be used to monitor your team’s marking quality and
should help you prioritise your backreading.
The report can also be exported and saved to your PC. This will allow you to review
and reformat the report whilst offline. Appendix 2 has details of how to do this.
5.3.2 Marker Differences Report
Where further investigation is required the Marker Differences report shows a more
detailed view on the performance of a Marker. It contains statistics on both
Validity Items and any backread items which have been marked by a senior examiner.
It displays all the occasions where a Marker’s marking has differed from the True
Score, on a trait level. This report indicates whether the Marker is tending to be
more harsh or lenient (+ or -) than the senior examiner’s marking and by how
many marks. The ‘true score’ for a backread item is the score that the Supervisor
has submitted.
Therefore this report can be used to identify a trend in marking. It can also indicate
areas where the mark scheme is being applied erratically. Therefore the feedback to
a Marker can include points about the particular trait which may be causing the
Marker difficulty.
Note: this report does not display the occasions where Markers agree with the senior
examiner’s marks.
Once the Marker Differences Report has been selected from the choice of reports,
the following screen will appear.
Figure 23: Marker Differences Criteria Selection Page
Select Marker
Differences.
Select the search
criteria for the report
and click on ‘View
Report’.
You can refine the details of the report by selecting the data in each of the available
fields. Select the Marker, the Item and other relevant parameters before clicking on
the View Report button.
You can refine your search by Role Type - AA, Non AA role or All. By selecting AA, the
selection of Role is limited to the marking roles on ePEN e.g. Examiner.
The figure below shows an example of a Marker Differences Report.
Figure 24: Marker Differences Report – Display
21
Prepared by Online Assessment
Authorised By Peter Challinor
Company Confidential
v1.0
October 2010
The columns in this report show you the following information:
Date
The date the item was marked (mm/dd/yyyy)
Trait
The name of the trait (row of the marking grid) e.g. Q1bii, Q1biii
True Score
The score assigned by a Senior Examiner either for a Validity Item or a
backread item.
Actual Score
The mark awarded by the Marker
Difference
The difference in marks between the examiner’s mark and the Senior
Examiner’s mark on a trait level
Type
This indicates whether the item is a Validity Item or a Backread item (Score)
Document ID
This identifies the script ID within ePEN
Case Study 1 – Marker Differences Report
Below is an example where the Marker is tending to be harsher in their marking than
the Senior Examiner. Although this only indicates a small number of items you may
wish to feedback to the Marker to alert them to the fact that they are marking Q2
harshly.
You may also need to backread some more of this Marker’s work for this item.
6xxx
Marker
Differences
Level:
GCE
Marker: All Markers
Type
Item:
6xxx_0x_Q02
Date
Trait
True
Score
Actual
Score
Difference
Document ID
16/06/2007
Q02
3
2
-1
Validity
QC0184300072259
16/06/2007
Q02
2
1
-1
Validity
QC0184300072896
16/06/2007
Q02
2
3
1
Validity
QC0184300072897
17/06/2007
Q02
4
3
-1
Score
17/06/2007
Q02
3
2
-1
Validity
0184500345799
QC0184300072259
In the first row of data the Marker has awarded the response 2 marks, whereas the
True Score is 3 marks. Therefore the Marker is -1 mark from the True Score.
Feedback to markers
22
Prepared by Online Assessment
Authorised By Peter Challinor
Company Confidential
v1.0
October 2010
Backreading items (Score): By noting the Document ID and accessing the Backreading
screen, you can enter this number into the search criteria, view the item and send a
message along with the image to the examiner as necessary.
Please note that Messaging is not possible if it is a Validity item. However, you can
still view the item in the Backreading screen but you won’t be able to send a
message.
This report can also be exported to your PC and viewed offline. To do this, select one
of the available formats (e.g. excel or Acrobat file), select export and save to your
PC.
5.3.3 Reviews, Pulls and Adjudications
The Reviews, Pulls and Adjudication report allows Supervisors to keep track of how
many items are in Review, in Pull or in Adjudication waiting to be marked.
Only Supervisors have access to the items waiting to be marked in review so it is
important that these are dealt with throughout the marking period and that this
report is checked on a regular basis.
The figure below shows the criteria page for this report when it is first selected.
Figure 25: Reviews Pulls and Adjudications – Selection
Select the Reviews, Pulls and
Adjudication Report from
the drop down menu.
You will need to select the paper, the item type and the Marker or ‘All’ before
clicking on ‘View Report’. The figure below shows an example of a typical report if
the ‘All’ option has been selected.
Figure 26: Reviews Pulls and Adjudications – Display
The ‘All’ option allows
the report to display
information on all the
Markers for the paper.
23
Prepared by Online Assessment
Authorised By Peter Challinor
Company Confidential
v1.0
October 2010
The report will only show information for examiners who have sent items to review.
The columns in the report contain the following information:
Item Name
The item name e.g. 5521_01_Q2c.
Markers ID
AA number.
Marker Name
Name of Marker.
Reviews
Pulls
Adjudications
Sent
The number of items sent to review by an examiner.
Outstanding
The number of review items still waiting to be marked.
Sent
The number of items sent from Review to Pull.
Outstanding
The number of items in Pulled Paper waiting to be marked.
Completed
Only applies to clerically marked items - The number of items
that need marking in adjudication. These are dealt with by
the Marking Centre Manager.
Outstanding
Only applied to clerically marked items –The number of items
marked in adjudication. These are dealt with by the Marking
Centre Manager.
Figure 27:
In the example above, Janinemark has sent 9 items to review of which 4 are still
waiting to be dealt with by the Supervisor. This Marker has sent the greatest number
to review when compared to any other Marker.
If a particular Marker is sending many items to review, it may be that they need
further guidance on a particular aspect of the mark scheme, which the Supervisor
could provide.
If one item is always being sent to review by different Markers, it may be that the
candidates have written outside of the viewable area. If this is the case, it may be
that you need to allocate more time to resolving these queries in Pulled Paper.
24
Prepared by Online Assessment
Authorised By Peter Challinor
Company Confidential
v1.0
October 2010
5.3.4 Validity Reports
There are two reports which are used primarily by the Principal Examiner of a paper
to ensure that the correct number of Validity Items are available during the marking
period and that the Validity Items are appropriate.
Validity Calculator
Every paper on ePEN requires a specific amount of Validity Items to be available to
the examiners. The number required for each item on a unit is confirmed by the
Qualification Delivery and Award Manager (QDAM).
The Validity Calculator report can be used to track how many items have been
proposed and commissioned. To view the report, select Validity Calculator the drop
down menu and then the ‘Paper’. The report can then be generated by clicking on
‘View report’.
Figure 28: Validity Calculator – Display
The columns in the Validity Calculator report contain the following information:
Item
Item name e.g. 5562_01_Q1
Item Type
General / Graduate / Expert
Number of Responses
Proposed
The number of responses that have been frontread and escalated into
the validity pool
Number of Responses
Approved
The number of responses that have been commissioned from the validity
pool and are available to examiners
Figure 28:
The number of Validity Items proposed and commissioned is also monitored by
Edexcel.
25
Prepared by Online Assessment
Authorised By Peter Challinor
Company Confidential
v1.0
October 2010
For General items (Type 3) it is only essential that Senior Examiners frontread and
propose Validity Items. The Marking Centre Manager is responsible for commissioning
the Validity Items for these items.
Validity Item Monitor
This report contains statistical information on the commissioned Validity Items
marked by examiners. It allows you to see if the item is performing as expected.
This report enables you to quickly target the specific Validity Items where there is a
low level of agreement with the true score.
It is recommended that this report is used in conjunction with the 0.Marker Statistics
Summary and Marker Difference reports. The report shows performance by trait,
including the count, variance and scores given by Markers against each validity
response. To access this report, you must select Validity Item Monitor in the drop
down menu in the reports tab. The figure below shows the report page.
Figure 30: Validity Item Monitor – Selection
Select the paper and item required before generating the report.
Figure 31: Validity Item Monitor – Display
26
Prepared by Online Assessment
Authorised By Peter Challinor
Company Confidential
v1.0
October 2010
The columns in the Validity Item Monitor report contain the following information:
Document ID
The Validity Item identification number. E.g.
QC500012345
Trait
The trait name e.g. Q2cii, Q2ciii
Cumulative
Number of times marked
The total number of times (so far) that this
Validity Item has been marked
Low Non-Adjacency %
The number of times (so far) examiners have
awarded a lower mark outside of adjacency.
Low Adjacency %
The number of times (so far) examiners have
awarded a lower mark within adjacency in relation
to the True Score (expressed as a percentage).
Perfect Agreement %
The number of times (so far) examiners have
agreed perfectly with the true score as a
percentage.
High Adjacency %
The number of times (so far) examiners have
awarded a higher mark within adjacency in
relation to the True Score (expressed as a
percentage).
High Non-Adjacency %
The number of times (so far) examiners have
awarded a higher mark outside of adjacency.
True Score
The True score assigned to the trait of the Validity
Item
Frequency Distribution%
The number of times (so far) a particular mark has
been awarded as a percentage
6xxx
Validity Item
Monitor
Level: GCE
Item:
6xxx_01_Q01a
Cumulative
Document ID
Trait
Low
Non-Adj
%
0.0
Low Ajd
%
Perfect
Agree %
High Adj
%
Q01a
No.
Times
Marked
3
QC0184300069429
0.0
100.0
QC0184300070260
Q01a
8
0.0
0.0
QC0184300069941
Q01a
2
0.0
QC0184300069719
Q01a
6
QC0184300069903
Q01a
3
QC0184300069924
Q01a
QC0184300069925
Q01a
Frequency
Distribution %
0
1
2
3
True
Score
0.0
High
Non-Adj
%
0.0
75.0
0.0
25.0
1
75
0.0
50.0
0.0
50.0
1
50
0.0
0.0
100.0
0.0
0.0
3
0.0
0.0
66.7
0.0
33.3
0
67
3
0.0
0.0
66.7
0.0
33.3
0
67
33
3
0.0
0.0
66.7
0.0
33.3
0
67
33
3
100
33
In the example above, QC0184300070260 has been marked 8 times (by various
Markers). 6 of the scores (75%) have agreed with the True Score. 2 of the scores
(25%) have been marked generously and outside of adjacency (High Non-Adj %)
Note: if a Validity Item is retired or deleted, a replacement must be commissioned
back into the system to ensure that the correct number are available to the
examining team.
5.4 Help
If you select the Help Tab you will be able to access the activity flow charts
electronically. There are also links to Edexcel Gateway and Ask Edexcel.
27
Company Confidential
50
100
The Validity Item Monitor report shows each validity response commissioned, and a
detailed overview of how a Marker performed against each item. Problematic Validity
Items should be easily identifiable using this report and the appropriate action taken.
For example, a problematic Validity Item could be retired.
Prepared by Online Assessment
Authorised By Peter Challinor
25
v1.0
October 2010
6.0 Backreading
6.1 What is Backreading?
Backreading is one of the key monitoring tools available to Supervisors in ePEN. It
allows you to select a sample of marked items from your team of Markers so that you
can monitor the quality of marking. Supervisors should use backreading as the way of
accessing a Marker’s (first) sample of marking to ensure consistent and correct
application of the mark scheme.
The functionality to backread the work of a Marker is available throughout the
marking period but you should be aware that if marking continues past the Contract
Completion deadline, marked items will be held on ePEN for a shorter period of time.
As such you have a shorter window of opportunity to backread.
Although the reports can indicate performance issues with a particular Marker or
item, the backreading functionality can assist you in pinpointing the issue by allowing
you to re-view a response and see the score the Marker had awarded it.
6.2 Selecting a sample to Backread
To start the backreading process, select ‘Backreading’ from the ‘Available Tasks’
menu on the Welcome Screen. Once you are on the backreading screen, you must
select your search parameters.
Figure 32: Selected a sample to Backread
Please note that the
Backreading functionality
is no longer date driven.
Select the item you wish to
backread.
After selecting the item you wish to backread, a further set of selection criteria will
appear.
28
Prepared by Online Assessment
Authorised By Peter Challinor
Company Confidential
v1.0
October 2010
Figure 33: Backreading Selection Criteria
You can select a Team
and Scorer from the drop
down menu.
Amend the maximum
number of responses to
return.
Sort by eitherDocument ID or
Latest Score Time
You can select
Previously Backread
Yes/No or Both
We recommend that you select a Marker in the ‘Scorer’ field as this will return a
sample of marked responses for this item, for that Marker. Please be aware that you
can only select the Marker if they have marked the item.
Please note that if you leave the default “Number of responses” set at 20, you will
always view the oldest 20 items marked by an examiner. If you wish to backread the
last 10 items that a examiner marked, please enter a “number of responses” greater
than the number of items marked by the individual for the question in the search
field. This means the last 10 they marked will then be displayed.
e.g. If an examiner has marked 50 responses , as long as you put in a number greater
than 50, the search results will show the last responses marked.
You also have additional options of selecting, for example, by ‘Team’ or ‘Trait’*.
These and the other additional parameters can be used if you wish to further limit
your search within a particular range.
*Trait – this allows you to select Backreading by any row in a marking grid.
You can also choose to sort your search results by Document ID number or Latest
Score Time. The Latest Score Time will find the most recently scored items for the
selected Marker(s).
Figure 34: Number of Responses and sort by selection
29
Prepared by Online Assessment
Authorised By Peter Challinor
Company Confidential
v1.0
October 2010
The screen below displays the responses available to Backread based on your
selection criteria. Here you will see a brief history of the responses showing whether
the response has been marked, what marks have been given, if the response has
been second marked, and who has done the marking. You can now select any of the
responses or all of the responses from this list, and then click on the ‘Backread’
button.
Figure 35: the Backreading Sample Return Screen
Here you can select
individual Items or select
‘All’.
You may get an additional download (as shown below) the first time that you access
a Supervisory function.
Figure 36: Supervisory Function Download
30
Prepared by Online Assessment
Authorised By Peter Challinor
Company Confidential
v1.0
October 2010
6.3 The Backreading Screen
Figure 37: Backreading Functions
Image manipulation
You can see previous
marks from Markers
Assign your own
marks
Once you have evaluated the response, you can choose to:
Figure 38: Backreading Options
You can submit a mark
You can send the response to the Principal Examiner for review*
You may choose to skip this response at this time
You can send a mail to the Marker or your whole team
You can escalate appropriate responses for Validity/Practice etc.
End task and return to other Supervisor functions.
* If you send an item from Backreading to Review, the score will be visible.
31
Prepared by Online Assessment
Authorised By Peter Challinor
Company Confidential
v1.0
October 2010
If you agree with the Marker’s scores while Backreading, we recommend that you
click on the Marker’s tab. When the Marker’s tab is clicked the marking grid will self
populate with the original scores given. Then submit the score using the ‘Submit
Score’ button as shown in the diagram below.
Figure 39: Agree the Score
Click on the Marker’s
tab to populate the
marking grid with the
scores.
Then click on Submit
Score button to
confirm the marks.
If you are backreading a multi trait item and do not agree with all of the marks the
Marker has given the item, you can amend the marks on a trait level as shown below.
Figure 40: Changing the score on a trait level
The Supervisor’s amended
score is shown as a
the marking grid.
in
The original Marker’s score
is shown as a
in the
marking grid.
When a mark is changed by a Supervisor it will be their scores that will be carried
forward as the candidate’s mark.
32
Prepared by Online Assessment
Authorised By Peter Challinor
Company Confidential
v1.0
October 2010
7.0 Review
The Review feature allows a Marker to send a response they cannot mark to a
Supervisor together with an explanation as to why they are unable to mark it.
Note: After ePEN is reset, after familiarisation marking, any items in review will
remain there until marked by the Supervisors on the paper.
From the ‘Available Tasks’ menu of the Welcome screen, select ‘Review’. Firstly
select the item you want to review and then the following window will appear:
Figure 41: The Review Sample Selection Screen
A Supervisor can select
what to review from this
window based on a variety
of selection criteria: eg
Team, Scorer, or Category.
Select the criteria in the following order to view a specific Marker’s sent review
items:
Step 1
Select
item
This allows the system to begin filtering all the responses based on the
item selection.
Step 2
Select
Category
For example, the category called ‘Mark Scheme’ will be chosen to allow
Markers to submit for review responses for which they have difficulty in
applying the mark scheme. If you do not select from a category the search
will return all selected responses regardless of the category.
Step 3
Select a
scorer
To review responses from a particular Marker, select their AA number from
the drop down list that will be displayed, or leave the scorer field blank to
return all Marker responses for the item.
You can quickly change your search setting in the window above using the
button.
33
Prepared by Online Assessment
Authorised By Peter Challinor
Company Confidential
v1.0
October 2010
Once the search criteria that you require have been entered, click on the Query
button to display the search results. A list of responses that match your search
criteria will be displayed. Select any or all of the responses and click Review.
Figure 42: Selecting the Responses to Review
Select from the list of
responses marked or
‘Select All’.
The figure below shows the functions and options available to Supervisors in the
reviewing screen.
Figure 43: Reviewing a Response
Document ID
Marking Grid
The Marker’s
comments (if any
submitted) on
the item.
The Review screen will display the selected item; a set of image control tools so that
you can adjust the image for better viewing; and the marking grid to be completed.
Note: Items in Review have not been marked even if the marking grid was completed
before the item was sent to Review.
34
Prepared by Online Assessment
Authorised By Peter Challinor
Company Confidential
v1.0
October 2010
Once you have reviewed the response, you can select from the following
options/actions shown in the figure below.
Figure 44: Review Menu Options
You can submit a mark.
This function is not available for expert or graduate Items.
You can escalate responses that are appropriate for Validity.
You can send a message.
You can Skip a response and revisit later.
This function is not available for expert or graduate Items.
You can change the category of the response.
You can send a response to the Pull, to enable the script to be viewed
where candidates have written outside the viewable area.
When complete, you need to click on Close Viewer.
7.1 Messaging in Review
You can respond to a review item with a message to either:
-
the person who sent the review (select Users on Response)
your team (select Users on Response)
selected members of your team (select Users on Response)
your own Supervisor (select Principal Examiner/Team Leader)
Attaching an Image of the Response to the Message
If you wish to give feedback to a Marker you can type your message and attach the
image of a specific item. To do this you must send the mail before clicking ‘submit
score’. The Marker will then be able to see the image of the response, but not the
marks associated with it.
For further guidance on how to use messaging please refer to the Messaging section
in the Examiner guidebook.
35
Prepared by Online Assessment
Authorised By Peter Challinor
Company Confidential
v1.0
October 2010
8.0 Marking Pulled Papers
Markers may have sent items to Review because a candidate has written outside the
defined region (clip area) allocated for the candidate’s written response; hence part
of the response cannot be seen in the Mark Student Responses screen.
When you view this item in Review you may still not be able to mark the item for the
same reasons. i.e. it may not be possible to assign a mark to the response without
viewing the whole page or indeed the whole script. Typically you will see these
responses if your Review search specifies the ‘out of clip’ category. If you agree that
there may be some unseen work that could affect the final mark but which cannot be
viewed, you must send the response to ‘Pull’. If you are able to mark the response in
Review you are advised to do so.
8.1 Accessing the Items in Pull
To mark these ‘out of clip’ responses, select ‘Pulled Paper Scoring’ from the
‘Available Tasks’ menu of the Welcome page.
Figure 45: Score Pulled Papers Item Selection
8.2 Marking a Response in Pulled Papers
Select an item from the ‘Select Item’ drop down menu. Please note that you do not
need to know the specific Document ID; all these will be listed automatically.
Figure 46: Selecting the Script to Pull
Select item,
then click on
‘Query’
You do not need to
change any of the
default settings
36
Prepared by Online Assessment
Authorised By Peter Challinor
Company Confidential
v1.0
October 2010
Once you have click query, the results page will be displayed as shown below:
Select a Document ID by
clicking in the radio button so
it is green. Note: you can only
select one document at a time.
You can then click ‘View’ to
display the whole candidate
script.
Upon making your selection, you can now view a complete script containing the item
you initially selected. By clicking on the ‘view’ button you will see a separate
window which will display the candidate’s answer booklet page by page.
Figure 47: The View Script Screen
Navigate through the
pages until you find the
page(s) of the script
with the selected item’s
response. You can also
use the drop down menu
to go straight to the
relevant page.
Once you are able to identify an accurate mark for the item, you can then return to
the selection screen by toggling (Use the keys alt and tab) or using the Start menu
bar and click on the ‘Score Pulled Papers’ button. This will take you to the marking
screen where you can enter the accurate mark into the mark grid and submit score.
Once you have submitted the mark you will need to close the window that shows the
full script.
Figure 48: Mark Pulled Paper Screen
Document ID to be noted
if you still can not assign
a score
Assign a Mark and submit
score.
37
Prepared by Online Assessment
Authorised By Peter Challinor
Company Confidential
v1.0
October 2010
Unmarkables
Sometimes you still cannot assign a mark even though you can see the whole script.
This may be because, for example the writing is too faint or coloured ink has been
used. If this is the case then you need to make a note of the Document ID together
with the item name (e.g. 5521_01_Q32). These details together with your AA number
should be emailed to the following address: [email protected] This
script will then be sent out as a hard copy to a White Mail Examiner for marking
traditionally.
38
Prepared by Online Assessment
Authorised By Peter Challinor
Company Confidential
v1.0
October 2010
9.0
Online Standardisation Activities
This section should only be read if you are a Supervisor on a unit which is to be
standardised online.
Online Standardisation is a remote Standardisation process undertaken in place of
holding a traditional Standardisation meeting. The aim of the activity remains the
same; to ensure a well-founded and common understanding of the requirements of
the mark scheme that can be applied reliably.
Using the ePEN system it is possible to prepare Standardisation material and make
this available online. Markers then have to complete three stages:
Familiarisation Marking, Marking Practice Sets and Marking Qualification Sets.
As soon as candidate scripts are scanned and items become available on ePEN
(normally 24 to 48 hours after the examination is sat) all Markers will have access to
all the available items in order to familiarise themselves with candidate responses
and the application of the mark scheme. This time is known as Familiarisation
Marking as the marks awarded to any items will be reset prior to actual live marking
commencing.
All Markers are expected to contact their Supervisor prior to the pre-standardisation
with feedback regarding the candidate responses seen during familiarisation along
with any proposed amendments to the mark scheme.
Familiarisation Marking will end at 23.00hrs on the day before the standardisation
activity as the paper will be reset, i.e. any marking that has taken place will be
rolled back so that the Online Standardisation process can commence, followed by
live marking.
9.1
Practice and Qualification Sets
In order for Online Standardisation to take place, the Principal Examiner/Team
Leaders need to select and propose responses to be used as Practice and
Qualification items. This can begin to happen as soon as items become available on
ePEN (normally 24 to 48 hours after the examination is sat).
The aim of the Practice Set(s) is similar to the photocopied scripts that would have
been used at a traditional meeting; to provide feedback and details of how marks
should be awarded. All of the Markers allocated to any given item will see the same
Practice Set(s).
Once the Practice Set(s) for an item has been completed a Marker can move onto the
Qualification Set(s). The aim of the Qualification Set is similar to the traditional first
sample of marking (CE1) but with the ability to feedback to each Marker on their
performance immediately.
9.2
Selection and Preparation of Responses for Practice and Qualification Sets
Both Practice and Qualification responses should be selected with their purpose in
mind. It is not beneficial to select responses that are blank or especially difficult to
mark.
The Principal Examiner together with Team Leaders/Supervisors (if necessary) will
pre-select the responses for use in Online Standardisation during the Familiarisation
period. You can either use ‘Frontreading’ or ‘Commissioning Frontreading’ from your
Available Tasks to escalate responses as either Practice or Qualification. Validity
responses can also be proposed at the same time from either of these screens (see
Section 4.0 of this booklet for details of how to use the ‘Frontreading’ screen).
39
Prepared by Online Assessment
Authorised By Peter Challinor
Company Confidential
v1.0
October 2010
9.3
How to ‘Frontread’ Practice or Qualification Responses using
Commissioning Frontreading, and load Draft Annotation
In version 4.6.2 of ePEN you can now ‘frontread’ and escalate to the
Validity/Practice/Qualification pool by using the Commissioning Frontreading screen.
If you prefer to use the ‘Frontreading’ screens you can also escalate Practice and
Qualification in the same way as for Validity Items (described in Section 4.0 of this
booklet).
From the Welcome Screen, select ‘Commissioning Frontreading’ from the ‘Available
Tasks’ menu. From the Commissioning Frontreading screen, select an item from the
‘Search Escalatable Responses’ area and click on search.
Figure 49: Commissioning Frontreading screen
‘Search Escalatable
Responses’ area.
Figure 50:
Select the item you wish to frontread.
Note: If you add a digit after the % sign in
the Doc Id field e.g. %3 your search will
only return documents with the number 3
in their ID code. This may be useful if more
than one person is escalating into the pool
and you want the search to return
different responses.
Click on ‘Search’ to retrieve responses.
When you revisit this function for a second time for the same item, the system is
likely to return the same sample of items from the same search. Note: If you add a
digit after the % sign in the Doc Id field e.g. %3 your search will only return
documents with the number 3 in their ID code. This may be useful if more than one
person is escalating into the pool and you want the search to return different
responses.
40
Prepared by Online Assessment
Authorised By Peter Challinor
Company Confidential
v1.0
October 2010
Figure 51: Resize the candidate response
Candidate response is
displayed.
Compete Marker grid
and click on ‘Escalate’
if the response is
suitable.
Click on ‘Skip’ to move
to the next response
You will now be presented with copies of candidate responses for you to propose
marks for and Escalate. Once you have assigned a provisional True Score the response
can then be proposed by clicking on the Escalate button. You will then be asked to
confirm that you wish to escalate the response and categorise the response as either
Practice or Qualification. (If you do not think the response is suitable then click on
‘Skip’ and the next response will appear).
Draft annotation can be added when the items have been proposed and prior to the
pre-standardisation meeting.
Figure 52: Frontreading Escalation Dialogue Screen
Select the required
Escalation Option: Practice,
Qualification (or Validity).
For practice Items you can
add draft annotation at this
stage by clicking on the
Annotation Text radio button
and typing the available
space.
Figure 53: Sample Annotation
Sample draft Annotation
Click on Escalate
41
Prepared by Online Assessment
Authorised By Peter Challinor
Company Confidential
v1.0
October 2010
Note: You can also escalate from the Review or Backreading function if you see a
suitable response.
Once you have escalated the response you will return to the image of the candidates’
response. To view the next candidate response you must click on
and
repeat the process until sufficient items have been escalated for both Practice and
Qualification. This process must be completed for each item on the paper that will
be standardised online. Note: For non-online standardised papers the option to
escalate to Practice and Qualification is not present.
Note : the “Reserve for future use” classification should only be used by Principal
Examiners to select responses for ERA (Examiners’ Report Assistant). For more details
on this process, please refer to ERA user guidelines.
9.4
Guidance on the Contents of Practice Set Annotation
Feedback on all the responses within a Practice Set is provided to the Marker in the
form of annotation and the True Score. Annotation is only necessary for Practice Set
items.
Annotation should be prepared whilst responses are being proposed for Practice Set.
This task of proposing/annotating the Practice items should be undertaken during
Familiarisation Marking, prior to the pre-standardisation meeting.
This annotation should indicate how the True Score has been assigned to that
particular response so that the application of the Final Mark Scheme can be
understood by the Marker. Markers are advised to read the annotation carefully,
especially where there is a difference between the mark they awarded and the True
Score. The breadth and depth of annotation will vary from item to item but should
always be clear and concise. Note: Some items may not need to have any annotation
because the mark scheme covers the issues.
Annotation for items with a greater available mark range may need to include the
following:
• The band/level (if appropriate)
• A clear explanation of where the marks have been awarded and how the True
Score was arrived at
• Reference to the mark scheme
• Reference to the Assessment Objectives if applicable.
Please remember that the Marker will have a copy of the mark scheme with them so
it may be preferable for the annotation to make reference to the mark scheme
(including page number) rather than replicate large sections.
9.5
How to review responses/annotation that have been escalated.
From the Welcome Screen, select Commissioning Frontreading. Then, from the QC
Commissioning screen select the item from the Qc Nominations Item menu.
Figure 54:
Select the
required Item
from the drop
down menu
42
Prepared by Online Assessment
Authorised By Peter Challinor
Company Confidential
v1.0
October 2010
Select ‘Select All’ for both Qc Pool and Classification to return all the frontread
responses for this item. Then click on ‘Search’.
Figure 55:
Once you have entered
your search parameters,
click on Search.
The search results will appear in the Qc Nominations window.
Figure 56:
You can determine the
order of the list by
clicking on the column
headings.
Each escalated response
is listed with details of
whether it is a Validity,
Practice or Qualification
item.
To view the response, click on one of the items in the results list. The candidate
response, along with any annotation will be displayed.
Figure 57:
You can now
review/amend the score
and/or annotation as
necessary.
43
Prepared by Online Assessment
Authorised By Peter Challinor
Company Confidential
v1.0
October 2010
9.6
Uploading Annotation using the ‘Create Annotations’ option from Available
Tasks
The ‘Create Annotations’ option should only be used if you have specific symbols
or images that are necessary to feedback effectively to the Markers. Images and
symbols that do not appear on the keyboard can not be loaded into ePEN without
using the Create Annotations function. We would expect that the vast majority of
annotation will not use the Create Annotations option.
How to upload annotation for an Item using the ‘Create Annotations’ Option
To upload annotation and review the item at the same time you will need to open
the annotation tool and ePEN. To do this you must first select an Item from the
Welcome screen, and then the ‘Create Annotations’ option from the available tasks.
Figure 58:
Select an item and
then Create
Annotations from
the Available Tasks
A pop up window with the annotation tool will appear on screen along with the Open
Content Dialogue Box.
Figure 59:
To view the
ePEN Welcome
screen click on
the ePEN button
in the start bar
or the ePEN bar
at the top of
the screen.
Before you begin any activity with the annotation tool you will need to return to the
ePEN Welcome Screen so that you can open and view the items that have been
proposed. To do this you can click on the ePEN icon in your start bar or click on an
area of the screen away from the active pop up box (see diagram above).
44
Prepared by Online Assessment
Authorised By Peter Challinor
Company Confidential
v1.0
October 2010
Once in the Welcome Screen, select an item from those available in the drop down
list. Then select Commissioning Frontreading from the Available Tasks drop down list.
Figure 60:
Select an item
Then select
Commissioning
Frontreading
from the drop
down menu
You will need to search for the responses, as previously described, by using the Qc
Nominations area of the commissioning screen. Enter the search parameters and then
click ‘Search’.
Figure 61:
The escalated responses are then listed in the Qc Nominations area. To view a
response, click on a Document ID and it will be displayed with the proposed True
Score and any existing annotation, if applicable. Underneath the image, the proposed
True Score will appear. If the True Score is incorrect use the marking grid on the
right hand side to enter a new true score and click on Submit Score.
45
Prepared by Online Assessment
Authorised By Peter Challinor
Company Confidential
v1.0
October 2010
Figure 62:
Selected
response is
displayed.
If necessary you
can amend the
True Score.
You will now need to access the Annotation Tool so that you can add the annotation
for that item. To do this you will need to click on the ‘ePEN Annotation Tool’ button
on your Start bar.
NB: You must not use the button that reads ‘update annotation’ beneath the ‘submit
score’ button. This button is not integrated with the annotation tool.
Figure 63:
Click on the ePEN Annotation icon on your Start
bar to open the Annotation Tool.
To open the Dialog Box select ‘File’ and ‘create/amend annotation’ or click on the
icon.
Figure 64:
To create or amend existing annotation you can search for a particular response that
has been proposed. By using the drop down menus available you will need to select
the paper, the item, the type (Practice or Qualification), and the document ID.
46
Prepared by Online Assessment
Authorised By Peter Challinor
Company Confidential
v1.0
October 2010
To create or amend existing annotation
Figure 65:
Select the paper
Select the item
Select the Set type
Select the document ID that
requires the annotation.
This is automatically
populated with the contents
of the QC responses folder
in ePEN.
Click on the Open button.
The text for the annotation can be typed directly into the new window which
appears, or alternatively cut and paste from other applications (MS Word, Excel etc).
Figure 66:
Type in, or cut &
paste the required
text for annotation
Then click on the Save icon. A pop up message will appear confirming that the
content, or changes made has been saved.
Figure 67:
The window supports normal text and limited special characters. The window also
supports tables so small sections of a mark scheme or assessment objectives, for
example, could be added, although it is preferable to make reference to the mark
scheme rather than cut and paste large sections.
47
Prepared by Online Assessment
Authorised By Peter Challinor
Company Confidential
v1.0
October 2010
There are Image Editor and Import icons on the toolbar. The Image Editor icon will
open another window which allows you to add hand drawn text and graphics. Click on
the Image Editor
the desired image.
icon and a new window will appear. Use the tools to create
Figure 68:
Once the images
have been created
click on the Save
icon.
Draw any images
required for
annotation using
the tools on the left
& right of the
window
Once any images have been created click on the Save
will automatically be added to the annotation window.
icon. The image created
Figure 69:
The image
automatically appears
in the annotation
window
To import a previously prepared image file or more lengthy text click on the Import
icon. Another window will appear prompting you to find the file to be imported.
This option should be used for previously prepared files containing specialist symbols
or foreign language text for example.
48
Prepared by Online Assessment
Authorised By Peter Challinor
Company Confidential
v1.0
October 2010
Figure 70:
Use the Browse
button to search for
the file to be
uploaded
Once the path to the
image appears, click
on the Upload button
Use the Browse button to select the file, and then click on Upload. A pop up message
will appear to let you know that the file has been imported successfully.
Figure 71:
Click OK to proceed. The image will now appear in the Annotation window. Click on
the Save
icon.
Figure 72:
The uploaded image will
automatically appear in
the annotation window
Once the annotation for the Response is complete, further annotation can be
prepared by clicking on the new document
icon. This will automatically close the
current annotation and open the dialog box so you can select the next document ID.
Repeat the instructions above.
This process must be repeated for all Responses within a Set before the Set can be
commissioned in the Commissioning Frontreading screen in ePEN.
Once all the annotation has been prepared, this window can be closed by clicking on
the Close
icon.
49
Prepared by Online Assessment
Authorised By Peter Challinor
Company Confidential
v1.0
October 2010
Note: The system only allows one annotation per Response/Document ID. This means
that that if Responses are nominated for use as both Qualification and Practice Items
the same annotation will appear.
Once all the annotations for a given Set are created and saved, return to the
Commissioning Frontreading screen in ePEN. By clicking on the Document ID(s) the
annotation created will become visible in the right hand window.
Figure 73:
The annotation,
including any images,
will appear in the
right hand window
when the relevant
Doc ID is clicked on
It is essential that each Response in a Set is checked thoroughly to ensure that the
correct annotation has been uploaded.
At the Pre-Standardisation meeting the Responses in a given Set are checked to see
that they have had their True Score agreed, annotation uploaded and checked. It is
then that the Set can be created and commissioned.
50
Prepared by Online Assessment
Authorised By Peter Challinor
Company Confidential
v1.0
October 2010
9.6 Commissioning Practice & Qualification Sets
This activity normally takes place at the pre-standardisation meeting where the final
mark scheme has been agreed. The commissioning of sets will be undertaken by your
QDAM/Subject Leader.
Each proposed response in both the Practice and Qualification QC Response folders
should have been reviewed to ensure that:
•
•
•
the True Score is correct
the candidate Response is fit for purpose
the annotations are appropriate, clear and concise.
Once these have been checked the proposed responses must then be commissioned
into Sets. These Sets will contain (x) number of responses, and Markers are expected
to ‘pass’ (x) number of Sets in Qualification. The number of responses in a Set, and
the number of Sets required will vary from question paper to question paper and
possibly from item to item.
The committee present at the pre standardisation meeting should be involved in
deciding which responses are used to create the Sets. If more than one Set is
created, they should be of equal demand to ensure a fair Standardisation process.
9.7 Setting of Qualification parameters
This activity is normally undertaken by the QDAM/Subject Leader. The parameters
for each set must be confirmed.
The Number of Sets Must See and the Number of Sets Must Pass refer to the number
of whole set a Marker must see and pass in order to qualify to mark.
All online standardised papers must have one Practice set and one Qualification
Set unless otherwise informed.
All Markers will be expected to see one Practice Set and pass zero Practice Sets.
All Markers will be expected to see one Qualification Set and pass one
Qualification Set. If a Marker does not pass the first qualification set, then a
second qualification may be created for them to have a second attempt. This
will be confirmed by the QDAM.
51
Prepared by Online Assessment
Authorised By Peter Challinor
Company Confidential
v1.0
October 2010
10.0 Online Standardisation Monitoring and Reports
Once the Reset has taken place, Markers can access the Practice and Qualification
Sets. Markers must ensure that they have the final version of the mark scheme before
attempting any of the Sets. The progress of all Practice & Qualification is available in
report format on ePEN. There are 3 key reports which are available on ePEN which
allow TL/PEs to monitor the progress of Markers on Practice and Qualification Sets:
QC Practice Report
QC Qualification Report
Cumulative Qualification Report
10.1
QC Practice and QC Qualification Reports
To access the reports within ePEN from the Welcome Page you need to select View
Progress and then the Reports Tab.
The Report Screen
showing the default
settings.
Figure 74:
Select the report and the paper required you will then need to click on generate
report. For a non specific search you should leave the other search parameters as
‘All’. For a more specific search you can select from the options available in the drop
down menu for each category.
Figure 75:
The QC Practice and QC Qualification Reports give details of each Marker assigned
to a particular item and whether they have attempted the set, passed the set, how
many sets have been seen, how many responses within that set were seen, and what
their agree percentage was. It also notes whether they were successful or not in
qualifying.
52
Prepared by Online Assessment
Authorised By Peter Challinor
Company Confidential
v1.0
October 2010
Figure 76: QC Practice/Qualification Set Report
Note: There is no pass criteria for the Practice Sets. The report can be used to
monitor when/if Markers have completed their Practice Sets.
The report displays the following information:
Item Name
The name of the unit and item/clip
Reader
The name of the Marker/Marker ID
Qualification Status
States Marker’s status e.g. Not Started/
Overridden/Started/Unsuccessful/Successful/Not OLS
Date Attempted
The date the Set was attempted
Date Qualified
Shows when/if the Marker has qualified
Set Seen
Shows number of sets seen
Set Passed
Shows the number of sets passed
Responses Seen
Shows the number of responses seen in the set(s)
Agree Percent
Shows the average percentage agree with the True Score
for a set
Adjacent Percent
Shows the average percentage within adjacency agree
of the True Score
The figure below shows a QC Qualification Report. Please note that this report is
often over more than one page so you may need to use the navigation tool to review
the whole report. You can also export this report in a choice of formats so that you
can review them offline.
Shows number of Sets and
responses seen
Figure 77:
Qualification Status shows if
the set has been
started/successful or not
attempted.
Shows the date that
the Set was first
attempted
Shows whether Marker has
qualified by date
Shows average
% Agree for Set
53
Prepared by Online Assessment
Authorised By Peter Challinor
Company Confidential
v1.0
October 2010
10.2
Cumulative Qualification Report
The Cumulative Qualification Report gives details of the true scores awarded to each
response within a set and a comparison with the marks awarded by the Marker. This
report can only be run on an item by item basis.
This report is available via the Welcome Page, selecting View Progress, then the
Reports Tab. From the Reports Menu you will need to select the Cumulative
Qualification Report from the drop down menu. Once you have selected the report
you will need to select the paper and item you wish to monitor.
The report displays the following information:
Examiner
Name of the Marker
Set
The Set Taken e.g. Q1, Q2
Date
Date the set was attempted
Trait
The trait name from the Marker grid
Low Non-Adj %
The number of times (so far) the examiners have
awarded a lower mark outside of adjacency.
Low Adj %
The number of times (so far) the examiners have
awarded a lower mark within adjacency in relation to
the True Score (expressed as a percentage).
Perfect Agree %
The number of times (so far) the examiners have agreed
perfectly with the true score as a percentage.
High Adj %
The number of times (so far) the examiners have
awarded a higher mark within adjacency in relation to
the True Score (expressed as a percentage).
High Non-Adj %
The number of times (so far) the examiners have
awarded a higher mark outside of adjacency.
Scores
A display of Markers’ score against the True Score, but
only if it differs from the True Score.
The example below only shows one Marker for the given item, please note this report
does not detail what the ‘pass’ criteria has been set at. This information is available
at Pre-Standardisation.
Figure 78:
Shows Perfect agree and Adj agree
percentages at a trait level
Shows True Scores awarded to each
response in the Set and any deviation
from True Scores by Marker. Note:
blank equals perfect agree
54
Prepared by Online Assessment
Authorised By Peter Challinor
Company Confidential
v1.0
October 2010
The Practice and Qualification Calculator reports give details of the number of Sets
Required, the number of Sets Proposed and the number of Sets Approved for each
item on a paper. The reports can be run per paper and should be used during the
Pre-Standardisation meeting to track progress.
Figure 79:
Shows number of Sets
at each state as well as
the number of
responses required /
assigned to approved
sets.
The Qualifying Summary Report by Item give details of the date on which a set was
taken, and the average agree % per trait for all sets attempted on the paper.
Figure 80:
Shows average %
agreement across all
responses within the
Set per trait
Item Details (Set name)
11.0 ERA
The Examiners’ Report Assistant (ERA) is a new functionality of ePEN introduced in
Summer 2010. It is an electronic template which helps the Principal Examiners to
structure their examiners’ reports. It can be accessed from the “Available Tasks”
menu on the Welcome Screen. For more details, please refer to ERA user guidelines.
55
Prepared by Online Assessment
Authorised By Peter Challinor
Company Confidential
v1.0
October 2010
12.0 Frequently Asked Questions and Trouble Shooting
Please contact helpdesk with your queries; however some may be resolved by reading
the information below.
Installation of ePEN
Has the version of ePEN changed for this
marking series?
Error Message - ‘page cannot be displayed’
during installation where the user needs to
upload PC specs
No – it is the same version of ePEN that was
used since March 2008, however the View
Progress screens have been updated. If
necessary, please click on the Download and
Install ePEN link on the Landing Page to
install ePEN.
Please ensure you are connected to the
internet during installation. For assistance
installing the helpdesk can be contacted.
I am getting an error with Java
Please contact helpdesk with any queries.
ePEN Passwords
Should my username be the same each series?
The first 6 digits of your username are your
Assessment Associate number and should not
be different. However the last three digits
may change from series to series. Please
refer to the user details sent to you by
Edexcel.
Locked out of ePEN
Please contact the Helpdesk to be unlocked.
Your Supervisor cannot unlock your account.
Forgotten password
If you have forgotten your password, please
use the ‘Forgotten Password’ link on the login
page. A reminder will be sent to your email
address.
ePEN has asked me to change my password
during the marking period
From time to time ePEN will ask you to
change your password. This is for security
reasons.
View Progress Tab
The number of items marked on View
progress does not look correct.
There can be a delay (approx 15 minutes)
before the View Progress screen is updated.
Note: The data shown includes both valid and
invalidated responses. This means any items
where your score has been changed in
backreading will be included in the total – in
previous sessions this has been subtracted.
A marker allocation has changed before the
contract completion date.
Markers who have marked the contracted
number of responses for the paper before the
contract completion date have access to
extra items from the pool.
A marker allocation has changed after the
contract completion date
Once the contract completion date has
passed, all Markers cap and allocations are
reset to 10000 to allow access to the
unmarked items.
‘Close Viewer’ Issues
Cannot ‘Close Viewer’
The common cause of this error is the use of
pop up blockers.
Please contact Helpdesk for further advice.
56
Prepared by Online Assessment
Authorised By Peter Challinor
Company Confidential
v1.0
October 2010
Practice Site
The paper I have access to is not the same
subject/unit as I will be marking.
The practice site uses historical items from
previous series. This site should be used to
practice using ePEN functionality and also to
test that ePEN has been successfully installed
on your PC. Therefore you may not be
allocated ‘your subject’.
Online Standardisation
Is my paper being standardised online?
Your contract will have details of whether
your paper is to be standardised online or if
you are required to attend a standardisation
meeting.
Please contact the helpdesk if you are
unsure.
Marking Period
How many Validity Items are required per
item?
The number of Validity Items will be notified
to the Principal Examiner and any nominated
Senior Examiners by the QDAM for each unit
The number at each stage (proposed or
commissioned) can be tracked using the
Validity Calculator report in ePEN. Not all
senior examiners will be asked to help with
this task.
I can’t see Mark Student Responses as an
option in the Available Tasks.
If you have been sent a message, the option
to Mark Student Responses is not available.
You must select Messages and read your mail
first.
If your paper is Online standardised, you must
complete the Practice and Qualification Sets
for the item before you have the option to
‘Mark Student Responses’.
57
Prepared by Online Assessment
Authorised By Peter Challinor
Company Confidential
v1.0
October 2010
Appendix 1 –Sequence of Events
The list below is to be used as a guide to the sequence of events that Supervisors
may be involved with. It is by no means meant to cover all aspects of the marking
process. More detailed information can be found in the Online E38-39 booklet.
Before pre/standardisation
Receive passwords to Practice and Live Marking
Complete online training courses and access the Practice Site
Day after the exam - access Edexcel Gateway for a copy of the Question paper and
pre-standardisation mark scheme
Access live site after examination to practice marking live responses (Familiarisation
Marking)
Traditional Standardisation Activity
Pre/Standardisation Meetings: use photocopies of either whole scripts or items
Agreement of standards/marks awarded
Mark scheme updated and posted on Edexcel Gateway
Markers and Supervisors notified of assigned items
Number of items for initial sample agreed (to be submitted within 48 hours)
All Familiarisation Marking items reset in ePEN on the day of standardisation
Markers and Supervisors mark their samples for each item
View Progress – marking tab- Supervisors can see when samples are completed
Backread samples and feedback to Markers
Marking Period
Focus is on Monitoring and Supervising the team
Tools available include: View Progress, Reports, Backreading, and Messaging
Marking Review and Pulled items
Ensuring progress and quality of marking is maintained and milestones achieved.
Or Online Standardisation Activity
Familiarisation Marking period: queries regarding mark scheme to Supervisors
Frontread and propose Practice and Qualification responses and upload annotation
Pre standardisation: Mark scheme updated and posted on Edexcel Gateway
Pre standardisation: True scores and annotation agreed. Sets created and
Commissioned/Approved by QDAM
All Familiarisation Marking items reset in ePEN after pre- standardisation
Markers access and score the Practice Set(s) for each item and receive feedback
Markers contact Supervisors after Practice Sets for feedback from Supervisor
Markers access and score the Qualification Set(s) for each item and receive feedback
Markers proceed to live marking
Supervisor monitor and feedback to Markers
Marking Period
Ensuring progress and quality of marking is maintained and milestones achieved.
58
Prepared by Online Assessment
Authorised By Peter Challinor
Company Confidential
v1.0
October 2010
Appendix 2 – Using Filters on Exported Reports in Excel
After the report has been generated you can export the data to your PC. To do this you need to
select a format for the data from the drop down menu.
There is a list of choices, but Excel is recommended as this will allow you to easily format the
data. The formats available are as follows:
Once selected, click on the Export button. You will be prompted to either Save or open the file.
Click open if you would like to view the spreadsheet straight away.
Once you have exported an ePEN report to excel you can focus on a particular part of
the report by using filters.
ePEN reports will typically
contain data relating to a
number of examiners and
/or items.
To easily view data relating to one examiner and /or one item at a time you can
filter the report.
Firstly, highlight the row
containing the column
titles. This is where the
filters need to be
applied.
59
Prepared by Online Assessment
Authorised By Peter Challinor
Company Confidential
v1.0
October 2010
Next, click on ‘Data’ on the menu at the top of the screen.
You will see the following dropdown menu.
Highlight the filter option to see the sub
menu. Click on the AutoFilter option.
Filter arrows
will then appear on the highlighted row on the report.
Clicking on the filter arrows will display a dropdown list showing all the data
contained in that column. Scroll up and down the list and select the data you want to
view. By selecting one of the options in the dropdown list, the spreadsheet will
automatically show all rows that contain that data in the filtered column.
60
Prepared by Online Assessment
Authorised By Peter Challinor
Company Confidential
v1.0
October 2010
Any column that has been filtered will be indicated by a filter arrow that has
changed colour.
Filtered Column
Non–Filtered Columns.
You can apply multiple filters to any spreadsheet, by clicking on the filter arrows for
each column and selecting your filter requirement.
Removing filters
To remove filters, click on the filter arrows which have changed colour and select
‘(All)’ from the dropdown list.
61
Prepared by Online Assessment
Authorised By Peter Challinor
Company Confidential
v1.0
October 2010