1
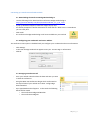
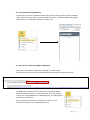
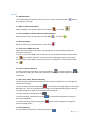
Red Sky
Meet- Me Conference Bridge
Set Up and User Guide
1|P a ge
Table of Contents
Page
1.0 System Requirements
3
2.0 Configuring the Conference Bridge in Provisioning
3
2.1 Signing In
3
2.2 Assigning the Bridge to a business
3
2.3 Conference Bridge Details
3
2.4 Conference Bridge Settings
3
2.5 User Membership
3
2.6 Ports and Users
4
3.0 Setting up a Conference Call
5
4.0 Setting up a Conference Call without Outlook
5
5.0 Setting up a Conference Call with Outlook
6
5.1 Downloading the Conference Bridge Outlook Plug –in
6
5.2 Configuring your Credentials and Server Address
6
5.3 Arranging a Conference Call
6
6.0 Conference Bridge Moderator Client
8
6.1 User Interface
8
6.2 Launch Conference Moderator
8
6.3 Dial into the Conference Bridge as a Moderator
9
7.0 Icons
10
7.1 Add Participant
10
7.2 Mute or Unmute Participants
10
7.3 Put Participant on Hold or Resume a Held Participant
10
7.4 Drop Participant
10
7.5 Turn Lecture Mode on or Off
10
7.6 Lock or Unlock Conference
10
7.7 Start, Stop, Pause, Resume Recording
10
7.8 End Conference
10
2|P a ge
1.0 System Requirements
The meet me conference bridge will run on IE, Firefox, Safari and Google Chrome.
2.0 Configuring the Conference Bridge in Provisioning
2.1 Signing In
-
Sign in to Provisioning http://www.Red Sky.com/extranet.html
Use the details that have been provided to from Red Sky
2.2 Assigning the Bridge to a Business
- Select Client Business from the Left Hand Panel
- Choose the business the conference bridge is going to be configured to.
- One you are in the business, select Group Services from the Top Panel
- Using the drop down tool bar, Select ‘BW-Meet me Conference Bridge’
2.3 Conference Bridge Details
- The details of the conference Bridge need to be entered carefully
- The Conference Bridge ID, must NOT have any spaces
- The Conference Bridge name, CAN have spaces
- The Bridge name and ID are for Broadsoft – no one will see this.
- A first and last name needs to be entered for the conference bridge
- It is a good idea to use the last 4 digits of the VoIP number as the extension number
2.4 Conference Bridge Settings
- Allocated ports are the number of channels that will able to be used for that conference
Bridge (the number of concurrent calls when conferencing)
2.5 User Membership
You can add members two ways;
1. Select the drop down tool bar and add users one by one
2. Add all users by clicking the ‘add all users’ button
- If you want all new users to be automatically added to the Bridge, be sure to check the box.
- When all the details have been entered, select the ‘Add Bridge’
3|P a ge
2.6 Ports and Users
- The number of ports represents how many channels One DDI can have.
- There can be a number of users using one DDI for the conference bridge, but each User will
have a Unique Conference ID and Moderator Pin Number.
For Example;
There is one DDI number with 10 ports allocated to it. The DDI number is 02086811256 there
are 3 users for this DDI. Each user has a unique Conference ID and Moderator Pin Number (A 123456, B - 654321, C- 246812). All 3 of the users want to call into the conference bridge at one
time. First of all ‘A’ rings into the conference bridge and the participants ring in and dial 123456
(there are 3 people on this conference call). Then ‘B’ rings into the conference bridge and the
participants ring in and dial 654321 (there are 4 people on this conference bridge). ‘C’ now rings
into the Conference Bridge the participants ring in and dial 246812. ‘C’ is only able to have 3
people on this conference call as 7 of the channels (ports) have already been used up by ‘A’ and
‘B’.
4|P a ge
3.0 Setting up a Conference Call
A Conference call can be set up manually or via outlook. Once on a Conference Call the moderator
can manage the conference by using the keypad on the phone or from within the outlook
Conference Bridge plug in.
4.0 Setting up a Conference call without Outlook
1. The moderator needs to be allocated both the moderator and participant pins, along with
the extension number (to be used by internal users) and DDI number (to be used by
external users). These are allocated by the system administrator.
2. Participant(s) to be given both Conference Bridge phone number and participant pin.
Participant calls Bridge Number and follows instructions.
3. The moderator calls Bridge Number and use the MODERATOR pin and follows
instructions. Please note, one of the moderator options available as part of the
configuration is to only allow participates to speak when the moderator has joined the
conference.
4. The following options are available to the moderator during the conference from the
Keypad on the phone.
Transfer to operator
Mute On/Off
Participants List
Lecture Mode
Look/UnLock Conference
Conference Recording
Bring in another person
Terminate Conference
To Return To Conference
Listen to Menu Options
0
1
2
3
4
5
6
8
#
*
5|P a ge
5.0 Setting up a Conference Call with Outlook.
5.1 Downloading the Conference Bridge Outlook Plug-in
-
Use the following link to download the Conference Bridge Outlook Plug-in
https://provision.Red Sky.com/bria/meetmemoderator_17_4_10_1.exe
-
A pop up window will appear, follow the stages step by step
You will be prompted to choose destination to install the file. Make sure it is somewhere
you can easily find.
Click Install
The conference bridge Outlook Plug-in will now installed into your outlook
-
5.2 Configuring your Credentials and Server Address
The conference menu option is disabled until you configure your credentials and server information
-
Click Settings
In the User Settings window that appears enter your Account Sign-In Information
Click Ok
5.3 Arranging a Conference Call
-
From your outlook calendar select the date and time you want
to hold the conference
-
Using the Meet- Me Conference Plugin which is allocated on
the top left side of your outlook and select ‘config bridge
Reservationless’
A pre populated email will appear. In this email the following
details will be stated
o The Conference Bridge Dial Number
o The Conference Bridge ID
-
6|P a ge
Please Note: The email will give the option of a ‘Request a call back link’. Please delete this as it will
mean that user will end up paying for the call.
1
-
It is important to add a subject heading so that the participants open the email and accept
the conference call.
To invite attendees to the conference bridge, select the invite attendees button
You will be able to invite participants from your address book or enter their email
address manually
Once the sent button has been hit. The email will be sent to the Attendees and they
need to accept the invite in order for it to be automatically populated into their Outlook
calendar.
7|P a ge
6.0 Conference Bridge Moderator Client
The Conference Bridge Moderator Client allows moderators to launch and supervise conferences.
The moderator can only moderate one conference at a time, but there can be several moderators in
one conference.
Global Message
Dialler
Conference Header Bar
General Controls
Status Icon
Action Buttons
Conference Tab
-
6.1 User Interface
Global Message Area - this area displays 10 seconds of information. This could be a warning
or error message that needs the user to see.
Dialler – This allows the moderator to add participants to the conference
Conference Tab – This tab contains the information and controls for the active conference.
Conference Header Bar – The Header Bar displays the conference name and number
General Controls - Allows the moderator to control the conference, for example Lock/Unlock
the conference, Start/ Pause/ Resume/ End Recording and End the Conference all together.
Moderator and Participants Lists – a list of the moderator and participants names, phone
number and status (could be Talking, Muted or on hold) Action buttons – actions can be
performed on selected moderators or participants. The buttons allow the individual to
Mute/ Unmute, Hold/ Unhold and Drop
8|P a ge
-
6.2 Launch Conferencing Moderator
To launch the conference moderator client from the Outlook Plug In simply select the Meet
–Me Conference Plug in and Click ‘Launch Moderator Client’. A Brower window will appear
with the meet- me conference application ready to use.
6.3 Dial into the Conference Bridge as Moderator.
-
Dialling in as a moderator is different to dialling in as a participant.
The email that is sent out to all the attendees has the Participant Conference ID code.
1
-
-
The Moderator Conference ID can be found in the Outlook Plug-In
When the Moderator dials in to the Conference, he or she will have
to enter the unique Moderator Pin followed by a #, to enable them to
moderate the conference.
All the participants Dial into the conference and then use the
Conference ID found in the email followed by a #
9|P a ge
7.0 Icons
7.1 Add Participant
-
In the Add Participants test box, enter the persons number and click the Dial
that appears to the right
button
7.2 Mute or Unmute Participant
-
Move the Mouse over the participant and click Mute
or Unmute
7.3 Put Participant on Hold or Resume a Held Participant
-
Move the mouse over the participant and click Hold
or Unhold
7.4 Drop Participant
-
Move the mouse over the participant and click Drop
-
7.5 Turn Lecture Mode On or Off
When the Lecture Mode is turned on, new participants are automatically muted upon
joining the conference.
To turn on the Lecture Mode, move the move over any moderator and click Lecture Mode
-
On
. The moderator becomes a lecturer and the remaining participants are muted.
To turn off the Lecture Mode, move the mouse over a moderator, and click Lecture Mode
-
Off
.
7.6 Lock or Unlock conference
-
-
To lock or unlock the conference, click Lock Conference
or Unlock Conference
on
the conference header bar, When the conference is locked, no new participants can join the
conference
7.7 Start, Stop, Pause, Resume Recording
The Start/ Stop/ Pause/ Resume buttons on the Conference header bar are to manage the
conference recording
To start recording, click Start Recording
. A confirmation message appears in the Global
Message area. The start recording button changes to the Pause Recording button and the
Stop Recording button appears on the Conference header bar.
-
To stop recording, click Stop Recording
-
To pause recording, click Pause Recording
Start Recording Button
. The Pause Recording button changes to
-
To resume recording, click Start Recording
Pause Recording button.
. The Start Recording button changes to
-
.
7.8 End Conference
On the Conference header bar, click End Conference
.
10 | P a g e