1
!!" #$%'& ( )* +-,
UPDATED September 13th 2004
Sound Sculpture user guide (V2.4)
Acknowledments and Feedback
One reason that this new Sound Sculpture is so good is that there are many who have found the Sound
Sculpture useful over the past few years who have taken the time to bring to my attention certain
necessary changes, suggestions and recomendations, and this new version benefits from there helpful
criticism.
Please let me have your feedback so that I can improve the documentation... your thoughts are
appreciated...
Sound Sculpture
Sound Sculpture is an electronic musical instrument which provides access to music-making for those of us
who are unable to play a conventional musical instrument such as saxophone, guitar, piano, drums etc.
In essence, Sound Sculpture replaces the usual piano-type keyboard of a synthesiser with special sensors
which enable people with a wide range of mobility difficulties to make musical sounds as if they were actually
playing on a conventional keyboard.
Sound Sculpture has a built in ultrasonic sensor with a range adjustable up to 10 metres or 30 feet.
Sound Sculpture also has a variable voltage input which provides access to other types of sensor. Switches,
mats, air pressure sensors and other sensors specially designed to suit individual requirements can all be used
with Sound Sculpture.
Some Benefits and Advantages
Visual Feedback
Sound Sculpture provides visual feedback using a Laser light scanner to show visually the extent and location
of the active space of the ultrasonic sensor. The Laser can be switched off if you want to keep the active space
invisible.
This visual feedback provides a real improvement in ease-of-use and speeds up the dawning of awareness...
the awareness that the sounds and music are made by your own movements.
1
./012.304 56078
9: ; <= ; >'<?<A@ BCD8 > /E 9-F
Musicality - Rhythm Harmony and Form
The ability to synchronise the Sound Sculpture with other instruments and musicians or recordings using a
microphone. Or to sequence it using MIDI, gives Sound Sculpture powerful rhythmic potential.
With this rhythmic capability and its versatile harmonic tools, Sound Sculpture enables group performances with
as much rhythmic and harmonic integrity as you choose. From totally in-time and in-tune, to completely chaotic,
atonal and formless.
With Sound Sculpture you also have the ability to control pitch-bend, volume and other aspects of the
synthesiser sound, using any of the sensors.
Sound Sculpture is a musical instrument of the highest calibre in it’s own right. You can follow complex jazz
scores if you really want to, by sequencing through different harmonies with a midi-footswitch or sequencer.
Recording Your Own
You can record your own music from a keyboard or sequencer directly into Sound Sculpture. And then replay it
using the sensors. The recorded music can be a sequence of single notes, chords or a mixture of single notes
and chords...
Each recorded sequence can contain over 190 recorded notes. You can record up to 39000 notes of your own
music into Sound Sculpture.
Flexible, Ease to Use, Accessible
Users have been very impressed by the flexibility and ease of use incorporated into the Sound Sculpture. This
is the result of carefully incorporating the suggestions, ideas and requirements of the many individuals and
organisations, clients and colleagues who have collaborated with Sound Sculpture's development and
maturation, while maintaining a sense of balance between flexibility, ease of use and accessibility.
Sound Patches and Memory Cards
A sound patch is a convenient way of handling all the settings and adjustments you make during a Sound
Sculpture session, as well as any recorded material, so that you can build up a library of personalised set-ups.
Sound Sculpture has 200 sound patches built in, each one can be modified, renamed and saved
Also, patches can be saved or loaded from plug-in transfferable memory cards. There are 100 patches per
card.
Affordabilty
Every effort has been made to make sure Sound Sculpture is as affordable and accessible as possible. I aim to
make a living, not a killing. Modern electronics is cheap to produce except for the development and marketing
costs. I have absorbed most of the development costs myself and have no need to recover these costs from the
users. Marketing costs are kept to a minimum, word-of-mouth is free and honest. Sound Sculpture uses very
recent technology, much less expensive and much more powerful than anything available a few years ago.
About the Originator
2
GHIJKGLIM NOIPQ
RS T UV T W'U?UAX YZ[Q S H\ R-]
Sound Sculpture has been developed by Jon Shaw over the past 6 years in collaboration with many
organisations and health and music professionals. (Drake Music Project, New Era Housing Project, Immersive
Media Spaces, Sheffield Social Services, Oldham Social services, New Mills Community arts... ), it has been
incorporated in permanent installations, art exhibitions, it has been central to live public performances, and is
used daily by day-care centres and individuals.
I work as a musician, technologist, trainee music therapist , teacher, and music workshop facilitator. I have
experience working with various client groups including people with severe learning disabilities, trainee
therapists, care workers, and musicians of diverse experience levels.
I have 15 years experience as a high flyer in the electronics and computer industry.
Last year I taught music therapy techniques to trainee therapists at Stockport College of Further Education.
I developed the Sound Sculpture because I identified the need for an affordable, flexible, easy-to-use, above all
accessible, alternative to existing equipment.
My varied experiences in the fields of music therapy, as a musician and as an electronics engineer, and my
close contact with colleagues and organisations working in relevant fields, have allowed me to develop Sound
Sculpture with a high level of awareness of the needs of the user.
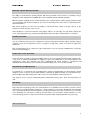
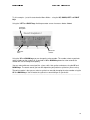
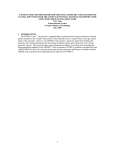
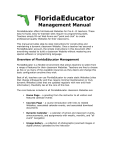
Laser Module
Sound Sculpture
Laser Module
Power Supply
Ultrasonic
Sensor
Sound Sculpture
Power Supply
Flight Case
3
^_`ab^c`d ef`gh
ij k lm k n'l?lAo pqrh o _s i-t
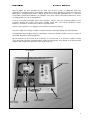
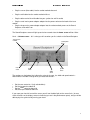
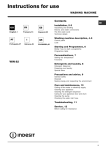
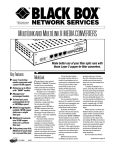
Connecting up your Sound Sculpture
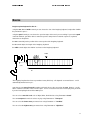
The Sound Sculpture is a MIDI (Musical Instrument Digital Interface) control unit. It doesn't generate any sound
of its own. The sounds are generated by a MIDI compatible synthesiser which responds to messages sent to it
by the Sound Sculpture. The synthesiser may have built in loudspeakers. If not you will need to connect the
synthesiser to a sound system... a domestic Hi Fi, or whatever.
You can plug Sound Sculpture directly into most Personal Computers if there is a MIDI interface fitted (most
modern computers have one fitted as standard, although often you will need an adapter cable (obtain this from
your computer vendor).
Most PCs have a built in synthesiser (often called a 'Sound Card'), and you can listen to the sounds using the
computers' multimedia 'speaker system...
sensor
,
MIDI cable
midi out
midi in
line out
Synthesiser
(sound generator)
line in
amplifier / loudspeakers
4
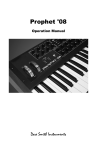
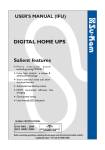
uvwxyuzw{ |}w~
'?A -
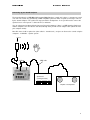
ultrasonic sensor
cable
MIDI out
cable
power cable
UP key
mounting bracket
RIGHT key
display screen
DOWN key
near control
speed control
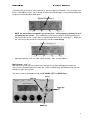
Here is a view of the back of the Sound Sculpture showing the connections...
memory
card
power
MIDI in
MIDI out
custom
sensor
input
ultrasonic
sensor
5
'?A ¡¢£ ¤ ¥ -¤
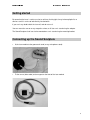
Getting started
Be aware that the laser is safe to use, but as with any flashing light it may induce epileptic fits or
dizziness and it is unwise to look directly into the beam.
If you are in any doubt switch the laser off, and do not use it.
You can mount the sensor on any magnetic surface, or fit it to a mic. stand using the adapter.
The Sound Sculpture itself can also be mounted on a mic. stand using the mounting bracket.
Connecting up the Sound Sculpture
•
fit the laser module to the gooseneck stand (or any microphone stand)
•
Fit the sensor (blue cable) to the magnet on the front of the laser module
6
¦§¨©ª¦«¨¬ ®¨¯°
±² ³ ´µ ³ ¶'´?´A· ¸¹º° » ¼½ ¾-¿
•
Plug the sensor (blue cable) into the socket marked ultrasonic
•
Plug the midi cable into the socket marked midi out
•
Plug the other end of the midi cable into your synthesiser midi in socket
• Plug the small mains power adapter adapter into the power socket on the back of the laser
module
• Plug the larger mains power adapter adapter into the socket marked power on the Sound
Sculpture, and switch it on
...............................................................................................................................................................
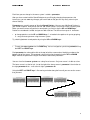
The Sound Sculpture screen will light up and a few seconds later the home screen will be visible...
Here's thehome screen... this is what you will see when you first switch on the Sound Sculpture.
sound patch
number
near
value
sound patch
title
far
value
width
value
speed
value
The numbers on the bottom line indicate the value of the near, far, width and speed controls...
Notice how the numbers change when you rotate the controls...
•
•
•
•
Set the near control to 1 (fully anticlockwise)
Set the far control to about 10
Set the width control to about 30
Set the tempo control to about 20
If you move your hand in front of the sensor you will see the blue light on the sensor flash, (also an
asterisk flashes on the display screen to show that you are in the performance space), and you will be
able to play the synthesiser by moving your hand.
7
ÀÁÂÃÄÀÅÂÆ ÇÈÂÉÊ
ËÌ Í ÎÏ Í Ð'Î?ÎAÑ ÒÓÔÊ Õ Ö× Ø-Ù
If the blue light (and asterisk) flash continuously, then turn down the far control... this just means that
there is some object ( a chair, wall, or whatever) within the selected range, i;e; you need to reduce the
range to an clear and unobstructed space.
•
NOTE the sensor doesn't respond if you are too close... while playing try to keep at least 2
feet away from the sensor... (this is deliberate so that you can mute all sounds by putting your
hand near to the sensor... try this with a sustained sound like a flute or a voice pad... ). When you
are in the near to the sensor an asterisk flashes next to the near display
•
experiment with the near, far, width, speed controls... they're pretty obvious
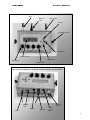
Menu System... what is it?
With the menu system you can customise the way you use the Sound Sculpture by choosing a
musical scale, selecting a particular sound, etc... there are about fourty (40) different things you can
change using the menu system.
The menu system is controlled by using the UP, DOWN, LEFT and RIGHT keys...
LEFT key
UP key
RIGHT key
DOWN key
8
ÚÛÜÝÞÚßÜà áâÜãä
åæ ç èé ç ê'è?èAë ìíîä é Ûï å-ð
Each item you can change in the menu system is called a parameter.
After you have customised the Sound Sculpture to your liking by changing the parameters that
interest you, you can save any changes you have made so that you can very easily return to your
chosen settings.
Parameters are saved in groups of 40 called Sound Patches. You can save 200 Sound Patches in
your Sound Sculpture. Also you can transfer 100 Sound Patches at a time to or from a memory card.
When you want to return to a particular sound patch, just find it using the UP and DOWN keys.
Patches are numbered 1 to 200, and you can add a title too. The title can have up to 11 characters.
•
to change patches use the UP and DOWN keys. I've loaded a few patches for you to get going,
it's easy to create your own using the menu system.
Try switching between sound patches by using the UP and DOWN keys...
.........................................................................................................................................................
• To enter the menu system use the RIGHT key. You can navigate to a particular parameter using
the LEFT and RIGHT keys.
Each parameter has a descriptive title at the top left of the screen and an identifying number at the
bottom right of the screen. The parameter value itself can be changed using the UP and DOWN
keys. Refer to the parameter listing for more details about each parameter.
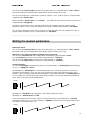
You can visualise the menu system a as a long line of screens. Only one screen is visible at a time.
The home screen is at the far left. Just to the right of the home screen is parameter 1 then further to
the right parameter 2 etc... until at the far right is parameter 40.
Using the LEFT and RIGHT keys is like moving a window along the line until you can see the screen
that you want.
<< LEFT
RIGHT >>
9
ñòóôõñöó÷ øùóúû
üý þ ÿ þ 'ÿ?ÿ û ü ÿ ò
ü
Try this example... just to illustrate how the Menu Works... using the UP, DOWN, LEFT and RIGHT
keys
Using the LEFT and RIGHT keys find the parameter screen Parameter 6 'Voice / Timbre'
parameter
description
parameter
value
parameter
number
Using the UP and DOWN keys you can change the voice number. This number selects a particular
voice or timbre on the synthesiser. If you hold an UP or DOWN key down for a few seconds the
number will start to change more quickly.
You can select whichever sound you like... piano, violin, flute, guitar or whatever using the UP and
DOWN keys. The actual sounds you hear will depend on your particular synthesiser you are using.
The point to notice is that you can select a synthesiser sound by changing the voice number using the
UP and DOWN keys. You will notice the synthesiser sound changes as you do this.
...............................................................................................................................................................
10
!#" $ %& $ '(%)%* +,-. !/! 0 !1
Basics
Imagine a piano keyboard in thin air...
using the near, far and width controls you can choose the size of the imaginary keyboard, and position it within
the performance space...
using the speed control you can choose the speed or tempo of the music you are making. If you set the speed
control to minimum, you will be able to control the speed or tempo from an external sequencer, keyboard,
metronome or microphone.
the near control adjusts the position of the nearest point of the imaginary keyboard.
the far control adjusts the length of the imaginary keyboard.
,
the width control adjusts the width of each note on the imaginary keyboard.
width
near
far
The imaginary keyboard can have any number of notes (divisions)... this depends on several factors... and is
automatically worked out for you...
note that you can mute all sounds by putting your hand closer to the sensor than the near distance... try this
with a sustained sound like a flute or a voice pad... there is an asterisk next to the near display to let you know
if you are interrupting the beam in the near space.
You can select a musical scale such as Major, Minor, diminished etc using Parameter 2 'Scale'
You can transpose the musical scale to any key using Parameter 3 'Transpose'
You can select the lowest note you want to hear using Parameter 4 ''Low Note'
You can select the highest note you want to hear using Parameter 5 'High Note'
11
234
562748 9:4
; <
=#> ? @A ? B.@)@C DEF< =#B 3
G =H
You can select the sound or timbre you want to hear (piano, flute etc.) using Parameter 6 'Voice / Timbre'
The actual sounds you hear will depend on the particular synthesiser that you are using.
You can select single notes, sustained notes (similar to using the 'Loud' pedal on a piano), or repeated notes
Sustain Type'
using Parameter 7 '
When Parameter 7 '
Sustain Type'is set to 'Sustain' , you may like to choose how many notes sound at once
Polyphony'
using Parameter 18 '
Sustained sounds like flutes, voices and organs will continue to sound after you have moved out of the
performance space. You can choose how long the notes remain sounding using Parameter 22 '
End Delay'
You can choose wether the musical scale ascends or descends and wether the scale is played once only, or
repeats to fill the performance space, using Parameter 13 'Play Mode'
...............................................................................................................................................................
Setting the musical parameters
Choosing a sound...
You can select the sound or timbre you want to hear (piano, flute etc.) using Parameter 6 'Voice / Timbre'
The actual sounds you hear will depend on the particular synthesiser that you are using.
Selecting a scale, setting the highest and lowest notes, transposing...
Scale'
You can select a musical scale such as Major, Minor, diminished etc using Parameter 2 '
You can transpose the musical scale to any key using Parameter 3 'Transpose'
'Low Note'
You can select the lowest note you want to hear using Parameter 4 '
You can select the highest note you want to hear using Parameter 5 'High Note'
creating arpeggios...
'Autotranspose'and Parameters
You can create arpeggios and similar musical devices using Parameter 14 '
15, 16, 17 'Arpeggio X, Y and Z'
'A
utotranspose' to automatically transpose the scale up by any interval, each time it is
Use Parameter 14 '
repeated in the performance space... this can create nice harmonic effects when using play mode 2 or 5, in
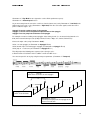
which the scale is repeated to completely fill the performance space. With Parameter 14 '
'Autotranspose'set
to 3 for example, the scale will move up by a minor third (3 semitones) as you move through the performance
space. Have a look at the pictorial example below...
sensor
Parameter 13 '
'Play Mode'set to 2 (repeat the scale to fill the performance space)
'Autotranspose'set to OFF
Parameter 14 '
'Low Note'
As you move away from the sensor the scale rises from the lowest note (set by Parameter 4 '
)
'HighNote'
to the highest note in the scale ( set by Parameter 5 '
). Then the scale starts again from the lowest
note and rises to the highest note... etc.
sensor
12
IJK
LMINKO PQK
R S
T#U V WX V Y.W)WZ [\]S T#U J
^ T_
'Play Mode'set to 2 (repeat the scale to fill the performance space)
Parameter 13 '
Parameter 14 '
'Autotranspose'set to 3
'Low Note'
As you move away from the sensor the scale rises from the lowest note (set by Parameter 4 '
) to the
'High Note'
highest note in the scale ( set by Parameter 5 '
). Then the scale starts again, but this time from a
point 3 semitones higher... etc.
Arpeggio X sets the number of notes in the arpeggio
Arpeggio Y sets the interval skip between adjacent notes of the arpeggio.
Arpeggio Z sets the jump interval between each arpeggio
For example to create ascending 4 note arpeggios of the tertiary chords (i.e. constructed using intervals of a
third) in the harmonised major scale (C Maj7, D min7, E min7, F Maj7, G 7, A min7, B min7 flat 5)...
Scale'
Choose the major scale (using Parameter 2 '
)
Arpeggio X'to 4)
Select a 4 note arpeggio (set Parameter 15 '
Select interval skip of 3 for tertiary type arpeggio (set Parameter 16 '
Arpeggio Y'to 3)
Arpeggio Z'to 1)
Select jump of 1 scale tone (set Parameter 17 '
This will produce the following note sequence from a C major scale...
C-E-G-B D-F-A-C E-G-B-D F-A-C-E G-B-D-F A-C-E-G B-D-F-A etc...
You can transpose this to any key using the transpose parameter. (Parameter 3 'Transpose'
)
etc...
Arpeggio X'set to 4...
'
means there are 4 notes in each arpeggio
Arpeggio Y' set to 3...
'
means ascend in thirds
Arpeggio Z' set to 1...
'
sets the upward jump from one arpeggio to the
next to one scale tone.
..................................................................................................................................................................................
13
`ab
cd`ebf ghb
i j
k#l m no m p.n)nq rstj kuq a
v kw
Recording your own music, scales and chords...
You can record your own scales and chords with a MIDI keyboard plugged into the midi in socket using
Parameter 1 'Record'
. Each patch can record up to 192 notes. You can use single notes, chords, or a mixture
of notes and chords.
You will need to save the patch if you want to keep your recording... Your recorded notes are saved
with the patch. So you can have up to 200 recordings, with up to 192 notes in each...
Scale'
To replay what you have recorded choose the Recorded Scale option using Parameter 2 '
Note... when you are recording chords, play the chord slowly, or one note at a time, not an arpeggio
though... hold all notes down until the chord is complete. This is because it takes a short but significant time for
Sound Sculpture to record each note into its permanent memory.
...............................................................................................................................................................
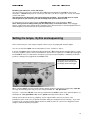
Setting the tempo, rhythm and sequencing
There are three ways to set the tempo or rhythm of the music you are playing with Sound Sculpture.
You can use the built in speed control. Anticlockwise is faster, clockwise is slower...
If you turn the speed control to minimum the display will show 'Ext’ meaning that the Sound Sculpture is ready
to receive a rhythmic sequence from an external device, which can be a sequencer or a MIDI keyboard plugged
into the midi in socket, or a metronome, microphone (you may need a pre-amplifier) or something similar that
produces a voltage pulse, plugged into the custom socket.
speed control set to minimum
the display shows Ext (External)
SS will play in time with trigger
When using the midi in socket the Sound Sculpture will only produce a note when it is triggered by a Note On
message corresponding to the note you choose using Parameter 19 ' Ext. Synch Note'
To try this... connect the midi out socket from your keyboard to the midi in socket on the Sound Sculpture, set
Parameter 19 ' Ext. Synch Note'to C3, turn the speed control fully anti-clockwise to 'Ext’
Now tap out a rhythm on the C3 key (middle C) on your keyboard while someone else moves in the
performance space. In this case you provide the rhythm while your friend generates the harmony... If you have
a sequencer you can write a simple rhythmic motive on middle C (ode to C ?) and use it to trigger the Sound
Sculpture automatically while you perform...
14
xyz
{|x}z~ z
#
.) y
Ext Synch' option for the custom input
To use the custom input to trigger the Sound Sculpture, choose the '
using Parameter 36 ' Voltage Input'
This is particularly useful if you want to use a metronome ( I recommend the Korg MA-30, which has a TAP
TEMPO feature as well as some simple rhythms built in), or if you want to play with say a drum kit or bass
player (use a microphone and pre-amplifier) or if you want to play along with a CD or other recording...
Note- the Sound Sculpture doesn't respond to MIDI time code messages.
...............................................................................................................................................................
Selecting a sensor input
There are two sensor inputs, the ultrasonic sensor input and the custom (or voltage) sensor input. You can
choose to use either one or the other, or both at the same time.
The ultrasonic sensor input can be used to play notes, or to send control messages such as pitch bend,
modulation, program changes, etc using Parameter35 'Ultrasonic Input'
The custom (or voltage) sensor input can be used to play notes, or to send control messages such as pitch
bend, modulation, program changes, etc it can also be used to trigger the ultrasonic sensor in time with a
metronome, microphone or other pulsed voltage, using Parameter36 'Voltage Input'
...............................................................................................................................................................
Using Control Change messages
Choose the control change message you want to send to your synthesiser using Parameter32 'Control
Message' .You can choose from Velocity, modulation or pitch, Program Change, or select any control
change number from 1 to 121
Using Parameter33 'Control Low'and using Parameter34 'Control High'you can select the range of control
values you wish to send to the synthesiser.
For example you may want to control velocity (equivalent to how hard you hit the keys of a piano) by using a
swell pedal (standard synthesiser swell pedals can be used with the custom input).
...............................................................................................................................................................
Setting the MIDI channels, program changes etc
Choose the MIDI channel to transmit note and / or control messages using Parameter 28 'TXCh Note / Cont'
Choose the MIDI channel to receive note messages for recording or sequencing using Parameter 29 'RXCh
Note / Cont'
Choose the MIDI channel to transmit Program Change messages using Parameter 30 'TXCh Prog Change'
if you don't want to transmit program change messages set this to'off'
15
# .)¡ ¢£¤ ¥
¦ ¥
Choose the MIDI channel to receive Program Change messages using Parameter 31 'RXCh Prog Change'
if you don't want to receive program change messages set this to'off'
...............................................................................................................................................................
Using the custom (voltage) input
The voltage input has an input voltage range from ground (0 Volts) to 5 Volts.
The input connection is via a 5 pin 270 degree DIN socket, pin 1 - ground, pin2 - 5V (current limited by 22R), pin
3 is the 0-5V input. input impedance is 100k.
Most commercial sensors use a voltage range of 0 to 5 Volts, however for increased flexibilty, you can select
the input voltage range and sensitivity of the voltage input using...
Parameter 37 ' V-I Min Volts' sets the minimum voltage in steps of 0.1 volts
Parameter 38 ' V-I Max Volts' sets the maximum voltage in steps of 0.1 volts
Parameter 39 ' V-I Sensitivity' sets the resolution in steps of 0.1 volts
For example if you have a sensor that produces an output voltage between 1 volt and 4 volts, and you want to
divide this 3 volt range into 30 divisions...
set Parameter 37 ' V-I Min Volts' to 10 ( 10 times 0.1 volt = 1 volt)
set Parameter 38 ' V-I Max Volts' to 40 ( 40 times 0.1 volt = 4 volts)
set Parameter 39 ' V-I Sensitivity' to 1 ( 30 times 0.1 volt = 3 volts)
for a standard 0 to 5 volt signal...
set Parameter 37 ' V-I Min Volts' to 1
set Parameter 38 ' V-I Max Volts' to 50
set Parameter 39 ' V-I Sensitivity' to 1
...............................................................................................................................................................
Utilities, saving, memory card, title edit, quiet mode
To save the changes you have made to a patch...
First give it a suitable title using Parameter 9 ' Title Edit'
Then decide where you want to save it (to itself, or to another patch number) using Parameter 10 ' Save To'
Then save it using using Parameter 11 'Save'
You can save or load one hundred patches at a time to or from a Sound Sculpture memory card using using
Parameter 8 ' Bulk Data'
If you are using the Sound Sculpture at close range, up to say 2 metres, then you may wish to reduce the
audible clicking of the ultrasonic sensor using Parameter 21 ' Quiet Mode'This reduces the power of the
ultrasonic sensor.
Parameter 12 ' Menu Switch'enables you to choose between the simple menu, which consists of parameters
1 to 12, or the full menu which includes all the more advanced parameters up to parameter number 40.
16