1
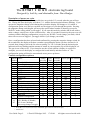
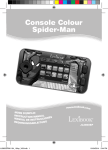
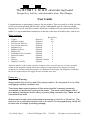
The SmartGun electronic tag board.
Designed by, built by, and obtainable from: Dave Bodger.
User Guide
Congratulations on purchasing a state-of-the-art product. This user guide is to help you find
your way around operating this flexible system. Although all aspects of the circuit and
display are covered, only those features which have had the relevant controls fitted will be
usable. It is up to individual constructors to decide on the mix of facilities they wish to use.
Main controls.
•
•
•
•
•
•
•
•
•
•
•
•
Trigger.
Magazine change.
Fire Selector Increase.
Fire Selector Decrease.
Brightness Up.
Brightness Down.
Display Off.
Load and/or Eject Grenade.
Reload Grenades.
Safety.
Silencer.
Display Cx and Fx.
Keypad key
Required
n/a
Required
n/a
Optional
7
Optional
9
Optional
*
Optional
#
Optional
0
Optional
1
Optional
2
Optional
5
Optional (custom)
8
Optional
3
All these must be 'push to make' switches. It may be more convenient to use a 'release to make'
switch for the magazine change function if a physical representation of a magazine is fitted,
arranged so it operates when the magazine is withdrawn from the gun. The magazine would then
have to be replaced before the trigger became operable once more.
Power on
Important Warning.
Always switch the circuit on and off by using a switch. Do not power it on or off by
unplugging a battery connector clip.
There have been some instances of the microcontroller's memory becoming
'scrambled' by rapid on/off cycling of the power. The same could happen with a
poor battery connection due to a dirty or poorly fitting connector clip. Make sure all
connections are solid.
Always wait a couple of seconds between powering on and off, or off and on. The
only cure for a corrupted controller chip is to return it for re-programming, which will
be done free of charge (excluding postage).
User Guide Page 1.
© David J P Bodger 1995. 17/02/98
All rights reserved world-wide.
The SmartGun electronic tag board.
Designed by, built by, and obtainable from: Dave Bodger.
Description of power-on cycle.
When power is applied there is an extended time-out period of 15 seconds when the gun will not
fire. During this time the display will show 'C.9.' with the decimal point indicators flashing. If you
operate the magazine change switch during this period the display will change to 'c0' (which is
configuration option zero) and you can then use the trigger to cycle through the options. Pressing
the magazine change switch again will accept the option whose number is showing (except for
WoW/LC mode setting which it will toggle). If you enter this mode by mistake and do not wish to
make a change, simply leave all the switches alone. After 10 seconds of inactivity the power on will
continue without changing configuration (except for any WoW/LC mode change you made, which
takes effect as soon as toggled - just toggle it back if you change your mind).
Once a configuration has been selected and confirmed by pressing the magazine change switch for
the second time, the display will show a number representing the option you have chosen for 10
seconds, then change to show the fire selector setting 'F.x.' for 2 seconds, then the decimal point
indicators will stop flashing and the amount of ammo in your magazine clip will be displayed 'xx'.
The gun is now ready to fire. If you intend to use the circuit without a display (in a pistol for
example) you can use the display to configure the board initially and then remove it. The
configuration setting will then be remembered across power up/downs.
Current configuration options.
Option
number
0
1
2
3
4
5
6
7
8
9
A
B
C
D
E
F
c
UU
or
LC
Name
"StarLite" Pistol
Auto Pistol
Assault "Pulse" Rifle
Heavy Assault Rifle
SMG
LMG
HMG
Laser Law
Mine
Sentry Gun
double-barrelled shotgun
Pump action shotgun
Combat shotgun
"toon" movie gun
Cowboy pistol
Mini-gun
Custom Configuration
Shows current mode UU=Worlds of Wonder,
LC=Laser Challenge.
Press mag change to toggle.
Ammo Spare
per clip Clips*
10
4
10
4
99
9
75
6
30
8
50
D¹
99
E¹
99
4
9
0
99
0
2
E¹
8
4
20
4
15
F¹
6
5
99
9
?
?
-
Reload
seconds
3
3
7.5
10
4
5
9
8
15
15
2
15
10
2
3
15
?
-
-
cyclic rpm fire selector
60
180
600
300
300
300
180
180
60
300
60
45
60
300
120
900
?
1
1
0²
0²
0²
0²
0²
9
9
9
2
2
3
2
1
0²
?
-
-
*. Spare clips in addition to clip fitted. Therefore 9 spare clips means gun has 10 full clips to start with.
¹. A=10, B=11, C=12, D=13, E=14, F=unlimited (gun will never run out of clips).
². 0=Full Auto.
User Guide Page 2.
© David J P Bodger 1995. 17/02/98
All rights reserved world-wide.
The SmartGun electronic tag board.
Designed by, built by, and obtainable from: Dave Bodger.
Custom Configuration
This can be loaded by use of the RS232 interface. As supplied the default is the same as config 2
(pulse rifle). Whenever the gun configuration is changed via the RS232 interface, a copy of the
settings is made to the custom configuration option slot, overwriting what was there before.
Magazine Change
When you run out of ammo in a clip, the display changes to 'Cx' and the gun will not fire. You must
activate the magazine change switch (remove/replace the physical representation of the magazine or
simply press the switch). This will activate the timed period during which the gun will not fire.
During this time the two decimal point indicators will flash denoting the reload. Once the two
indicators stop flashing the display changes to show the number of rounds in the clip and firing may
recommence.
The magazine change switch may be activated at any time, except when the safety is on, and will
eject the current clip and load a fresh one. This enables you to make sure you have a full clip before
entering a firefight. Unfortunately the remaining rounds in the old clip are lost as you throw it away.
Once you use up all your clips the power must be turned off and on to replenish them. This incurs
the extended power up time-out delay of approximately 15 seconds.
Fire Selector switches (also, for convenience, Keypad #7 & #9)
When fitted, these switches allow you to change the fire selector setting from its default value
loaded at configuration time to between 1 and 9 rounds per burst, and 0 which represents full-auto.
One switch will increment the value, the other will decrement it. They both 'wrap-around' at their
limits, so only one switch need be fitted if you prefer.
Display Brightness switches (Keypad # and *)
These allow the brightness of the display to be turned up and down. The display always defaults to
minimum brightness at power-on. These controls have 'end-stops' such that you cannot reduce
brightness below minimum or above maximum.
Display Clips & Fire selector settings (Keypad #3)
When pressed, the display cycles through the sequence shown. The display changes to show the
current number of clips remaining and the fire selector setting before returning to the ammo count
display. This is for information only and does not affect the operational capability of the gun. You
may still fire while this information is being displayed.
9 clips
User Guide Page 3.
Fires burst of 3 rounds
99 rounds in clip
© David J P Bodger 1995. 17/02/98
All rights reserved world-wide.
The SmartGun electronic tag board.
Designed by, built by, and obtainable from: Dave Bodger.
Display OFF switch (Keypad #0)
If fitted, this may be used to turn the display off at any time before its normal 30 second auto-powerdown. This may be useful in night games where you may wish to check your ammo and clips
remaining but do not want the display on for an extended period which might reveal your position.
This switch will still function when the Safety is on.
Load/Eject Grenade (Keypad #1)
This switches back and forth between your normal rifle ammo and a special 'Grenade' feature which
consists of 9 clips of 1 round of special extra-long duration fire, allowing the gun to be 'waved
around' to simulate the area burst of a grenade. It is best used in conjunction with a dual-action
switch that switches in a secondary barrel with a wider angle shorter range beam. A double latching
switch could be used to switch in a secondary sound generator to produce a load/eject sound - see
constructional guide for details.
If after activating this function you change your mind and decide not to use it, simply press the
switch again and the grenade will be ejected without loss. Once you have used up all 9 grenades,
you will not be able to use any again until the next power down/up unless you have fitted the
optional 'Reload Grenades' switch.
After firing a grenade the system reverts to 'rifle mode' automatically.
This function obviously only makes sense on a large rifle which would be capable of being fitted
with a grenade launcher. I would not expect to see it being used on pistols (unless your name is
Judge Dredd) ! If a switch is not fitted to activate this feature, you would not know it was there.
Reload Grenades (Keypad #2)
This works in conjunction with the previous 'load/eject grenade' feature. If you press this button
while switched into 'Grenade' mode your grenade magazine will be refilled. There is a reload delay
while this happens. If not in grenade mode this switch is ignored (but the display will light if off).
Safety (Keypad #5)
Pressing this switch toggles between 'Safe' and 'Live' mode for all the keys and switches except
'Display Off'. When in 'Safe' mode all of the switches (including trigger and magazine change) are
ignored so you cannot accidentally press any of them. To indicate that this mode is active, the
decimal point indicator of the right-hand (or least significant digit) display will light solidly.
Silencer (Keypad #8)
This switch turns off and on the pulse that triggers the sound board and produces the muzzle flash,
without affecting the ability of the gun to fire tag. While the silencer function is active, the lefthand decimal point of the display will light solidly. This option is disabled as standard. It can only
be activated by custom configuration via the RS232 link.
User Guide Page 4.
© David J P Bodger 1995. 17/02/98
All rights reserved world-wide.
The SmartGun electronic tag board.
Designed by, built by, and obtainable from: Dave Bodger.
Unallocated buttons
You will see from the installation guide that there are some switch positions in the 16 way matrix
which do not have functions allocated to them. Activating a switch connected to one of these will
do nothing other than illuminating the display if it is currently off. These switches are reserved for
use in future versions of the software.
Display Features.
Heartbeat blip
The decimal point indicator of the left-hand (or most significant digit) display will 'blip' on once
every 2 seconds while the gun is powered up with the display blanked. This is to remind you that the
gun is powered on and using battery power.
Lockout indication
When the optional lockout connection between the sensor and the gun is fitted, and when the sensor
'dies', the gun will not fire and both decimal point indicators will light up solid.
Silencer On.
If the left-hand decimal point indicator is lit solidly then the silencer has been engaged.
Safety On.
If the right-hand decimal point indicator is lit solidly then the safety feature has been engaged.
User Guide Page 5.
© David J P Bodger 1995. 17/02/98
All rights reserved world-wide.