1
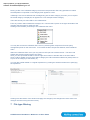
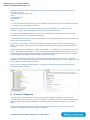
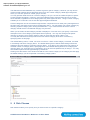
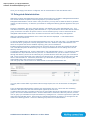
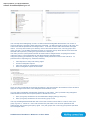
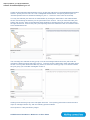
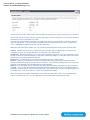
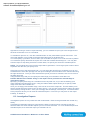
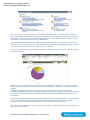
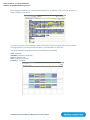
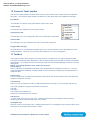
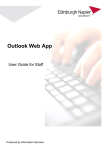
Kent Public Service Network Schools Broadband Content Filtering Websense V7 – User Guide Author – Marc Turner, EIS. www.eiskent.co.uk?broadband [email protected] 1 Contents 1 CONTENTS ....................................................................................................................................................2 2 FILTERING SERVER INFORMATION ......................................................................................................3 3 FILTERING BASICS.....................................................................................................................................3 4 WEBSENSE MANAGER .............................................................................................................................4 5 CREATING A FILTERING POLICY ...........................................................................................................8 5.1 5.2 5.3 5.4 6 CREATING A CATEGORY FILTER ...............................................................................................................8 CREATING A PROTOCOL FILTER ............................................................................................................10 CREATING A POLICY...............................................................................................................................11 IMPORTING CLIENTS AND ASSIGNING A POLICY......................................................................................12 RECATEGORISING / UNFILTERING URLS..........................................................................................13 6.1 6.2 RECATEGORISING ..................................................................................................................................13 UNFILTERING ..........................................................................................................................................14 7 FILE TYPE FILTERING .............................................................................................................................15 8 CUSTOM CATEGORIES ...........................................................................................................................16 9 8 RISK CLASSES ......................................................................................................................................17 10 DELEGATED ADMINISTRATION ........................................................................................................19 11 REPORTING ............................................................................................................................................22 11.1 11.2 PRESENTATION REPORTS..................................................................................................................22 INVESTIGATIVE REPORTS...................................................................................................................24 12 COMMON TASKS TOOLBAR ..............................................................................................................27 13 TOOLBOX ................................................................................................................................................27 KPSN Schools Broadband - Websense V7 User Guide www.eiskent.co.uk?broadband [email protected] 2 Filtering Server Information Each school is provided with a Dell Poweredge 860 or R200. The physical server and software remains property of Kent County Council. The server is supported and maintained by KCC. Control of filtering policies is delegated to the school and filtering policies are managed via a web interface. Logging into the console of the server is prohibited; making any modifications to anything other than the filtering policies will render the server unsupported. The specifications of the servers are as follows: Poweedge 860 2x 7200RPM 146GB SATA disks (RAID1) Dell PERC 6/I Raid Controller 4GB RAM Single 1.87GHZ Dual core processor Dual Broadcom Gb NIC Windows Server 2003 Standard Edition ISA Server 2006 Standard Edition Websense Web Filter v7 Microsoft SQL server 2005 Workgroup edition Poweredge R200 2x 7200RPM 1TB SATA disks (RAID1) Dell PERC 6/I Raid Controller 4GB RAM Single 2.4 GHZ Dual core processor Dual Broadcom Gb NIC Windows Server 2003 R2 Standard Edition ISA Server 2006 Standard Edition Websense Web Filter v7 Microsoft SQL server 2005 Workgroup edition The filtering servers are all named to the same convention “INET1-DCSF” and the IP address is always .5 of the first octet available. The Server is made a domain member, this allows Websense (along with a service account) to apply filtering policies to Active Directory security groups, OUs and users. Being a domain member means ISA can transparently authenticate users using integrated authentication. Users’ browsers should be configured to use the FQDN of the filtering server, and port 8080, eg inet11234.school.lan:8080. Ideally Internet explorer version 7 or 8 should be used on clients, as these browsers support Kerberos authentication. Using a different browser or not specifying the FQDN will result in degraded performance. 3 Filtering Basics ISA server provides the web proxy functionality. When a request is received by the ISA server it uses the ISAPI filter to provide the Websense services with the username and the destination URL. Websense then gives a yes/no response to ISA based on the policies configured in Websense. ISA server will then either return the page or redirect the user to a block page. Websense uses Windows security groups, OUs or user accounts to apply filtering. When configuring filtering you need to think about the structure: for example what groups will be imported, and what sort of groups, OUs or security groups, or both? When working with security groups in filtering policies remember that allow overrides deny. For example, the staff policy has games allowed, the student policy denies games. If the user bob is a member of both staff and students and bob tried to access a games website, it would be permitted. Using this methodology you can build very granular filtering policies. A good example of this would be making a restrictive students policy and applying it to the generic students security group, then creating a less restrictive policy for art students (allowing nudity for example) then apply that policy to the art students security group. KPSN Schools Broadband - Websense V7 User Guide www.eiskent.co.uk?broadband [email protected] Any user account that is imported into Websense will override security groups and OUs. It doesn’t matter which policy has been assigned to the user’s security groups, the policy assigned to the user will always take precedence. To summarize, the filtering hierarchy is as follows: 1. 2. 3. 4. 5. Policy assigned to the user. Policy assigned to the IP address of the machine being used. Policies assigned to groups the user belongs to. Policies assigned to the user’s domain. The Default policy. The first applicable policy is always used. Filtering policies are constructed from a number of components within Websense: Filters: These define what action to take when a specified category is accessed, and there are 3 types of filter. A category filter allows you to configure URL categories, a protocol filter to configure protocol access and a limited access filter which allows you to create a “white list” to only permit access to a limited number of websites. You can create as many category and protocol sets as you like. Policies: These define when a category filter, protocol filter or limited access filter will take effect based on time and day. As many policies can be created as you like. Clients: These are objects you pull from the Active Directory, or IP addresses / ranges you specify. Policies are applied to clients which means the client is then subjected to the filtering configured within that policy. These will be covered in more detail later in this guide. 4 Websense Manager All management and reporting is carried out using the Websense Manager interface which is accessed using a web browser. Only Internet explorer v7 is supported when accessing Websense Manager. Websense manager has been configured to query the local directory service for authentication. Typically the domain admins security group has rights to log into Websense, however this is configured locally so may be different. All features covered in this section are covered in more detail later in the manual. To access the management interface, follow these instructions: 1. 2. 3. 4. Open Internet Explorer 7 and browse to https://inet1-DCSF:9443/nmg. Accept the certificate error and click continue. Select Network Account. Enter your username and password, then click log on. To avoid receiving the certificate error follow these instructions below. Once complete, step 2 of the previous instructions is negated: 1. Click the padlock icon next to the address bar. 2. Click view certificate. 3. Click install certificate and follow the wizard accepting the default settings. When you login to Websense manager, the view defaults to the “today” view. This view displays some basic statistics about the current filtering climate, including: KPSN Schools Broadband - Websense V7 User Guide www.eiskent.co.uk?broadband [email protected] Health Alert Summary: This panel displays any alerts such as a URL database update failure. If you see an alert here please contact the service desk. Today’s Value: This panel displays information about how many requests the server has processed today, along with what kind of content has been blocked. Current filtering load: This graph displays the filtering load from 00:00 to 24:00 in a line graph form. Top Categories by requests: This bar graph displays the top categories being accessed based on requests. Top Uncategorized sites: This bar graph displays the top uncategorized websites being accessed based on request. To the right of the today panel is a common tasks panel. This panel is static throughout the entire Websense manager interface; there are many useful tools accessible here: Save Changes: Whenever a change is made within the manager interface, it is not active until the changes are saved using this button. This button will look different depending on the status No changes need committing Changes have been made which require saving Changes have been saved Whenever changes are waiting to be committed (the orange button) you can click the magnifying glass next to the save button to view which changes will be committed. The Common tasks panel contains several shortcuts to common features of the management console: Run Report: This will take you to the presentation reports feature where detailed reports can be generated. Create Policy: This will take you to the policies feature where you can create new filtering policies. Recategorize URL: This will take you to the Filter Components > Edit Categories feature. From here you can put specific URLs into different categories to override the Websense categories. Unblock URL: This will take you to the Filter Components > Unfiltered URLs menu. From here you can add a URL to be unfiltered. This means the URL will remain in the original category, but if that category is blocked, that specific URL will not be. The toolbox panel provides access to some very useful investigative features: URL Category: This allows you to check what category a URL is in, checking both the Websense master database and any custom categorizations you have made. Check Policy: This allows you to check what policy applies to a specific user or IP address. Enter the username into the user box or the IP address into the IP address box then click go. Test Filtering: This function allows you to specify a user or IP address and a URL. The manager will then display how the URL is filtered for the client. URL Access: This will generate a report to display whether a specific URL has been accessed by anyone within the last 14 days. KPSN Schools Broadband - Websense V7 User Guide www.eiskent.co.uk?broadband [email protected] Investigate user: This will generate a report to display the websites a specific user has accessed over the last 14 days. On the left hand side of the management interface is the main menu panel. This is where all filtering and configuration changes are made. The main menu is split into 3 panels: status, reporting and policy management. The status menu gives information regarding the current health and condition of the filtering server: Today: This is the home page where information regarding the current climate is displayed. History: This builds on the information presented on the today screen. Websense estimates how much time and bandwidth has been saved by blocking access and gives an overview of internet activity. Alerts: This displays a log of active alerts and database updates. Audit log: This displays a log of all changes made to the filtering system and details of who made them. The reporting panel provides access to the reporting features of Websense, two types of reporting exist: Presentation reports: These reports are predefined reports which can be customized to report on the set of data or users that you select. Investigative reports: These reports can be generated in an interactive way. This is the most flexible way of reporting; however it may take you longer to get the data you want using this method rather than the presentation reports method. The policy management toolbox is where the filtering settings are managed: Clients: These are objects that filtering policies are applied to. Any client that is imported is then subjected to a filtering policy. A client can be an IP address, network range or a directory object (domain, OU, security group or user). Policies: These are assigned to clients. A policy defines what happens during days of the week at different times by specifying a filter for that day and time. Filters: These are applied in policies. A filter is a list of categories, protocols or websites which have an action defined next to them. For example a category filter has 90 categories defined (games, gambling, education etc) and you can choose to permit, deny, quota or confirm. You can also block file types and keywords on categories. Filter Components: This menu allows you to modify the underlying Websense master database by moving URLs into different categories, unfiltering URLs and adding new file types etc. Delegated Administration: It’s possible to delegate control of a number of features within the software or allow users to report on their own internet activity. This is based on roles, and these roles can be managed from this menu. Filter Lock: When using delegated administration you may want to stop delegated administrators from modifying the properties of some categories (e.g. don’t let delegated administrators allow the illegal or questionable category). This can be done via the filter lock menu. The settings tab provides access to the system settings, many of these settings should never be changed but some can to customise the system to suit your filtering needs. KPSN Schools Broadband - Websense V7 User Guide www.eiskent.co.uk?broadband [email protected] The general settings menu contains many settings which shouldn’t be changed and some which can be to meet the needs of the local site. Account: No settings in this menu should be changed; the subscription key is required for the filtering to function. The “block users when subscription expires or is exceeded” option means the filtering system “fails closed” if there is a problem with loading the database, so it is strongly recommended that this is turned on. The option to send category and protocol data to Websense should be enabled so uncategorised sites are flagged for categorisation. Filtering: No settings in this menu should be changed. The bandwidth optimizer hasn’t been purchased so these settings are not relevant. The use most restrictive group policy option should be disabled - enabling this means that deny overrides allow. The option to enable search filtering is irrelevant as this is enabled on the core filtering servers, so enabling or disabling this will have no effect. However, we recommend that this is always enabled. Database Download: No settings in this menu should be changed. For the URL database to download successfully these settings need to remain the same. A proxy server must be used, but the loopback of the server itself should be set (127.0.0.1) as no authentication is required for this network. Directory Services: This is where Websense is provided with the credentials to connect to the local directory service, enabling Websense to pull directory objects into the filtering system to apply filtering policies to. This is specific to each school and may be updated as and when the structure of the LAN changes (for example if a new forest is installed, or another global catalogue is added). Logon Directory: This is where the settings are specified for the logon to Websense manager. If the “use directory service for administrator and self reporting authentication” setting is enabled, then these settings take effect. Users in the directory service are granted rights within Websense using delegated administration. Users in the domain cannot log into Websense until they have a role assigned. Logging: This menu contains log server settings, these must not be changed. All categories should be logged and the database should be on localhost. Risk Classes: Risk classes define what risk a category should be classed as. Risk classes have already been configured but may be changed to suit the specific school. For example an art collage may feel that nudity is business usage, therefore you could select nudity under the business usage risk class. User Identification: ISA provides user authentication so no settings on this menu are used. Remote Filtering: This feature is not implemented. Policy Servers: This is used when there are multiple filtering servers. Typically in schools there is only one. The alerts and notifications menu allows you to setup some system-wide alerts. Many won’t be used as they aren’t relevant to the local site, but some are useful. Alerts: This menu is essential for any system alerts to work. You can configure a maximum number of category usage alerts (the standard 100 is usually more than enough) for any email alerts to work. The enable email alerts box must be ticked and an SMTP server, from address and to address configured. You may use the KPSN (Schools Broadband) mail relay (smtp.kcn.org.uk) but please ensure that the from address is valid. Pop up alerts use the legacy messenger service (winpopup) which is disabled in modern operating systems. System: You can select the alerts which you would like to be emailed to you by selecting them here. Many of these will not be of interest. Category Usage: This allows you to configure an alert to be triggered when a category is permitted / denied a number of times. KPSN Schools Broadband - Websense V7 User Guide www.eiskent.co.uk?broadband [email protected] Protocol usage: This is the same as category usage, only it reports on protocol usage. Network agent / Global: Network Agent has not been implemented. The reporting menu contains settings which control how data is logged. The preferences menu is the only menu which you are likely to use. Preferences: Within this menu you can specify the email address that emailed reports will appear to come from. Please ensure this is a valid address such as [email protected]. You must also specify an SMTP server for the Websense server to use when sending mail. You can specify either the name or IP address of the mail server within your establishment, or alternatively you may use the KPSN mail relay (smtp.kcn.org.uk). You may also enable self reporting. Self reporting is a feature that allows users to report on their own internet activity which is covered in more detail later. Log Database: No settings on this menu should be changed. Log server: This menu explains how to access the log server configuration tool, this is for use by EIS staff only. 5 Creating a filtering policy A complete filtering policy consists of 4 objects: a category filter (or limited access filter), a protocol filter, a policy and a client. A category filter defines which categories of website can be accessed; a policy defines what category filters are assigned at what time. A policy is then assigned to a client. Client Policy Category Filter Protocol Filter Limited Access FIlter The order you create each component isn’t important, but if you’re creating a policy from scratch, it’s easiest to create the components in this order: 1. 2. 3. 4. 5.1 Category Filter Protocol Filter Policy Import client Creating a category filter The first step is to create a category filter. Category filters define the action to take when a website within a certain category is accessed. KPSN Schools Broadband - Websense V7 User Guide www.eiskent.co.uk?broadband [email protected] Websense allows you to choose from four actions to take when a website is accessed: This option permits the website and logs the request This option blocks the website and logs the request This option prompts the user to use their quota time to visit the website and logs the action the user takes This option prompts to user to confirm the website is going to be used for work related purposes. The category and URL is displayed. The user’s action is logged. There are two additional options that can be specified on a per category basis This will enable keyword filtering on that specific category This will enable file type filtering on that specific category. (Note, the bandwidth optimizer has not been purchased) When using keyword or file type filtering, remember that the disposition selected has an effect on what action is taken. For example: The games category is permitted with keyword filtering enabled and a keyword of “games” is in the games category. Any website with the word “games” in the URL will be BLOCKED. The games category is blocked with keyword filtering enabled and a keyword of “games” is in the games category. Any website with the word “games” in the URL will be PERMITTED. The games category is permitted with file type filtering enabled, the audio file type is selected. Any audio content will be BLOCKED. The games category is denied with file type filtering enabled, the audio file type is selected. Any audio content will be PERMITTED. As a general rule of thumb if you have blocked a category, then don’t use keyword or file type blocking (as the category is blocked anyway) unless you want to begin permitting parts of a category. To create a new category filter, within the main tab click Filters then click the Add button under category filters. You will be prompted for a filter name and description. The filter name is mandatory and the description is optional. You may base the new filter on an existing filter by selecting the one from the drop down list. This effectively makes a copy of the filter you are basing the new filter on. Clicking ok at the bottom of the window will take you to the configuration page. The configuration page is where you select what categories are permitted / denied etc. You select the category by selecting it from the categories list, then select the action to take by pressing the appropriate button below the list. KPSN Schools Broadband - Websense V7 User Guide www.eiskent.co.uk?broadband [email protected] On the right hand side is the advanced filtering options such as keyword and file type blocking. You will also notice that any keywords / custom URLs that are in that specific category will be displayed. You may apply the same action to multiple categories under a parent category by pressing “apply to subcategories.” You can apply keyword filtering to a category by selecting the category and ticking the box labelled “block keywords.” You may also enable file type blocking using the same method but selecting “block file types” instead. When you select block file types, you will then be able to select the file types you wish to block from the additional selections that appear. Should you apply keyword or file type filtering to a category, the appropriate icon next to the category will become active. Keyword Filtering enabled File type filtering enabled You may find it useful to add notes to the description field during day to day managing to explain why a change was made etc. When you begin to assign this filter to a policy, the “policies using this filter” section will display the number of policies using the filter, and give you a link to view what policies they are. Once you have configured the filter, click the ok button at the bottom of the window, the filter will then appear in the list of category filters. 5.2 Creating a Protocol Filter Protocol filters are a lot like category filters, only the objects are protocols opposed to categories of websites. Protocol filters are created and managed by selecting filters from the main menu, then either clicking add to create a new protocol filter, or clicking on an existing filter to edit it. When filtering protocols there are 2 actions that can be taken. A protocol can be permitted or blocked. The action that has been assigned to a protocol is illustrated with a logo (the same logos as used in category sets). The protocol is permitted The protocol is blocked (Note, the bandwidth optimizer has not been purchased) KPSN Schools Broadband - Websense V7 User Guide www.eiskent.co.uk?broadband [email protected] You may also decide whether to log access to particular protocols by ticking the log protocol data box which appears on the right when you select a protocol. If you have enabled logging on a protocol the logging icon will become active next to the protocol name. Protocol usage is logged Protocol usage is not logged The first step when creating a protocol filter is to give it a name. Specifying a description is optional but it may be useful to explain what the protocol set is for in this field. You may also base this new protocol filter on an existing filter. This is useful if you are creating a filter for sixth form for example, and would like it to be exactly the same as the students filter to start with. Clicking ok on the bottom of the page will take you to the next window where the filter is configured. You decide the action to be taken when a protocol is accessed by selecting the appropriate protocol, then clicking either permit or block. You can apply the same action to a whole group of protocols by using the apply to group button. Once you have configured the protocol filter, click the ok button at the bottom of the window, the new protocol will then be listed under protocol filters. Note regarding Protocol filtering Websense monitors and enforces protocol filtering using a packet analysis application and sending a TCP reset to the client. For the Websense server to be able to see all the traffic on the LAN, it would require a mirrored port to be setup. Websense has not been implemented this way on the KPSN, and therefore the only protocol traffic that the Websense is able to filter is traffic that it can see. For example, you can permit and block access to MSN messenger by using a protocol filter as MSN messenger will use a proxy server, however you cannot stop SQL traffic on your network by blocking the SQL protocol as the Websense server will not see this traffic. 5.3 Creating a Policy A policy is an object that defines when category and protocol filters are active. A policy is assigned to one or more objects (user, IP, security group, OU, IP range etc). The users associated with those objects are then subjected to the filtering policy you have created. A default policy called global exists. This policy is a “catch all” that will take effect when a user is not associated with any of the objects specified, or a policy is not applied at a certain time. By default this policy blocks all access. A policy works on a day and time basis. You can specify a different category filter & protocol filter for every day if required, as well as a different filter every 15 minutes should you wish. A policy can be very simple, such as this one below which enforces the standard category filter & default protocol filter all day every day. You can also create a more complex policy such as this one. This policy enforces the standard filtering policy every day between 00:00 and 12:00, then from 13:00 to 24:00. Between 12:00 and 13:00 a less restrictive policy is assigned. KPSN Schools Broadband - Websense V7 User Guide www.eiskent.co.uk?broadband [email protected] Should any gaps exist in a policy, then the global policy will be applied during that period. To create and manage policies, from the main menu select policies. The policy management window will display the policy name, description (if set) the number of users who this policy is assigned to, as well as the networks and computers it’s assigned too. To create a policy, click the add button at the bottom of the policy management window. The policy creation is again very similar to a category/protocol filter in the sense you name the policy, add a description if desired and you have the option of basing the policy on an existing policy (copying the settings), or simply start from scratch by not ticking the base on existing policy box. Clicking ok will take you to the policy configuration window. The policy definition panel is where you configure what category / protocol filters are applied at what day and time. By default a single line is in the schedule. You may add more lines to the schedule if you require them by clicking add, each line defines a start and end time, as well as the day and what filters you have applied. If you would like a policy which has a generic filtering policy all day, then a single line is required. If you would like a policy which has different filters in the morning and afternoon then two lines are required. If you would like a different filter assigned during lunch time, then the same policy the rest of the day 3 lines are required. Please remember that a policy must cover 00:00 – 24:00 seven days a week, otherwise the global policy will apply. Schedule values can be changed by clicking the drop down box on the value you wish to change. When you assign a category or protocol filter to a policy, the filter is displayed below the schedule. It is also possible to edit the filter from within the policy management window. Once you have created the policy, click the ok button, you will then see the new policy in the policy management window. Now a policy has been created it may be assigned to client. This is covered in section 7.4. 5.4 Importing clients and assigning a policy NOTE: The steps in this chapter assumes that the directory service has already been configured To enforce a filtering policy to a specific set of users a policy must be assigned to a client. A client can be a workstation IP address, a range of IP addresses or a directory object (user, security group, OU, domain etc) although in most cases due to all users being authenticated it will be a directory object. To manage clients, from the main menu select Clients. Any clients that are already imported will be displayed, as well as what policy is assigned to them and the quota time that has been assigned. KPSN Schools Broadband - Websense V7 User Guide www.eiskent.co.uk?broadband [email protected] To add a new client, click the Add button. From one window you can either import a directory object, specify an IP address or a network. To import a directory object browse through the directory window and drill down the directory service by clicking on the folder icon. Once you have found the object you wish to import select it by placing a tick in the box next to it, and then press the right arrow button to add the object to the selected clients panel. To add an IP address, specify the IP address in the computer panel then click the right arrow button to add it to the selected clients list. To add a network range, specify the network range in the network panel then click the right arrow button to add it to the selected clients list. When the clients you wish to apply a filtering policy to are in the selected clients panel, tick the clients and select the policy you wish to apply to them using the drop down policy box. Should you wish to remove a client select just that client and click the remove button. Clicking the ok button at the bottom of the window will import the clients into the policy management window and the policy will then be assigned to those clients. 6 Recategorising / Unfiltering URLs Websense maintains the default categories by placing URLs in the lists. However, there may be instances where you disagree with the categorisation or would simply like to permit a website within a blocked category to be allowed. Both of these requirements can be achieved by either recategorising or unfilteirng a URL. 6.1 Recategorising KPSN Schools Broadband - Websense V7 User Guide www.eiskent.co.uk?broadband [email protected] The Websense master database is simply a list of URLs with the category they belong to. You may change what category a URL belongs to be recategorising it. When you recategorise a URL it will be seen in reports as existing in the category you have placed it in. It will also be permitted or blocked depending on the disposition specified in the category filter being applied to the user. There are two uses for recategorisation. You may disagree with the category a URL is in and wish to place the URL in the correct category (you may feel a games website should be categorized as educational materials for example). You may also wish to use the approach of creating an allow and deny custom category, then placing websites into either category to either allow or deny them. This method would require the allow and deny categories to have the appropriate disposition assigned in all category filters. There are two ways of accessing the recategorise URLs menu: From any location within Websense manager, the “common tasks” panel on the right hand side of the manager has the option to recategorise a URL. Clicking in this will take you directly to the recategorise URL menu. You may also recategorise a URL from the policy management section on the main tab, selecting filter components then edit categories. Select the category you would like to add URLs to on the left hand panel. A panel will appear on the left with the option to add URLs to a recategorised list. Click the add URLs button to specify the URL you wish to recategorise. You may specify one URL per line. Pressing the ok button at the bottom of the screen will add the URL to the recategorised list. REMEMBER: Websense will automatically wildcard a domain name, in most cases if you want to block an entire domain the www should be removed, for example if you specify: www.awebsite.com – the specified domain will be blocked, however somethiingelse.awebsite.com will be permitted. bbc.co.uk – the entire domain will be blocked, anything.bbc.co.uk will be blocked. uk.youtube.com/watch?v=WCPB4abwK0k – this would permit access to this specific page only, the rest of the website would be blocked. You may also recategorise based on keywords by adding them to the keywords list, or by regular expression by clicking advanced then adding them to the regular expressions list. Please remember that when using keywords and regular expressions that if the category is blocked, if any of the keywords / expressions you have specified are in the URL the website will be allowed. Therefore it’s best practice NOT to enable keyword filtering on blocked categories unless you actually want to achieve this. 6.2 Unfiltering If you would like to permit access to a website which is in a blocked category but you agree with the categorization, the unfilter option is ideal. KPSN Schools Broadband - Websense V7 User Guide www.eiskent.co.uk?broadband [email protected] Placing a URL in the unfiltered category will result in that particular URL being permitted no matter what disposition is specified on the category filter applied to a user. unfiltering is much more efficient than recategorising into an allow category, as when you run reports the actual category is displayed, as opposed to a non descriptive allow category. There are two ways to add a URL to the unfiltered list. From any location within Websense manager, the “common tasks” panel on the right hand side of the manager has the option to unblock a URL. Clicking in this will take you directly to the unfiltered URL menu. You may also access the unfiltered URLs menu by selecting filter components from the policy management panel on the main menu. From within the filter components window, select unfiltered URLs. Within the unfiltered URLs menu you may add one URL per line to add to the list. The same rule applies with domain names (remove the www). Once you have specified the URLs click the right arrow button to add the URL to the list of URLs. Once a URL is added you may select which category the URL should be unfiltered in (best practice is to put it in the category it was already in) You may also unfilter based on a regular expression by clicking the advanced button then specifying the expression. Clicking ok at the bottom of the window will apply the changes (note changes will not be active until changes are saved using the save button). 7 File type filtering KPSN Schools Broadband - Websense V7 User Guide www.eiskent.co.uk?broadband [email protected] Websense maintains a list of categories of file types, and adds files to the categories when they discover new ones. The four file type categories are: Audio Compressed Files Executables Video You can access the file types menu by clicking filtering components on the policy management panel on the main menu, then selecting file types. Unlike URL categories you can see what file types are in each category by clicking on the file category. They will then be displayed on the right hand side of the window. You may also add additional file types to the file type categories by specifying it in the custom file extensions input box and selecting Add Extension. It’s also possible to create your own file type categories by clicking add file type then specifying the file types in the file extensions box. It may prove more useful to create file type categories based on sets of users (similar to category filters). For example “Denied file types for students” then specify the file types you wish to block for students. Keyword filtering can be enabled on a per category basis. For example you could block the audio file type on the entertainment category. This would mean the websites would be allowed but running or downloading audio file types would be denied. Remember, if the category is denied and you enable file type filtering, the category will be blocked and the files allowed. To apply file type filtering to a category edit the category filter you want to apply it too. Select the category you would like to filter file types on, then tick the block file types box. This will expand to give you the options of file what types to block. Once you have enabled file type filtering on a category the blocked file type logo will illuminate to indicate it has been enabled. 8 Custom Categories The Websense master database contains over 22 million websites, published in more than 50 languages and organised into more than 90 categories. Websense update the master database daily and new websites are added to Websense managed categories (categories with a blue W next to them). There may be a situation where you wish to categorise some websites into a category that you manage, an example of this may be educational games. KPSN Schools Broadband - Websense V7 User Guide www.eiskent.co.uk?broadband [email protected] The Websense master database only contains a generic games category. However you may wish to review several websites and recategorise them into a new custom category called approved games which you can then permit for certain groups of users. You may question what the use of a custom category is as you can use the unfiltered option to permit access to approved games. However, using the unfiltered option would permit everyone to access those websites, regardless of what category filter they have applied to them. Using a custom category enables you to control who can access the approved games websites. Custom categories can be accessed through the filter components menu under policy management on the main menu (the same menu used to recategorise URLs). You may add a new custom category by selecting a parent category then clicking the add button. If you cannot decide where the custom category should live the user defined category may be used. When you click add, the add category window is displayed. From this menu you specify a name and description for the new category (description field is optional). You may also change what parent category to place the new custom category under by using the drop down “add to” box. You may also add URLs and keywords to the new custom category at the time of creation by specifying them on this page. The default filtering action, if used, can save a lot of time. When a new category is created, it is listed in all existing and future category filters. The default filtering action defines what settings should be applied to this new category in existing category filters. If you plan to only permit this new category in a limited number of category filters, specifying block at the default filtering action then modifying the category filters you would like it to be permitted in is by far the most painless way of doing it. You may also enable keyword and file type filtering by default too. Clicking ok at the bottom of the window will add the new custom category to the category list and apply the default settings you have specified in all existing category filters. 9 8 Risk Classes Risk classes enable you to specify how you class access to a specific category. KPSN Schools Broadband - Websense V7 User Guide www.eiskent.co.uk?broadband [email protected] Risk classes suggest possible levels of vulnerability, from business usage to legal liability. These risks are displayed in reports generated in Websense reporting. By configuring risk classes correctly, you can tell straight away when viewing a report based on risk class what type of activity is occurring. Below is an example of a report based on risk classes: There are 5 categories of risk class: Legal Liability Business Usage Network Bandwidth Loss Security Risk Productivity Loss You can define what categories you feel are classed as productivity loss, and what categories are business usage. Categories aren’t limited to a single risk class, you may for example class the proxy avoidance category as both security risk and productivity loss. To access the risk class menu select the settings tab, and then select risk classes form the general menu. The risk classes are listed on the left of the risk class definitions window. To add a category to a risk class, select the desired risk class from the list then select the categories you would like to include by ticking them in the categories list. KPSN Schools Broadband - Websense V7 User Guide www.eiskent.co.uk?broadband [email protected] Once you are happy with what is configured, click ok at the bottom of the risk classes menu. 10 Delegated Administration Websense is tightly integrated with Active directly which means it’s possible to delegate administration at a number of levels to specific users and groups in your active directory. Delegated administration can be used in many scenarios; you may want to allow the SMT to generate reports on internet activity, or allow the year heads to manage the filtering policies applied to their year groups. During the installation, the group “Domain Admins” was added to the super administrator role. This role allows users to modify anything within Websense. If you would like to remove the domain admins group, and tie this role down to specific users or a more relevant group, it can be achieved via the delegated administration menu which is located on the main menu under policy management. Within the delegated administration menu a list of the roles are displayed. A role defines what activities can be carried out. To add an additional group to the super administrators role, click on the role name. The administrators section lists which groups are currently assigned to that role. Within the super administrators role there are 3 options that can be enabled: reporting, policy and unconditional. Enabling reporting and policy will grant the user access to report on all users and modify all policies. The unconditional option will allow the group to change the Websense server settings such as the directory service. To import an additional group, click the add button in the administrators section. You will then be able to add either an object from the directory service, or a Websense user you have created. Browse through the directory service in the same way as you add clients to select the group you would like to add. Once you have found the group select it by ticking the box, and then click the right arrow to add them to the selected box. Select the permissions you would like to grant the group by ticking the appropriate boxes, then click ok once complete. The new group will now be listed as an administrator in the super administrator role. You may want to allow SMT to generate internet usage reports; this can be achieved via delegated admin. From the delegated administration window click add to add a new role. Name the role something relevant in the name box and write a description (optional) and click ok. To define what users are a member of this role you must either import the individual users or a security group / OU into the administrators field. Click the add button to browse the directory service, find the user or group you would like to import and select it by ticking the box. Click the right arrow to place the object into the selected clients. Ensure only the reporting permission is ticked so no changes can be made to the filtering policies. Click ok to add the group to the list of administrators. KPSN Schools Broadband - Websense V7 User Guide www.eiskent.co.uk?broadband [email protected] The next step when delegating control is to define what the delegated administrator has control of. This is achieved by specifying what clients are managed. As SMT will need to report on all users, the entire forest will be specified as a managed client. To do this click the add button below managed clients. You may then browse your directory service and add whatever OUs, security groups and users you wish. For the SMT to be able to report on everyone, the top level domain name has been selected and imported by clicking the right arrow then clicking ok. The client you have just imported will then be listed under managed clients; anything that resides under this client is now manageable by the administrators specified earlier. Using the reporting permissions you may configure what permissions users in this role have. To permit access to reporting only, select the following: View Reports on today and History pages Access investigative reports View user names in investigative reports Save investigative reports as favourites Once you have configured the reporting permissions, click the ok button at the bottom of the window to apply the changes and return to the delegated administration screen. You may want to delegate management of filtering to year heads. This is possible using delegated administration but there are two prerequisites to enable this to work: 1. Each year group should have its own dedicated category filter(s) and policy. 2. Each year group should have its own security group or OU The way the delegated administration will work in this scenario is there will be a role for each year group, eg Year 7, Year 8 etc. Each role will have the year head’s user account specified as the administrator with reporting and policy rights. The year groups OU or security group will be specified as a managed client. KPSN Schools Broadband - Websense V7 User Guide www.eiskent.co.uk?broadband [email protected] Create the first delegated administration role by clicking the add button in the delegated administration window. Specify the role name as “Year 7 Delegated Administration” and specify a description of “Permits specified users to administer filtering for year 7.” Click ok to move onto the next step. You may now add the year head as an administrator by clicking the add button in the administrators section, and browsing the directory for the year head’s user account. Once you have found the year head’s user account, add it to the selected clients window by selecting the user account and clicking the right hand arrow. Ensure both policy and reporting boxes are ticked then click ok to add the users to the administrators list. The next stage is to add the security group or OU to the managed clients list so the year head can manage the filtering policies that apply to them. To do this click the add button under managed clients section. You may then browse the directory service to select the security group or OU which contains the year group you would like to delegate control of. Clicking ok will add the group to the managed clients list. The reporting permissions should be set to report on managed clients only, with the following options enabled: View reports on Today and History Pages KPSN Schools Broadband - Websense V7 User Guide www.eiskent.co.uk?broadband [email protected] Access investigative reports View usernames in investigation reports Save investigative reports as favourites Schedule investigative reports Click ok to return to the delegated administration window. Save the changes to apply the settings. The year head will now be able to login to Websense Manager with a limited view, and edit any policy or category filter that is assigned to the clients managed by the Year 7 Delegated Administration role. The year head will also be able to report on any of those clients. To delegate administration for the other year heads follow the same procedure but specify the appropriate year group as the managed client, and the appropriate year head as the administrator. 11 Reporting Websense logs all internet activity to an SQL 2005 database on the local filtering server. The data is retained for as long as the disk takes to become full, at which point EIS will delete the oldest data. In most cases around 5 years worth of data is kept, however the minimum that will be kept is one year. The today and history views within Websense manager are generated from data in the database. There are two methods or reporting within Websense: Presentation reports: These reports are predefined reports which can be customized to report on the set of data or users that you select. Investigative reports: These reports can be generated in an interactive way, and this is the most flexible way of reporting. However it may take you longer to get the data you want using this method as opposed to the presentation reports method. Both methods are explored in the following sections. 11.1 Presentation Reports Presentation reports are pre-configured reports that can be customised to output the data you require in a text format. To access presentation reports, from the main menu under the reporting section, click presentation reports. The reports are classified into five categories: Internet Activity: These reports detail the general day to day internet usage by users or group. Security Threats: These reports present data which is related to security, eg spyware sites permitted by date. Policy Enforcement: These reports will help to judge how effective your filtering policy by reporting on how much is blocked. Productivity: These reports provide information on time spent, e.g. the users which spend most time online, or the website users spend the most time viewing. Network Activity: These reports display data based on bandwidth, e.g. the users that pull the most bandwidth. To run a report simply expand the category it lives in, then click the report you would like to run. A description will appear under the report name. If you would like to run it, click the run button in the top right hand corner. You are able to customise the date range you would like to report on as well as the output format and if the report is for a “top x” list, the number of top users to be included. BEWARE: The bigger the date range the longer the report will take to run. A report for a whole years worth of data will take well over 24 hours to generate and will affect the performance of the server. KPSN Schools Broadband - Websense V7 User Guide www.eiskent.co.uk?broadband [email protected] Clicking the run button at the bottom of the window will generate the report in the format you specified. Should you wish to be more granular with this report (eg you would only like to run this report based on students) this can be achieved very easily. From the main presentations reports menu highlight the report you would like to customise, and then click the copy button. The report will then appear under the same category but with a (1) after the name. Highlight the copied report and click the edit button. Within the edit report filter window you may customise several aspects of the report using the tabs: Clients: Use the search function to select the users, groups, OUs IP addresses etc here that you would like to report on, use the right arrow to add them to the selected list. Categories: Select the category or risk class you would like to report on. Eg if you would like to view the top 10 users of a specific category or risk class, select that category or risk class here and use the right arrow to add it to the selected items list. Protocols: If you would like to only report on a specific protocol, select it here. Actions: Select if you would like to report on websites that were just permitted, blocked or both. Select the disposition and use the right arrow to select it. By expanding the disposition you can get as granular as the website was permitted with the continue option. Options: This tab allows you to customise the report title, description and whether a logo should be included. You may also tick the save as favourite box if you would like to use the scheduling feature. Confirm: Confirm lets you customise the title if this is a onetime report, and you may specify what you would like to do: save, save and run, or save and schedule the report. Once the report filer has been configured to your liking, click the finish button. If you selected save and run, the report will run. If not you will return to the presentation reporting main menu. KPSN Schools Broadband - Websense V7 User Guide www.eiskent.co.uk?broadband [email protected] Opposed to running a common report manually, you can schedule a report you have configured and saved as a favourite to run on a schedule. To schedule a report to run, click the scheduler button on the presentation reports main menu. The menu that appears is very similar to the edit report filter menu in its tabular form. You must specify a job name, and how often you would like the report to run under recurrence pattern. You must also specify what time the report runs under the schedule time dialog box. You may also want the report to stop being sent after a certain date; if so specify this under the schedule period. NOTE: The schedule time is the time the report will be generated. If it’s a large report it will not arrive anywhere near the time you specify here. Click next to move to the select report tab. You can select the report(s) you would like to run at your scheduled time: select the report(s) from the report catalogue and move them to the selected list using the right hand arrow. Once you have selected the reports you wish to schedule, click next to move to the date range tab. Using the date range tab you can specify the date range you would like to view data over. DO NOT SELECT ALL DATES - doing so will impact server performance and take days to generate the report. Specifying a specify date range in a schedule serves very little use, as you will consistently get a report regarding the same date range. Using the relative dates option allows you to specify a date range such as the last 2 weeks etc. Once you are happy with the date range, click next to move to the output tab. This tab allows you to specify the file format the report is sent in and to whom. You may also customise the subject and body of the email by ticking the box. Once you are happy with all settings, click save job. You will be taken to the job queue where you can view all scheduled reports. From here you may also run the report instantly, or disable it. 11.2 Investigative Reports Investigative reports are very interactive and customisable. Data can be generated and viewed very swiftly. Customising investigative reports to get exactly the data you want however can take a long time, therefore there are come standard reports you can run and customise. To run a standard report click standard reports, then select the report you would like to run. KPSN Schools Broadband - Websense V7 User Guide www.eiskent.co.uk?broadband [email protected] Once you have run a standard report, it is opened in the web browser. You may use the controls to adjust the variables in the report to meet your requirements. For example, you may wish to view just a single day, or a week, you can use the view drop down list to select the time frame. Alternatively you can use the view from calendar to specify a date period. The way internet use is displayed is configured in the “internet use by” drop down box in the top left hand corner, you can select any one of the usage types and the display will update to display that type of usage without affecting the other settings you have specified. As well as the bar chart which is displayed by default, you can also view the data in a pie chart format by clicking pie chart. Within the pie chart window you can also customise the data that is displayed, e.g. you can view the data for a week or a whole month by using the view drop down box, and the pie chart will dynamically update. Using the outliners button you can view any clients whose internet activity is out of the norm. Websense’s software calculates the average activity for all users per category, per day, per action and per protocol. It then displays the user activity that has the most statistically significant variance from the average. User by Day / Month provides a graphical view of internet usage on a per user basis. As an example, if you are investigating a user, looking through traditional text based reports may be tiresome. The user by day / month feature will illustrate the user’s internet access using icons. Each category is represented and you can hover over each icon, and in the status bar you will see the URL the user has visited. KPSN Schools Broadband - Websense V7 User Guide www.eiskent.co.uk?broadband [email protected] Each category of website has a symbol associated with it. A definition of each one can be seen by clicking category view control. You can also view the user’s internet activity for the entire month by clicking user activity by month. This will provide an overview of internet usage by coloured blocks on each day. The coloured blocks represent the risk of the website they are visiting: RED: High Risk ORANGE: Medium to High Risk Yellow: Medium Risk Blue: Medium to Low Risk Dark Blue: Low Risk KPSN Schools Broadband - Websense V7 User Guide www.eiskent.co.uk?broadband [email protected] 12 Common Tasks toolbar The common tasks toolbar provides swift access to many of the functions that have been explored in this guide. The common tasks toolbar is located on the top right hand side of Websense manager. Run Report This will take you directly to the presentation reports main menu. Create Policy This will take you straight to the new policy wizard. Recategorise URL This will take you to the recategorise URL menu under filter components. Unblock URL This will take you to the unfiltered URL menu under filter component. Suggest New Category This will take you to the Websense website where you can recommend a new URL category for the master database. This does not mean they will implement it, it is just a suggestion. 13 Toolbox The toolbox contains many useful tools, some of which run within their own right by gathering data from other components within Websense. Others simply submit the information to another component of Websense. The toolbox is located on the right hand side of Websense Manager under the common tasks panel. NOTE: Turn popup blockers off to enable this function. URL Category Enter a URL here and Websense will open a new window with the category the URL is in. This will query the Websense database currently loaded on the local server including any recategorisations or unfiltered URLs. Check Policy Enter a username or IP address and Websense will open a new window with the policy that has been assigned to that user and why. Test Filtering Enter a user or IP address as well as a URL and Websense will open in a new window and tell you: The result (would the category be permitted or blocked) The URL The Client The Category the website is in Details such as where the URL is listed URL Access You may enter all or part of a URL here. Websense will launch an investigative report showing whether it has been accessed within the past 14 days. Investigate user Enter all or part of a username here. Websense will launch an investigative report showing which sites that user has accessed within the past 14 days. KPSN Schools Broadband - Websense V7 User Guide