1
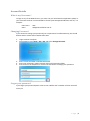
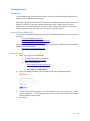
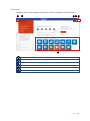
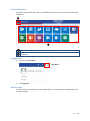
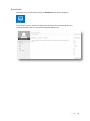
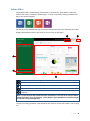
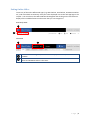
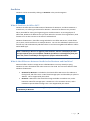
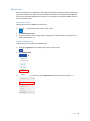
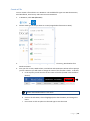
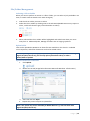
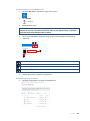
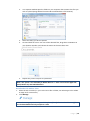
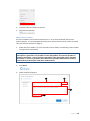
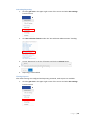
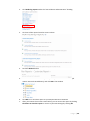
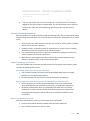
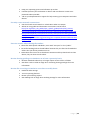
SUTTON COLDFIELD GRAMMAR SCHOOL FOR GIRLS USER GUIDE Table of Contents Account Details ....................................................................................................................................... 1 What is my Username? ....................................................................................................................... 1 Changing Password ............................................................................................................................. 1 Forgot your password ......................................................................................................................... 1 Getting Started........................................................................................................................................ 2 Perquisites........................................................................................................................................... 2 How to Access Office 365 ................................................................................................................... 2 How to Login ....................................................................................................................................... 2 Homepage ........................................................................................................................................... 3 Portal Navigation ................................................................................................................................ 4 Logging Out ......................................................................................................................................... 4 Mobile Apps ........................................................................................................................................ 4 Newsfeeds............................................................................................................................................... 5 Online Office ........................................................................................................................................... 6 Exiting Online Office............................................................................................................................ 7 OneDrive ................................................................................................................................................. 8 What is OneDrive in Office 365? ......................................................................................................... 8 What is the difference between OneDrive for Business and OneDrive?............................................ 8 Mobile View ........................................................................................................................................ 9 Create a File ...................................................................................................................................... 10 Edit a File ........................................................................................................................................... 11 Saving a File....................................................................................................................................... 11 Exit a File ........................................................................................................................................... 11 File/Folder Management .................................................................................................................. 12 Security Recommendations .............................................................................................................. 21 Account Details What is my Username? To login to any of the O365 services, you must use your Username Principal Name (UPN) i.e. your username must be in an Email address format ([email protected]). For example: Username = UPN = ABC [email protected] Changing Password If you wanted to change your password (not a requirement for Office 365 use), this should be done within school and not within Office 365. 1. 2. Login to School computer Once logged in press CTRL + ALT + DEL and select Change Password 3. 4. 5. Enter current password in Old Password field Enter new password in New Password and Confirm Password fields Press Enter on the Keyboard or Click the Arrow button to Change your password Forgot your password If you forget your password please come to the IT Office and a member of the IT team will assist you. Page |1 Getting Started Perquisites To access Office 365, you will need an internet connection, and for the best experience it is advised to use a supported web browser. Office 365 is designed to work with the current or immediately previous version of Internet Explorer or Firefox, or the latest version of Chrome or Safari. Other versions or other browser are not recommended but may still function. These other browsers are likely to affect the quality of the user experience and may only function in part. How to Access Office 365 To access any of the 0ffice 365 services you can use the Office 365 portal, and the portal can be found: http://Portal.Office.com/home http://Portal.MicrosoftOnline.com/home http://Portal.Office365.com/home All of these sites resolve to the same place so any can be used. Additionally link can also be found on the school website: http://www.suttcold.bham.sch.uk How to Login 1. 2. 3. 4. There are 2 way to access Office 365 a. Go to the Office 365 portal website: http://Portal.Office.com/home b. Go via school website: i. http://www.suttcold.bham.sch.uk ii. Click Menu iii. Click O365 in the Main Menu Enter your UPN & Password (same password used with network/Email login) If want to keep yourself signed in so you don’t have to login the next time, put a Tick in ‘Keep me signed in’. It is not advised to do this on an unsecured computer (on premise school computers are secured). Click Sign in Page |2 Homepage The Office 365 Portal Homepage provides quick access to available services and features. 1 2 3 4 5 6 Office 365 Portal Navigation, Click on here to Display the Features/Services available. Office 356 logo, Click on here to return to the Office 365 Portal Homepage. Your personal account settings in Office 365 Help User Menu Access to Features/Services available Page |3 Portal Navigation Anywhere within Office 365, access to available features/services can be found in the Portal Navigation. 1 2 Office 365 Portal Navigation, Click on here to Display the Features/Services available. Access to Features/Services available (When Portal Navigation is clicked this menu is displayed) Logging Out 1. Click on the User Menu User Menu 2. Click Sign Out Mobile Apps We currently do not support the use of mobile apps, it is advised to use a web browser and use Office Online. Page |4 Newsfeeds Newsfeeds can be accessed by clicking on Newsfeeds in the portal navigation. In this section you can monitor the documents and sites you are following. Also any newsfeed posted in the sites you are following will appear here. Page |5 Online Office Online Office offers online editing of documents, presentations, spreadsheets, and notes, without the need to install any software/app. It can be accessed by clicking on the desired app in the portal navigation. On clicking on the desired web app, the online web app will open (the following illustration displays Excel Online however the layout is the same for all web apps): 1 2 3 4 6 Your personal account settings in Office 365 Sign out Files recently used are displayed here and can be opened from here. Open OneDrive Template here can be used to create a new file in OneDrive. Scroll down for more templates. Note: If a previous file was created and not renamed, an error may occur and you will be asked to try again or go to OneDrive. If this happens, go to OneDrive and rename the file to stop the error from happening. To open an existing saved file, open OneDrive and click on the file name (Edit a File on Page 11). Page |6 Exiting Online Office To exit any of the online Office web apps (e.g. Word Online, Excel Online, PowerPoint Online etc.) and return back to OneDrive, Click your name displayed next to the web app logo in the Top bar. You can also use the Office 365 Portal Navigation but clicking on the Tile button to display all the available features and services that you can navigate to. Read Only Mode 1 2 Edit Mode 1 2 Office 365 Portal Navigation, Click on here to Display the Features/Services available. User’s Name in Word Online. Position of User’s Name in Excel Online, PowerPoint Online and OneNote Online is the same. Page |7 OneDrive OneDrive can be accessed by clicking on OneDrive in the portal navigation. What is OneDrive in Office 365? OneDrive in Office 365 is an abbreviation of OneDrive for Business, and when OneDrive is stated here, it is referring to OneDrive for Business. OneDrive for Business is a personal library intended for storing and organizing your work documents. As an integral part of Office 365, OneDrive for Business lets you work within the context of our organization, with features such as direct access to the school’s address book. OneDrive for Business is cloud file storage included in our Office 365 service, which allows you to store, and share files across multiple devices. You can also collaborate with users on and off site, and simultaneously edit documents in real time using Microsoft Office or Office Online Web Apps. Note: OneDrive for Business is different from OneDrive, which is intended for personal storage separate from your workplace. OneDrive for Business is also different from your team site, which is intended for storing team or project-related documents. What is the difference between OneDrive for Business and OneDrive? Microsoft offers another storage service called OneDrive. You may already be using OneDrive to store documents and other content in the cloud. This service is different from OneDrive for Business: OneDrive for Business is included in the schools Office 365 service for students or faculty/staff, and offers users 1 TB of cloud storage space and the ability to upload a 2GB file. This is supported by the school. OneDrive is Microsoft's free cloud file storage available at onedrive.com, and is limited to 7GB of file storage space. OneDrive is a free consumer service, and is intended as personal data storage. This is not supported by the school. Note: In the header or elsewhere on Office 365, ‘OneDrive’ appears as an abbreviation of OneDrive for Business. Page |8 Mobile View When a mobile device is detected it will display (by default) in Mobile View for a better user experience however this view does have limitations (elements of File/Folder Management may not be supported depended on device) so it is possible to switch from Mobile View to PC View and vice versa. Switch to PC View Change the View from Mobile to full PC View. 1. Click on … in the bottom right corner of the screen. 2. Click Switch to pc view 3. If you this doesn’t work, change folders (navigate to another folder by Clicking on the folder) and repeat 1 – 2. Switch to Mobile View Change the View from full PC to Mobile View 1. Clicking the gear icon in the upper-right corner of the screen 2. Click Mobile View 3. If Mobile View is not in the list, Click Documents in the left pane and repeat 1 – 2. Page |9 Create a File You can create a file and store it in OneDrive. The available file types are Word Documents, Excel Workbook, Excel Survey and Power Point Presentation. 1. In OneDrive, Click new (Plus Icon) 2. Or Choose what type of file you want to create (image below illustrates PC View). 3. 4. This will open/load the web app for the type of file you chose e.g. Word Online for a Word Document. Give your file a name, Word Online, Excel Online and PowerPoint Online will not prompt you for a Name so you will need to change the name of the file after it loads. To do this: a. In the top bar you will see the current name of the file (located in the middle of the bar). 1 File Name in Word Online. Position of File Name in Excel Online, PowerPoint Online and OneNote Online is the same. b. Click on the File Name, this will highlight/select the File Name, and change the name. c. Press Enter or Click anywhere in the web app to save the name P a g e | 10 Edit a File 1. 2. 3. 4. Click on the File Name This will open the File in the appropriate Office web app in Read Only Mode Depending on kind of file, Edit Document or Edit Workbook or Edit Presentation menu is available. Click this. In the submenu displayed, Click on Edit in Word Online or Edit in Excel Online or Edit in PowerPoint Online. Saving a File When editing online, the file is saved while you are working so you no action is required to save. Exit a File When editing online, see Exiting Online Office on Page 7 to exit to OneDrive. P a g e | 11 File/Folder Management Selecting a File or Folder When you want to perform an action on a file or folder, you can select it (only available in PC View, to switch view see Switch to PC View on Page 9). 1. 2. Find the File or Folder you want to select Select the File or Folder by Clicking next to the File Name (Mobile Devices may require 2 Clicks, 1 Click will show the grey Tick and another to select) 3. When selected the File or Folder will be highlighted and ticked even when you move away from it. Additionally Edit, Manage and Share are no longer greyed out. Upload a File Files can be uploaded to OneDrive so those files are available on the cloud i.e. available access anywhere, and office documents can then be edited online. Note: Depending on Operating System, access to files to upload may be restricted e.g. on Apple iOS (iPad, iPhone etc) you can only upload from Photo Library or Take a Photo/Video to upload. Upload via Browser in PC View 1. Click Upload 2. Browse for the file (image below illustrates Microsoft Windows 7 file browser) 3. 4. Select file and Click Open Repeat this process anytime to upload files Note: This option may not be available for Mobile Devices e.g. does not work with Apple iOS (iPad, iPhone etc). P a g e | 12 Upload via Browser with Mobile View 1. Click the Plus icon in the bottom right of the screen 2. Click Upload 3. Browse/Select a File Note: Apple iOS (iPad, iPhone etc) only grants access to the Photo Library and Camera so you can only upload a Photo or Video in your Photo Library, or upload from the Camera by Taking a Photo or Video. 4. Click on the Tick icon to Upload (change name or select Replace existing file if required) 1 2 3 4 Upload file Cancel Upload File name, change if required Replace an existing file if ticked 5. Repeat this process anytime to upload files Upload using Drag-and-Drop 1. Navigate to the folder you want to upload files to P a g e | 13 2. In a separate window open the folder on your computer that contains the files you wish to upload (image below illustrates Microsoft Windows 7 file browser) 3. 4. Select the file(s) you wish to upload Click and hold the cursor over one of the selected files, drag them to OneDrive in your browser window, and release the mouse in the Drop here area. 5. Repeat this process anytime to upload files Note: This option is not available for Mobile Devices i.e. does not work with Apple iOS (iPad, iPhone etc) and Android devices. Download a File with PC View 1. Select the File or Folder (i.e. put a tick next to file or folder, see Selecting a File or Folder on Page 12 for instructions) 2. Click Manage Note: The Manage option is only available after a file or folder is selected but only files can be downloaded and only one file at a time. P a g e | 14 3. 4. 5. In the Manage submenu Click on Download a Copy The file will either automatically download to the Downloads folder on your computer or a Save As window will appear asking you to choose a location on your computer to save the file to (this varies by Internet browser and browser settings). Repeat this process any time you need to download a copy of a file to your computer. Note: This option is not available for Apple iOS Devices (iPad, iPhone etc). Rename a File or Folder with PC View 1. Select the File or Folder (i.e. put a tick next to file or folder, see Selecting a File or Folder on Page 12 for instructions) 2. Click Manage Note: The Manage option is only available after a file or folder is selected but only one file of folder can be renamed at a time. 3. 4. 5. In the Manage submenu Click on Edit Properties Type the new name in the Name textbox and Click Save Repeat these steps any time you wish to rename a file or folder. Deleting Files or Folders with PC View 1. Select the File or Folder (i.e. put a tick next to file or folder, see Selecting a File or Folder on Page 12 for instructions) 2. Click Manage 3. In the Manage submenu Click Delete 4. Click OK in the confirmation window Note: Deleted files and folders are placed in the Recycle Bin and it will be stored there for 30 days, after which it will be permanently deleted. 5. Repeat this process any time you need to delete a file or folder Restore a File or Folder with PC View Deleted files and folders are not deleted permanently for 30 day, they are sent to the Recycle Bin (only available in PC View, to switch view see Switch to PC View on Page 9). Files here can be restored. 1. Click Recycle Bin P a g e | 15 2. 3. Tick all the files and folders to Restore Click Restore Selection Share a File or Folder Any file in OneDrive can be shared with anyone i.e. it can be shared with internal and external people. It is recommended that PC View is used to Share a File or Folder (to switch view see Switch to PC View on Page 9). 1. Select the File or Folder (i.e. put a tick next to file or folder, see Selecting a File or Folder on Page 12 for instructions) Note: If you share a folder, you are giving access to everything under that folder i.e. if edit rights are given then it is possible to create files/folders and it will be possible to upload to that folder. Access to all files and folders under that folder will be available recursively i.e. access is granted to all subdirectories (includes subdirectories inside of subdirectories) and the files inside those subdirectories. 2. Click Share 3. Share window will appear 1 2 3 4 P a g e | 16 Who to share with Desired Permission (Can edit or Can view) Message sent to those notified of share Sign-in requirement 4. Enter who you want to share the file or folder with. Note: When you start typing the system will search the address book for known users which you then select to add them i.e. for staff you can start entering their name or staff code and it will display what it matches. For students you can enter their username. You can also enter Email addresses both internal and external. 5. 6. 7. 8. Set desired permission a. Can edit will allow those you share the files with to view and make changes b. Can view will allow those you share the files with to view only Enter a personal message if desired, this will be the message that will be included in the Email that is sent notifying the person that you’ve shared the file or folder with them. If you want them to have guest access without the need to sign-in (login with Microsoft ID), then untick Require sign-in. For example you can share a file with an external contact and allow them to access the file or folder without the need to sign-in. Use this with caution (see Security Recommendations on Page 21). Click Share Accepting a Shared File or Folder 1. When a File or Folder is shared with you, you will be sent an Email notifying you of it. 2. You will get an Email saying someone (the person who shared with you) has shared a document or folder with you. 3. Click on Follow if you want to add the file to your OneDrive or click on the file’s or folder’s name if you want to open the file but not add it to OneDrive. 4. If you clicked on Follow you will be redirected to your OneDrive, where you can see that the shared file is now visible. Change Share with PC View 1. Select the File or Folder (i.e. put a tick next to file or folder, see Selecting a File or Folder on Page 12 for instructions) 2. Click Share 3. Click Shared with 4. 5. 6. Click on the dropdown next to the person you want to change share permission. Click Can edit or Can View. Click Save changes. Stop Sharing with PC View 7. Select the File or Folder (i.e. put a tick next to file or folder, see Selecting a File or Folder on Page 12 for instructions) 8. Click Share 9. Click Shared with P a g e | 17 10. Click on the dropdown next to the person you want to stop sharing it with. 11. Click Stop sharing. 12. Click Save changes. Auditing Files with PC View You can keep track of your files as well as monitor who is accessing them and the changes they are making (only available in PC View, to switch view see Switch to PC View on Page 9). Configure Audit Settings 1. Click the gear icon in the upper-right corner of the screen and select Site settings from the menu. 2. Click Site collection audit settings under the “Site Collection Administration” heading. 3. Check all boxes under the “Documents and Items” and “Lists, Libraries, and Sites” headings and click OK. 4. Auditing is now enabled for all actions on all documents, items, lists, libraries, and sites in your Office 365 account. P a g e | 18 Activating Reporting 1. Click the gear icon in the upper-right corner of the screen and select Site settings from the menu. 2. Click Site collection features under the “Site Collection Administration” heading. 3. Locate “Reporting” in the list of features and click its Activate button. 4. Scroll back down to Reporting and verify that its status is now “Active.” 5. Reporting is now enabled. Viewing Reports After Audit settings are configured and Reporting activated, audit reports are available. 1. Click the gear icon in the upper-right corner of the screen and select Site settings from the menu. P a g e | 19 2. Click Audit log reports under the “Site Collection Administration” heading. 3. Click one of the reports listed to access its data. 4. Click the Browse button. 5. Select Documents to save the report to your My Documents in OneDrive (all reports are Excel spreadsheets), and click OK in the window. 6. 7. Click OK to run and save report to your My Documents in OneDrive. After you receive the success screen below, you can access the report by clicking Click here to view this report or return to your Site Settings by clicking OK. P a g e | 20 8. If you do not receive the success screen above, it is likely there were no actions logged for the type of report you generated. Try running another type of report or confirm your audit and reporting settings (discussed in the first two sections above). Security Recommendations Because OneDrive is a cloud-based file storage and sharing utility, extra care should be taken when deciding what information to store and share on the system. Some points to be aware of are: Data stored in the cloud can be accessed by any computer, laptop, tablet, or mobile device with access to the Internet. Students, faculty, and staff are likely to access data in a variety of ways, including potentially unsecured connections from off-site locations. It is not possible for the school to govern how OneDrive is being accessed by nonschool computers or Internet connections. When files are shared with others from a device that is infected with viruses or malware, the data is likely to be compromised as well. Online File Storage Alternatives If you have confidential or sensitive data that must be stored and/or shared online, please consider the following alternatives: De-identify data before sharing on OneDrive: Use a random identifier and store both the identifiable data and its encrypted identifier on an internal network drive. De-identified data can be stored and shared with others via OneDrive. Encrypt and store data that cannot be de-identified on a network drive: Ensure the party you are sharing these files with has met the requirements associated with the type of data being shared (e.g. confidentially agreement) OneDrive can be used to share encrypted files if the other party is properly authorized to receive and care for the data, the encryption key or password is exchanged over the phone, and the file(s) are removed from OneDrive once transferred How to Use OneDrive Securely Secure the workstation or device you are using to access Office 365: Install virus/malware detection software with the latest definitions Run a firewall that blocks in-bound traffic P a g e | 21 Keep your operating system and software up-to-date Password-protect your workstation or device and use idle-time screen saver passwords where possible Talk to your departmental IT support for help securing your computers and other devices Use only secure network connections: Use the schools wired network or schools Wi-Fi when on campus Advise on using public and home Wi-Fi connections can be found: http://ico.org.uk/for_the_public/topic_specific_guides/online/wifi_security http://www.kaspersky.co.uk/internet-security-center/internet-safety/public-wifi http://www.kaspersky.co.uk/internet-security-center/internet-safety/protectingwireless-networks http://www.getsafeonline.org/protecting-your-computer/wireless-networks-andhotspots-pyc/ Exercise caution when sharing files online: Share files with specific individuals, never with “everyone” or the “public” Be careful sending links to shared folders because they can often be forwarded to others who you did not provide access to Remember that once a file is shared with someone and they download it to their device, they can share it with others Review sharing privileges in OneDrive on at least a quarterly basis: Remove individuals when they no longer require access to files or folders See Share a File or Folder on Page 16 on reviewing sharing privileges for more information Review file access logs in OneDrive on at least a weekly basis: Enable all audit settings Turn on reporting features Review your audit log reports See Auditing Files on Page 18 on Auditing settings for more information P a g e | 22