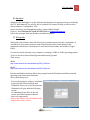
1
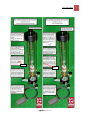
Installing your TC1 Processing Earthquake Data With AmaSeis and WinQuake Networking With Other Schools By Linda and Ted Channel and Dr Caroline Neuberg TC1 user guide 1 TC1 user guide 2 Foreword There are around 500,000 earthquakes each year. 100,000 of these can actually be felt. The largest earthquake ever recorded was a magnitude 9.5 (Mw) in Chile on May 22, 1960. The world's deadliest recorded earthquake occurred in 1556 in central China. It struck a region where most people lived in caves carved from soft rock. These dwellings collapsed during the earthquake, killing an estimated 830,000 people. The normal average is 33 earthquakes of magnitude 5 and above per 7 days. Scientists use seismometers (sometimes also called seismographs) to record the Earth’s vibrations generated by tectonic earthquakes, volcanic eruptions, and other seismic sources such as nuclear tests. From these recordings, earth structure can be inferred and tectonic plate boundaries mapped. The holy grail of seismologists, finding a method to predict earthquakes and eventually saving lives, is still way out of reach of any legitimate and competent scientist. Owning a TC1, a vertical component seismometer, is an exciting way to be involved in such a scientific adventure. This manual intends to assist you setting up your new instruments and answer as many questions regarding the setup as possible. For the last 5 years in Fulneck School, Leeds, UK, I have enjoyed using a seismometer as a teaching and learning tool. Teaching with a seismometer generated lots of interest in my students, opening up my classroom to the world. I also like to believe that such an interest helps spark in them motivation for a scientific career. Have fun with your TC1! Dr Caroline Neuberg TC1 user guide 3 Contents Step 1. Assembly instructions for TC1 ................................................................................. 5 Step 2. Downloading softwares ............................................................................................. 9 A) Arduino …………………………………………………………………………………………………………..………………………………….9 1)For windows Vista, 7, XP……………………………………………………………………..…………………………………..9 2) For windows 8 and 8.1………………………………………………………………………….………………………………10 B) AmaSeis…………………………………………………………………………………………………………………………………………….11 C) Winquake………………………………………………………………………………………………………………………………………….11 Step 3. Acquiring data and processing earthquakes ................................................... 13 A) Adjusting the time…………………………………………………………………….………………………………………………………13 B) Setting up AmaSeis……………………………………………………………………….…………………………………………………..14 C) Which earthquake have you recorded? Let's process the data……………..…………………………………………..15 1) Receive USGS earthquake notification ……………..………………………………………………………………….16 2) Process the data……………………………………………………………………………………………………………………17 i. ii. Extract the earthquake using Amaseis……………………...…………………………17 Identify the earthquake using WinQuake………………….…………………………19 Step 4. Networking with other schools using IRIS……………………………………….24 Step 5. Problems? Where to turn for help?......................................................................28 Appendix A. Saving SAC binary file; time correction ................................................. 29 Appendix B. Teaching geophysics with a vertical component seismometer .. 32 TC1 user guide faster faster 4 TC1 user guide 5 Step 1. Assembly instructions for TC1 This is what your TC1 will look like once assembled. Remove sensor components from cardboard box. Remove top ABS cap containing spring. Hook eyebolt containing magnets over bottom of spring. Insert and lower the magnet assembly into top opening of acrylic tube. Ensure ABS cap sits snugly on the tube, but do not force it or damage tube. Position magnet assembly inside white coil and copper damper. TC1 user guide 6 Top of magnet assembly should be even with top of white coil body. Heights are set before shipping, but if correction is needed, turn magnets and nuts up or down. From a side view raise or lower the slinky spring, using the knob on the top cap, to make the coil magnets even with the top of the white coil. From a top view, center the coil magnets, like a bull eye into the white coil body, leaving an even air space all around, with nothing touching the white coil. Do this using the three black base leg knobs or base screw. TC1 user guide 7 Repeat the same centering process with the copper damper tube and magnet. Damper magnet height should be about even with the top of copper damper tube. Again the heights are set before shipping, but if correction is needed, turn magnets and nuts up or down. Use three adjusting legs on base to center magnets like a bulls eye inside coil and damper, with equal free space all around. Magnets must not touch inner walls or the sensor will appear to be working but will never record an earthquake. Periodically, ensure everything is still centered. NOTE: On the side of the black base is a small brass screw, used for shipping. Back this screw off and rotate the clear tube about 1”. Finger tighten (only) this screw against the clear tube to make for a tighter fit TC1 user guide 8 between the clear tube and the black base. Spring can stretch or turn over time, so corrections may be needed. A B Depending on the TC1 version that you have, the NERdaq and Arduino Uno board are either integrated inside the TC1 (A) or in an independent grey box (B). Plug the sensor’s NERdaq amplifier USB cable from NERdaq amplifier into a computer. Finding the correct place for your TC1. The most important factor is a GOOD ground coupling. A table is not a good idea. You may also want your students to see it, but not knock it over. Using a hand held GPS or SatNav system, or Google Earth (press CTRL+L, Latitude and Longitude are displayed at the bottom of the screen), find the precise latitude and longitude of your station. You will need it for AmaSeis and Winquake. It needs to be expressed in decimal places so to convert your position data from degree, minutes, seconds into decimal, use for example the following program: http://www.directionsmag.com/site/latlong-converter/ TC1 user guide 9 South and West are written as negative values, whilst North and East are positive. Step 2. Downloading softwares To acquire and process data, you will need to upload three softwares: Arduino, AmaSeis and Winquake. Depending on operating system, the programs to download will be located in slightly different web places. At this stage, the seismometer is plugged in the computer. A) Arduino As the digitalisation of the analogue signal is done via an Arduino Uno microcontroller board, you need this software such that your computer can read the signal. The program size is about 250 Mb. Access the page http://arduino.cc/en/Guide/Windows 1) For Windows Vista, 7, XP Access the page http://arduino.cc/en/Guide/Windows Scroll to point 2: 2 | Download the Arduino environment Get the latest version from the download page. Click on download page. Scroll to Arduino 1.0.5 Click on Windows Installer and select Run. Agree to the terms and conditions, then click next, then Install. You then need to install the Arduino driver. Follow the subsequent instructions (not as daunting as it looks, promise!) Plug in your board and wait for Windows to begin its driver installation process. After a few moments, the process will fail, despite its best efforts Click on the Start Menu, and open up the Control Panel. While in the Control Panel, navigate to System and Security. Next, click on System. Once the System window is up, open the Device Manager. Look under Ports (COM & LPT). You should see an open port named "Arduino UNO (COMxx)" Right click on the "Arduino UNO (COMxx)" port and choose the "Update Driver Software" option. PLEASE MAKE A NOTE OF THE NUMBER XX WRITTEN AFTER THE COM. TC1 user guide 10 Next, choose the "Browse my computer for Driver software" option. Finally, navigate to and select the driver file named "arduino.inf", located in the "Drivers" folder of the Arduino Software download (not the "FTDI USB Drivers" subdirectory). Windows will finish up the driver installation from there. 2) For Windows 8 and 8.1 Arduino drivers have been updated to add support for Windows 8.1. The version to download is version 1.0.5-r2 located under the title: Arduino 1.5.6-r2 BETA (with support for Arduino Yún and Arduino Due boards). Access the page http://arduino.cc/en/Guide/Windows Scroll to point 2: 2 | Download the Arduino environment Get the latest version from the download page. Click on download page. Scroll to Arduino 1.5.6-r2 BETA. Click on Windows Installer and select Run. Agree to the terms and conditions, then click next, then Install. You then need to install the Arduino driver. Follow the subsequent instructions (not as daunting as it looks, promise!) Plug in your board and wait for Windows to begin its driver installation process. After a few moments, the process will fail, despite its best efforts Open up the Control Panel, by selecting “Settings” in the “Charm “list Select the section “Device and printers” and the option “Device manager”, accept the changes on the pop up window. Look under Ports (COM & LPT). You should see an open port named "Arduino UNO (COMxx)" Right click on the "Arduino UNO (COMxx)" port and choose the "Update Driver Software" option. PLEASE MAKE A NOTE OF THE NUMBER XX WRITTEN AFTER THE COM. Next, choose the "Browse my computer for Driver software" option. Finally, navigate to and select the driver file named "arduino.inf", located in the "Drivers" folder of the Arduino Software download (not the "FTDI USB Drivers" subdirectory). Windows will finish up the driver installation from there. TC1 user guide 11 B) AmaSeis AmaSeis is the datalogger. It is the software that displays the ongoing activity recorded by the TC1.With Amaseis, you will be able to visualise the seismic activity as well as select, extract and save “earthquakes” files. Access it at http://pods.binghamton.edu/~ajones/AmaSeis.html Click on : Fetch Version 3.2 Level 2012.07.06 here: AmaSeisSetup.exe. Follow the prompts from the Windows installation wizard. C) Winquake Winquake is the software that will allow you to analyse and process the earthquakes. It contains lots of necessary features such as filtering processes, event distance and magnitude calculations, calculation of P and S wave arrival times, and a link to Google Earth. You need to decide whether your computer is running a 32 Bit or 64 Bit operating system. To do so, check in Control Panel\System and Security\System. Then access: 32-Bit: http://www.seismicnet.com/software/wq336b_32bit.exe 64-Bit: http://www.seismicnet.com/software/wq336b_64bit.exe Run the installation and then follow the prompts from the Windows installation wizard, agreeing to the terms and conditions. Select the desktop icon. You are then asked to register, and asked to have the file.PSN associated with Winquake. Select yes to the last question. Winquake will open with the following screen: Go immediately into File, on the left corner and select Register software. Enter the registration: Registration Name: New Zealand Schools Registration Code: 22499 TC1 user guide 12 Close the registration window1. Using the Google Earth feature of Winquake program, you need to -download Google Earth on the computer; - In Winquake, under the "File" menu, you should see "Google Earth Exe". Select it. In the Locate Google Earth dialog box, locate the GoogleEarth.exe file. On most systems, it is located in this folder/directory: c:\Program Files (x86)\Google\Google Earth\client\ After selecting the GoogleEarth.exe file you should be able to use the Google Earth feature. You are now (nearly!) ready to record seismic activity and process data! Step 3. Acquiring data and processing earthquakes 1If you experience registration issues, log into the computer as Administrator and turn off UAC. This page http://windows.microsoft.com/en-us/windows-vista/turn-user-account-control-on-or-off has information on how to disable it. Once you do that, you should be able to register WinQuake. Once you have it registered you can turn UAC back on again. TC1 user guide 13 A) Adjusting the time This is a very important step: you need to have correct computer time to be able to process earthquakes. The computer clock must be accurate within a few seconds, and an unaided computer cannot hold this tolerance. If your computer does not have an automatic time-setting and adjustment device (which it would have if your school has a network), use a device like an atomic clock, or an Internet program (an excellent resynchronize time : http://www.pretentiousname.com/timesync/ ). You can adjust your computer time by clicking on the time on the right bottom corner of the screen; select change date and time settings; select the tab “Internet time” and let your computer adjust to the internet time. Alternatively, you can download an atomic clock program from http://download.cnet.com/Atomic-Clock-Sync/3000-18512_4-14844.html Beware not to download the attached program (called Jotsey). Select the “Decline” option. Before processing, note any clock error and write it down to be used later in WinQuake (Appendix A). B) Setting up AmaSeis Open AmaSeis: You may get an error, “Can’t open COM port”, and then another error. This is because we need to set up AmaSeis. NOTICE, IF YOU GET THIS ERROR AFTER YOU WERE SUCCESSFUL IN SETTING THINGS UP, IT MAYBE BECAUSE YOU HAVE ANOTHER AMASEIS RUNNING AND MINIMIZED ON THE TASK BAR. YOU CAN ONLY HAVE ONE AMASEIS OPEN. Go to AmaSeis/settings/device, and select SEPuk1 Go to AmaSeis/settings/COM port, and change it to the same com port as indicated in the device manager for the Arduino Uno hardware found. Please refer to Step2, Section A. Close AmaSeis and reopen….hopefully you will get no error this time. Go to Amaseis/settings/this station and enter the latitude, longitude, and elevation of your station. Go to AmaSeis/settings/helicorder and change the gain to 4. Go to AmaSeis/settings/show data values…in that window you should see a number flickering. TC1 user guide 14 That’s your data coming in. Leave this window open so you can monitor the numbers. Go to AmaSeis/settings/set zero level….change this number to about 32600. The objective here is to modify this set zero number to whatever brings the Black data line up or down to match and follow the Blue hour line on the helicorder screen. You can watch the flickering “show data values” window until it flickers close to zero. This maybe +10/-10……..or +100/-135, could be any numbers. Just keep changing the set zero level until the Black data line is following the Blue hour line on the screen. You will realise that the time displayed on AmaSeis is UTC (Coordinated Universal Time; time standard used for many Internet and World Wide Web standards, as well as aviation). For New Zealand, the time zone offset is UTC/GMT +13 hours or +12 hours depending on daylight savings time. Check http://www.timeanddate.com/worldclock/c ity.html?n=22 if you are uncertain. That’s it; you are now recording seismic activity! TC1 user guide 15 C) Which earthquake have you recorded? Let’s process the data Now, the real fun begins. Seeing a trace on the computer screen on AmaSeis, you will want to identify which earthquake you have recorded (the “who’s done it” aspect of the project). This is when you will use WinQuake. However, you need to know where earthquakes happen (the suspects on the “who’s done it” list!). In New Zealand, the task is made more exciting by the fact that there are teleseismic events (distance station-epicenter >1000km) as well as many local events. (picture http://www.iris.edu/) For the local events, Geonet is the best source of information. For teleseismic events, IRIS seismic monitor (http://www.iris.edu/seismon/) is a good source, as well as USGS. You can get seismic alerts sent to your email/mobile as explained below. 1) Receive USGS earthquake notifications. To receive USGS earthquake notifications, access the USGS Earthquake Hazards Program Website: http://earthquake.usgs.gov/ Select tab “Real time feed and notifications” Select “Earthquake Notification service”. Subscribe. You will receive text or email messages notifying you of seismic events. Go down to Subscribe, Step 2, and Create your account. You will be asked a series of questions about the parameters you want to set for receiving earthquake notifications. You can use any settings you want, but I use worldwide earthquakes (Default World), 24-hour notifications, and magnitudes 3.0 and greater for the U.S. and 5.0 and greater for worldwide. Skip through the information to Managing Your Email Addresses. Select HTML as message format, and 00:00 for day begins and day ends. Save. Skip to Change my account preferences. Select Yes for “Aftershock.” Select Yes for “Receive updates for events.” Select No for “Defer notifications during night hours.”After you set up your account, you will be notified of earthquakes by automatic email notices (fig. 1). TC1 user guide 16 Example of USGS Notification. 2) Process the Earthquake. Processing will involve two software programs, AmaSeis and WinQuake. AmaSeis is the viewer and logger where the earthquake traces are recorded in 24-hour time (hereafter called the datalogger or datalogger screen), and WinQuake is used to edit, filter, print, and publish the earthquake data. i. Extract the Earthquake using Amaseis First you use the AmaSeis program. If the earthquake is recorded on the current datalogger screen, highlight the earthquake trace, using the event time on the USGS notification sheet as a guide (fig. 2). TC1 user guide 17 Highlighted earthquake trace on datalogger screen. Where to start and end highlighting the trace is optional; however, you may find the following suggestions helpful: Others may be comparing your data file with theirs, so some continuity in time lines is beneficial. If the event time is 11:43, for example, you might consider rounding to a better number, such as 11:30. For small earthquakes, the P wave should be more or less centered between the start and end of the trace. If the P wave occurred at about 11:30, then highlighting should start at 11:00 and end at 12:00. For large earthquakes with 2 or more hours of data, the P wave would be left of center, perhaps at 20 percent of the time line, because there would be a lot more data after the P. All earthquakes are different, but most will contain a 20-minute trace, a 30-minute trace, or up to 180 minutes or more. Leave blank space before and after the visible trace on the screen. If the earthquake has been recorded earlier on a datalogger screen that is no longer visible, at the upper left on the computer toolbar, pull down the Settings menu. Click on Date/Time, highlight the month and day that are there and enter the month and day of the earthquake, using the USGS notification sheet. Click OK. AmaSeis also has two green arrows on the toolbar to scroll back to an earlier day, and a Now button to return to the current time (fig. 3). With the earthquake highlighted (shown in figure 2 in black), click on the “Extract earthquake” icon on the top toolbar (green squiggly line that looks like an earthquake trace)—see figure 3. “Extract earthquake” icon. The enlarged image will now appear in a different window as an enlarged image (fig. 4). TC1 user guide 19 Enlarged image of extracted earthquake trace. At the top left of the toolbar, pull down the File menu; click Save As. Save on Desktop. Name the file as follows, beginning with the year, month, and day (yymmdd); then the time (hours, minutes, and seconds); then the station name. Use a period between each set of identifiers, and use no spaces: 11 0 3 28 . 1 0 3 5 2 1 . B S U (date) (time) (station name) Save the file as a .PSN or .SAC file to the desktop. Click on Back at the top left of the enlarged earthquake screen (see in figure 4); this restores the AmaSeis datalogger screen. On the toolbar in the datalogger window, click Now to return the datalogger to the current day. Minimize AmaSeis, the datalogger window (-). Don’t close (x). ii. Identify the earthquake using WinQuake Now you can see the file you just saved on the desktop. Double click on this file to open it in WinQuake. To process your data, you will need to filter it. Filtering is important because it removes undesired frequencies from the earthquake trace and enhances the desired frequencies. The undesired frequency, called noise, can be generated by traffic, students in the TC1 user guide 20 classroom, even wind applying forces on the building that contains the seismometer. Click on the F icon on the top toolbar for filtering (fig. 5). Depending on the type of earthquake you presume to have recorded, select the following: High pass Low pass Poles Local earthquake 0.5 1.5 2 Teleseimic event (>1000km from station) 0.5 1 2 Applying a filter to the earthquake trace. The data file should now look better, as seen below TC1 user guide 21 Earthquake trace after filtering. If you adjusted the time on the computer, you need to adjust the time on this earthquake display also, because the traces were recorded when the computer clock was running at an inaccurate time and, if not adjusted, will cause WinQuake to misplace the earthquake phase markers. If you adjusted the time on the computer, see instructions in Appendix A. Now enter both your Sensor information and the Event information. Pull down the Display/Modify menu (fig. 7), click on Sensor Information and enter the latitude, longitude, and elevation of the station; then click on Event Information and enter your data. You can find earthquake information on either: -USGS website: http://earthquake.usgs.gov/earthquakes/ -IRIS Website: http://www.iris.edu/seismon/ -Geonet website for more local earthquakes: http://www.geonet.org.nz/ TC1 user guide 22 Display/Modify menu. You need to enter your Sensor information only once. WinQuake will save your Sensor information. For the Event information, in the Comment box, enter the information as given on the USGS notification sheet. Use the format: M7.5 xxx km from BSU1 Taupo ID – NAME OF EARTHQUAKE Enter the time of the earthquake (for example, 11/30/2010 05:56:59) Enter the magnitude in the Mw box. Enter the latitude and longitude of the earthquake. Ensure that the latitude ends with the letter N (north) or S (south), and that the longitude ends with the letter E (east) or W (west). Another way of entering these coordinates is: o enter a plus (+) in front of the latitude number, indicating North latitude, or a minus (_) indicating South latitude; o enter a + in front of the longitude number, indicating East longitude, or a _, indicating West longitude. Taupo is -38.7 or 38.7S latitude, and +176.0 or 176.0E longitude. Enter the depth of the earthquake. At the bottom of the window, click OK. The P and S and any other phase markers you may have specified should now be show (fig. 8). Other information, such as arrival times, distances, etc., also has been automatically entered. TC1 user guide 23 If the predicted arrival time of the Pwaves fit your recorded P waves, you have identified the trace correctly! Pull down the Display/Modify menu again and left click on Event Information again. Highlight the “xxx” in the Comment box and enter the correct number of kilometers, which has automatically been entered in the descriptive information at the top of the earthquake image. More on the phase markers: If desired, click on View/Phases/Display. You can select the different phases you want displayed on the earthquake image. If you want to print the earthquake image with these phases marked, Save and overwrite the old file. WinQuake automatically adds phase markers when the Event Information is completed. When you are satisfied with the final earthquake image, pull down the File menu and Print a copy if you wish. You can also use the Google Earth feature to fly from the event to your station. TC1 user guide 24 After printing is done, the completed earthquake image can be saved in two formats for posting—(1) PSN Type 4 or SAC Binary, and (2) GIF. Pull down the File menu and click Save. Under Save Format, click on PSN Type 4 or SAC Binary (bottom of File Save window). Click OK (fig. 9). Save the completed earthquake image as PSN or SAC, and GIF. Pull down the File menu again and click Save. Under Save Format, click on GIF Image. Click OK. Close WinQuake (x). If you save your file as an SAC binary, additional steps may be required. See Appendix A. Step 4. Networking with other schools using IRIS: some real seismology! WinQuake is an ideal program to help you identify which earthquake you have recorded. However, seismologists cannot extract much information using a single station. TC1 user guide 25 With your station, knowing the time interval between the P wave arrival and S wave arrival, you can evaluate the epicenter distance at which these waves were emitted using the graph below (from http://edition.cnn.com/fyi/interactive/0006/riverdeep/earthquakes/earthquake_tips_a.html ). WinQuake allows you to measure such a time difference and from the equivalent epicenter distance, you could plot manually on a map a circle corresponding to the distance or use WinQuake directly using the tab “View/Locate Event”. TC1 user guide 26 Using the data from 2 stations, you can narrow down the position of the epicenter to 2 locations, i.e., the intercept of the 2 circles. Using the data from 3 stations will narrow down the choice to one location only, the real epicenter of the earthquake. This is the reason behind the necessary networking in seismology. Iris (Incorporated Research Institutions for Seismology) provides a free platform for such a necessary exchange of information. To network with other schools, you need to register your station at http://www.iris.edu/hq/ssn/schools/register TC1 user guide 27 After registering your station, you will be able to upload your own recorded seismic data and share it with other schools. For local events, it is better to use nearby stations. For large teleseismic events, it can be a great exercise to download data from far-away stations. Upload all the files related to the same event from the different stations (downloaded from IRIS) onto WinQuake. You can display them as shown below by selecting the tab “windows” then “arrange”. By selecting “locate event”, WinQuake will display the result of the triangulation process. TC1 user guide 28 If not all the lines fit on the square, it most likely means that the computer time of one of the recording stations is inaccurate and needs correction. To get a different perspective, you can get the globe to rotate by double clicking on the green dot located next to big cities. Don’t forget to try the Google Earth option in Winquake, and fly your students and yourself from your station to the event! Explore and Enjoy!! Step 5. Problems? Help is at hand. For questions please contact: Ted Channel :[email protected] Dr Kasper Van Wijk: [email protected] Dr Caroline Neuberg: [email protected] More information can be found at: http://cgiss.boisestate.edu/ssis or http://tc1seismometer.wordpress.com TC1 user guide 29 Appendix A. Saving SAC Binary File; Time Correction If you save your file as an SAC binary, additional steps may be required: Make sure the Sensor and Event information have been entered, and click OK. Event File Information window. Pull down the Display/Modify menu; click on Time Information. In the Event File Start Time window, adjust the time according to the correction you noted when you corrected the computer clock. If, for example, the computer clock was 9 seconds fast, enter -00:00:09 in the UTC Time window. This subtracts no hour, no minutes, and 9 seconds from the earthquake trace. If you wanted to save as a PSN file you could enter -9 in the Start Time Offset window but, for an SAC file, enter the correction in the UTC Time window. Click OK. (If you need to add increments of time, do not enter a minus sign.) TC1 user guide 30 Time Information menu. Pull down the File menu and Save. If you do not do this step, when you close, the Event Information will be removed. Applying a time correction in the UTC Time window. TC1 user guide 31 That should move the P and S phase markers to their correct positions. Then pull down the File menu and Save as SAC binary (fig. 13). Now when the SAC file is closed and reopened, the changes should be saved and the P and S markers located correctly. File saved as SAC Binary. This software situation should be corrected in the newer versions of WinQuake. TC1 user guide Appendix B. 32 TC1 user guide 33 TC1 user guide 34