1
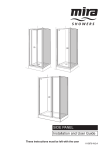
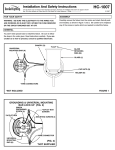
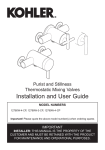
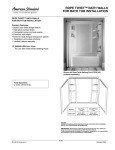
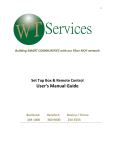
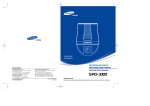
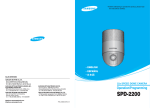
Sequoia Fitted Bathroom
Furniture
Installation and User Guide
MODEL NUMBERS
2721W-F27, 2722W-F27, 2723W-F27, 2724W-F27, 2724W-HU, 2725W-F27,
2725W-HU, 2726W-F27, 2726W-HU, 2694W-CP, 2685W-NF, 2686W-NF,
2687W-NF, 2688W-F27, 2688W-HU, 2689W-F27, 2689-HU, 2695W-F27,
2693W-L-F27, 2693W-L-HU, 2693W-R-F27, 2693W-R-HU, 2690W-NF,
2691W-NF, 2692W-NF
Important! Please quote the above model number(s) when ordering spares
IMPORTANT
Installer: This manual is the property of the
customer and must be retained with the product
for maintenance and operational purposes.
1083248-W2-A
Contents
Description................................................................................................ 2
Safety:Warnings....................................................................................... 2
Installation................................................................................................ 3
Install the Rectangular Mirror with Halagen Lighting............................. 3
Install the Mirrored Cabinet................................................................... 5
Install the Mirror with Magnifying Mirror................................................ 7
Install the 1200 mm Base Unit.............................................................. 9
Install the 600 and 900 mm Base Unit................................................ 10
Continue with the Installation.............................................................. 11
Install the Countertops........................................................................ 12
Install the Washbasin.......................................................................... 13
Install the Drawer Handles.................................................................. 13
Door Adjustment.................................................................................. 14
User Maintenance................................................................................... 15
Cleaning.............................................................................................. 15
Customer Care........................................................................................ 16
description
This installation and user guide covers the installation of the Sequoia range of fitted
bathroom furniture.
Safety:Warnings
Kohler products are precision-engineered and should give continued superior and
safe performance, provided:
They are installed and maintained in accordance with the recommendations given in this manual.
Carefully inspect the new furniture for any signs of damage.
1083248-W2-A
Installation
Install the Rectangular Mirror with Halagen Lighting
Y
X
X/2
Y
Y
1900 mm
Y
1880 mm
650 mm
220 - 240V
X
1.Decide on the location of the mirror.
2. Mark the positions of the fixing holes for the wall hanging brackets and the
incoming electrical supply to the dimensions given.
3. Using a suitable drill, drill the hole for the fixing screws. Fit suitable wall
plugs.
Note! There are no fixing screws or wall plugs suppplied with this product.
Special consideration should be given to the fixing arrangements when installing
on to a dry lined, stud partition or laminated panel wall structures. Installers
may wish to obtain alternative proprietary cavity fixing, or choose other options,
however, these methods of fixing are beyond the scope of this guide.
4.
5.
Fit the wall hanging brackets with the fixing screws
Position the mirror on the wall and make sure that the pre-installed bracket on
the back of it rests on the wall hanging bracket installed on the wall.
6.Use the adjustment screws on the top of the mirror to make sure that it is
level.
7.Connect the electrical supply to the electrical connectors.
1083248-W2-A
8.Fit the lamp housing to the top of the mirror with the screws provided.
9.Fit the bulb to the lamp housing.
1083248-W2-A
X
20 mm
220-240V
1250 mm
480 mm
650 mm
20 mm
60 mm
Install the Mirrored Cabinet
650 mm
X
1.Decide on the location of the mirrored cabinet.
2. Mark the positions of the fixing holes for the wall hanging brackets and the
incoming electrical supply to the dimensions given.
3. Using a suitable drill, drill the hole for the fixing screws. Fit suitable wall
plugs.
Note! There are no fixing screws or wall plugs supplied with this product. Special
consideration should be given to the fixing arrangements when installing on to
a dry lined, stud partition or laminated panel wall structures. Installers may wish
to obtain alternative proprietary cavity fixing, or choose other options, however,
these methods of fixing are beyond the scope of this guide.
4.
5.
Fit the wall hanging brackets with the fixing screws
Remove the doors from the mirrored cabinet.
1083248-W2-A
6.
Position the mirror on the wall and make sure that the pre-installed bracket on
the back of it rests on the wall hanging bracket installed on the wall.
7.Use the adjustment screws on the top of the mirror to make sure that it is
level.
8.Connect the electrical supply to the electrical connectors.
9. Refit the doors from the mirrored cabinet.
10.Fit the lamp housing to the top of the mirror with the screws provided.
11.Fit the bulb to the lamp housing (refer to bulb installation procedure).
1083248-W2-A
Install the Mirror with Magnifying Mirror
900 mm
750 mm
73 mm
220 - 240V
380 mm
1250 mm
600 mm
73 mm
1.Decide on the location of the mirror.
2.Carefully remove the mirror from the wall bracket.
3. Carefully remove the fluorescent lights from the wall bracket.
2. Mark the positions of the fixing holes for the wall bracket and the incoming
electrical supply to the dimensions given.
3. Using a suitable drill, drill the hole for the fixing screws. Fit suitable wall
plugs.
Note! There are no fixing screws or wall plugs supplied with this product. Special
consideration should be given to the fixing arrangements when installing on to
a dry lined, stud partition or laminated panel wall structures. Installers may wish
to obtain alternative proprietary cavity fixing, or choose other options, however,
these methods of fixing are beyond the scope of this guide.
4.Connect the electrical supply to the electrical connectors.
1083248-W2-A
5.
6.
7.
8.
Hang the wall bracket in position on the fixing screws.
Refit the fluorescent lights.
Carefully refit the mirror.
Carefully fit the magnifying mirror onto the mirror.
1083248-W2-A
Install the 1200 mm Base Unit
1.
Remove the drawers from the base units.
X
150 mm
20 mm
20 mm
20 mm
450 mm
320 mm
450 mm
X/2
2.Decide on the location of the base units.
3. Mark the positions of the fixing holes for the wall hanging brackets to the
dimensions given.
4. Using a suitable drill, drill the hole for the fixing screws. Fit suitable wall
plugs.
1083248-W2-A
Note! There are no fixing screws or wall plugs supplied with this product. Special
consideration should be given to the fixing arrangements when installing on to
a dry lined, stud partition or laminated panel wall structures. Installers may wish
to obtain alternative proprietary cavity fixing, or choose other options, however,
these methods of fixing are beyond the scope of this guide.
5.
Fit the wall hanging brackets with the fixing screws
Install the 600 and 900 mm Base Unit
1.
Remove the drawers from the base units.
150 mm
20 mm
20 mm
450 mm
320 mm
450 mm
X
2.Decide on the location of the base units.
3. Mark the positions of the fixing holes for the wall hanging brackets to the
dimensions given.
4. Using a suitable drill, drill the hole for the fixing screws. Fit suitable wall
plugs.
1083248-W2-A
10
Continue with the Installation
3
B
2
H
B
H
1.
If necessary, fit the feet to the base of the unit with the supplied fixing
screws.
2.Fully unscrew the bottom adjusting screws. This will give you enough clearance
when hanging the base unit.
3.Fit the unit in position on the wall, lifting it over the wall hanging brackets.
4.Use a spirit level to make sure that the unit is level.
5.Level the base unit by adjusting the attachment screws. The top screw will
adjust the unit vertically, and the bottom screw will adjust it horizontally.
6.
Refit the drawers.
11
1083248-W2-A
Install the Countertops
Note! The counter top can be installed on the base unit or with wall brackets.
3
2
4
1
1.
Apply silicone sealant in accordance with the manufacturer’s instructions to
the top surface of the base unit.
2.Fit the countertop in position on the base unit and secure in position with the
brackets and the screws.
3. Remove and excess sealant.
4.Decide on the location of the wall brackets
5. Mark the positions of the fixing holes for the wall brackets.
6. Using a suitable drill, drill the hole for the fixing screws. Fit suitable wall
plugs.
7. Secure the wall brackets to the wall with the supplied fixing screws.
8. Place the countertop in position on the wall brackets and secure with the fixing
screws.
1083248-W2-A
12
Install the Washbasin
Note! Before installing the washbasin or vessel you will need to cut a hole in the
countertop. An Installation Template is supplied with each washbasin/vessel.
2
1
1.
2.
3.
Apply silicone sealant in accordance with the manufacturer’s instructions around
the opening for the washbasin.
Install the washbasin making sure that it is orientated correctly.
Remove and excess sealant.
Install the Drawer Handles
1
2
1.
Note! Installing the door handles is optional. In some configurations door
handles are not required.
Install the door handles and secure in position with the screws.
13
1083248-W2-A
Door Adjustment
A
B
B-Lateral
Loosen screw 'B'.
Adjust door and
retighten screw.
C
C-Horizontal
Loosen screw 'B' ½ turn.
Turn screw 'C' until door
is positioned correctly
and retighten screw 'B'.
A-Vertical
Loosen screw 'A' on all
hinges. Adjust door and
retighten screw.
A
C
B
1.
If necessary, adjust the doors to fit as shown in the above diagram.
1083248-W2-A
14
user Maintenance
Cleaning
Caution! Risk of product damage. Many cleaners contain abrasive and chemical
substances, and should not be used for cleaning stainless steel, wood, enamel,
plated or plastic fittings. These finishes should be cleaned using a mild washing up
detergent or soap solution, rinsed and then wiped dry with a soft clean cloth.
Door and Cabinet Care: Usually regular cleaning with a damp cloth is sufficient.
Never use strong detergents or abrasive cleaners as this may damage the surface
finish of your furniture.
Glass Care: When cleaning glass panels or mirrors, use a damp cloth or leather
with washing-up liquid or soft soap. Do not use washing powders or any other
substance containing abrasives, as these will scratch the glass. Bathroom furniture
may deteriorate if subjected to heavy water spillage or prolonged condensation. Any
edges that may come into contact with water must be sealed.
We strongly recommend that all installations are well ventilated, failure to do so may
invalidate your guarantee.
15
1083248-W2-A
Customer Care
Guarantee of Quality
Kohler UK guarantee products against any defect of materials or workmanship for the following periods
Ceramic Ware and Cast Products
Shower Valves, Taps, Cistern
Fittings, Toilet Seats and Bath
Panels
Stainless Steel Products and, Acrylic Baths
Bathroom Furniture and
Accessories
Whirlpool / Spa Baths
Our confidence in the quality and reliability of our superior products enables us to offer a
comprehensive guarantee for all products.
To register and fully benefit from this guarantee you must
return the enclosed product registration card indicating
the Kohler items you have purchased.
Within the guarantee period we will undertake to resolve
any material defects, by providing replacement parts,
modules or complete product, as we deem appropriate.
To be free of charge, work must only be undertaken by
Kohler UK approved personnel.
To ensure that any problems can be promptly resolved
you must contact Kohler UK directly.
Proof of purchase must be provided with any claims.
This guarantee covers products in domestic use, installed
and maintained in accordance with the instructions. It
covers the purchaser only and is not transferable.
Commercial / Business Use
Any Kohler Bathroom product used within a commercial /
business premise is guaranteed for 1 Year against any
defect of materials or workmanship.
To Contact Us
Kitchen and Bathroom Taps and Accessories
Tel: 0870 240 7896
Fax: 01242 282 595
Email: [email protected]
Website: www.kohler.co.uk
Showers and Fittings
Tel: 0870 241 0888
Fax: 01242 282 595
Email: [email protected]
Website: www.kohler.co.uk
All other Kohler Products
Tel: 0870 850 5551
Fax: 0870 850 5552
Email: [email protected]
Website: www.kohler.co.uk
Not Covered by this Guarantee
Damage or defects arising from incorrect installation,
improper use or lack of maintenance.
Installed product damaged in transit Consequential loss,
damage or product removal and installation costs.
General wear and tear.
This guarantee is in addition to your statutory and other
legal rights.
1083248-W2-A
16
© Kohler Mira Limited, August 2007