1
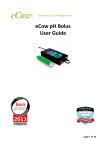
eBolus Software
User Guide
V 2.2.2
January 2013
eCow Ltd, Unit 5b King Street Business Centre, 7-9 King Street, Exeter, UK . Version 2.2.3
January 2013
Contents
Contents..........................................................................................................................2
Preparation for Use.................................................................................................3
Device Storage and Maintenance...........................................................................3
1.Plug in Dongle and Switch on the Computer......................................................4
2. Download Data...................................................................................................4
3. Transfer Data.....................................................................................................6
4. Adding More Boluses.........................................................................................7
5. Calibrating the Sensor........................................................................................7
6. Calibrating the Redox Sensor if enabled............................................................9
7. Battery Voltages...............................................................................................10
8. Deployment......................................................................................................11
9. Troubleshooting and things to remember when calibrating.............................11
Download success criteria :..................................................................................20
Accuracy Success Criteria – quick test................................................................20
Accuracy Success Criteria 2 – formal test............................................................20
eCow Ltd, Unit 5b King Street Business Centre, 7-9 King Street, Exeter, UK . Version 2.2.3
January 2013
Preparation for Use
All eBoluses are shipped with the sensing end covered with a hydrating blue
vinyl cap. Remove the tape and the blue vinyl cap from the metal end. During
shipment it is possible for air bubbles to move into the glass bulb of the
sensor. To remove the air, shake down the device, in the same manner as a
clinical thermometer until the glass bulb is filled with solution. You may need a
magnifier and lamp to see this from the holes of the end cap. After rinsing the
sensing end with deionised water, the eBolus must be warmed up.
All eBoluses have a responsive time window of 00:00 to 23:59 GMT but only
log when above 35°C. When interrogating an eBolus for the first time, ensure
it has been warmed for at least 20 minutes between 35°C and 45°C. Use an
independent thermometer to check the temperature of your heat block/water
bath. The Q1 computer has been set to 00:00 Greenwich Mean Time. Please
change the Computer's time zone, suitable to your country, by right clicking on
the clock at the bottom right of the screen.
Each bolus has been accurately calibrated for pH and/or Redox using ORP
Buffer Test Kit pH 4 @ 265mV and pH 7 @ 92mV which can be purchased
from our online store;
http://shop.ecow.co.uk
We recommend you buy “ORP Buffer Solution and Electrode Test Kit” so you
can complete a calibration. On each bolus there may be up to 5 data points
stored, these “fabrication memories” exist so you the customer knows when it
was first awakened. Be aware that to do a full calibration normally takes
approx 30 minutes for each eBolus, so do calibrations a day or two prior to
deployment. Once calibrated the device remains in calibration for months
when kept hydrated.
As a new customer please become a registered user on our eCow website
and email [email protected] to upgrade you to customer status. Then you
can access our video tutorials;
http://www.ecow.co.uk/customer-support/video-tutorials-and-software-guides/
Device Storage and Maintenance
eBoluses should be stored in pH 4 Buffer for both overnight and long term
storage. Ensure they are kept below 30°C to retain maximum battery life.
Slow response and non-reproducible measurements are signs that the
electrodes have become coated or clogged. If the device becomes coated or
clogged the time taken to make a measurement will increase (normally 95%
of final readings should be achieved in less than 10 seconds). Rinsing with
methyl alcohol should remove the coating and restore the speed of response.
Redox electrodes may need additional cleaning from time to time with crocus
paper.
If the methyl alcohol rinse does not restore the response, soak in 0.1M Hcl for
five minutes. Remove and rinse with water and place in 0.1M NaOH for five
eCow Ltd, Unit 5b King Street Business Centre, 7-9 King Street, Exeter, UK . Version 2.2.3
January 2013
minutes. Remove, rinse again, and soak in pH 4 buffer for 10 minutes before
use.
1.Plug in Dongle and Switch on the Computer
Plug in the USB Dongle before turning on the Computer. Never unplug the
dongle whilst the software is running as this will require a complete reinstallation of the software. Ensure the PC time is correct for your country.
Change by right clicking on clock at the bottom right hand side the screen.
The computer has been set up to automatically load the pH eBolus software
from login. If this does not occur then double click on the pH eBolus icon on
the desktop. The software automatically searches and finds the USB Dongle,
and when successful a green light emits from the dongle.
If the short cut doesn't work, pH bolus will be found in C:\Program Files\eCow
Ltd\pHBolus. A record of all calibrations and configurations are sent to the
eBolus and this is kept in C:\Bolus\Uploads folder and the file is called Bolus
followed by the ID number. It is a .CSV format file which will load directly into
Excel. A record of all downloads is also kept in the same file.
2. Download Data
As the eBoluses are set at 00:00 GMT, you need to send each eBolus the
newly determined time by doing a data download then clearing its memory.
This will send the PC time to the device.
Press the Download button on the Start Page.
Change the ID of the bolus to that within the cow.
Press Download - the system will do everything until download has failed or
succeeded.
eCow Ltd, Unit 5b King Street Business Centre, 7-9 King Street, Exeter, UK . Version 2.2.3
January 2013
First the message Checking for Bolus will appear followed by a number
relating to the data points stored.
If the number of points downloaded does not equal the number of points
stored then you should press Download and repeat until all the data is
downloaded.
Examine the file in C:\bolus\Data, It will be named with your site name, the
bolus number and the date terminating in “.csv”. It can be opened with
Notebook, or in a spreadsheet. Examine the last line, it should be close to
the current time. Back this file up.
You can now press Clear Memory and the PC's time will be sent to the
eBolus.
eCow Ltd, Unit 5b King Street Business Centre, 7-9 King Street, Exeter, UK . Version 2.2.3
January 2013
3. Transfer Data
Right click over the Start icon and select explore. Select the Data folder from
the bolus folder and copy to a USB stick. Copy the files created onto a USB
stick and email them to [email protected]. This data can help determine when
your eBolus needs replacing by analysing battery rate of depletion.
eCow Ltd, Unit 5b King Street Business Centre, 7-9 King Street, Exeter, UK . Version 2.2.3
January 2013
4. Adding More Boluses
The system was set up with bolus identities specific to your site. To add
boluses you need to either replace the file C:\bolus\BolusID.DAT with one we
send you or edit the file using Notepad or another text editor.
To edit the BolusID.DAT file browse to C:Bolus\BolusID.dat and right click to
'open with' Notepad. Add the ID numbers found on the side of the new
boluses and close the file. Save on exit. The pH Bolus software will need to
be closed and re-opened to enable the new ID numbers to be available.
5. Calibrating the Sensor
As stated before, all eBoluses have a responsive time window of 00:00 to
23:59 GMT but only log when above 35°C. When interrogating an eBolus for
the first time, ensure it has been warmed for at least 20 minutes between
35°C and 50°C. Use an independent thermometer to check the temperature of
your heat block/water bath. You will also need standard buffers of pH 4 and
pH 7.
Our classic pH buffers 4 and 7 state that there is a change in values as
temperature increases;
pH 4 @ 20degees C = 4.00
pH 7 @ 20degees C = 7.01
pH 4 @ 30degees C = 4.02
pH 7 @ 30degees C = 6.98
pH 4 @ 40degees C = 4.04
pH 7 @ 40degees C = 6.97
eCow Ltd, Unit 5b King Street Business Centre, 7-9 King Street, Exeter, UK . Version 2.2.3
January 2013
But please check your own solution's manufacturers guidelines. You can edit
these values by selecting the white text box in the calibration screen, to
the left of the "Low Point" and "High Point" buttons.
Place the eBolus into pH 4 buffer and raise to a temperature above 35°C, this
will activate the eBolus although a few minutes may elapse before the sensing
system wakes and decides that it is in this state.
Press Full Calibration (taking 25 minutes per eBolus) and follow the
instructions or conduct a manual calibration as follows (this is quicker).
On the Calibrate Bolus tab select the bolus ID. Press the Low Point button,
after a while a number will appear in the box. This is the value read by the
ADC, it should be between 1700 and 2000. Repeat this process until the
number is not varying by more than 5.
Take the bolus out and place it in pH 7 Buffer for a few minutes. Then repeat
the process of collecting a number for the High Point this number should be
between 250 and 550. When it stabilises press Calculate to set the Offset
and Gain. Press Arm to prepare the eBolus. When the status says Armed
press Download, when the status message says Completed your eBolus is
ready to use.
eCow Ltd, Unit 5b King Street Business Centre, 7-9 King Street, Exeter, UK . Version 2.2.3
January 2013
6. Calibrating the Redox Sensor if enabled
To calibrate the Redox sensor select Redox from the Calibration Type
menu.
Our software sets up a two point calibration that enables the software to know
the slope and gain for each of the sensors. However, many authorities only
use a single point calibration (or standardisation) for redox on theoretical
grounds.
To do this select the test form and press latest reading and you will see the
Redox value in the relevant box. Do this in a known Redox solution for a
single point standardisation or if you have two solutions go to the calibrate
bolus page and follow the procedure similar to pH. You will have to enter your
Redox standard values into the low and high points as these will differ
between manufacturer and temperature. Follow the specification of your
buffer for the value to enter here.
eCow Ltd, Unit 5b King Street Business Centre, 7-9 King Street, Exeter, UK . Version 2.2.3
January 2013
7. Battery Voltages
Our eBoluses are shipped with a starting voltage of at least 3.00v in the
logged data. At 2.70v and below the pH amplification looses accuracy.
However our bench tests have shown this means the accuracy is only
lowered to +- 0.4pH as opposed to +- 0.2pH when newly dispatched. If this is
acceptable for your application, the device can keep logging until the logged
voltage is as low at 2.05v
eCow Ltd, Unit 5b King Street Business Centre, 7-9 King Street, Exeter, UK . Version 2.2.3
January 2013
8. Deployment
When deployed into the cow using a balling gun by a qualified technician you
can ensure optimal download by finding the sweet spot on the cow. Allow the
eBolus to settle for at least 1 hour before trying to make contact. Make sure
the antenna is positioned beneath the cow in the eBolus area of residence,
ideally just behind its point of elbow and about 5cm away from its skin. (See
below)
The larger the size of your cows the more difficult it may be to communicate
with the eBoluses. This is because larger animals tend to have more body
mass and more dense bones. It is important once you have made contact with
the eBolus to not move the dongle as this "line of sight contact" is easily
broken. We would recommend asking for a latest reading first, and once a
message is successfully received and the eBolus is in fast mode, THEN press
download button.
9. Troubleshooting and things to remember when calibrating
When calibrating, if you have the eBoluses in a cluster (close together in
parallel) the dongle has limited "line of sight" to the eBolus in question and
struggles to make contact. The setup we use to talk to and calibrate our
eBoluses is highlighted in the photos below, where eBoluses are being prewarmed in the tub to the right on a heat plate with a thermometer inside the
tub. Then the eBolus to calibrate is stood vertically in pots filled with pH 4 and
eCow Ltd, Unit 5b King Street Business Centre, 7-9 King Street, Exeter, UK . Version 2.2.3
January 2013
pH 7. Again another thermometer to ensure correct temperature is reached
Ensure cleaning with de-ionised water between buffers. Also when placing the
eBolus in the buffer pots, give them a sharp spin in the pot to push out any
trapped air bubbles.
The hood to the heat block is wrapped in tinfoil as our office is "noisy" with
conflicting radio waves and this simple measure helps a great deal to get
eBoluses responding fast. Notice both the dongle and eBolus are under the
tinfoil hood.
eCow Ltd, Unit 5b King Street Business Centre, 7-9 King Street, Exeter, UK . Version 2.2.3
January 2013
Calibration and set-up files relating to the eBolus reside in the C:/bolus
directory under normal circumstances these are not needed by the user.
Data files are automatically labelled and stored in the C:/bolus/data directory
If the antenna is accidentally pulled out when the software is running, the
program cannot work until the antenna is reconnected and the computer is
restarted.
Never dip the eBolus into your stock buffers, decant a small amount from
stock and assume that it will quickly become contaminated.
Rinse the sensors between tests with deionised water by washing the the
water through the crossholes ideally with a squeezy bottle.
Redox solution can poison the pH electrode for several hours so do the pH
calibration last
Ideally immerse the end cap of the eBolus in rumen liquor or an analogue (a
recipe for this is in Appendix A) to condition the pH probe for several days but
keep the liquor below 30C to keep the eBolus inactive.
Redox potential is very sensitive to temperature so maintain the eBolus at a
stable temperature of 35 C for calibration. pH is less sensitive to temperature
but our process ensures that the eBolus is in the correct zone.
The best guide to temperature is that given by the eBolus. Go to the test form
page and press the temperature button and you will see the current
temperature this may differ from your bath setting because of heat loss from
the surface
On extraction from the cow the eBolus will be heavily contaminated and the
cross holes may need to be swilled out of rumen debris
The crossholes restrict the flow of buffer to the sensors so do move the
eBolus about to ensure flow through.
Radio does not travel well through water or steel so do not fill your bath too
deep and mount the antenna in line of sight of the eBolus for best results.
Any problems please get in touch on +44 (0) 1392422441 or email
[email protected]
eCow Ltd, Unit 5b King Street Business Centre, 7-9 King Street, Exeter, UK . Version 2.2.3
January 2013
Appendix A
Configuration
Configure the eBoluses to have a smaller time window e.g. 08:00-12:00, as
this has been found to improve battery life. This responsive time window just
means when the radio for wireless communication, is switched on. The
eBolus still logs 24/7 at a 15 minute interval, or more frequently if you would
prefer. Our other customers normally interact with their cows early in the
morning, so a time window to interrogate the eBoluses to retrieve data would
most likely be 08:00-12:00. The device can retain up to 2700 lines of data so
please ensure to download data weekly and clear its memory on a routine
basis after a successful download.
Please Note:
Your system has been factory configured for reliability. No
responsibility can be accepted should you wish to make any
changes to the configuration settings or installation of
additional software on the table devices, and the like for like
replacement warranty will be invalid.
The software has three operating modes, Idle, Calibration and Logging and
the mode the eBolus operates in depends on the temperature.
The temperature settings for the modes are :Logging temperature , lower temperature at which
data logging occurs. No upper point
(Recommended 35 degrees)
Calibration Temperature High, upper limit for
calibration mode (Recommended 35 degrees)
Calibration Temperature Low, lower limit for
calibration mode. (Recommended 31 degrees) If
the temperature of the eBolus falls below this it will
enter idle mode to save power (no radio!)
It is also possible to configure an idle mode between calibration and logging
by selecting different temperatures although this isn't recommended.
The operating parameters for each mode can be set by selecting the
appropriate tab.
eCow Ltd, Unit 5b King Street Business Centre, 7-9 King Street, Exeter, UK . Version 2.2.3
January 2013
Idle
The only parameter for idle mode is the Temperature Check Interval. At
this interval the eBolus switches on and checks the temperature to see
if the mode has changed before returning to sleep. No radio
communication is possible in this mode. Maximum time interval is 34
minutes. The recommended interval is 5 minutes.
Calibrate
Calibrate mode has a Temperature Check Interval used to check the
temperature and change modes. Unlike idle mode this is not used for a
sleep time, see below.
Radio Interval (fast and slow modes) sets the sleep time, the longer the
sleep time the longer battery life.
There are two modes, fast and slow. Normally it operates in slow mode
because fast communication is not required. If fast communication is
required then the software switches to fast mode.
Recommended settings
Logging
Temperature Check Interval, Radio Intervals are the similar to those
used for calibration mode.
Logging Time sets how often pH readings are stored. The stored
readings are an average taken since the last reading, with each
individual reading time being set by the Temperature Check Interval.
E.g. If the Temperature Check Interval is set to 3 minutes and the
Logging Time to 15 minutes then five readings will be taken (3 minutes
apart) and the average stored.
eCow Ltd, Unit 5b King Street Business Centre, 7-9 King Street, Exeter, UK . Version 2.2.3
January 2013
Radio Check Time Window
To save power the eBolus can be programmed so it doesn’t check the
radio during the night when it’s unlikely that the operator would need to
download any data. A check is made on the radio between the Start
and End Times (at the Radio Interval). Note only Hours and minutes
are used, no seconds
Press the Download Settings button to transfer the settings to the
eBolus
eCow Ltd, Unit 5b King Street Business Centre, 7-9 King Street, Exeter, UK . Version 2.2.3
January 2013
Appendix B
Description:
Scope:
Purpose:
Preparation of artificial rumen fluid
Define the preparation of 1000 ml of artificial rumen fluid
Preparation of artificial rumen fluid for conditioning pH boli
EQUIPMENT
CODE
DESCRIPTION
QUANTITY
1
1
1
DESCRIPTION
QUANTITY
5 ml
9.8 g
9.3 g
0.47 g
0.57 g
0.04 g
0.06 g
Analytical balance
Magnetic stirrer
pH meter
MATERIAL AND SOLUTIONS
CODE
Acetic acid 5M
NaHCO3
Na2HPO4.12H2O
NaCl
K Cl
CaCl2 (anhyd.)
MgCl2 (anhyd.)
NaOH 5N
HCl 5N
MAIN STEPS
1.
ACTION
Using an analytical balance weight the following constituents:
NaHCO3
NAME
9.80 g
Na2HPO4.12H2O
9.30 g
NaCl
0.47 g
KCl
0.57 g
CaCl2 (anhyd.)
0.04 g
MgCl2 (anhyd.)
2.
3.
4.
5.
6.
7.
0.06 g
Dissolve the CaCl2 in about 10 ml of deionised water before adding to the
other constituents.
Dissolve the other constituents in 750 ml of deionised water using the
magnetic mixer
Add the 10 ml of CaCl2 solution
Add 20 ml of 5M acetic acid
Complete the volume to 1000 ml with deionised water.
Final pH should be in the range of 5.5 to 6.5. If it is not, adjust pH using
either HCl 5N or NaOH 5N.
eCow Ltd, Unit 5b King Street Business Centre, 7-9 King Street, Exeter, UK . Version 2.2.3
January 2013
Appendix C
Bolus acceptance protocol
This is the protocol (to be operated by the customer) to demonstrate that the
eBoluses are operating correctly.
Switch on the hand held eCow computer and login as the nominated user
(this is not password protected but can be at the customer's discretion) This
is a touch screen computer but it is not waterproof and will not operate in the
rain. Put it into a clear plastic bag if working in wet conditions.
The eCow software should start automatically and the green bar state
“Connected”. If this bar is red or says “Not Connected” check the USB port is
connected to the antenna and try again.
Press the screen button that says Configure Bolus and also calibrate the
eBolus and set the eBolus clock to computer time.
Insert the eBolus into the cow by fistula. It will take up to 2 hours to migrate to
its final resting place in the rumen reticulum. The eBolus will rest
approximately 100 mm inside the cow at a point approximately 300 mm tailwards from the front legs about 100 mm from the centreline of the cow. A
metal detector tuned to maximum range will be provided for demonstration
purposes to aid in its location.
The software must be given the correct identity of the eBolus. If set running it
will continue working for 10 minutes before time-out. If data has not been
downloaded repeat the process. Most data will download within a few
minutes of contact being established. However, breaks in transmission can
occur and the process may need to be repeated.
pH sensors do drift – principally due to different ionic status. Accurate results
will only be achieved if the sensor is recalibrated after being kept either in
rumen liquor for 24 hours or preferably removed from the cow and calibrated
at 39C.
eCow Ltd, Unit 5b King Street Business Centre, 7-9 King Street, Exeter, UK . Version 2.2.3
January 2013
Download success criteria :
A complete file of data downloaded within 1 hour of starting download.
Accuracy. An approximate check on accuracy involves passing a rigid
sample tube into the rumen via the fistula and drawing a sample from close to
the end cap of the sensor and measuring it immediately.
Accuracy Success Criteria – quick test
The sample drawn from near the bolus end when compared to the immediate
pH value will be within 0.2 pH units of that recorded by the comparative
instrument.
Accuracy Success Criteria 2 – formal test
After the agreed period of measurement (say 1 week for a new customer) the
eBolus should be removed, rinsed in warm water and placed in a vessel of 4
pH buffer at 39 C. On interrogation after 5 minutes the bolus output should be
between 3.8 and 4.2 pH. The process should be repeated in buffer 7 and
after 5 minutes the bolus output should be between 6.8 and 7.2 pH. After this
the bolus can be recalibrated and placed in another cow.
If there is a difference you may want to apply a linear adjustment to the data
file but this is at your own risk as the drift may not be linear.
eCow Ltd, Unit 5b King Street Business Centre, 7-9 King Street, Exeter, UK . Version 2.2.3
January 2013