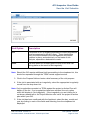
1
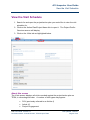
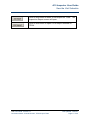
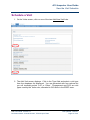
_______________
TESA A10 Inspector
User Guide
_______________
Table of Contents
INTRODUCTION ....................................................................................................................... 3
HOW TO USE THIS GUIDE .............................................................................................................. 3
ABOUT A10 INSPECTORS ............................................................................................................. 3
TEAM LEADER ROLE .................................................................................................................... 3
LOGGING IN AND OUT OF TESA ........................................................................................... 4
LOGIN ......................................................................................................................................... 4
LOGOUT ...................................................................................................................................... 5
HOME: TASKS.......................................................................................................................... 6
FILTERING PROJECTS................................................................................................................... 7
VIEW THE VISIT SCHEDULE .................................................................................................. 9
CHANGE OR CONFIRM A VISIT DATE ................................................................................ 15
DELETE A VISIT ..................................................................................................................... 16
ADD OR EDIT A VISIT REPORT............................................................................................ 18
ENTER A VISIT REPORT .............................................................................................................. 18
EDIT A VISIT REPORT ................................................................................................................. 20
A10 Inspector User Guide
Introduction
Introduction
How to use this guide
This user guide is designed to support you following your TESA training. The
guide is broken down into clear sections so that you can pick out the functionality
that you are interested in re-visiting, revising or reminding yourself of. The user
guide can be used in conjunction with the online help within the TESA system.
About A10 Inspectors
This role will be performed by GO users, so they can schedule A10 visits and
record findings for a project or an Action Plan that their region is managing.
The key operations performed by this role are:
• Schedule an A10 visit. The user confirms the date of a project visit
and the system will alert the Applicant Project Manager.
• Prepare and print out documentation to be taken on the visit.
• Register the findings of an A10 visit on TESA.
Team Leader Role
An A10 user allocated a ‘team leader’ status on TESA can, in addition to the tasks
above:
•
Access a visit assigned or ‘locked’ under another A10 user and route
it on to him or herself, or another A10 user for action.
This feature of TESA ensures that if an A10 user is out of the office, on holiday or
sick leave for example, any items locked to them can be ‘released’ and re-allocated
to another member of staff where necessary.
A10 User Guide: Version 2.0
Document Owner: Victoria Norman, TESA Project Team
Last updated: 13/04/07
Page 3 of 20
A10 Inspector User Guide
Logging in and out of TESA
Logging in and out of TESA
Login
To log in to TESA, go to the home page of the ERDF for England website www.erdf.communities.gov.uk - and click on ‘login’.
Note: The ‘log-in’ link is not yet available on the ERDF website. For early adopter
office staff using the staging environment for Business Readiness Testing,
please enter https://tesa.brt.erdf.odpm.gov.uk to display the login screen.
On the Login screen, to enter the system:
1. Enter your Government Gateway username and password.
2. Click on Login. Your home page will display.
First time log-in
The first time you log-in as a new user, for security purposes you will be asked to
change your password. You are also required to add two security questions and
answers. These will be used to validate your identity if you should forget your
password in the future.
A10 User Guide: Version 2.0
Document Owner: Victoria Norman, TESA Project Team
Last updated: 13/04/07
Page 4 of 20
A10 Inspector User Guide
Logging in and out of TESA
Security questions
Change Password screen
Notes:
•
Once you are logged-in, TESA will not generally request further proof
of your identity. It is therefore essential that you do not share your ID
and password with anyone.
•
If you have not received a TESA ID and password prior to go-live
contact your GO TESA helpdesk.
•
For what to do if you forget or want to change your password please
see the Introduction to TESA user guide.
Logout
Click on the Logout link in the top right navigation bar.
A10 User Guide: Version 2.0
Document Owner: Victoria Norman, TESA Project Team
Last updated: 13/04/07
Page 5 of 20
A10 Inspector User Guide
Home: Tasks
Home: Tasks
To display this screen
‘Tasks’ is always the first page that displays after you log in to TESA. To return to
this page at any time during your TESA session click on the ‘Home’ link in the top
right navigation bar.
About this screen
‘Tasks’ is your main ‘hub’ on TESA. Your Task List displays all tasks relevant to
the role or roles that you have been allocated. For the purpose of this guide we will
focus only on tasks relevant to the A10 role.
Tasks can be either open or locked:
Task Status
Description
Open
Anyone with the appropriate TESA role can take up and
complete. To pick up an open task click on the link in the
Action column.
Locked
Only the named user can take up and complete. The
status will contain the name of the user who currently
owns the task.
All visits that require confirmation and those which are currently being worked on
by other A10 users will be shown.
Your Task List
A10 User Guide: Version 2.0
Document Owner: Victoria Norman, TESA Project Team
Last updated: 13/04/07
Page 6 of 20
A10 Inspector User Guide
Home: Tasks
Filtering Projects
A range of filter criteria are provided to help you prioritise your Task List.
1. To filter tasks, enter as many or as few criteria as you require and
click on the Filter Tasks button.
2. To remove all selections and display all tasks, click on the Remove
Filter button.
Filter Tasks button
Field
Description
Reference
Enter the project or Action Plan reference to display only
tasks relating to that project/Action Plan.
Name
Enter the project or Action Plan name to display only
tasks relating to that project/Action Plan.
Group
Groups are categories set up by the GO at programme
level for workflow and reporting purposes. Groups may
be, for example, thematic - eg urban regeneration - or
geographic - eg sub-regions. Enter a group name to
display only tasks associated with projects or Action
Plans belonging to that group.
Owner
Each project or Action Plan on TESA is ‘owned’ by a
Project Monitor within the GO. To filter tasks by an
owner enter their name here. This can be your own, or
another user’s name.
Raised By
If you wish only to view tasks raised by a specific person
on TESA, enter their name here.
A10 User Guide: Version 2.0
Document Owner: Victoria Norman, TESA Project Team
Last updated: 13/04/07
Page 7 of 20
A10 Inspector User Guide
Home: Tasks
Field
Description
Status
Click in this field to display different task statuses by
which you can then filter your list.
Locked Against
If you wish only to view tasks locked against a specific
person on TESA, enter their name here. This may be
you, or another user.
Action
Click in the field to display a list of actions – for example
Certify Claim - which you can then select from and filter
by.
Priority
If you wish only to view tasks which relate to a specific
programme priority, enter the priority ID here.
Measure ID
Enter a Measure ID (numeric) to display only tasks
relating to that measure.
Sort By
Click in the field to display and select from a list of
options to sort your tasks. You may sort by any of the
Task List column headings. The default setting is ‘Date
Raised’.
Sequence
Results will display in descending order. If you wish to
view results in an ascending order, click the ‘Asc’ radio
button.
Page Size
Click in this field and enter the number of results you
would like to appear on each page. The default setting is
10.
A10 User Guide: Version 2.0
Document Owner: Victoria Norman, TESA Project Team
Last updated: 13/04/07
Page 8 of 20
A10 Inspector User Guide
View the Visit Schedule
View the Visit Schedule
1. Search for and open the project/action plan you would like to view the visit
schedule for.
2. Click on the Action Plan/Project Name link to open it. The Project Profile
Overview screen will display.
3. Click on the Visits tab as highlighted below.
About this screen
The Visits screen displays all visits recorded against the project/action plan on
TESA, in chronological order. A number of visit types may appear:
•
•
•
PAV (previously referred to as Article 4)
Article 10
Project Engagement
A10 User Guide: Version 2.0
Document Owner: Victoria Norman, TESA Project Team
Last updated: 13/04/07
Page 9 of 20
A10 Inspector User Guide
View the Visit Schedule
•
Other.
Each visit type can display in the schedule in a number of formats:
•
Visit Scheduled - Confirmation Required. These are loosely
scheduled but not yet confirmed appointments. These visits will
appear with only a month and year indicated.
•
Visit Due. These are confirmed appointments: the day, month and
year when the visit is scheduled to take place will be shown.
•
Visit Took Place - Report Required. These are visits that have
taken place, but have not yet had a visit report completed/attached on
TESA.
•
Visit Complete. These are historic visits, which have findings
attached. These visits can not be edited.
Buttons
The table below explains the function of the buttons and links that display on this
screen.
Button
Description
Click on this link to add a visit to the schedule. The Add
Visit screen will display.
This button displays once a visit has been created and
saved on TESA. Click on the Change Date button if you
need to change the date of a confirmed visit, or if you
want to add a confirmed date for a scheduled visit.
The Delete button displays once a visit has been created
and saved. You may delete a visit from TESA at any
point until a report has been added.
This button displays when you have only loosely
scheduled a visit, or when you have clicked on the
Change Date button to amend the date of a confirmed
visit. Once you have amended the visit date, click on the
Update Schedule button and the visit schedule will
reorder if necessary into chronological order.
A10 User Guide: Version 2.0
Document Owner: Victoria Norman, TESA Project Team
Last updated: 13/04/07
Page 10 of 20
A10 Inspector User Guide
View the Visit Schedule
Click on this button to enter a Visit Report on TESA. The
Inspection Report screen will open.
Click on this button to open a Visit Report entered on
TESA.
A10 User Guide: Version 2.0
Document Owner: Victoria Norman, TESA Project Team
Last updated: 13/04/07
Page 11 of 20
A10 Inspector User Guide
View the Visit Schedule
Schedule a Visit
1. On the Visits screen, click on one of the two Add New Visit links.
2. The Add Visit screen displays. Click in the Type field and select a visit type
from the dropdown list displayed. You are presented with four options but
you will invariably select ‘A10’ or ‘Other’. Engagement and PAV are visit
types used by the Visitor role, allocated to GO users in the ERDF team.
A10 User Guide: Version 2.0
Document Owner: Victoria Norman, TESA Project Team
Last updated: 13/04/07
Page 12 of 20
A10 Inspector User Guide
View the Visit Schedule
Visit Option
Description
A10
A minimum of 5% of eligible expenditure of each programme
must be examined by the A10 team. These inspections
verify the effectiveness of the management and control
systems in place, and selectively on the basis of risk
analysis, expenditure declarations made.
Other
Use this option for all other types of visits, such as a visit
taking place as the result of an irregularity.
Note: Should the GO require additional visit types adding to the dropdown list, this
should be requested through the TESA central support service.
3. Click in the Purpose field and enter a brief summary of the visit purpose.
4. If the visit is associated with an irregularity, select the appropriate irregularity
record from the drop down list.
Note: Only irregularities recorded on TESA against the project or Action Plan will
display in the list. If no irregularities have been entered, the only option
which will display is ‘No Irregularity’. If the irregularity you are looking for is
not shown please talk to the Project Monitor who ‘owns’ the project or action
plan within your GO.
5. If the visit has been confirmed with the Applicant, select the day, month and
year by clicking in each of the fields and selecting from the dropdown list
displayed.
A10 User Guide: Version 2.0
Document Owner: Victoria Norman, TESA Project Team
Last updated: 13/04/07
Page 13 of 20
A10 Inspector User Guide
View the Visit Schedule
OR
If you are loosely scheduling a future visit, enter just the month and the year.
A notification will appear in your Task List with a required action of ‘Confirm
Project Visit’. Once the visit date has been agreed with the Applicant, you
should click on this link to open the Visits screen and confirm the visit date
(see Change or Confirm a Visit Date section below).
6. Click on the
button.
7. Alternatively, to cancel your entry, click on the
button.
8. Once you have clicked Save, the Visits screen displays with the visit
entered on the schedule.
A10 User Guide: Version 2.0
Document Owner: Victoria Norman, TESA Project Team
Last updated: 13/04/07
Page 14 of 20
A10 Inspector User Guide
Change or confirm a visit date
Change or confirm a visit date
1. If necessary, search for and open the project/action plan you wish to amend
a visit for. The Project Profile Overview screen displays.
2. Click on the Visits tab. The Visits screen displays.
3. To change the date of a confirmed or historic visit, click on the Change Date
button.
You can change a
historic visit as
long as a report
has not been
attached.
You can update a
future scheduled visit.
You can change a future
confirmed visit.
4. The date fields will display in edit format. Amend the date as required. For
your reference the original visit date will display in the date fields.
5. Click on the Update Schedule button.
6. To confirm a loosely scheduled visit, click in to the date fields and enter the
agreed visit date.
7. Click on the Update Schedule button.
8. The visit schedule will reorder if necessary to display visits in chronological
order.
A10 User Guide: Version 2.0
Document Owner: Victoria Norman, TESA Project Team
Last updated: 13/04/07
Page 15 of 20
A10 Inspector User Guide
Delete a visit
Delete a visit
1. If necessary, search for and open the project/action planyou wish to amend
a visit for. The Profile Overview screen displays.
2. Click on the Visits tab. The Visits screen displays.
Note: It is possible to delete future confirmed or loosely scheduled visits. It is not
possible to delete historic visits.
1. Click on the Delete Visit button.
A10 User Guide: Version 2.0
Document Owner: Victoria Norman, TESA Project Team
Last updated: 13/04/07
Page 16 of 20
A10 Inspector User Guide
Delete a visit
2. Click on OK to confirm your action. The visit is deleted.
A10 User Guide: Version 2.0
Document Owner: Victoria Norman, TESA Project Team
Last updated: 13/04/07
Page 17 of 20
A10 Inspector User Guide
Add or Edit a Visit Report
Add or Edit a Visit Report
Enter a Visit Report
Once a visit has been completed, a visit report should be completed.
1. If necessary, search for and open the project or action plan you wish to add
a visit for. The Profile Overview screen displays.
2. Click on the Add Report button next to the relevant visit.
3. The Visit Report screen displays.
The remainder of the screen is on the next page.
A10 User Guide: Version 2.0
Document Owner: Victoria Norman, TESA Project Team
Last updated: 13/04/07
Page 18 of 20
A10 Inspector User Guide
Add or Edit a Visit Report
4. The Visitor’s Name and Organisation fields will display your details. If you
are adding the visit report on behalf of someone else, click in each field and
enter the correct contact information.
5. The visit date fields will display the current date. Click in each field and
select the date the visit took place.
6. You can enter your report in two ways: directly into the Visit Report box, or
as an attachment. Please remember however that as the Visit Report field is
mandatory so you must enter something in this field to allow you to save the
page. (You may wish to enter a summary of the report or simply a reference
to the attached report).
7. Choose from the three options presented in the ‘Reason for selecting the
project/action plan’ field by clicking on the appropriate radio button.
8. To enter the amount (£) of expenditure inspected during the visit, click on
the Add Year button. A table (shown below) displays to allow you to enter
data.
9. Click in the Year field and select from it the year during which the
expenditure you inspected was defrayed.
10. If the project or action plan that was inspected is multi-measure, click in the
measure field and select the appropriate measure, for which the expenditure
was inspected, from the dropdown list.
11. Enter the value of expenditure inspected for that year/measure in the
‘Amount’ field.
A10 User Guide: Version 2.0
Document Owner: Victoria Norman, TESA Project Team
Last updated: 13/04/07
Page 19 of 20
A10 Inspector User Guide
Add or Edit a Visit Report
12. To add a further year click on the Add Year button and repeat steps 9-11.
Repeat as necessary.
13. To upload a file, click on the Add New Attachment button, then:
a. Click on the Browse button.
b. Navigate to where the attachment is stored.
c. Select the item to attach.
d. Enter a title for the attachment in the Title field.
e. A description may be entered if required.
f. Click on the Upload Attachment button.
g. Use the Abandon Upload button if you have chosen the wrong item
to attach. Select the correct item and then repeat the steps above.
14. Click on the Save Report button.
15. The screen re-displays with report details and attachments displayed.
16. Click on the Visits tab to display the visit schedule. You will see the visit
now displays with a Visit Report button. All users with access to the Visits
tab can click on this button to view the report.
Edit a Visit Report
It is possible to edit a visit report after it has been completed. It is also possible to
add or remove attachments.
1. If necessary, navigate to the Visits screen using the steps outlined above.
2. Click on the appropriate Visit Report button. The Visit Report screen will
display.
3. Click on the Edit Report button. The form will become editable.
4. Amend the information displayed as required.
5. Using the Add New Attachment or Delete buttons to add a new, or remove
an existing attachment.
6. Click on the Save Report button once the changes are complete.
A10 User Guide: Version 2.0
Document Owner: Victoria Norman, TESA Project Team
Last updated: 13/04/07
Page 20 of 20