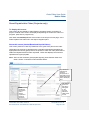
1
________________
TESA Claim Editor
User Guide
________________
Table of Contents
INTRODUCTION ................................................................................................................................ 3
HOW TO USE THIS GUIDE ................................................................................................................... 3
ABOUT CLAIM EDITORS ..................................................................................................................... 3
CLAIM EDITOR TEAM LEADERS .......................................................................................................... 3
THE CLAIMS PROCESS ON TESA ....................................................................................................... 4
LOGGING IN AND OUT OF TESA..................................................................................................... 5
LOGIN .............................................................................................................................................. 5
LOGOUT ........................................................................................................................................... 6
HOME: TASKS................................................................................................................................... 7
FILTERING ........................................................................................................................................ 8
INITIATE A CLAIM ........................................................................................................................... 10
SEARCH CRITERIA .......................................................................................................................... 11
CLAIM OVERVIEW .......................................................................................................................... 16
DRAFT A CLAIM .............................................................................................................................. 20
MEASURE FINANCIAL PERFORMANCE ............................................................................................... 20
TARGETS ....................................................................................................................................... 21
TARGET DETAILS (OUTPUT PROFILES) .............................................................................................. 22
CAPITAL EXPENDITURE ................................................................................................................... 24
REVENUE EXPENDITURE ................................................................................................................. 27
COMMITMENT (ACTION PLAN CLAIMS ONLY) ...................................................................................... 30
PROGRESS..................................................................................................................................... 32
INCOME (PROJECTS ONLY) .............................................................................................................. 34
GRANT PAYABLE THIS CLAIM (PROJECTS ONLY) ................................................................................ 35
PAID CLAIMS .................................................................................................................................. 36
PROGRESS ONLY CLAIMS AND LEGACY PROGRESS REPORTS ............................................................ 36
GRANT PAYABLE THIS CLAIM (ACTION PLANS ONLY) .......................................................................... 37
SUBMIT A CLAIM ............................................................................................................................ 40
CLAIM COVER SHEET ...................................................................................................................... 40
PRINT CLAIM REPORT ................................................................................................................... 42
COVER SHEET ................................................................................................................................ 43
CLAIM HISTORY .............................................................................................................................. 44
EXPENDITURE ................................................................................................................................ 45
INDICATORS ................................................................................................................................... 46
PROJECT INCOME ........................................................................................................................... 47
PROGRESS AND CHANGES TO PROJECT ........................................................................................... 48
MEASURE FINANCIAL STATUS .......................................................................................................... 49
GRANT DUE ................................................................................................................................... 52
PROJECT FINANCIAL PERFORMANCE THIS MEASURE ......................................................................... 56
SAVE AND EDIT A CLAIM .............................................................................................................. 57
ROUTE A CLAIM ............................................................................................................................. 58
OFFER DETAILS ............................................................................................................................. 60
COVER SHEET ................................................................................................................................ 61
VIEW CONTRACTUAL DOCUMENTS ................................................................................................... 62
PROJECT AND APPLICANT DETAILS................................................................................................... 63
CLAIM SCHEDULE ........................................................................................................................... 64
TARGETS ....................................................................................................................................... 65
COSTS PROFILE ............................................................................................................................. 66
YEARLY FUNDING PROFILE .............................................................................................................. 67
QUARTERLY FUNDING PROFILE ........................................................................................................ 68
TERMS AND CONDITIONS ................................................................................................................. 69
Claim Editor User Guide
Introduction
Introduction
How to use this guide
This user guide is designed to support you following your TESA training. The guide
is broken down into clear sections so that you can pick out the functionality that you
are interested in re-visiting, revising or reminding yourself of. The user guide can be
used in conjunction with the online help within the TESA system.
About Claim Editors
The Claim Editor role in TESA allows the user to:
1.• Draft a claim for a project, or an Action Plan, in line with the agreed
monthly or quarterly claim schedule
Formatted: Bulleted + Level: 1 +
Aligned at: 53.45 pt + Tab after:
71.45 pt + Indent at: 71.45 pt
2.• Submit a completed claim for review, prior to submission for payment,
to the Applicant Claim Reviewer.
This role will normally be allocated to:
1.• Applicant Users, so they can enter claim data for a project or action
plan that their organisation is claiming funding for; or
Formatted: Bulleted + Level: 1 +
Aligned at: 53.45 pt + Tab after:
71.45 pt + Indent at: 71.45 pt
2.• Accountable Body Users, so they can enter claim data for an action
plan that their organisation is claiming funding for.
It can also be allocated to:
1.• GO Users, so they can enter a claim on behalf of an Applicant
organisation, or complete a Technical Assistance project claim.
Formatted: Bulleted + Level: 1 +
Aligned at: 53.45 pt + Tab after:
71.45 pt + Indent at: 71.45 pt
Note: Until TESA is rolled out to Applicants, nominated personnel within the GO
may assume the Claim Editor role and key in claims on their behalf.
Claim Editor Team Leaders
A claim editor allocated a ‘team leader’ status on TESA can, in addition to the tasks
above:
3.• Access a claim ‘locked’ under another claim editor and route it on to
him or herself, or another claim editor.
This feature of TESA ensures that claims locked against a claim editor who is out of
the office on holiday or sick leave for example can be ‘released’ and re-allocated to
another member of staff to action.
Note: It is recommended that all users are allocated ‘Team Leader’ status.
Claim Editor User Guide: Version 6
Document Owner: Victoria Norman, TESA Project Team
Last updated: 30-07-07
Page 3 of 69
Formatted: Bulleted + Level: 1 +
Aligned at: 53.45 pt + Tab after:
71.45 pt + Indent at: 71.45 pt
Claim Editor User Guide
Introduction
The Claims Process on TESA
The stage in the TESA workflow which is covered by this guide is outlined in the
shaded boxes below:
1. Claim Editor
Drafts claim
2. Applicant
Claim Reviewer
Reviews claim
•• Initiates the claim.
•• Quarterly or monthly activity
depending on schedule.
•• Enters all claim data.
•• Adds comments/attachments.
•• Submits claim to Applicant Claim
Reviewer.
•• GO staff may be allocated this
role on behalf of Applicants
initially.
3. Claim Approver
Approves claim
4. Certifier
Certifies claims
5. Authoriser
Authorises claim for
payment. Claim is
sent to SAP.
Note: If, during the drafting or review of a claim by the Applicant organisation, the
project or action plan is ‘suspended’, the claim will be returned to the claim
editor who initiated the claim.
Claim Editor User Guide: Version 6
Document Owner: Victoria Norman, TESA Project Team
Last updated: 30-07-07
Page 4 of 69
Formatted: Bulleted + Level: 1 +
Aligned at: 0 pt + Indent at: 0 pt
Claim Editor User Guide
Logging in and out of TESA
Logging in and out of TESA
Login
To log in to TESA, go to the home page of the ERDF for England website www.erdf.communities.gov.uk - and click on ‘login’.
Note: The ‘log-in’ link is not yet available on the ERDF website. For Government
Office staff using the BRT environment for Business Simulation, please enter
https://tesa.brt.erdf.communities.gov.uk to display the login screen.
Enter your Government Gateway Username and password. Click on
a.1.
Login.
The first time you log-in as a new user, for security purposes you will
b.2.
be asked to change your password. You are also required to add two
security questions and answers. These will be used to validate your identity if
you should forget your password in the future.
Change Password screen
Claim Editor User Guide: Version 6
Document Owner: Victoria Norman, TESA Project Team
Last updated: 30-07-07
Page 5 of 69
Formatted: Numbered + Level: 1 +
Numbering Style: 1, 2, 3, … + Start
at: 1 + Alignment: Left + Aligned at:
18 pt + Tab after: 36 pt + Indent at:
36 pt
Claim Editor User Guide
Logging in and out of TESA
Security questions at first logon
On subsequent log-ins, your home page will display.
c.3.
Notes:
2.• Once you are logged-in, TESA will not generally request further proof
of your identity. It is therefore essential that you do not share your ID
and password with anyone.
3.• If you have not received a TESA ID and password prior to go-live
contact your GO TESA helpdesk.
4.• For what to do if you forget or want to change your password please
see the Introduction to TESA user guide.
Logout
Click on the Logout link in the top right navigation bar.
Claim Editor User Guide: Version 6
Document Owner: Victoria Norman, TESA Project Team
Last updated: 30-07-07
Page 6 of 69
Formatted: Numbered + Level: 1 +
Numbering Style: 1, 2, 3, … + Start
at: 1 + Alignment: Left + Aligned at:
18 pt + Tab after: 36 pt + Indent at:
36 pt
Formatted: Bulleted + Level: 1 +
Aligned at: 53.45 pt + Tab after:
71.45 pt + Indent at: 71.45 pt
Claim Editor User Guide
Home: Tasks
Home: Tasks
To display this screen
The ‘Tasks’ screen is your home page and is always the first page that displays
after you log in to TESA. To return to this page at any time during your TESA
session click on the ‘Home’ link in the top right navigation bar.
About this screen
Your Task List displays tasks relevant to the role or roles that you have been
allocated. For the purpose of this guide we will focus only on tasks relevant to the
Claim Editor.
Tasks in the list can be either open or locked:
Task Status
Description
Open
Anyone with the appropriate TESA role can take up and
complete. These tasks will display with a status of ‘For
acceptance’. To pick up an open task click on the link in
the Action column.
Locked
Only the named user can take up and complete. The
status will contain the name of the user who currently
owns the task. If a task is routed to a new user then the
status will display as ‘Routed to x’, where x is the user’s
name, until the user accepts the task.
For the Claim Editor, the Task list will only show ‘locked’ claims, ie those that are
being worked on by another claim editor within your organisation, or claims that
have been returned to you by the Applicant Claim Reviewer or Claim Approver for
amendment or further information. These will display with an Action of ‘Amend
Claim’.
Claim Editors do not initiate new claims from the task list. To open a new claim for
drafting you must navigate to the claim schedule screen, as described in the next
section, Initiate a Claim.
Note: If you do not submit your claim by the due date, you will receive an email
reminder:
1.• If the claim is monthly, you will receive a notification one week after the
end date of the claim period.
Claim Editor User Guide: Version 6
Document Owner: Victoria Norman, TESA Project Team
Last updated: 30-07-07
Page 7 of 69
Formatted: Bulleted + Level: 1 +
Aligned at: 36 pt + Tab after: 54 pt
+ Indent at: 54 pt
Claim Editor User Guide
Home: Tasks
2.• If the claim is quarterly, you will receive an email notification one month
after the end date of the claim period.
Your Task List
Click on the link
to access a claim
for editing.
Filtering
A range of filter criteria are provided to help you prioritise your Task List.
1. To filter tasks, enter as many or as few criteria as you require and click
on the Filter Tasks button.
2. To remove all selections and display all tasks, click on the Remove
Filter button.
Filter Tasks button
Claim Editor User Guide: Version 6
Document Owner: Victoria Norman, TESA Project Team
Last updated: 30-07-07
Page 8 of 69
Formatted: Numbered + Level: 1 +
Numbering Style: 1, 2, 3, … + Start
at: 1 + Alignment: Left + Aligned at:
54 pt + Tab after: 72 pt + Indent at:
72 pt
Formatted: Numbered + Level: 1 +
Numbering Style: 1, 2, 3, … + Start
at: 1 + Alignment: Left + Aligned at:
54 pt + Tab after: 72 pt + Indent at:
72 pt
Claim Editor User Guide
Home: Tasks
Field
Description
Reference
Enter the project or Action Plan reference to display only
tasks relating to that project/Action Plan.
Enter the project or Action Plan name to display only
tasks relating to that project/Action Plan.
Groups are categories set up by the GO at programme
level for workflow and reporting purposes. Groups may
be, for example, thematic - eg urban regeneration - or
geographic - eg sub-regions. Enter a group name to
display only tasks associated with projects or Action
Plans belonging to that group.
Each project or Action Plan on TESA is ‘owned’ by a
Project Monitor within the GO. To filter tasks by an
owner enter their name here. This can be your own, or
another user’s name.
If you wish only to view tasks raised by a specific person
on TESA, enter their name here.
Click in this field to display different task statuses by
which you can then filter your list.
If you wish only to view tasks locked against a specific
person on TESA, enter their name here. This may be
you, or another user.
Click in the field to display a list of actions – for example
Certify Claim - which you can then select from and filter
by.
If you wish only to view tasks which relate to a specific
programme priority, enter the priority ID here.
Enter a Measure ID (numeric) to display only tasks
relating to that measure.
Click in the field to display and select from a list of
options to sort your tasks. You may sort by any of the
Task List column headings. The default setting is ‘Date
Raised’.
Results will display in descending order. If you wish to
view results in an ascending order, click the ‘Asc’ radio
button.
Click in this field and enter the number of results you
would like to appear on each page. The default setting is
10.
Name
Group
Owner
Raised By
Status
Locked Against
Action
Priority
Measure ID
Sort By
Sequence
Page Size
Claim Editor User Guide: Version 6
Document Owner: Victoria Norman, TESA Project Team
Last updated: 30-07-07
Page 9 of 69
Claim Editor User Guide
Initiate a claim
Initiate a claim
As a Claim Editor you should know when a claim for your project or action plan is
due to be submitted and should log in to TESA to initiate the claims process.
To create a claim, you must first search for and open the project or action plan you
wish to make a claim against.
1. From your home (Tasks) page click on the Projects/Action Plans tab.
Formatted: Numbered + Level: 1 +
Numbering Style: 1, 2, 3, … + Start
at: 1 + Alignment: Left + Aligned at:
18 pt + Tab after: 36 pt + Indent at:
36 pt
2. The screen below displays.
Formatted: Numbered + Level: 1 +
Numbering Style: 1, 2, 3, … + Start
at: 1 + Alignment: Left + Aligned at:
18 pt + Tab after: 36 pt + Indent at:
36 pt
About this screen
This screen allows you to search for project(s) or action plan(s) held on TESA.
Government Office users can search all projects and action plans in their
programme(s). Applicant users can search only for projects or action plans
associated with their organisation.
A range of criteria can be applied to your search, as detailed in the table below.
Note: TESA allows you to use a ‘wildcard’ search: eg, if you want to find all projects
which start with A, type A* in the Project Name field. Wildcards can be used
in any alphanumeric field. For example, if you want to search for measures
1.10-1.19, type 1.1* in the measures field.
Claim Editor User Guide: Version 6
Document Owner: Victoria Norman, TESA Project Team
Last updated: 30-07-07
Page 10 of 69
Claim Editor User Guide
Initiate a claim
Search Criteria
Field
Description
Programme
To perform a search, you must first select the correct
programme. Click in the field to display a list of all
programmes in your region and select the appropriate
one.
Projects
If you wish to search for projects, leave the checkbox
selected. If you wish to search only for Action Plans, click
in the box to remove the tick.
Action Plans
If you wish to search for Action Plans, leave the
checkbox selected. If you wish to search for projects
only, click in the box to remove the tick.
Measure ID
To search against a specific measure, enter the measure
reference (in numbers) in this field.
Project/AP Ref
Each project/AP has a unique reference code assigned
to it by the GO. Enter this reference here to search for a
single project/AP.
Project/AP Name
Enter the project or AP name to search for a single
project or Action Plan.
Project/AP
Organisation
Enter an applicant or AP name to display all projects or
action plans associated with that organisation.
Status
Click in this field to display and select from a list of
different statuses to search for all project or action plans
you are permitted to view, at that status.
Group
Groups are categories set up by the GO at programme
level for workflow and reporting purposes. Groups may
be, for example, thematic - eg urban regeneration - or
geographic - eg sub-regions. GO users may enter a
group name to display all projects/action plans in the
programme allocated to that group.
Current Owner
GO users may enter the name of the current owner of
the project or Action Plan to search for all projects and
action plans that person is responsible for.
Claim Editor User Guide: Version 6
Document Owner: Victoria Norman, TESA Project Team
Last updated: 30-07-07
Page 11 of 69
Claim Editor User Guide
Initiate a claim
Field
Description
Sort By
Click in the field to display and select from a list of sort
options to determine how your search results will display.
The default setting is Project/AP Ref.
Sequence
Results will display in an ascending order. If you wish to
view results in a descending order, click the ‘Desc’ radio
button.
Page Size
Click in this field and enter the number of results you
would like to appear on each page. The default setting is
10.
Formatted: Numbered + Level: 1 +
Numbering Style: 1, 2, 3, … + Start
at: 1 + Alignment: Left + Aligned at:
18 pt + Tab after: 36 pt + Indent at:
36 pt
3. Enter your chosen search criteria.
4. Click on the Search button.
Formatted: Numbered + Level: 1 +
Numbering Style: 1, 2, 3, … + Start
at: 1 + Alignment: Left + Aligned at:
18 pt + Tab after: 36 pt + Indent at:
36 pt
5. The Profile (Overview) page displays.
Formatted: Numbered + Level: 1 +
Numbering Style: 1, 2, 3, … + Start
at: 1 + Alignment: Left + Aligned at:
18 pt + Tab after: 36 pt + Indent at:
36 pt
Your project/action
plan profile displays
Formatted: Numbered + Level: 1 +
Numbering Style: 1, 2, 3, … + Start
at: 1 + Alignment: Left + Aligned at:
18 pt + Tab after: 36 pt + Indent at:
36 pt
Claim Editor User Guide: Version 6
Document Owner: Victoria Norman, TESA Project Team
Last updated: 30-07-07
Page 12 of 69
Claim Editor User Guide
Initiate a claim
6. From the Profile screen, click on the Claims tab to view the claim schedule.
Formatted: Numbered + Level: 1 +
Numbering Style: 1, 2, 3, … + Start
at: 1 + Alignment: Left + Aligned at:
18 pt + Tab after: 36 pt + Indent at:
36 pt
7. The Claim Schedule displays.
Click on the View
link to open a
detailed claim
report.
About this screen
This screen lists all transactions associated with a project or Action Plan, broken
down by measure. All historic and scheduled future claims are displayed, together
with values of grant paid, offsets and overpayments. Any pre-TESA progress-only
claims will show in the claim schedule as ‘Legacy Progress Reports’ with a final
status of Approved.
You may also view a detailed claim report from this screen. The report can be
viewed at any time from the point at which the claim is created.
Claim Editor User Guide: Version 6
Document Owner: Victoria Norman, TESA Project Team
Last updated: 30-07-07
Page 13 of 69
Claim Editor User Guide
Initiate a claim
The table below provides a description of each column item.
Column Item
Description
View
Click on this link to view a detailed claim report. See Print
Claim Report section later in this guide for details.
Number
The claim number.
Period
The claim frequency – quarterly or monthly. For pre-TESA
claims, migrated from the old database, that were not
monthly or calendar quarterly, this column will be left blank.
Period End
The end date of the claim period covered.
Type
This may be ‘Legacy Progress Report’ which is
Status
This displays the current status of the transaction and
allows applicant and GO users to track progress of a
transaction as it moves through the TESA workflow. A
claim may have a status of draft, pending certification,
pending authorisation, paid, etc.
Version
Each time a claim is amended after it is submitted to the
GO for payment, a new version is created, and the
previous version ‘archived’, to ensure a strong audit trail is
maintained. Whenever more than one version of a claim
exists, the number in this column becomes a link to a
summary screen listing all earlier versions.
Offset
An offset is a way of the GO recovering a previous
overpayment. The value of the grant overpaid is ‘offset’ or
deducted from the grant due on a future claim or claims.
Overpayment
This is the excess amount that the TESA system has
determined that a project or AP was paid on this claim. A
cumulative total appears at the bottom of the column.
Recovery
mechanism
The recovery mechanism is the means by which a GO
recovers an overpayment to an applicant. Funds can either
be recovered by offsetting the value against a future claim,
or claims, or by raising and issuing a demand note (an
invoice) to the applicant.
Click on the link in the Recovery Mechanism column to
display the Clawback Details screen. If there is more than
one clawback associated with a claim then a View Details
link will appear in this column. Click the link to open the
Clawback Summary screen. This will allow you to look at all
Claim Editor User Guide: Version 6
Document Owner: Victoria Norman, TESA Project Team
Last updated: 30-07-07
Page 14 of 69
Claim Editor User Guide
Initiate a claim
Column Item
Description
clawbacks associated with the claim.
Recovery status
The recovery status is a general indication of the success
of a clawback, e.g. ‘partially recovered’, rather than a
percentage or monetary figure.
Click on the link in the Recovery Status column to view the
Clawback Coversheet.
8. To open a claim, click on either the Number, Period, Period End, Type or
Status link.
Claim Editor User Guide: Version 6
Document Owner: Victoria Norman, TESA Project Team
Last updated: 30-07-07
Page 15 of 69
Formatted: Numbered + Level: 1 +
Numbering Style: 1, 2, 3, … + Start
at: 1 + Alignment: Left + Aligned at:
18 pt + Tab after: 36 pt + Indent at:
36 pt
Claim Editor User Guide
Claim Overview
Claim Overview
The project claim form on TESA has nine ‘steps’ which must be completed before it
can be submitted to the Applicant Claim Reviewer for approval and submission to
the GO. These are illustrated below.
The Steps navigation pane – Project Claim Form
The Steps navigation pane provides an easy way for
you to move from page to page quickly and easily
and to access pages in your chosen order. Simply
click on a step to display the page.
It also provides an at a glance view of which pages
are completed and which you still have left to do:
1. A red cross indicates that the page is not
complete, and requires additional information.
2. As pages are filled out, and validated by the
system, the red crosses turn to green ticks.
Note: A claim cannot be submitted until all pages display green ticks in the Steps
navigation pane.
Steps - Key
A key below the Steps navigation pane explains what
the page icons mean. For example, a blank page icon
shows a page is empty, while a grey page icon
indicates that the page is read only.
Claim Editor User Guide: Version 6
Document Owner: Victoria Norman, TESA Project Team
Last updated: 30-07-07
Page 16 of 69
Formatted: Numbered + Level: 1 +
Numbering Style: 1, 2, 3, … + Start
at: 1 + Alignment: Left + Aligned at:
18 pt + Tab after: 36 pt + Indent at:
36 pt
Formatted: Numbered + Level: 1 +
Numbering Style: 1, 2, 3, … + Start
at: 1 + Alignment: Left + Aligned at:
18 pt + Tab after: 36 pt + Indent at:
36 pt
Claim Editor User Guide
Claim Overview
The Action Plan claim form Steps vary slightly from those on a project claim form.
These are illustrated below.
The Steps navigation pane – Action Plan Claim
The Commitment and Grant Paid to Projects Steps are
specific to Action Plan claim forms.
Saving your Work
When you are drafting or editing a claim, always save your work on a page by
clicking on either the Save, Next Step or Previous Step button. If you click on a
Steps link to move to a new section before pressing one of these buttons you will
lose any unsaved changes.
Buttons
A number of buttons are available to you as you complete your claim. These are
described in the table below.
Button
Meaning
This button enables you to route the claim to another user
in your organisation with the Claim Editor role. It is only
available on the Cover Sheet screen.
You should use this function if, for example, you open a
claim in error, or if you require another Claim Editor to add
data to the claim before it can be submitted to the Applicant
Claim Reviewer. Click in the Route field and you will be
Claim Editor User Guide: Version 6
Document Owner: Victoria Norman, TESA Project Team
Last updated: 30-07-07
Page 17 of 69
Claim Editor User Guide
Claim Overview
Button
Meaning
presented with a dropdown list of people in your
organisation with the Claim Editor role. Select the
appropriate person and click on Route.
When you route a claim to another user, a notification will
appear in all Claim Editors’ Task lists. The status of the
notification will read ‘with x’, where x is the person to whom
the claim has been routed. Note that this action will not
cause the claim to change status from draft, as routing it
has not moved the claim through the workflow.
Moves to the previous page and if any changes have been
made to the page, saves the changes.
Moves to the next page and if any changes have been
made to the page, saves the changes.
Saves the data entered on the current screen.
Clears any data entered on the current page which has not
yet been saved. If you have clicked on Next Step,
Previous Step, or Save, the restore function will not work.
This button will only display once you have green ticks
displayed in the Steps Navigation pane against all pages
and you have entered a comment in the Cover Sheet.
Claim Header
At the top of each claim screen a
range of key information about the
project and the claim is displayed.
A range of project/action plan and claim specific information is presented on each
screen, in the claim header.
Project/Action Plan information (shown at the top) includes:
- Name
- Programme
- Reference
- Status
Claim Editor User Guide: Version 6
Document Owner: Victoria Norman, TESA Project Team
Last updated: 30-07-07
Page 18 of 69
Claim Editor User Guide
Claim Overview
Claim information includes:
- Measure ID
- Claim number
- Period covered
- Due date.
- Status
- Claim Type
The following pages of the guide describe each of the claim form screens and how
to complete them.
Claim Editor User Guide: Version 6
Document Owner: Victoria Norman, TESA Project Team
Last updated: 30-07-07
Page 19 of 69
Claim Editor User Guide
Draft a Claim
Draft a Claim
Measure Financial Performance
To display this screen
When you open a claim from the claim schedule to draft the Measure Financial
Performance page is the first screen to display. While you have the claim open you
may return to this screen at any point by clicking on the Measure Financial
Performance link in the Steps navigation pane.
About this screen
This page presents a read only view of financial performance. The top half of the
page shows contracted versus actual expenditure in a chart format; the lower part of
the page shows the numeric values that support the graph and a percentage
indication of how much expenditure slippage has taken place on the project/AP.
The page displays a ‘before claim’ and ‘after claim’ position. When you have
entered all data on the claim, return to this screen to display the ‘after claim’ view.
Claim Editor User Guide: Version 6
Document Owner: Victoria Norman, TESA Project Team
Last updated: 30-07-07
Page 20 of 69
Claim Editor User Guide
Draft a Claim
Targets
To display this screen
Click either the Next Step button at the bottom of the Measure Financial
Performance page, or the Targets link in the Steps navigation pane.
About this screen
This page displays the project/AP targets, and against each, the target to date, and
the achieved and % achieved by the end of the last claim period.
Click on a
link to view
the Target
details
Claim Editor User Guide: Version 6
Document Owner: Victoria Norman, TESA Project Team
Last updated: 30-07-07
Page 21 of 69
Claim Editor User Guide
Draft a Claim
Target Details (Output profiles)
To display this screen
Click on the Next Step button or an individual target within the Targets page, or
click on the Target Details link in the Steps navigation pane.
About this screen
This page displays details of the outputs achieved during this claim period (monthly
or quarterly) and the anticipated outputs over the remaining quarters of the
project/AP (forecasts). Historic actual achieved values are also shown.
Target figures from the offer letter are also displayed on this screen.
Each page holds a maximum of five targets. If there are more targets, extra pages
are created. The following button will appear to allow you to navigate through these
additional Target Details pages.
The cumulative annual total
and the annual target value
from the offer letter are
displayed to the right.
Enter actual target values in
the highlighted box. Enter
forecast values in all other
boxes displayed.
Bottom half of the screen follows on the next page
Claim Editor User Guide: Version 6
Document Owner: Victoria Norman, TESA Project Team
Last updated: 30-07-07
Page 22 of 69
Claim Editor User Guide
Draft a Claim
If you have more than five
targets, a Next Target Page
button will display.
Completing this screen
1. Enter the actual and forecast figures for each target in the boxes provided.
All values for all quarters must be entered. Annual totals and offer targets
display at the right hand side.
Formatted: Numbered + Level: 1 +
Numbering Style: 1, 2, 3, … + Start
at: 1 + Alignment: Left + Aligned at:
18 pt + Tab after: 36 pt + Indent at:
36 pt
Notes:
5.• When the screen is validated, where the value you have entered
differs from the offer value by more than +/- 10%, a box will appear in
which you are required to enter a reason for the variance.
If you realise you have entered incorrect information which has caused
the error message, re-enter the correct figures, and click the Next
Step or Save button. If your figures are correct, or the revised figures
are still +/- 10% different from those in your offer, you must enter a
reason in the box provided.
Claim Editor User Guide: Version 6
Document Owner: Victoria Norman, TESA Project Team
Last updated: 30-07-07
Page 23 of 69
Formatted: Bulleted + Level: 1 +
Aligned at: 53.45 pt + Tab after:
71.45 pt + Indent at: 71.45 pt
Claim Editor User Guide
Draft a Claim
Capital Expenditure
To display this screen
Click the Next Step button on the Target Details page, or the Capital Expenditure
link in the Steps navigation pane.
Enter values
of capital
expenditure
defrayed.
You must
provide
details of
defrayed
expenditure.
Enter
forecast
expenditure
values in
each box
displayed.
Note: If no capital expenditure is contracted against this measure for the lifetime of
a project, or this is a ‘progress only’ claim, the Steps navigation pane will
display a green tick against Capital Expenditure and the page will not require
data to be entered.
Claim Editor User Guide: Version 6
Document Owner: Victoria Norman, TESA Project Team
Last updated: 30-07-07
Page 24 of 69
Claim Editor User Guide
Draft a Claim
About this screen
This screen is designed to capture details of capital expenditure defrayed during this
claim period (monthly or quarterly) and the anticipated capital expenditure over the
remaining quarters of the project/action plan. It also shows:
•
•
Capital expenditure to date, excluding this claim period, by category.
The target for capital expenditure (as per the offer) in this claim period.
Formatted: Bulleted + Level: 1 +
Aligned at: 18 pt + Tab after: 36 pt
+ Indent at: 36 pt
Under the Latest Capital Expenditure Forecast heading TESA shows for reference:
4.• Total Achieved Not Displayed: This is the total of all historically reported
capital expenditure, prior to the earliest displayed actual on the screen.
5.• Total Achieved to Date: All capital expenditure reported to date, i.e.
including the capital expenditure reported on the current claim.
Formatted: Indent: Left: 18 pt,
Bulleted + Level: 1 + Aligned at:
53.45 pt + Tab after: 71.45 pt +
Indent at: 71.45 pt, Tab stops: 36
pt, List tab + Not at 71.45 pt
Completing this screen
1. Enter the value of capital expenditure defrayed during the claim period
against each capital expenditure category in the box(es) provided. Values
must be entered for all categories displayed. The total spend to date
(excluding this claim period) by category is displayed for reference. The
target capital expenditure for this claim period (from the quarterly funding
profile held on TESA) is displayed at the bottom of the right hand column.
Formatted: Numbered + Level: 1 +
Numbering Style: 1, 2, 3, … + Start
at: 1 + Alignment: Left + Aligned at:
18 pt + Tab after: 36 pt + Indent at:
36 pt
Note: When the screen is validated, where the value entered differs from the target
value by more than +/- 10%, the user is presented with a box in which to
enter a reason for the variance.
2. You must attach a spreadsheet identifying the documents that form evidence
of the expenditure reported on the claim (e.g. invoices, certificates,
timesheets etc).
To add a file, click on the Add Attachment button:
Formatted: Numbered + Level: 2 +
Numbering Style: a, b, c, … + Start
at: 1 + Alignment: Left + Aligned at:
54 pt + Tab after: 72 pt + Indent at:
72 pt
a. Click on the Browse button.
Claim Editor User Guide: Version 6
Document Owner: Victoria Norman, TESA Project Team
Formatted: Numbered + Level: 1 +
Numbering Style: 1, 2, 3, … + Start
at: 1 + Alignment: Left + Aligned at:
18 pt + Tab after: 36 pt + Indent at:
36 pt
Last updated: 30-07-07
Page 25 of 69
Claim Editor User Guide
Draft a Claim
b. Navigate to where the file you wish to attach is stored.
c. Select the file and click ‘Open’. The file name will appear in the ‘Local
File (required):’ field.
Formatted: Numbered + Level: 2 +
Numbering Style: a, b, c, … + Start
at: 1 + Alignment: Left + Aligned at:
54 pt + Tab after: 72 pt + Indent at:
72 pt
d. Enter a title for the attachment in the Title field.
e. Click on the Upload Attachment button.
f. Click on the Abandon Upload button if you have chosen the wrong
item to attach. Select the correct item and then repeat steps.
g. If you wish to add more than one attachment, repeat the upload
process.
Note: An Excel template to capture the required information has been provided by
the Department for Communities and Local Government to GOs for issue to
Applicants.
3. Enter forecast capital expenditure for future claim periods in the boxes
provided. The target expenditure (as per the quarterly funding profile) is
displayed below the forecast boxes. Historic actuals are also displayed, or in
the case of freshly migrated projects/action plans a summary of what has
been achieved to date.
Claim Editor User Guide: Version 6
Document Owner: Victoria Norman, TESA Project Team
Formatted: Numbered + Level: 2 +
Numbering Style: a, b, c, … + Start
at: 1 + Alignment: Left + Aligned at:
54 pt + Tab after: 72 pt + Indent at:
72 pt
Last updated: 30-07-07
Page 26 of 69
Formatted: Numbered + Level: 2 +
Numbering Style: a, b, c, … + Start
at: 1 + Alignment: Left + Aligned at:
54 pt + Tab after: 72 pt + Indent at:
72 pt
Formatted: Numbered + Level: 2 +
Numbering Style: a, b, c, … + Start
at: 1 + Alignment: Left + Aligned at:
54 pt + Tab after: 72 pt + Indent at:
72 pt
Formatted: Numbered + Level: 2 +
Numbering Style: a, b, c, … + Start
at: 1 + Alignment: Left + Aligned at:
54 pt + Tab after: 72 pt + Indent at:
72 pt
Formatted: Numbered + Level: 2 +
Numbering Style: a, b, c, … + Start
at: 1 + Alignment: Left + Aligned at:
54 pt + Tab after: 72 pt + Indent at:
72 pt
Formatted: Numbered + Level: 1 +
Numbering Style: 1, 2, 3, … + Start
at: 1 + Alignment: Left + Aligned at:
18 pt + Tab after: 36 pt + Indent at:
36 pt
Claim Editor User Guide
Draft a Claim
Revenue Expenditure
To display this screen
Click either the Next Step button at the bottom of the Capital Expenditure page, or
the Revenue Expenditure link in the Steps navigation pane.
Enter values
of revenue
expenditure
defrayed.
You must
provide
details of
defrayed
expenditure.
Enter
forecast
expenditure
values in
each box
displayed.
About this screen
The Revenue Expenditure page captures details of revenue expenditure defrayed
during this claim period (monthly or quarterly) and the anticipated revenue
expenditure over the remaining quarters of the project/action plan.
Under the Latest Revenue Expenditure Forecast heading TESA shows for
reference:
6.• Total Achieved Not Displayed: This is the total of all historically reported
revenue expenditure, prior to the earliest displayed actual on the screen.
Claim Editor User Guide: Version 6
Document Owner: Victoria Norman, TESA Project Team
Last updated: 30-07-07
Page 27 of 69
Formatted: Indent: Left: 18 pt,
Bulleted + Level: 1 + Aligned at:
53.45 pt + Tab after: 71.45 pt +
Indent at: 71.45 pt, Tab stops: 36
pt, List tab + Not at 71.45 pt
Claim Editor User Guide
Draft a Claim
7.• Total Achieved to Date: All revenue expenditure reported to date, i.e.
including the revenue expenditure reported on the current claim.
Completing this screen
The revenue expenditure screen is completed in exactly the same way as the
capital expenditure page.
1. Enter the value of revenue expenditure defrayed during the claim period
against each revenue expenditure category in the box(es) provided. Values
must be entered for all categories displayed. The total spend to date
(excluding this claim period) by category is displayed for reference. The
target revenue expenditure for this claim period (as per the offer letter) is
displayed at the bottom of the right hand column.
Note: When the screen is validated, where the value entered differs from the target
value by more than +/- 10%, the user is presented with a box in which to
enter a reason for the variance.
2. You must attach a spreadsheet identifying the documents that form evidence
of the expenditure reported on the claim (e.g. invoices, certificates,
timesheets etc).
To add a file, click on the Add Attachment button:
•a. Click on the Browse button.
•b. Navigate to where the file you wish to attach is stored.
•c. Select the file and click ‘Open’. The file name will appear in the ‘Local
File (required):’ field.
•d. Enter a title for the attachment in the Title field.
Formatted: Numbered + Level: 1 +
Numbering Style: 1, 2, 3, … + Start
at: 1 + Alignment: Left + Aligned at:
18 pt + Tab after: 36 pt + Indent at:
36 pt
Formatted: Numbered + Level: 1 +
Numbering Style: a, b, c, … + Start
at: 1 + Alignment: Left + Aligned at:
54 pt + Tab after: 72 pt + Indent at:
72 pt
Formatted: Numbered + Level: 1 +
Numbering Style: a, b, c, … + Start
at: 1 + Alignment: Left + Aligned at:
54 pt + Tab after: 72 pt + Indent at:
72 pt
Formatted: Numbered + Level: 1 +
Numbering Style: a, b, c, … + Start
at: 1 + Alignment: Left + Aligned at:
54 pt + Tab after: 72 pt + Indent at:
72 pt
Formatted: Numbered + Level: 1 +
Numbering Style: a, b, c, … + Start
at: 1 + Alignment: Left + Aligned at:
54 pt + Tab after: 72 pt + Indent at:
72 pt
•e. Click on the Upload Attachment button.
•f. Click on the Abandon Upload button if you have chosen the wrong
item to attach. Select the correct item and then repeat steps.
•g. If you wish to add more than one attachment, repeat the upload
process.
Note: An Excel template to capture the required information has been provided by
the Department for Communities and Local Government to GOs for issue to
Applicants.
Claim Editor User Guide: Version 6
Document Owner: Victoria Norman, TESA Project Team
Formatted: Numbered + Level: 1 +
Numbering Style: 1, 2, 3, … + Start
at: 1 + Alignment: Left + Aligned at:
18 pt + Tab after: 36 pt + Indent at:
36 pt
Last updated: 30-07-07
Page 28 of 69
Formatted: Numbered + Level: 1 +
Numbering Style: a, b, c, … + Start
at: 1 + Alignment: Left + Aligned at:
54 pt + Tab after: 72 pt + Indent at:
72 pt
Formatted: Numbered + Level: 1 +
Numbering Style: a, b, c, … + Start
at: 1 + Alignment: Left + Aligned at:
54 pt + Tab after: 72 pt + Indent at:
72 pt
Formatted: Numbered + Level: 1 +
Numbering Style: a, b, c, … + Start
at: 1 + Alignment: Left + Aligned at:
54 pt + Tab after: 72 pt + Indent at:
72 pt
Claim Editor User Guide
Draft a Claim
3. Enter forecast revenue expenditure for future claim periods in the boxes
provided. The target expenditure (as per the quarterly funding profile) is
displayed below the forecast boxes. Historic actuals are also displayed, or in
the case of freshly migrated projects/action plans a summary of what has
been achieved to date.
Note: You MUST press Next Step or Save to save your data. If you use the Steps
navigation pane to move to another page before pressing either of these
buttons, data you have entered will be lost.
Note: As illustrated below, if no revenue expenditure is contracted against this
measure for the lifetime of a project/AP, or if it is a ‘progress only’ claim, the
Steps navigation pane will display a green tick against Revenue Expenditure
and a message will display stating that you are not required to enter data.
This message will display
where a claim is ‘capital’
only.
Claim Editor User Guide: Version 6
Document Owner: Victoria Norman, TESA Project Team
Last updated: 30-07-07
Page 29 of 69
Formatted: Numbered + Level: 1 +
Numbering Style: 1, 2, 3, … + Start
at: 1 + Alignment: Left + Aligned at:
18 pt + Tab after: 36 pt + Indent at:
36 pt
Claim Editor User Guide
Draft a Claim
Commitment (Action Plan Claims only)
To display this screen
This screen will only display to Claim Editors completing a claim on behalf of an
Action Plan.
To view this page click on Next Step button at the bottom of the Revenue
Expenditure screen or on the Commitment link in the Steps navigation pane.
This field will display the value
entered in the ‘Current
Commitment’ screen on the
previous claim.
Enter the total value of grant currently
committed to projects for this action plan.
In these fields, enter a profile of your
commitment across the remaining
quarters of the action plan.
About this screen
This screen captures details of an Action Plan’s previous, current and forecast
commitment.
The Previous Commitment field displays the value entered in the current
commitment field on the last created claim.
Note: This field will not display a value if this is the first claim you have submitted on
TESA.
Claim Editor User Guide: Version 6
Document Owner: Victoria Norman, TESA Project Team
Last updated: 30-07-07
Page 30 of 69
Claim Editor User Guide
Draft a Claim
Completing this screen
1. Click in the Current Commitment field and type the value of total grant
committed by the Action Plan.
2. Click in each field under the Commitment Forecast section and enter the
anticipated commitment profile across the remaining quarters of the Action
Plan.
Claim Editor User Guide: Version 6
Document Owner: Victoria Norman, TESA Project Team
Last updated: 30-07-07
Page 31 of 69
Formatted: Numbered + Level: 1 +
Numbering Style: 1, 2, 3, … + Start
at: 1 + Alignment: Left + Aligned at:
18 pt + Tab after: 36 pt + Indent at:
36 pt
Formatted: Numbered + Level: 1 +
Numbering Style: 1, 2, 3, … + Start
at: 1 + Alignment: Left + Aligned at:
18 pt + Tab after: 36 pt + Indent at:
36 pt
Claim Editor User Guide
Draft a Claim
Progress
To display this screen
Click either the Next Step button at the bottom of the Revenue Expenditure page, or
the Progress link in the Steps navigation pane.
You must
provide a
Progress
Report.
Add
Attachment
button
Practical and
Financial
Completion
dates are
taken from
the offer.
Tendering and Publicity
Compliance tick box
About this screen
The primary purpose of this page is to capture information on project/action plan
progress since the last claim was submitted.
Completing this screen
1. Enter your progress report in the field provided. The box will expand as you
enter text. If you would rather, you may upload the report as an attachment.
As this field is mandatory you must still enter a comment in the box however.
2. To add a file to the page, click on the Add Attachment button:
Formatted: Numbered + Level: 1 +
Numbering Style: 1, 2, 3, … + Start
at: 1 + Alignment: Left + Aligned at:
18 pt + Tab after: 36 pt + Indent at:
36 pt
Formatted: Numbered + Level: 1 +
Numbering Style: a, b, c, … + Start
at: 1 + Alignment: Left + Aligned at:
54 pt + Tab after: 72 pt + Indent at:
72 pt
•a. Click on the Browse button.
Claim Editor User Guide: Version 6
Document Owner: Victoria Norman, TESA Project Team
Formatted: Numbered + Level: 1 +
Numbering Style: 1, 2, 3, … + Start
at: 1 + Alignment: Left + Aligned at:
18 pt + Tab after: 36 pt + Indent at:
36 pt
Last updated: 30-07-07
Page 32 of 69
Claim Editor User Guide
Draft a Claim
•b. Navigate to where the file you wish to attach is stored.
•c. Select the file and click ‘Open’. The file name will appear in the ‘Local
File (required):’ field.
•d. Enter a title for the attachment in the Title field.
•e. Click on the Upload Attachment button.
•f. Click on the Abandon Upload button if you have chosen the wrong
item to attach. Select the correct item and then repeat steps.
•g. If you wish to add more than one attachment, repeat the upload
process.
3. The Practical Completion Date and the Financial Completion Date for the
project/action plan are displayed. To amend these dates, click in each field
and type the revised date. Please note however that this will not change the
dates in your offer/contract variation. You should always discuss a change of
dates with your Government Office in advance. If you do amend these dates,
you will be asked to enter a reason for the change when you attempt to save
the screen.
4. Funding Change Explanation: Please provide the details of any new sources
of funding for your project/AP where relevant. This information should include
the amount of funding that will be provided.
5. Ownership change details: Please provide reasons for any change in the
ownership of a project/action plan as well as new contact information where
relevant.
6. Click on the Tendering and Publicity Compliance tick box when applicable.
Claim Editor User Guide: Version 6
Document Owner: Victoria Norman, TESA Project Team
Last updated: 30-07-07
Page 33 of 69
Formatted: Numbered + Level: 1 +
Numbering Style: a, b, c, … + Start
at: 1 + Alignment: Left + Aligned at:
54 pt + Tab after: 72 pt + Indent at:
72 pt
Formatted: Numbered + Level: 1 +
Numbering Style: a, b, c, … + Start
at: 1 + Alignment: Left + Aligned at:
54 pt + Tab after: 72 pt + Indent at:
72 pt
Formatted: Numbered + Level: 1 +
Numbering Style: a, b, c, … + Start
at: 1 + Alignment: Left + Aligned at:
54 pt + Tab after: 72 pt + Indent at:
72 pt
Formatted: Numbered + Level: 1 +
Numbering Style: a, b, c, … + Start
at: 1 + Alignment: Left + Aligned at:
54 pt + Tab after: 72 pt + Indent at:
72 pt
Formatted: Numbered + Level: 1 +
Numbering Style: a, b, c, … + Start
at: 1 + Alignment: Left + Aligned at:
54 pt + Tab after: 72 pt + Indent at:
72 pt
Formatted: Numbered + Level: 1 +
Numbering Style: a, b, c, … + Start
at: 1 + Alignment: Left + Aligned at:
54 pt + Tab after: 72 pt + Indent at:
72 pt
Formatted: Numbered + Level: 1 +
Numbering Style: 1, 2, 3, … + Start
at: 1 + Alignment: Left + Aligned at:
18 pt + Tab after: 36 pt + Indent at:
36 pt
Claim Editor User Guide
Draft a Claim
Income (Projects Only)
To display this screen
Click either the Next Step button at the bottom of the Progress page, or the Income
link in the Steps navigation pane.
Note: Action Plans should NOT declare income on this screen.
Enter the value of total
income generated during
this claim period
About this screen
This page captures information about any planned and unplanned income
generated by a project.
‘Maximum’ reflects the total planned income over the lifetime of the project, as
stated in the offer. Any income declared on this screen which is over and above this
figure is deemed ‘Excess Income’ and is deducted from the grant due (see ‘Grant
Payable this Claim’ screen described later).
Completing this screen
•1. Enter the total value of project income achieved during this claim period.
Claim Editor User Guide: Version 6
Document Owner: Victoria Norman, TESA Project Team
Last updated: 30-07-07
Page 34 of 69
Formatted: Numbered + Level: 1 +
Numbering Style: 1, 2, 3, … + Start
at: 1 + Alignment: Left + Aligned at:
18 pt + Tab after: 36 pt + Indent at:
36 pt
Claim Editor User Guide
Draft a Claim
Grant Payable this Claim (Projects only)
To display this screen
This screen will only display to Claim Editors completing claims on behalf of a
project. Variants of the screen are displayed depending on whether the claim is in
progress, paid, final or progress only.
Click either the Next Step button at the bottom of the Project Income page, or the
Grant Payable This Claim link in the Steps navigation pane.
About this screen (Interim/Restricted Unpaid Claims)
This screen presents a read-only statement of the grant to be paid on this claim.
TESA takes the amount of capital/revenue expenditure declared and applies the
appropriate intervention (grant) rate for the quarter in which the claim period falls to
obtain the Capital/ Revenue Grant requested. TESA also displays the maximum
capital/revenue grant payable.
Note: See how the maximum grant payable figure(s) is/are derived under Print
Claim: Section 7: Measure Financial Status below.
Any deductions,
including any
previous
overpayment of
grant that is being
offset against this
claim, will display
here.
TESA
applies the
intervention
rate to
assess
Capital and
Revenue
Grant due
Claim Editor User Guide: Version 6
Document Owner: Victoria Norman, TESA Project Team
The value of
grant to be
paid which
will appear
on the
payment
instruction
TESA sends
to SAP.
Last updated: 30-07-07
Page 35 of 69
Claim Editor User Guide
Draft a Claim
If the value of requested capital or revenue grant exceeds the maximum allowed,
the claim is automatically restricted.
TESA also lists any deductions which need to be made to the claim. These include:
1.• any income over and above the planned project income across the lifetime of
the project as detailed in the offer
2.• the value of any clawback(s) against previous overpayment being offset
against grant due on this claim.
At the bottom of the screen TESA states the Grant To Be Paid This Claim. This is
the value which appears on the payment instruction sent to the accounting system,
SAP.
Once you have reviewed this screen, click on the Cover Sheet link in the Steps
navigation pane to start the process of submitting the claim. See the Submit a
Claim section, below.
Final Claims
On the final claim, the capital and revenue amounts withheld on previously restricted
claims are displayed as separate items and added onto the capital and revenue
grant requested figures.
In place of the maximum allowed figures the system displays Capital Grant
Remaining and Revenue Grant Remaining.
An explanation of how these figures are derived is provided in section ??. Also,
see Section 7 of the print claim report to see how this figure has been derived on a
particular project final claim.
Paid Claims
The screen simply displays the capital amount paid and the revenue amount paid
before any offsets were deducted.
Progress Only Claims and Legacy Progress Reports
The same version of the screen as for paid claims is displayed with n/a shown under
the capital and revenue headings.
Claim Editor User Guide: Version 6
Document Owner: Victoria Norman, TESA Project Team
Last updated: 30-07-07
Page 36 of 69
Formatted: Bulleted + Level: 1 +
Aligned at: 18 pt + Tab after: 36 pt
+ Indent at: 36 pt
Claim Editor User Guide
Draft a Claim
Grant Payable this Claim (Action Plans only)
To display this screen
This screen will only display to Claim Editors completing claims on behalf of an
Action Plan. Variants of the screen are displayed depending on whether the claim is
in progress, paid, final or progress only.
Click on the Next Step button at the bottom of the Income screen or the Grant Paid
to Projects link in the Steps navigation pane.
About this screen
This screen records the value of capital and revenue grant paid or due to projects in
the claim period and uses these figures to calculate the total grant being requested.
TESA displays the maximum grant payable. See the discussion of how this figure is
derived under Print Claim: Section 7: Measure Financial Status below.
Claim Editor User Guide: Version 6
Document Owner: Victoria Norman, TESA Project Team
Last updated: 30-07-07
Page 37 of 69
Claim Editor User Guide
Draft a Claim
If the value of requested grant exceeds the maximum allowed, the claim is
automatically restricted.
The value of any clawback(s) against previous overpayment being offset against
grant due on this claim is also applied.
At the bottom of the screen the Grant To Be Paid This Claim is stated. This is the
value which appears on the payment instruction sent to the accounting system,
SAP.
Formatted: Numbered + Level: 1 +
Numbering Style: 1, 2, 3, … + Start
at: 1 + Alignment: Left + Aligned at:
18 pt + Tab after: 36 pt + Indent at:
36 pt
Formatted: Numbered + Level: 1 +
Numbering Style: 1, 2, 3, … + Start
at: 1 + Alignment: Left + Aligned at:
18 pt + Tab after: 36 pt + Indent at:
36 pt
Completing this screen
1. Click in the Capital Grant Paid to Projects field and enter the appropriate
value.
2. Click in the Revenue Grant Paid to Projects field and enter the appropriate
value.
3. Click on the Save and Calculate button to save the data and calculate the
total grant requested.
Note: TESA checks that the actual intervention rate to date does not exceed 50%.
4. You may add an attachment with further information if required/appropriate.
To upload a file, click on the Add Attachment button:
1.a.
Click on the Browse button.
2.b.
Navigate to where the file you wish to attach is stored.
Select the file and click ‘Open’. The file name will appear in the
3.c.
‘Local File (required):’ field.
4.d.
Enter a title for the attachment in the Title field.
5.e.
Click on the Upload Attachment button.
6.f. Click on the Abandon Upload button if you have chosen the wrong
item to attach. Select the correct item and then repeat steps.
If you wish to add more than one attachment, repeat the upload
7.g.
process.
Formatted: Numbered + Level: 1 +
Numbering Style: 1, 2, 3, … + Start
at: 1 + Alignment: Left + Aligned at:
18 pt + Tab after: 36 pt + Indent at:
36 pt
Formatted: Numbered + Level: 1 +
Numbering Style: 1, 2, 3, … + Start
at: 1 + Alignment: Left + Aligned at:
18 pt + Tab after: 36 pt + Indent at:
36 pt
Formatted: Numbered + Level: 1 +
Numbering Style: a, b, c, … + Start
at: 1 + Alignment: Left + Aligned at:
54 pt + Tab after: 72 pt + Indent at:
72 pt
Formatted: Numbered + Level: 1 +
Numbering Style: a, b, c, … + Start
at: 1 + Alignment: Left + Aligned at:
54 pt + Tab after: 72 pt + Indent at:
72 pt
Formatted: Numbered + Level: 1 +
Numbering Style: a, b, c, … + Start
at: 1 + Alignment: Left + Aligned at:
54 pt + Tab after: 72 pt + Indent at:
72 pt
Formatted: Numbered + Level: 1 +
Numbering Style: a, b, c, … + Start
at: 1 + Alignment: Left + Aligned at:
54 pt + Tab after: 72 pt + Indent at:
72 pt
Formatted: Numbered + Level: 1 +
Numbering Style: a, b, c, … + Start
at: 1 + Alignment: Left + Aligned at:
54 pt + Tab after: 72 pt + Indent at:
72 pt
Formatted: Numbered + Level: 1 +
Numbering Style: a, b, c, … + Start
at: 1 + Alignment: Left + Aligned at:
54 pt + Tab after: 72 pt + Indent at:
72 pt
Formatted: Numbered + Level: 1 +
Numbering Style: a, b, c, … + Start
at: 1 + Alignment: Left + Aligned at:
54 pt + Tab after: 72 pt + Indent at:
72 pt
Claim Editor User Guide: Version 6
Document Owner: Victoria Norman, TESA Project Team
Last updated: 30-07-07
Page 38 of 69
Claim Editor User Guide
Draft a Claim
Screen Variants
Final Claims
On the final claim, the amount withheld on previously restricted claims is displayed
as a separate item and added onto the combined capital and revenue grant
requested figures to produce the total grant requested
In place of the maximum allowed figures the system displays Capital Grant
Remaining and Revenue Grant Remaining. See the user guide for an explanation of
how these figures are derived. Also, see section 7 of the print claim report to see
how this figure has been derived on a particular action plan final claim.
Paid Claims
The screen simply displays the capital amount paid and the revenue amount paid
before any offsets were deducted.
Progress Only Claims and Legacy Progress Reports
The same version of the screen as for paid claims is displayed with n/a shown under
the capital and revenue headings.
Claim Editor User Guide: Version 6
Document Owner: Victoria Norman, TESA Project Team
Last updated: 30-07-07
Page 39 of 69
Claim Editor User Guide
Submit a claim
Submit a claim
When you have completed all screens and green ticks display against each Step
(other than the Cover Sheet), you are ready to submit the claim.
To do this, you first need to open the Claim Cover Sheet and add a comment, and if
necessary, an attachment with additional information, for the Applicant Claim
Reviewer.
Claim Cover Sheet
To display this screen
Click on the Cover Sheet link in the Steps navigation pane.
All Steps
(other than
the cover
sheet) must
display with
green ticks
before you
are able to
submit the
claim.
After you
have
completed
the claim
you are
required to
enter a
comment
here before
you can
submit the
claim for
review.
About this screen
The Claim Cover Sheet provides details of the claim’s ‘history’. When you first
create a claim, the history will show a status of draft, the current date, your user
details and role. As the claim progresses through the TESA workflow towards
authorisation for payment, this history will build. This will include comments added
by each person involved in processing the claim. The current status of the claim
always appears at the top of the ‘History’ list.
Claim Editor User Guide: Version 6
Document Owner: Victoria Norman, TESA Project Team
Last updated: 30-07-07
Page 40 of 69
Claim Editor User Guide
Submit a claim
•1. Click in the Comments field and enter a comment for the Applicant Claim
Reviewer.
•2. You may add an attachment with additional information if required. To add a
file, click on the Add Attachment button:
•a. Click on the Browse button.
•b. Navigate to where the file you wish to attach is stored.
•c. Select the file and click ‘Open’. The file name will appear in the ‘Local
File (required):’ field.
•d. Enter a title for the attachment in the Title field.
•e. Click on the Upload Attachment button.
•f. Click on the Abandon Upload button if you have chosen the wrong
item to attach. Select the correct item and then repeat steps.
•g. If you wish to add more than one attachment, repeat the upload
process.
Formatted: Numbered + Level: 1 +
Numbering Style: 1, 2, 3, … + Start
at: 1 + Alignment: Left + Aligned at:
18 pt + Tab after: 36 pt + Indent at:
36 pt
Formatted: Numbered + Level: 1 +
Numbering Style: 1, 2, 3, … + Start
at: 1 + Alignment: Left + Aligned at:
18 pt + Tab after: 36 pt + Indent at:
36 pt
Formatted: Numbered + Level: 2 +
Numbering Style: a, b, c, … + Start
at: 1 + Alignment: Left + Aligned at:
54 pt + Tab after: 72 pt + Indent at:
72 pt
Formatted: Numbered + Level: 2 +
Numbering Style: a, b, c, … + Start
at: 1 + Alignment: Left + Aligned at:
54 pt + Tab after: 72 pt + Indent at:
72 pt
Formatted: Numbered + Level: 2 +
Numbering Style: a, b, c, … + Start
at: 1 + Alignment: Left + Aligned at:
54 pt + Tab after: 72 pt + Indent at:
72 pt
Formatted: Numbered + Level: 2 +
Numbering Style: a, b, c, … + Start
at: 1 + Alignment: Left + Aligned at:
54 pt + Tab after: 72 pt + Indent at:
72 pt
•3. Click on the Next Step button. The Measure Financial Performance page
displays. Scroll down to reveal the Submit button in the bottom right of the
screen.
Formatted: Numbered + Level: 2 +
Numbering Style: a, b, c, … + Start
at: 1 + Alignment: Left + Aligned at:
54 pt + Tab after: 72 pt + Indent at:
72 pt
•4. Click on the Submit button. The claim is forwarded to the Applicant Claim
Reviewer.
Formatted: Numbered + Level: 2 +
Numbering Style: a, b, c, … + Start
at: 1 + Alignment: Left + Aligned at:
54 pt + Tab after: 72 pt + Indent at:
72 pt
•5. The Claim Schedule redisplays. The status of the claim has changed to
Pending Applicant Review. The claim will now appear in the Task list of
users with the Applicant Claim Reviewer role.
Formatted: Numbered + Level: 2 +
Numbering Style: a, b, c, … + Start
at: 1 + Alignment: Left + Aligned at:
54 pt + Tab after: 72 pt + Indent at:
72 pt
Formatted: Numbered + Level: 1 +
Numbering Style: 1, 2, 3, … + Start
at: 1 + Alignment: Left + Aligned at:
18 pt + Tab after: 36 pt + Indent at:
36 pt
Note: If this is the first time you have submitted the claim for review the version will
remain as ‘1’. The version is only increased if the Claim Approver rejects the
claim and it is subsequently edited by the Claim Editor, or the Claim Approver
amends the claim on behalf of the Claim Editor.
Claim Editor User Guide: Version 6
Document Owner: Victoria Norman, TESA Project Team
Last updated: 30-07-07
Page 41 of 69
Formatted: Numbered + Level: 1 +
Numbering Style: 1, 2, 3, … + Start
at: 1 + Alignment: Left + Aligned at:
18 pt + Tab after: 36 pt + Indent at:
36 pt
Formatted: Numbered + Level: 1 +
Numbering Style: 1, 2, 3, … + Start
at: 1 + Alignment: Left + Aligned at:
18 pt + Tab after: 36 pt + Indent at:
36 pt
Claim Editor User Guide
Print Claim Report
Print Claim Report
Formatted: Numbered + Level: 1 +
Numbering Style: 1, 2, 3, … + Start
at: 1 + Alignment: Left + Aligned at:
18 pt + Tab after: 36 pt + Indent at:
36 pt
1. Navigate to the claim schedule screen.
Click the link
to view a
claim report.
2. Click on the View link next to the claim you would like to print.
3. TESA’s reporting tool, Cognos ReportNet will open in a new window. A
message will display telling you that your report is running.
Formatted: Numbered + Level: 1 +
Numbering Style: 1, 2, 3, … + Start
at: 1 + Alignment: Left + Aligned at:
18 pt + Tab after: 36 pt + Indent at:
36 pt
Formatted: Numbered + Level: 1 +
Numbering Style: 1, 2, 3, … + Start
at: 1 + Alignment: Left + Aligned at:
18 pt + Tab after: 36 pt + Indent at:
36 pt
4. Your claim report will open as a read-only PDF document, split up into a
number of sections. These are described in the pages below.
Claim Editor User Guide: Version 6
Document Owner: Victoria Norman, TESA Project Team
Last updated: 30-07-07
Page 42 of 69
Formatted: Numbered + Level: 1 +
Numbering Style: 1, 2, 3, … + Start
at: 1 + Alignment: Left + Aligned at:
18 pt + Tab after: 36 pt + Indent at:
36 pt
Claim Editor User Guide
Print Claim Report
Cover Sheet
The first section of the claim report provides headline details about the claim, the
applicant and the project/action plan.
Claim Editor User Guide: Version 6
Document Owner: Victoria Norman, TESA Project Team
Last updated: 30-07-07
Page 43 of 69
Claim Editor User Guide
Print Claim Report
Claim History
This section provides details of the claim’s history, as per the claim form cover
sheet.
Claim Editor User Guide: Version 6
Document Owner: Victoria Norman, TESA Project Team
Last updated: 30-07-07
Page 44 of 69
Claim Editor User Guide
Print Claim Report
Expenditure
This section displays details captured on the expenditure screens in the claim form.
In this example, there is no contracted revenue expenditure to display.
Claim Editor User Guide: Version 6
Document Owner: Victoria Norman, TESA Project Team
Last updated: 30-07-07
Page 45 of 69
Claim Editor User Guide
Print Claim Report
Indicators
This section shows indicator information captured on the Target Details screens on
the claim form. Past actuals are not displayed. The Achieved to Date figure is the
total achieved against this indicator across all previously authorised claims. The
Achieved this Claim value is the achieved figure against this indicator on the current
claim.
Claim Editor User Guide: Version 6
Document Owner: Victoria Norman, TESA Project Team
Last updated: 30-07-07
Page 46 of 69
Claim Editor User Guide
Print Claim Report
Project Income
This provides details of project income. It is not applicable to Action Plan claims.
Claim Editor User Guide: Version 6
Document Owner: Victoria Norman, TESA Project Team
Last updated: 30-07-07
Page 47 of 69
Claim Editor User Guide
Print Claim Report
Progress and Changes to Project
This section shows information captured on the claim progress screen.
Claim Editor User Guide: Version 6
Document Owner: Victoria Norman, TESA Project Team
Last updated: 30-07-07
Page 48 of 69
Claim Editor User Guide
Print Claim Report
Measure Financial Status
This section shows a measure-level breakdown of how much capital and revenue
grant is available to the project taking into account the retention reserve. In other
words, it shows how the maximum allowed figure shown on the Grant Due section
of the report is calculated. For action plans, the capital and revenue breakdowns are
rolled up to the level of the measure. This section is not shown in the case of
migrated claims and progress-only claims.
How the Maximum Allowed is calculated
Interim & Restricted Claims
A
B
C
D
E
F
G
H
I
J
K
L
M
Each time a claim is raised, TESA compares the amount of grant requested against
the amount of grant available to the project at that point in time, i.e. the maximum
allowed. If the amount requested exceeds the maximum allowed, TESA restricts the
grant that can be paid to the maximum allowed figure and the claim type is set to
‘Restricted’.
Section 7 of the Print Claim report for a project shows separately how, on a
particular claim, the maximum allowed figures are derived for the capital and
revenue components of the claim. For an action plan, a single breakdown is shown,
rolled up to the level of the measure, with capital and revenue components
combined. The logic of the calculation laid out below should be read, in the case of
a project claim, as referring to either of the capital or the revenue components of
expenditure and grant under a particular measure. In the case of an action plan, it
refers to total expenditure and grant under a particular measure.
Claim Editor User Guide: Version 6
Document Owner: Victoria Norman, TESA Project Team
Last updated: 30-07-07
Page 49 of 69
Claim Editor User Guide
Print Claim Report
•1.
TESA takes the total eligible expenditure (A) and subtracts from it any
irregular expenditure (B) to obtain the approved eligible expenditure (C). To
obtain B, TESA looks across all clawbacks raised under the measure that
are associated with an irregularity report. For these clawbacks, TESA adds
up all the individually entered ineligible amounts to obtain the total irregular
expenditure.
C is multiplied by the measure-level intervention rate (D) to obtain the
•2.
total grant available (E).
In the case of projects, any excess income on the project that has
•3.
been deducted from previous claims (F) is deducted from E to bring that
figure down to the true amount of available grant (G).
To do this at a capital and revenue level, TESA must take the
undifferentiated income figure and partition it into a notional capital income
figure and a notional revenue income figure. This is achieved by multiplying
the excess income figure by the ratio of approved capital grant to total
approved grant to obtain the capital income figure (F cap), and by the ratio
of approved revenue grant to total approved grant to obtain the revenue
income figure (F rev).
Excess income on Action Plans is always set to zero.
TESA then works out how much grant has been paid based on the
•4.
amounts recorded on the SAP grant payment record (H - grant paid based
on all previous AP1s, see ‘How the SAP transaction amounts are calculated’
below) and deducts from it the value of any recovered or offset clawbacks
(I) to produce the effective grant paid figure (J). Note that any unrecovered
pending clawbacks are not deducted from the grant paid figure thus keeping
the maximum allowed figure artificially depressed as ‘insurance’ against
non-recovery.
The effective grant paid (J) is subtracted from the available grant (G)
•5.
to obtain the amount of grant remaining to the project before retention (K).
To calculate the maximum allowed (M), i.e. the amount of available
•6.
grant that can be paid before the claim must be restricted, TESA, subtracts
the retention reserve (L) from K, where L = x% of E, where x = the retention
rate.
Claim Editor User Guide: Version 6
Document Owner: Victoria Norman, TESA Project Team
Last updated: 30-07-07
Page 50 of 69
Formatted: Indent: Left: 28.35 pt,
Hanging: 14.2 pt, Numbered + Level:
2 + Numbering Style: 1, 2, 3, … +
Start at: 1 + Alignment: Left +
Aligned at: 90 pt + Tab after: 108 pt
+ Indent at: 108 pt, Tab stops: Not
at 108 pt
Claim Editor User Guide
Print Claim Report
Final Claims
A
A1
A2
B
C
D
E
F
G
H
I
J
K
L
M
For a final claim, Section 7 of the Print Claim report works differently than on an
Interim/Restricted Claim.
1. TESA looks at the total reported eligible expenditure (A1) and compares it to
the the total eligible expenditure (A). If A1 is less than A, then this figure is
taken to be the available eligible expenditure (A2), otherwise A2 is set to A.
Any irregular expenditure (B) is now subtracted from A2 to obtain the
approved eligible expenditure (C).
2. The retention reserve (L) on a final claim is not subtracted from the grant
remaining, because all of the grant remaining is available to the project by
the time of the final claim. The maximum allowed (M) therefore becomes
identical with the grant remaining (K).
Claim Editor User Guide: Version 6
Document Owner: Victoria Norman, TESA Project Team
Last updated: 30-07-07
Page 51 of 69
Formatted: Indent: Left: 28.35 pt,
Hanging: 14.2 pt, Numbered + Level:
1 + Numbering Style: 1, 2, 3, … +
Start at: 1 + Alignment: Left +
Aligned at: 90 pt + Tab after: 108 pt
+ Indent at: 108 pt, Tab stops: Not
at 108 pt
Claim Editor User Guide
Print Claim Report
Grant Due
Section 8 of the print claim report is a statement of grant due on a claim. It is not
shown because it is not relevant in the case of progress-only claims and legacy
progress reports. In the case of claims processed and paid before TESA was
introduced only a summary of grant paid is shown. Otherwise, the full breakdown is
shown. The layout of this section is the same for interim, restricted and final claims.
How the Grant Due is calculated
Interim & Restricted Claims
A
B
C
D
E
F
G
H
I
J
K
Section 8 of the Print Claim report for a project shows separately how, on a
particular claim, the capital and revenue components of the grant to be paid are
calculated. For an action plan, a single breakdown is shown, rolled up to the level of
the measure, with capital and revenue components combined. The logic of the
calculation laid out below should be read, in the case of a project claim, as referring
to either of the capital or the revenue components of expenditure and grant under a
particular measure. In the case of an action plan, it refers to total expenditure and
grant under a particular measure.
1. In the case of project claims, TESA takes the actual expenditure reported on
the claim (A) and multiplies it by the intervention rate operating in the
quarter in which the claim period falls (B - derived from the quarterly funding
profile on the offer) to obtain the total grant requested (E – note that D is
always zero on interim and restricted claims, which means that E is always
identical to C).
In the case of action plan claims, C is entered manually on Sc33; therefore
A and B are set to n/a on the report.
2. TESA compares C with the maximum grant allowed (F – see explanation of
how this is calculated under Section 7). Where C is greater than F, the grant
Claim Editor User Guide: Version 6
Document Owner: Victoria Norman, TESA Project Team
Last updated: 30-07-07
Page 52 of 69
Formatted: Indent: Left: 28.35 pt,
Hanging: 14.2 pt, Numbered + Level:
1 + Numbering Style: 1, 2, 3, … +
Start at: 1 + Alignment: Left +
Aligned at: 90 pt + Tab after: 108 pt
+ Indent at: 108 pt, Tab stops: Not
at 108 pt
Claim Editor User Guide
Print Claim Report
allowed this claim (G) is set to F and the claim type is set to restricted;
otherwise G is set to C.
Note that if the maximum allowed figure, derived on Section 7, is negative, it
is displayed on Section 8 and Sc33/56 as zero.
3. The amount of income on the claim that is excess to that in the funding
profile (H - always zero in the case of action plans) is added to the sum of
any offsets against the claim (I) to obtain the value of total deductions (J).
Sc33 shows undifferentiated figures for income and offsets, whereas the
print claim report partitions these figures into notional capital and revenue
components.
a. In the case of income, it does this by multiplying the amount of income
on the claim that is excess to that in the funding profile by the ratio of
capital grant due on the claim to total grant due on the claim to obtain
the capital income figure (H cap), and by the ratio of revenue grant
due on the claim to total grant due on the claim to obtain the revenue
income figure (H rev).
b. In the case of offsets, it does this by multiplying the sum of all offsets
against the claim by the ratio of capital grant due on the claim to total
grant due on the claim to obtain the capital offset figure (I cap), and by
the ratio of the revenue grant due on the claim to total grant due on the
claim to obtain the revenue offset figure (I rev).
4. The total deductions figure (J) is subtracted from the grant allowed this
claim figure (G) to obtain the grant to be paid this claim (K).
Final Claims
Formatted: Numbered + Level: 2 +
Numbering Style: a, b, c, … + Start
at: 1 + Alignment: Left + Aligned at:
54 pt + Tab after: 72 pt + Indent at:
72 pt
Formatted: Indent: Left: 28.35 pt,
Hanging: 14.2 pt, Numbered + Level:
1 + Numbering Style: 1, 2, 3, … +
Start at: 1 + Alignment: Left +
Aligned at: 90 pt + Tab after: 108 pt
+ Indent at: 108 pt, Tab stops: Not
at 108 pt
Section 8 of the Print Claim report for a final claim works somewhat differently than
for an Interim/Restricted Claim.
1. The amount withheld on previous restricted claims (D) is added to the grant
requested (C) to obtain the total grant requested (E).
To calculate D, TESA adds the amount withheld on migrated restricted
claims, as entered onto the system by helpdesk on behalf of the GO, to the
individual amounts withheld on restricted claims paid on TESA.
2. The maximum grant allowed figure (labelled capital/revenue grant remaining
on Sc33) is calculated differently: see previous explanation under Section 7.
Migrated Paid Claims
Section 8 and Sc33 shows a simple summary of the actual grant paid (i.e. AP1
amount minus any AP2 amount: see ‘How the SAP transaction amounts are
calculated’ below) split into its capital and revenue components.
How the SAP transaction amounts are calculated
SAP expects every transaction to be differentiated into capital and revenue
components. This forces TESA into the unfortunate position of having to apply
somewhat arbitrary ratios to certain values (e.g. income or amount withheld on
Claim Editor User Guide: Version 6
Document Owner: Victoria Norman, TESA Project Team
Last updated: 30-07-07
Page 53 of 69
Formatted: Indent: Left: 28.35 pt,
Hanging: 14.2 pt, Numbered + Level:
1 + Numbering Style: 1, 2, 3, … +
Start at: 1 + Alignment: Left +
Aligned at: 90 pt + Tab after: 108 pt
+ Indent at: 108 pt, Tab stops: Not
at 108 pt
Claim Editor User Guide
Print Claim Report
action plans) in order to split them into capital/revenue amounts, even though these
values make little sense in business terms.
1. In the case of a project or action plan claim requiring payment (i.e. claim has
a positive amount of grant due before any offsets are considered), the
amount to be paid to the applicant based on the information recorded on the
claim is written to the SAP AP1 document. This amount is equal to G minus
H. If there are any offsets against the claim, the value of these (split using
the ratios described in 3b above) are written to a separate document, an
AP2. Both documents are sent to SAP where the AP2 is offset (in the form
of a credit on the vendor account) against the AP1 to calculate the correct
BACS payment.
2. There is an additional split required in the case of an action plan final claim:
because retention is performed at the measure level and not at the capital
and revenue level, the amount withheld is held on TESA as an
undifferentiated figure. For SAP payment purposes it must be split into a
capital and revenue component to be added to the capital and revenue
grant requested components entered on Sc33 and displayed in rolled up
form at C. The rule for performing this split is as follows: if there is no
amount previously withheld, then use the final grant due, split, respectively,
in the ratios of the capital/revenue grant requested on the claim to total
grant requested. If there is an amount previously withheld, then use the final
grant due, split, respectively, in the ratios of the capital/revenue grant paid
on the project to the total grant paid.
How final claims become final restricted claims (the ‘ghost claim’
scenario)
If the grant paid to a capital or revenue-only project has not been previously
restricted and there is still an amount that can be paid before the retention limit must
be imposed then on the final claim if an additional amount is requested which
pushes the grant total grant requested over the retention limit, TESA will change the
claim label from Final to Final restricted.
If the grant paid to a capital and revenue project has been previously restricted
under either cost category and under the non-restricted cost category there is still an
amount that can be paid before the retention limit must be imposed then on the final
claim if an additional amount is requested under the non-restricted cost category,
TESA will change the claim label from Final to Final restricted.
In both cases, Sc33 switches from final claim to restricted mode, i.e. the amount
withheld field disappears and the maximum allowed figure changes to the amount of
grant available pre-retention. This may have the effect, though not necessarily, of
capping the amount requested. Either way the claim is technically restricted
because no grant can be paid under the previously restricted cost category.
Claim Editor User Guide: Version 6
Document Owner: Victoria Norman, TESA Project Team
Last updated: 30-07-07
Page 54 of 69
Formatted: Indent: Left: 28.35 pt,
Hanging: 14.2 pt, Numbered + Level:
1 + Numbering Style: 1, 2, 3, … +
Start at: 1 + Alignment: Left +
Aligned at: 90 pt + Tab after: 108 pt
+ Indent at: 108 pt, Tab stops: Not
at 108 pt
Claim Editor User Guide
Print Claim Report
The final restricted claim can be processed through to payment without the delays
that slow up the payment of final claims. As soon as the final restricted claim is
authorised (i.e. sent to SAP), a new final claim is added to the claim schedule at a
status of Pending Approval. No expenditure appears on this new final claim and
therefore on Sc33, the expenditure, grant rate and grant requested values are set to
n/a. The only grant to be paid will be the grant that was previously withheld on
previous restricted claims - including the final restricted claim.
Claim Editor User Guide: Version 6
Document Owner: Victoria Norman, TESA Project Team
Last updated: 30-07-07
Page 55 of 69
Claim Editor User Guide
Print Claim Report
Project Financial Performance This Measure
This section presents financial performance information. It is not shown in the case
of pre-TESA claims or progress-only claims.
Claim Editor User Guide: Version 6
Document Owner: Victoria Norman, TESA Project Team
Last updated: 30-07-07
Page 56 of 69
Claim Editor User Guide
Save and Edit a Claim
Save and Edit a Claim
To save a claim
If you are not able to complete a claim for any reason you can save and close it and
then return to it at a later date.
1. Click on the Save button.
2. Click on the Claims tab. The Claim Schedule screen redisplays.
3. The Status of the claim is shown as Draft.
4. Click on home. The claim is displayed in your Task List with a status of For
Acceptance and an action to Amend Claim. The claim is locked with you until
you are ready to reopen and continue drafting it.
To open a draft claim
Claims which you have started to draft and then closed, or claims that have been
‘routed’ to you for drafting, will display in your Task list. To open the claim:
1. Click on the notification in your Task list.
2. The claim Cover Sheet displays. Any incomplete pages will display in the
Steps navigation pane with red crosses.
3. Edit and then either route or submit the claim as appropriate.
Formatted: Numbered + Level: 1 +
Numbering Style: 1, 2, 3, … + Start
at: 1 + Alignment: Left + Aligned at:
18 pt + Tab after: 36 pt + Indent at:
36 pt
Formatted: Numbered + Level: 1 +
Numbering Style: 1, 2, 3, … + Start
at: 1 + Alignment: Left + Aligned at:
18 pt + Tab after: 36 pt + Indent at:
36 pt
Formatted: Numbered + Level: 1 +
Numbering Style: 1, 2, 3, … + Start
at: 1 + Alignment: Left + Aligned at:
18 pt + Tab after: 36 pt + Indent at:
36 pt
Formatted: Numbered + Level: 1 +
Numbering Style: 1, 2, 3, … + Start
at: 1 + Alignment: Left + Aligned at:
18 pt + Tab after: 36 pt + Indent at:
36 pt
Formatted: Numbered + Level: 1 +
Numbering Style: 1, 2, 3, … + Start
at: 1 + Alignment: Left + Aligned at:
18 pt + Tab after: 36 pt + Indent at:
36 pt
Formatted: Numbered + Level: 1 +
Numbering Style: 1, 2, 3, … + Start
at: 1 + Alignment: Left + Aligned at:
18 pt + Tab after: 36 pt + Indent at:
36 pt
Formatted: Numbered + Level: 1 +
Numbering Style: 1, 2, 3, … + Start
at: 1 + Alignment: Left + Aligned at:
18 pt + Tab after: 36 pt + Indent at:
36 pt
Claim Editor User Guide: Version 6
Document Owner: Victoria Norman, TESA Project Team
Last updated: 30-07-07
Page 57 of 69
Claim Editor User Guide
Route a claim
Route a claim
If you require another Claim Editor to add data to the claim or review it before it is
submitted to the Applicant Claim Reviewer you should use the route function on
TESA.
1. Click on the Cover Sheet link in the Steps navigation pane.
2. Add a comment in the Comments box provided.
Formatted: Numbered + Level: 1 +
Numbering Style: 1, 2, 3, … + Start
at: 1 + Alignment: Left + Aligned at:
18 pt + Tab after: 36 pt + Indent at:
36 pt
3. Click in the Route field and select the appropriate person from the dropdown
list presented. (Only people in your organisation with the Claim Editor role are
provided as options).
Formatted: Numbered + Level: 1 +
Numbering Style: 1, 2, 3, … + Start
at: 1 + Alignment: Left + Aligned at:
18 pt + Tab after: 36 pt + Indent at:
36 pt
4. Click on the Route button.
Formatted: Numbered + Level: 1 +
Numbering Style: 1, 2, 3, … + Start
at: 1 + Alignment: Left + Aligned at:
18 pt + Tab after: 36 pt + Indent at:
36 pt
5. You will be prompted to confirm your action. Click on OK.
6. Your homepage will display. In your task list a notification will indicate that
the claim has been routed.
Formatted: Numbered + Level: 1 +
Numbering Style: 1, 2, 3, … + Start
at: 1 + Alignment: Left + Aligned at:
18 pt + Tab after: 36 pt + Indent at:
36 pt
Formatted: Numbered + Level: 1 +
Numbering Style: 1, 2, 3, … + Start
at: 1 + Alignment: Left + Aligned at:
18 pt + Tab after: 36 pt + Indent at:
36 pt
Formatted: Numbered + Level: 1 +
Numbering Style: 1, 2, 3, … + Start
at: 1 + Alignment: Left + Aligned at:
18 pt + Tab after: 36 pt + Indent at:
36 pt
7.
This action will not cause the claim to change status from draft, as routing the
claim has not moved it through the workflow.
Claim Editor User Guide: Version 6
Document Owner: Victoria Norman, TESA Project Team
Last updated: 30-07-07
Page 58 of 69
Formatted: Indent: Left: 0 pt, First
line: 0 pt, Numbered + Level: 1 +
Numbering Style: 1, 2, 3, … + Start
at: 1 + Alignment: Left + Aligned at:
18 pt + Tab after: 36 pt + Indent at:
36 pt, Tab stops: Not at 36 pt
Claim Editor User Guide
Route a claim
Deal with returned claims
If an Applicant Claim Reviewer returns your claim for amendment or additional
information a notification will display in your Task list, to Amend Claim.
A Claim Approver may also return your claim. In this instance you will receive an
email notification advising you of this. The claim will also display in your Task list,
with a required action of Amend Claim.
1. Click on the Task list notification. The claim Cover Sheet displays.
2. Read the comments at the top of the ‘history’ report. These should indicate
the reason(s) why the claim was returned.
Formatted: Numbered + Level: 1 +
Numbering Style: 1, 2, 3, … + Start
at: 1 + Alignment: Left + Aligned at:
18 pt + Tab after: 36 pt + Indent at:
36 pt
Formatted: Numbered + Level: 1 +
Numbering Style: 1, 2, 3, … + Start
at: 1 + Alignment: Left + Aligned at:
18 pt + Tab after: 36 pt + Indent at:
36 pt
3. Make the necessary amendments.
4. Click on the Steps Cover Sheet link.
5. Add your comment for the Applicant Claim Reviewer, and an attachment if
required.
6. Click on the Next Step button to save your comment and to display the
Submit button.
7. Click the Submit button. You will be prompted to confirm your action. Click
on OK.
8. The Claim Schedule screen displays. The claim shows as pending review.
The claim is returned to the Applicant Claim Reviewer.
Formatted: Numbered + Level: 1 +
Numbering Style: 1, 2, 3, … + Start
at: 1 + Alignment: Left + Aligned at:
18 pt + Tab after: 36 pt + Indent at:
36 pt
Formatted: Numbered + Level: 1 +
Numbering Style: 1, 2, 3, … + Start
at: 1 + Alignment: Left + Aligned at:
18 pt + Tab after: 36 pt + Indent at:
36 pt
Formatted: Numbered + Level: 1 +
Numbering Style: 1, 2, 3, … + Start
at: 1 + Alignment: Left + Aligned at:
18 pt + Tab after: 36 pt + Indent at:
36 pt
Formatted: Numbered + Level: 1 +
Numbering Style: 1, 2, 3, … + Start
at: 1 + Alignment: Left + Aligned at:
18 pt + Tab after: 36 pt + Indent at:
36 pt
Formatted: Numbered + Level: 1 +
Numbering Style: 1, 2, 3, … + Start
at: 1 + Alignment: Left + Aligned at:
18 pt + Tab after: 36 pt + Indent at:
36 pt
Formatted: Numbered + Level: 1 +
Numbering Style: 1, 2, 3, … + Start
at: 1 + Alignment: Left + Aligned at:
18 pt + Tab after: 36 pt + Indent at:
36 pt
Claim Editor User Guide: Version 6
Document Owner: Victoria Norman, TESA Project Team
Last updated: 30-07-07
Page 59 of 69
Claim Editor User Guide
Offer Details
Offer Details
When you are drafting a claim, you may wish to refer to the offer details held on
TESA for the project/action plan.
1. Click on the Offer Details tab
Formatted: Numbered + Level: 1 +
Numbering Style: 1, 2, 3, … + Start
at: 1 + Alignment: Left + Aligned at:
18 pt + Tab after: 36 pt + Indent at:
36 pt
2. The Cover Sheet screen displays.
Formatted: Numbered + Level: 1 +
Numbering Style: 1, 2, 3, … + Start
at: 1 + Alignment: Left + Aligned at:
18 pt + Tab after: 36 pt + Indent at:
36 pt
Claim Editor User Guide: Version 6
Document Owner: Victoria Norman, TESA Project Team
Last updated: 30-07-07
Page 60 of 69
Claim Editor User Guide
Offer Details
Cover Sheet
To display this screen
This is the first page to display when you click on the offer details tab. You can
redisplay this page at any point when reviewing the pages of the offer by clicking the
Cover Sheet link in the Steps navigation pane.
About this screen
This screen shows the history of the project/action plan from its earliest to its latest
state on TESA. The most recent status displays at the top.
The project/action
plan history is
displayed here. The
most recent status is
listed at the top.
From this screen, use the Steps navigation pane or click on the Next Step button to
move through the pages and view the offer details.
Claim Editor User Guide: Version 6
Document Owner: Victoria Norman, TESA Project Team
Last updated: 30-07-07
Page 61 of 69
Claim Editor User Guide
Offer Details
View Contractual Documents
To display this screen
Click either the Next Step button at the bottom of the Cover Sheet screen, or the
Contractual Documents link in the Steps navigation pane.
About this screen
This screen allows you to view a Word version of either the offer letter, in the case
of projects that have been contracted via TESA and have not yet had a contract
variation, or the latest contract revision where the contractual details of the project
have been amended on TESA. This facility is not available for projects migrated
onto TESA that have not had a contract variation, or for action plans as the offer is a
hard copy letter stored outside the system.
Click on the
link to open the
offer or
contract
variation letter.
1. Click on the Contract Variation (or Offer) link to view the letter in Word.
Note: If you do not use Word as your word processing application, first click on the
Install Word Viewer 2003 link.
2. The document opens. You may save or print the letter if you need to.
3. Close the Word document. The Contractual Documents redisplays.
Formatted: Numbered + Level: 1 +
Numbering Style: 1, 2, 3, … + Start
at: 1 + Alignment: Left + Aligned at:
18 pt + Tab after: 36 pt + Indent at:
36 pt
Formatted: Numbered + Level: 1 +
Numbering Style: 1, 2, 3, … + Start
at: 1 + Alignment: Left + Aligned at:
18 pt + Tab after: 36 pt + Indent at:
36 pt
Formatted: Numbered + Level: 1 +
Numbering Style: 1, 2, 3, … + Start
at: 1 + Alignment: Left + Aligned at:
18 pt + Tab after: 36 pt + Indent at:
36 pt
Claim Editor User Guide: Version 6
Document Owner: Victoria Norman, TESA Project Team
Last updated: 30-07-07
Page 62 of 69
Claim Editor User Guide
Offer Details
Project and Applicant Details
To display this screen
Click either the Next Step button at the bottom of the Offer Letter page, or on the
Project and Applicant Details link in the Steps navigation pane.
About this screen
This screen shows the headline project and applicant details that appear on the
offer.
Claim Editor User Guide: Version 6
Document Owner: Victoria Norman, TESA Project Team
Last updated: 30-07-07
Page 63 of 69
Claim Editor User Guide
Offer Details
Claim Schedule
To display this screen
Click either the Next Step button at the bottom of the Project and Applicant Details
page, or on the Claim Schedule link in the Steps navigation pane.
About this screen
This screen displays the contractually agreed claim schedule for the project/action
plan.
Claim Editor User Guide: Version 6
Document Owner: Victoria Norman, TESA Project Team
Last updated: 30-07-07
Page 64 of 69
Claim Editor User Guide
Offer Details
Targets
To display this screen
Click either the Next Step button at the bottom of the Claim Schedule page, or on
the Targets link in the Steps navigation pane.
About this screen
This screen summarises the annual outputs that the project/action plan is contracted
to deliver, by measure, across its lifetime.
Claim Editor User Guide: Version 6
Document Owner: Victoria Norman, TESA Project Team
Last updated: 30-07-07
Page 65 of 69
Claim Editor User Guide
Offer Details
Costs Profile
To display this screen
Click either the Next Step button at the bottom of the Targets page, or on the Costs
Profile link in the Steps navigation pane.
About this screen
This screen shows the amount that the project/action plan is contracted to spend
each year, broken down by Capital and Revenue eligible expenditure categories
and profiled across its lifetime.
Claim Editor User Guide: Version 6
Document Owner: Victoria Norman, TESA Project Team
Last updated: 30-07-07
Page 66 of 69
Claim Editor User Guide
Offer Details
Yearly Funding Profile
To display this screen
Click either the Next Step button at the bottom of the Costs Profile page, or on the
Yearly Funding Profile link in the Steps navigation pane.
About this screen
This screen shows the sources of funds that the project/action plan will draw upon to
cover its planned expenditure profiled by year across the lifetime. As well as public,
private and voluntary match funding sources, it also displays the ERDF contribution
and any anticipated income. The funding profile is contractually agreed between the
GO and the project/action plan and any changes to the match funding component
must be reported on the claim.
Claim Editor User Guide: Version 6
Document Owner: Victoria Norman, TESA Project Team
Last updated: 30-07-07
Page 67 of 69
Claim Editor User Guide
Offer Details
Quarterly Funding Profile
To display this screen
Click either the Next Step button at the bottom of the Yearly Funding Profile page,
or on the Quarterly Funding Profile link in the Steps navigation pane.
About this screen
This screen shows the same information as the Yearly Funding Profile broken down
by quarter. The ratio of any quarterly ERDF value (capital or revenue) and the total
(capital or revenue) expenditure for that quarter determines the quarterly (capital or
revenue) intervention rate.
In TESA, intervention rates may vary from one quarter to the next as long as they do
not exceed the programme level intervention rate (50% for Objective 2 and 75% for
Objective 1 programmes) and stay in line with the overall measure intervention rate.
The quarterly profile is not displayed on the offer letter; only the yearly totals have
contractual significance.
Claim Editor User Guide: Version 6
Document Owner: Victoria Norman, TESA Project Team
Last updated: 30-07-07
Page 68 of 69
Claim Editor User Guide
Terms and Conditions
To display this screen
Click either the Next Step button at the bottom of the Quarterly Funding Profile
page, or on the Terms and Conditions of Offer link in the Steps navigation pane.
About this screen
This screen shows miscellaneous items that appear on the offer, including the
retention rate, and any offer conditions and the date by which they should be
fulfilled.
Claim Editor User Guide: Version 6
Document Owner: Victoria Norman, TESA Project Team
Last updated: 30-07-07
Page 69 of 69