1
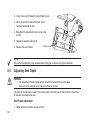
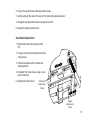
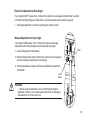
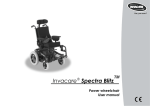
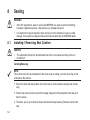
8
Seating
WARNING
8.1
•
After ANY adjustments, repair or service and BEFORE use, make sure that all attaching
hardware is tightened securely - otherwise injury or damage may result.
•
It is important for regular inspection to be carried out on the Armrests for signs of visible
damage. If any repairs are required, these should be carried out by an INVACARE dealer.
Installing / Removing Seat Cushion
CAUTION:
•
This adjustment should only be made when the chair is unoccupied and the joystick unit
switched off.
Installing/Removing
NOTE:
The cushion inner may be removed from the nylon cover by sliding it out from cover flap on the
underside of the cushion.
1. Ensure the hook and loop fastener strip on the seat is visible (remove covering strip if necessary).
2. Position the cushion on the seat with the wedge shape end at the wheelchair front and push
down to secure.
3. To remove, pull up on cushion to release the hook and loop fastening. Remove cushion from
seat.
54
8.2
Lapbelt
WARNING
•
The standard lapbelt is NOT intended to be used as a vehicle seat belt.
A lapbelt is provided for use while seated in the power chair. INVACARE recommends that you keep
the lapbelt fastened at all times while seated in the chair. Buckles are fitted to each side of the belt
to allow for size adjustment.
8.3
Adjusting Seat Width
WARNING
• This adjustment should only be performed when the wheelchair is unoccupied.
• Take care not to damage any accessories fitted to the seat.
The seat can be adjusted in width. This can be useful if another type of seat cushion is to be fitted,
or to better accomodate the user.
WARNING
• Before making the following adjustments ensure that the backpost support bracket
adjustment screws are loose (see section 7.3), and the backboard is removed (see section 7.2).
• Failure to follow the above may result in damage to your Sectra BlitzTM seat.
1. Remove the seat cushion (see section 8.1).
55
2. Using a hex wrench loosen the adjustment screws .
3. Gently pull/push the side of the seat, until it
reaches the desired position.
4. Re-tighten the adjustment screws using a hex
wrench
5. Repeat for opposite side of chair.
6. Replace the seat cushion
Set Screw
NOTE:
Ensure the backboard is firmly secured before fitting the cushion or using the wheelchair.
8.4
Adjusting Seat Depth
WARNING
• This adjustment should only be performed when the wheelchair is unoccupied.
• Take care not to damage any accessories fitted to the seat.
The seat can be adjusted in depth. This can be useful if another type of seat cushion is to be fitted,
or to better accomodate the user.
Seat Frame Adjustment
1. Remove the seat cushion (see section 8.1).
56
2. Using a hex wrench loosen the adjustment screws.
3. Gently pull/push the side of the seat until it reaches the desired position.
4. Re-tighten the adjustment screws using a hex wrench.
5. Repeat for opposite side of chair.
Seat Board Adjustment
1. Remove the seat cushion (see section
8.1).
2. Using a cross point screwdriver loosen the
fixing screws.
3. Slide the seatboard until it reaches the
desired position.
4. Re-tighten the fixing screws using a cross
point screwdriver.
5. Replace the seat cushion.
Seatboard
Adjustment
Screw
Legrest
Adjustment
Screw
57
8.5
Installing / Removing Seat board
WARNING
• This adjustment should only be performed when the wheelchair is unoccupied.
• Take care not to damage any accessories fitted to the seat board.
The seat board can be removed from the wheelchair seat frame.
1. Remove the seat cushion (see section 8.1).
2. Remove the four fixing screws using a cross point screwdriver.
3. Install / Remove the seat board (if installing ensure that the holes on the under side of the seat
board are alligned with the slots in the seat frame).
4. Replace and tighten the four fixing screws using a cross point screwdriver.
NOTE:
Ensure the seat board is firmly secured before fitting the cushion or using the wheelchair.
8.6
Adjusting Seat Angle
WARNING
• This adjustment should only be performed when the wheelchair is on a flat, and horizontal
surace. Under no circumstances should this adjustment be made while the chair is in motion,
obstical climbing or stionary on a slope.
58
Electrical Adjustment of Seat Angle
If your Spectra BlitzTM power chair is fitted with an electrical seat angle adjustment refer to section
12 Controls and Operating your Powerchair or see the seperate control system user guide
1. Seat angle adjustment is made by operating the control system.
Manual Adjustment of Seat Angle
If your Spectra Blitz power chair is fitted with a manual seat angle
adjustment refer to the following to set the required seat angle:
1. Loosen the adjustment handwheel
Collar
2. Rotate the adjustment collar clockwise to increase the seat angle or
counter clockwise to decrease the seat angle
3. Once the desired seat angle is achieved re-tighten the adjustment
hand wheel
Hand
wheel
WARNING
• Before using the wheelchair, ensure that the hand wheel is
tightened. Failure to do so could cause bodily harm or damage to
the wheelchair or those around you.
59