1
RTM-T User Guide
D-TACQ Solutions Ltd
RTM-T User Guide
Prepared By: Peter Milne
Date:
Rev 7
11 December 2011
Page 1 of 35
Date: 01 June 2012
RTM-T User Guide
Rev
D-TACQ Solutions Ltd
Date
Description
1
20110105
Init.rtm
2
20110601
Updated to include ACQ-FIBER-HBA
3
20110701
updates
4
20110803
Simplify networking with hosts
5
20110929
Updates, validation.
6
20111211
Improved build procedure.
7
20120601
Rtm-t-flash updated
Rev 7
Page 2 of 35
Date: 01 June 2012
RTM-T User Guide
D-TACQ Solutions Ltd
Table of Contents
1 Introduction.....................................................................................................6
1.1 Advantages PCI-Express on Cable 1x....................................................6
1.2 Advantages of Fiber SFP connection......................................................6
1.3 Intended Audience...................................................................................6
1.4 Scope.......................................................................................................6
1.5 Glossary...................................................................................................6
1.6 References..............................................................................................7
1.7 Notation...................................................................................................7
2 Theory of Operation........................................................................................8
2.1 Logical Interfaces on PCI-Express Cable Link:.......................................9
2.2 Streaming DMA Sequence....................................................................10
2.3 Control Channel.....................................................................................11
2.4 Digital Signaling Channel.......................................................................11
2.5 Comparison with previous htstream capability......................................11
2.6 Low Latency Control capability..............................................................12
3 ACQ196CPCI Full Rate Streaming Example................................................13
3.1 Turnkey operation: ................................................................................13
3.1.1 Setting up the turnkey example.....................................................14
3.2 Streaming capture with complete control by HOST..............................15
3.2.1 Pre-requisite...................................................................................15
3.2.2 Host Side control............................................................................15
4 Streaming Process Options..........................................................................16
4.1 Script to Demux one block per cycle:....................................................16
4.2 Data Validation......................................................................................17
5 Installation.....................................................................................................18
5.1 Pre-requisites........................................................................................18
5.1.1 ACQ196CPCI-96-250....................................................................18
5.1.2 Firmware........................................................................................18
5.1.3 Console comms link.......................................................................18
5.1.4 Host Computer...............................................................................18
5.1.5 PCIe x1 HBA..................................................................................18
5.1.6 Host Software................................................................................19
5.2 Build and install host-side software.......................................................20
5.2.1 Recommended user ......................................................................20
5.2.2 Automated install available from web site.....................................20
5.2.3 Driver..............................................................................................20
5.2.4 Use of modprobe and hotplug services.........................................20
5.2.5 Private Backplane Communications Network................................21
5.2.6 Driver Parameters..........................................................................22
5.2.7 Driver Knobs and Data devicefiles:................................................22
5.2.8 Control Knobs:................................................................................23
5.3 API.........................................................................................................23
5.3.1 Link to acqcmd, acq2sh.................................................................24
5.3.2 Slot Numbering Convention N........................................................24
5.3.3 Host lookup on private back-plane network:..................................24
5.3.4 Applications....................................................................................24
Rev 7
Page 3 of 35
Date: 01 June 2012
RTM-T User Guide
D-TACQ Solutions Ltd
5.3.5 Using the DIO Signaling.................................................................25
5.4 Recommended Utilities..........................................................................25
6 MDSplus segmented data............................................................................26
6.1 Post Shot...............................................................................................26
6.2 Live MDS Data Store............................................................................26
6.2.1 xterm 1: Setup and stream.............................................................26
6.2.2 xterm 2: Control the capture..........................................................27
6.2.3 xterm 3: Monitor job.......................................................................27
6.2.4 xterm 4: Monitor Backlog...............................................................27
7 Appendix: Boot sequence.............................................................................28
8 Appendix: Fault finding sequence................................................................29
8.1 Can Linux see the device?:...................................................................29
8.2 Did the device driver load?....................................................................29
8.3 Did the hotplug scripts execute?...........................................................29
8.4 Are the remote devices working?..........................................................30
8.5 Did Interrupt assignment succeed?.......................................................30
8.6 Did UART assignment succeed?..........................................................30
8.7 Did Private backplane network configuration succeed?.......................30
9 Firmware Update..........................................................................................31
9.1 RTM-T....................................................................................................31
9.2 Storing multiple FPGA images on ACQ196 card..................................31
9.3 ACQ-FIBER-HBA..................................................................................32
10 Appendix : turnkey two card example........................................................33
10.1 xterm 1:................................................................................................33
10.2 xterm 2:................................................................................................33
10.3 xterm 3:................................................................................................33
10.4 xterm 4:................................................................................................33
11 Appendix: Fiber-optic channel diagnostics.................................................34
11.1 Link Layer Diagnostic..........................................................................34
11.2 Physical Layer Diagnostic...................................................................34
12 Current restrictions.....................................................................................35
12.1 Running with Linux 2.6.18 :.................................................................35
12.2 Running with Linux 2.6.30+ :...............................................................35
Rev 7
Page 4 of 35
Date: 01 June 2012
RTM-T User Guide
D-TACQ Solutions Ltd
Copyright and Attribution.
Document created using OpenOffice.Org www.openoffice.org.
This document and D-TACQ Software comprising platform Linux port, Linux
kernel modules and most applications are released under GNU GPL/FDL:
Document:
Copyright (c) 2004-10 Peter Milne, D-TACQ Solutions Ltd.
Permission is granted to copy, distribute and/or modify this
document under the terms of the GNU Free Documentation
License, Version 1.2, with no Invariant Sections, no Front-Cover
Texts, and no Back-Cover Texts.
Software:
Copyright (C) 2004-10 Peter Milne, D-TACQ Solutions Ltd.
This program is free software; you can redistribute it and/or
modify it under the terms of the GNU General Public License
version 2 as published by the Free Software Foundation.
This program is distributed in the hope that it will be useful, but
WITHOUT ANY WARRANTY; without even the implied warranty of
MERCHANTABILITY or FITNESS FOR A PARTICULAR PURPOSE. See
the GNU General Public License for more details.
You should have received a copy of the GNU General Public
License along with this program; if not, write to the Free Software
Foundation, Inc., 59 Temple Place, Suite 330, Boston, MA 021111307 USA
Rev 7
Page 5 of 35
Date: 01 June 2012
RTM-T User Guide
D-TACQ Solutions Ltd
1 Introduction
RTM-T [1] links existing ACQ1xx series cards to fast serial links,
•
PCI-Express on cable 1x
•
Fiber SFP.
1.1 Advantages PCI-Express on Cable 1x
1. Streams full rate data (up to 200MB/s).
2. Scalable – one link per card. (32, 64 or 96 channels).
3. Low cost – the PCI-1x cable, available in lengths up to 15m. A selection of
compatible third-party 1- and 2- port Host Bus Adapters is commonly
available.
1.2 Advantages of Fiber SFP connection.
1. Fiber-optic allows data transmission over longer distances (up to 1km)
2. Provides electrical isolation
3. Uses ACQ-FIBER-HBA, a host bus adapter available from D-TACQ.
4. Maximum compatibility with PCI-Express link (same drivers).
1.3 Intended Audience
End users who require continuous full-rate data streaming
1.4 Scope
Covers driver installation and example applications using the PCI-Express on cable
interface of RTM-T. Other interfaces SFP, E1000 and DSP functionality will be
covered in detail in a future release.
We assume that the user has already installed or is familiar with ACQ196CPCI or
ACQ132CPCI digitizer, basic operation and connectivity as described in 2GUG [3],
and has previously installed RTM-T following the RTM-T Installation Guide [2].
This document refers to ACQ196CPCI throughout, but the discussion applies
equally well to ACQ132CPCI and ACQ164CPCI. Please note that ACQ132CPCI
requires a factory modification to work with RTM-T. RTM-T will also work with
AO32CPCI.
1.5 Glossary
•
PBI: Local bus on ACQ196/ACQ132
•
Host : Host Computer sequences the capture and receives the data.
Rev 7
Page 6 of 35
Date: 01 June 2012
RTM-T User Guide
D-TACQ Solutions Ltd
1.6 References
1. RTM-T Data Sheet RTM-T-ds-v1.1.pdf
http://www.d-tacq.com/pdfs/RTM-T-ds-v1.1.pdf
2. RTM-T Installation Guide Rev 1.0
http://www.d-tacq.com/resources/InstallationGuides/d-tacq-RTM-T-InstallationGuide-v1p0.pdf
3. D-TACQ 2G User Guide 2GUG -
http://www.d-tacq.com/resources/D-Tacq_2G_UserGuide.pdf
4. KST Plot Tool http://kst-plot.kde.org/
1.7 Notation
: indicates name of a program (command)
•
command
•
preformatted text
•
Defined Term : some term or acronym specific to this domain (perhaps
referenced in the glossary)
•
N refers to Slot Number
Rev 7
: literal input or output from terminal session.
Page 7 of 35
Date: 01 June 2012
RTM-T User Guide
D-TACQ Solutions Ltd
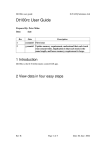
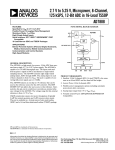
2 Theory of Operation.
RTM-T features a Xilinx Spartan 6 LXT FPGA [S6] . This FPGA was selected
because it combines gigabit serial links in a low cost device. The FPGA takes over
the ACQ196/ACQ132 processor local bus [PBI] and masters data transfers from the
existing front-side system FPGA. Data is buffered inside the S6 and then transferred
by bus master DMA to the Host computer.
Use Case: ACQ196CPCI, Stream Data at 96ch x 500kSPS
J5
SFP Fiber
S6
LXT
J3
ACQ196
A
100MB/s
E1000
DRAM
S3
J1
The FPGA to FPGA bus transfer is able to use the local bus (32 bit, 66MHz) very
efficiently, and so data transfer at the maximum rate of the ADC devices is attained
on ACQ196CPCI (500kHz), and up to 200MB/s on ACQ132CPCI (faster than the
default local cpu configuration).
Rev 7
Page 8 of 35
Date: 01 June 2012
RTM-T User Guide
D-TACQ Solutions Ltd
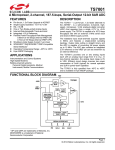
2.1 Logical Interfaces on PCI-Express Cable Link:
RTM-T
Data Flow: to 200MB/s
DMAC
DIO6
Digital Signaling
UART
Private
IP Network
Host Computer
The device interface provides two logical channels over the same physical link:
•
Data Channel: a very high performance streaming DMA system.
•
Control Channel: implements a one megabit serial line IP link
•
Register access, primarily to control DIO signaling lines on the RTM.
During capture, ACQ196CPCI fakes a regular capture to local memory. So all the
normal command and monitoring facilities normally available in transient capture
are still available.
Rev 7
Page 9 of 35
Date: 01 June 2012
RTM-T User Guide
D-TACQ Solutions Ltd
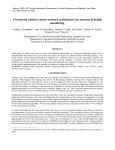
2.2 Streaming DMA Sequence
ACQ196
RTM-T
ACQ196
DATA
FIFO
3
DMAC
Host Buffer
DESCRIPTOR
FIFO
4
Host Buffer
Host Buffer
2
Host Buffer
Host Buffer
1
ISR
Feed
Host Buffer
Host Buffer
Host Buffer
Host Buffer
5
Host app
rtm-t-stream
Host Computer
Disk
Rev 7
Page 10 of 35
Date: 01 June 2012
RTM-T User Guide
D-TACQ Solutions Ltd
1. HOST device driver allocates nbuffers_fifo fixed DMA buffers each length
buffer_len in host RAM. Each buffer is represented by a descriptor. The
device driver feeds the descriptors to RTM-T.
2. RTM-T maintains a hardware FIFO queue of descriptors for the DMAC.
3. After capture has started, the DMAC copies data from the ACQ196 DATA
FIFO, pulls the next descriptor from the FIFO and sends the data to the
corresponding Host Buffer using bus master DMA.
4. The DMAC sends an interrupt to the Host, the Host ISR refills the Descriptor
FIFO queue and signals a host application that data is waiting.
5. The host app, for example rtm-t-stream reads newly filled host buffers,
perhaps archives the data to disk and recycles the host buffers.
The free flow nature of this system achieves extremely high performance without
needing hard real time behaviour from the host OS, since, provided the Descriptor
FIFO queue is properly maintained, the DMAC never blocks. It doesn't matter if the
ISR misses one incoming interrupt, the interrupts are sent for each buffer without
acknowledgment, and ISR (or, more correctly, an associated work-function) will
deal with all available buffers in a batch. There is sufficient buffering in the FPGA
data FIFO to avoid overflow if the outbound DMA is blocked for any reason
(perhaps bus contention in the HOST).
Default buffer_length is 1MB, and the default number of buffers is 66; this equates
to 500msec of available buffer when running at a typical maximum rate of 128MB/s.
2.3 Control Channel
The Control Channel provides a private back-plane network. ACQ196CPCI is
designed to run as a networked appliance, and the private network allows complete
control of the ACQ196CPCI without the need for an Ethernet connection. The data
rate (~1 mb/sec), and the technology (CSLIP, used in dial up networking), may seem
old and slow, but actually for a control interface, this is more than adequate, note
that the control channel runs in parallel with the data channel as it runs at
100MByte/s +.
2.4 Digital Signaling Channel
The Host device driver maps 6DIO bits on the RTM-T using the familiar D-TACQ
DIO interface. These bits can be routed via the RIO port onto the ACQ196CPCI
FPGA and/or PXI back-plane.
2.5 Comparison with previous htstream capability.
allowed streaming data to the CPCI back-plane. However, maximum
rate was limited, as was reliability. RTM-T allows the ACQ196CPCI front-side card
to operate to the peak of its performance. Reliability has been confirmed over weeks
of continuous operation.
Htstream
Rev 7
Page 11 of 35
Date: 01 June 2012
RTM-T User Guide
D-TACQ Solutions Ltd
2.6 Low Latency Control capability
RTM-T also supports the Low Latency control feature offered by ACQ196CPCI on
the PCI backplane. Latency from AI CLK to data in host memory is reduced from
around 10usec to 5usec.
The Low Latency control feature is also supported by AO32CPCI/RTM-T.
Rev 7
Page 12 of 35
Date: 01 June 2012
RTM-T User Guide
D-TACQ Solutions Ltd
3 ACQ196CPCI Full Rate Streaming Example
NB: there are many ways to sequence this capture ....
Here we demonstrate streaming ACQ196CPCI data at full -rate :
•
96 channels * 500kSPS/channel, 96MB/s.
•
ACQ196 boots with a turnkey configuration,
•
Clock : default Internal 500kHz
•
GATE : control line from HOST
•
TRIG : trigger pulse from HOST or front panel LEMO.
First follow install software following [5] Then we recommend running the simplest
possible scenario - Host Side control [3.2.2].
3.1 Turnkey operation:
ACQ196CPCI is configured with a turnkey boot script, to control the same capture
each time from power up. If required, the script may be modified by editing from the
system console. The capture is then sequenced by digital IO lines, either under
control from the Host or from an external trigger. The turnkey boot script allows for
repeated captures as follows:
GATE
TRIG
STOP
ARM
RUN
STOP ARM RUN
Default: GATE is d4, controlled by the Host, TRIG is d3, front panel LEMO.
The STOP, ARM phases will each complete in under 1s. The TRIG pulse is handled
by the normal capture hardware, minimum width 2usec. The RUN phase can be
anything from 10s to infinity, 3600s typical.
Rev 7
Page 13 of 35
Date: 01 June 2012
RTM-T User Guide
D-TACQ Solutions Ltd
3.1.1 Setting up the turnkey example
1. Enable RTM-T=YES in /ffs/rc.local.options
(either using the console or from RTM1, before fitting RTM-T)
2. Copy turnkey boot scripts: NB: overwrites /ffs/user/rc.user
scp acq-scripts/* root@$rtm-tN:/ffs/user
3. Reboot HOST and ACQ196CPCI.
4. Set up a monitor on ACQ196. Eg
ssh dt100@$rtm-tN statemon
5. Start a streaming process:
stream-to-ramdisk N
6. Arm and then run the capture.
set.rtm-t dio_bit 4 1
# ACQ196 transitions to ARM
set.rtm-t dio_bit 3 1
set.rtm-t dio_bit 3 0
# ACQ196 transitions to RUN
7. Monitor the capture
ls -l /mnt/disk
inotifywait -m /mnt/disk
8. Stop the capure:
set.rtm-t dio_bit 4 0
Optionally, this turnkey capture can be triggered from LEMO in the normal way –
reivew the script /ffs/auto-run. In addition, one card can be used to GATE and
TRIGGER all other cards in the chassis.
Rev 7
Page 14 of 35
Date: 01 June 2012
RTM-T User Guide
D-TACQ Solutions Ltd
3.2 Streaming capture with complete control by HOST.
Since the private backplane network connects ACQ196CPCI to TCP/IP, and of the
well know control methods can be used –
eg acqcmd (over ip), pexpect (python expect over ip), API, dt100rc.
Example uses acqcmd
3.2.1 Pre-requisite
Enable RTM-T=YES in /ffs/rc.local.options and reboot.
(either using the console or from RTM1, before fitting RTM-T)
3.2.2 Host Side control.
NB: substitute the value of SLOT. In a one-card system, the value of SLOT is 100.
1. Set up a monitor, eg:
connect-statemon SLOT
2. Start a streaming process:
stream-to-ramdisk SLOT
3. Configure the capture.
single-uut-rio-trigger
trigger>
4. Trigger
Hit <RETURN> to trigger
stop>
5. Stop
Hit <RETURN> to stop.
Rev 7
Page 15 of 35
Date: 01 June 2012
RTM-T User Guide
D-TACQ Solutions Ltd
4 Streaming Process Options.
Two example streaming data programs are included with the driver:
creates a series of fixed size files on the host computer, and
the fixed files overwrite cyclically. It's then the responsibility of downstream user
application software to consume the data before it is overwritten. The files match the
driver host buffers, so given the default setting of 66 buffers each 1MB long, 66 files
are created and they are overwritten approximately every 0.6s when capturing data
96 channels, 500kSPS/channel.
stream-to-ramdisk
creates a series of files, no data is overwritten. We used an
80Gb flash-disk, and ran the system until the disk was full. We suggest this is the
ideal way to capture long-shot data – we think of it as like having an ACQ196CPCI
card with 80GB of RAM. After the shot, the data should be spooled off from the
flash disk to main rotating disk storage. This means that equipment in the plant
control room is all solid state, while the mass storage is safely maintained in the data
centre.
stream-to-flashdisk
Note that these files contain raw data in [sample][channel] order, while most data
archive systems will save data per channel as a time-series channel[sample] order.
The incoming data rate is such that it may not be feasible to transform all the data in
real time. The strategy then should be to store the raw data on disk, and to transform
after the shot.
However, it's always possible to transform and plot some of the captured data and
D-TACQ can demonstrate this as follows.
4.1 Script to Demux one block per cycle:
#!/bin/bash
export PATH=$PATH:~dt100/bin
SRC=0.00
RAW=/mnt/disk/000000
TMP=/mnt/disk
while [ 1 ]; do
inotifywait -q -e close $RAW/$SRC
cp $RAW/$SRC $TMP
acq_demux -a acq196.def -O $TMP/ $TMP/$SRC
done
/mnt/disk was exported as an NFS directory and plotted using KST on another
desktop.
Rev 7
Page 16 of 35
Date: 01 June 2012
RTM-T User Guide
D-TACQ Solutions Ltd
4.2 Data Validation
ACQ196 includes a test mode, generating a digital ramp on 32 channels. A live data
validation program tests the ramp. Please note, you will need a powerful computer
to run this progam at full speed, and it may be necessary to clock the ACQ196 at
lower speed.
1. Start a streaming process:
stream-to-ramdisk-checkramp SLOT.
2. Start the capture as before
single-uut-rio-trigger
trigger>
3. Appearance at run time.
If there are no errors, there is nothing to see. However, running top shows the
processes at work. This is good use of SMP.
PID USER
4483 root
4482 root
4481 root
PR
18
18
15
NI VIRT RES SHR S %CPU %MEM COMMAND
0 1608 292 236 S 66.6 0.0 checkramp
0 3664 404 340 S 65.6 0.0 hbsplit
0 70540 1084 960 S 10.6 0.1 rtm-t-stream-disk
4. To force an error
change this line in stream-to-ramdisk-checkramp, before running:
-acqcmd -s $SLOT set.dtacq simulate 1
+acqcmd -s $SLOT set.dtacq simulate 0
5. To clean up after the test:
acqcmd -s $SLOT set.dtacq simulate 0
Rev 7
Page 17 of 35
Date: 01 June 2012
RTM-T User Guide
D-TACQ Solutions Ltd
5 Installation.
5.1 Pre-requisites
5.1.1 ACQ196CPCI-96-250
RTM-T works with a 66MHz PBI, used on all models other than
ACQ196CPCI-96-500.
This does mean that, when streaming data on RTM-T, ACQ196CPCI-96-250 cards
upgrade from 250 to 500kHz.
RTM-T firmware compatibility with 100MHz PBI as used on ACQ196CPCI-96-500
and ACQ132CPCI is planned. Please contact D-TACQ for availability.
5.1.2 Firmware
ACQ196 should be programmed with firmware 177.2095.3422 or later.
In particular, the FPGA image must be up to date to support RTM-T comms.
It's recommended to make the firmware update using Ethernet/RTM-1 before
replacing the RTM-1 with RTM-T.
5.1.3 Console comms link.
Currently RTM-T does not support Ethernet, so it will be helpful but not essential to
use the RS232 console connection on RTM-T for initial setup. Alternatively, the
ACQ196 may be pre-configured using RTM-1/Ethernet before switching to RTM-T.
Future versions of RTM-T will support Ethernet, however it will be necessary to
load new firmware before the new Ethernet device can be used.
5.1.4 Host Computer
The only fixed requirement for the Host Computer is that it have sufficient PCIe 1x
(or 4x, 16x) slots for the HBA devices. Please note, some older Dell BIOS's failed to
enumerate a PCIe device correctly. The CPU requirement for raw data streaming is
typically low (10% per card, streaming to ramcisk, 20% streaming to disk). Please
note, live demuxing is much more resource-intensive operation. If data is to be
archived to disk, then a fast disk subsystem is required. D-TACQ actually
recommends using an SSD. An 80GB SSD can take an hour's worth of data; treat the
SSD as memory to hold one shot, and archive to disk in the data center at the end of
the shot. The Host Computer must run Linux. Please refer to 12 for current
restrictions.
5.1.5 PCIe x1 HBA
RTM-T conforms to the PCISIG standard “PCI-Express on Cable”, and a number of
Host Bus Adapters HBA exist. However, the standard is quite loose, so operation
with any HBA cannot be guaranteed. D-TACQ have successfully tested RTM-T
with the following parts:
Rev 7
Page 18 of 35
Date: 01 June 2012
RTM-T User Guide
D-TACQ Solutions Ltd
•
NI PCIe-8361 (single port)
•
NI PCIe-8362 (dual port)
•
Cable: standard Molex 74576-0003, (the NI cable is the Molex).
We use a 5m cable as standard. Operation with longer cable lengths is
possible, but will require a change to the hardware equalization settings. Please
contact D-TACQ for details.
•
•
One Stop OSS-PCIe-HIB2-x1 is a lower-cost alternative.
We've tested running 2 x ACQ196CPCI at full speed using both ports on NI-PCIe8362.
5.1.6 Host Software
The host side driver and applications are supported on Linux-i686. (32 bit)
Specifically, we've tested the driver with Centos 5.5 and Fedora 13.
The driver compiles clean on the following kernels:
Distro
Kernel
Compiles Tested
Centos 5.5/RHEL 5
2.6.18-194.26.1.el5
Yes
Yes
Fedora 13
2.6.31.9-174.fc12.i686.PAE
Yes
Yes
2.6.20-1.2948.fc6-i686
Yes
No
2.6.35.6-45.fc14.x86_64
Yes
Yes
Fedora 14
Ensure that the package net-tools is installed (supplies /sbin/slattach )
Rev 7
Page 19 of 35
Date: 01 June 2012
RTM-T User Guide
D-TACQ Solutions Ltd
5.2 Build and install host-side software.
5.2.1 Recommended user
By convention, D-TACQ recommends setting up a user dt100. Ideally dt100 has
sudo permissions
groupadd -g 1001 dt100
useradd -g dt100 -u 1000 -G wheel dt100
# give sudo permissions, uncomment line 87
visudo
86 ## Same thing without a password
87 %wheel ALL=(ALL)
NOPASSWD: ALL
5.2.2 Automated install available from web site.
If the host system has access to the Net, install may be automated. Otherwise,
download the install script and adapt.
For latest version, see:
http://www.d-tacq.com/details_page.php?prod_id=contact&page_id=3
wget http://www.d-tacq.com/swrel/rtm-t_install;chmod 777 rtm-t_install
./rtm-t_install ACQ2XX_API.201111241928.tgz rtm-t-hostdrive-1109272131.tgz
5.2.3 Driver
NB: rtm-t_install will perform these steps.
Download latest driver from
http://www.d-tacq.com/software_downloads.shtml
mkdir ~/PROJECTS;
tar xvzf rtm-t-hostdrive-yymmddHHMM.tgz
cd RTM-T/HOSTDRV
make
# make user_install installs all scripts to ~/bin
# this assumes that ~/bin exists and it is in the PATH.
make user_install
# Check Makefile for kernel version options.
sudo make install
5.2.4 Use of modprobe and hotplug services
On reboot, when the OS bus enumeration routines identify a D-TACQ RTM-T card,
the following sequence should take place automatically:
Rev 7
Page 20 of 35
Date: 01 June 2012
RTM-T User Guide
D-TACQ Solutions Ltd
loads kernel module /lib/modules/$(KRNL)/d-tacq/rtm-t.ko
•
modprobe
•
udev
•
20-rtm-t.rules
•
rtm-t.hotplug
•
/etc/init.d/rtm-t
starts backplane networking comms service.
•
/etc/rtm-t-hosts
defines rtm-t private backplane networking.
runs the rules file /etc/udev/rules.d/20-rtm-t.rules
runs /etc/hotplug.d/acqX00/rtm-t.hotplug
creates a number of device nodes, representing the userland
interface to the device driver.
By default, this uses a network 10.0.196/24; if this clashes with existing
site network assignments, please modify the file to suit local conditions.
5.2.5 Private Backplane Communications Network.
RTM-T presents a 16550-UART interface to PCI-Express. This UART is linked
internally in the FPGA with a second UART on the ACQ196 PBI, enabling a serial
communications link from the HOST to the ACQ196. The UART runs at a megabit
per second, and is configured for CSLIP point to point inter-networking. This means
that all the normal network services of ACQ196 may be used without fitting a
second network (e.g. Ethernet link). The primary purpose of this communications
link is to allow run time configuration and status monitoring of the ACQ196,
however the link may also be used, for example for configuration and firmware
upgrade on the ACQ196CPCI.
Rev 7
Page 21 of 35
Date: 01 June 2012
RTM-T User Guide
D-TACQ Solutions Ltd
5.2.6 Driver Parameters
Parameters are static values set at boot time.
File
RW
Function
/sys/module/rtm-t/parameters/..
buffer_len
R
length of each host buffer [1MB]
nbuffers
R
number of host buffers [66]
pulse_top_usec
RW
length of pulse generated by DIO
rtm_t_debug
RW
set non zero to debug
rtm_t_debug_descr
RW
set non zero to debug descriptors
rtm_t_debug_isr
RW
set non zero to debug ISR
rtm_t_debug_regs
RW
set non zero to debug regs
RX_TO
RW
timeout on read
SMOO
RE
smoothing factor for stats
stalls
R
test_mode
RW
transfer_buffers
R
number of buffers to transfer.
version
R
driver version
WORK_TO
RW
WORK TIMEOUT (dummy load)
5.2.7 Driver Knobs and Data devicefiles:
RTM-T devices are numbered in logical order 0,1....
(unfortunately it's not possible to list by slot numbers as it is with CPCI).
Device File Name
Function
/dev/rtm-t.0
First Device node – API uses this
/dev/rtm-t.0.data/
Directory of host data buffers
/dev/rtm-t.0.ctrl/
Directory of control knobs
/dev/rtm-t.0.fifo_histo.desc
Diagnostic
/dev/rtm-t.0.fifo_histo.data
Diagnostic
/dev/rtm-t.0.regs
Diagnostic
/dev/rtm-t.1
Second Device Device node .. etc
/dev/rtm-t.1.data/
Directory of host data buffers
/dev/rtm-t.1.ctrl/
Directory of control knobs
/dev/rtm-t.0.data/hb00 ..
Host Data Buffers
/dev/rtm-t.0.data/hb65 ..
Rev 7
Page 22 of 35
Date: 01 June 2012
RTM-T User Guide
D-TACQ Solutions Ltd
5.2.8 Control Knobs:
Directory: /dev/rtm-t.0.ctrl/
Set Value: DEV=N set.rtm-t KNOB VALUE
Get Value: DEV=N get.rtm-t KNOB
Important Knobs:
•
dio_bit N BITVAL
•
dio_bit_N BITVAL
•
dio :
•
dio_raw :
•
BITVAL: { 0, 1, -, P, N }
•
cable_connected
•
mboxH1, mboxH2
: mailboxes, written by Host (system only)
•
mboxQ1, mboxQ2
: mailboxes, written by ACQ196CPCI (system only)
•
job
: set get individual bit values
ascii pattern represents all 6 DIO bits
binary pattern represents all 6 DIO bits
: outputs 1 if cable is connected.
: prints current job status, can be used for a live update.
5.3 API
The private back-plane network uses an ip-aware version of the acqcmd, acq2sh
utilities.
If HOST already has the older pci/kernel device driver loaded, please rename
acqcmd to acqcmd.kdd
•
Download API version ACQ2XX_API.201101291237 or later.
•
Build at minimum acqcmd, acq2sh:
user@host
mkdir -p ~/PROJECTS/ACQ200/project
cd ~/PROJECTS/ACQ200/project
wget http://www.d-tacq.com/swrel/ACQ2XX_API.201101291237.tgz
tar xvzf ACQ2XX_API.201101291237.tgz
cd API; make rtm_t
•
Install
sudo make install_rtm_t
rtm_t:
$(patsubst %,$(EXEDIR)/%, $(CONTROL_APPS))
install_rtm_t: rtm_t
cp $(EXEDIR)/acq2sh /usr/local/bin/acq2sh.ip
cp $(EXEDIR)/acqcmd /usr/local/bin/acqcmd.ip
Rev 7
Page 23 of 35
Date: 01 June 2012
RTM-T User Guide
D-TACQ Solutions Ltd
5.3.1 Link to acqcmd, acq2sh
The RTM-T host driver provides a scripted “ acqcmd” that maps slot number to
private IP address and calls out to acq2sh.ip , acqcmd.ip as appropriate.
In otherwords, scripts using the original acqcmd, acq2sh call will run unchanged.
5.3.2 Slot Numbering Convention N
acqcmd uses the convention
SLOT >= 100 :: RTM-T connection, use logical device SLOT – 100
SLOT < 10 :: use convention kernel device SLOT
nb: dt100-hub users will be familiar with the convention:
SLOT > 10 :: hub device.
This can still be applied if necessary.
5.3.3 Host lookup on private back-plane network:
rtm-t-host SLOT
# outputs IP address
ssh root@$(rtm-t-host 101)
[1]
# connect to card “101”
When the backplane networking is made, the local /etc/hosts file is modified to add
a hostname for the new connection. Assuming the system is using /etc/hosts, then
connection to the card is follows the normal IP hostname convention:
ssh root@rtm-tN eg
ssh root@rtm-t0
[2]
This is equivalent to, but more natural than [1] so we recommend this notation.
5.3.4 Applications
returns the value of a driver knob
•
[DEV=SLOT] get.rtm-t KNOB :
•
[DEV=SLOT] set.rtm-t KNOB VALUE:
•
stream-to-flashdisk :
•
stream-to-ramdisk :
•
stream-to-ramdisk-start-stop-test :
sets the value of a driver knob
continuous streaming to physical disk
continuous streaming to ramdisk
stress test to identify any start/stop
issues.
•
Rev 7
: continuous streaming to ramdisk, aborts on
overwrite. Use with downstream data consumer process.
stream-to-elastic-store
Page 24 of 35
Date: 01 June 2012
RTM-T User Guide
D-TACQ Solutions Ltd
5.3.5 Using the DIO Signaling
RTM-T DIO6 bits may be set as inputs or outputs, and they can be connected back
to the ACQ196CPCI and/or PXI backplane using the standard ACQ196CPCI routing
commands eg
•
Software Control of ACQ196CPCI / PXI signaling line
acqcmd -b SLOT set.route d3 in rio out fpga pxi
DEV=SLOT set.rtm-t dio_bit_3 1
DEV=SLOT set.rtm-t dio_bit_3 0
•
Software monitoring of ACQ196CPCI/ PXI signaling line
acqcmd -b SLOT set.route d3 in lemo out fpga pxi rio
DEV=SLOT set.rtm-t dio_bit_3 DEV=SLOT get.rtm-t dio_bit_3
5.4 Recommended Utilities
•
inotify-tools : to monitor incoming files:
sudo yum install inotify-tools
•
kst
: to plot demux data.
http://kst-plot.kde.org/
Rev 7
Page 25 of 35
Date: 01 June 2012
RTM-T User Guide
D-TACQ Solutions Ltd
6 MDSplus segmented data
D-TACQ has a version of acq_demux that will submit data direct to MDSplus.
This will work successfully on post-shot data, as well as on real time data, to the
limit of host computer performance.
6.1 Post Shot
export PATH=$PATH:~dt100/bin
SRC=?.??
RAW=/mnt/disk/000000
TMP=/mnt/disk
TREE=mytree
FIELD=acq196_064.CH%02d
find $RAW -name $SRC | sort -n | xargs \
acq_demux-mds -a acq196.def $TREE $FIELD
6.2 Live MDS Data Store
Storing long pulse data direct to MDSplus has been achieved at
96channels x 200kSPS
The demo uses a 1GB RAMDISK for intermediate file storage and an SSD as fast
file storage. A suitable tree should be created eg using make_acqtree.
[dt100@krypton ~]# make_acqtree rtmt acq196_387,96
[dt100@krypton ~]# export rtmt_path=/mnt/flashdisk/trees/rtmt
[dt100@krypton ~]# newshot rtmt
Review the script run-live-mds, it will probably need some site-customization
We use 4 xterms, two are necessary for to host the data transfer and capture control
processes respectively, two are used for monitoring only.
6.2.1 xterm 1: Setup and stream.
Initial setup: ** ./bin/rc.local will need local customization! **
[dt100@krypton ~]# sudo ./bin/rc.local
Stream data from “card 100”. We ask for 35000 (1MB) buffers (900s).
[dt100@krypton ~]$ stream-to-elastic-store 100 35000 | run-live-mds
Rev 7
Page 26 of 35
Date: 01 June 2012
RTM-T User Guide
D-TACQ Solutions Ltd
6.2.2 xterm 2: Control the capture
Start a capture:
[dt100@krypton ~]$ CLKHZ=200000 single-uut-rio-trigger
...
trigger>
** Hit Return to Trigger **
stop> ** Hit Return to Stop (if required).
6.2.3 xterm 3: Monitor job
Monitor shot progress
[dt100@krypton ~]$ forsleep cat /dev/rtm-t.0.ctrl/job
dev=rtm-t.0 idx=0 demand=35000 queued=6417 rx=6351
rx_rate=34 int_rate=34 MBPS=34
BS_EMPTY=1 BS_FILLING=65 BS_FULL=0 BS_FULL_APP=0 STATUS=
ERRORS=0
demand=35000
queued=6417
rx=6351
rx_rate=34 :: receiving
int_rate=34
MBPS=34
Queue states:
BS_EMPTY=1
BS_FILLING=65
BS_FULL=0
BS_FULL_APP=0
:: 35000 buffers requested
:: so far, we have queued 6417 buffers
:: so far, we have received 6351 buffers
34 buffers / sec
:: 34 interrupts /sec
:: 34 Mega Byte /sec
:: one empty buffer waiting to be queued
:: 65 buffers are queued to be filled
:: 0 buffers are currently full [device driver]
:: 0 buffers are currently full [application]
6.2.4 xterm 4: Monitor Backlog
Monitor shot progress: shows the number of buffers held in the ramdisk / elastic
store.
[dt100@krypton ~]$ monitor-ramdisk
backlog Sat Aug 6 13:26:54 BST 2011 11
backlog Sat Aug 6 13:26:55 BST 2011 18
backlog Sat Aug 6 13:26:56 BST 2011 25
backlog Sat Aug 6 13:26:57 BST 2011 14
backlog Sat Aug 6 13:26:58 BST 2011 9
backlog Sat Aug 6 13:26:59 BST 2011 5
backlog Sat Aug 6 13:27:00 BST 2011 18
backlog Sat Aug 6 13:27:01 BST 2011 31
backlog Sat Aug 6 13:27:02 BST 2011 20
Rev 7
Page 27 of 35
Date: 01 June 2012
RTM-T User Guide
D-TACQ Solutions Ltd
7 Appendix: Boot sequence
Step
Host
1
Hardware Reset off
Acq/RTM
2
3
RTM-T FPGA Load
OS Enumerates PCI/PCIe Device Tree
... identifies RTM-T vendor/device-id
4
modprobe loads Host driver
... acq100_rtm_t.ko
5
Driver load triggers udev
... udev finds
/etc/udev/rules.d/20-rtm-t.rules
...... calls
6
/etc/hotplug.d/acqX00/rtm-t.hotplug
... creates device nodes in /dev/
7
/etc/rc.d/init.d/rtm-t
... calls /usr/local/bin/rtm-t-connect N
...... waits for mboxQ1
8
ACQ196 Boots
loads driver rtm-t.ko
writes ACQ196 SN to mboxQ1
... polls mboxH1
9
/usr/local/bin/rtm-t-connect N
... configures network, sends network
prams to mboxH1, mboxH2
ifconfig slN
10
11
Rev 7
ifconfig sl0
Ping rtm-tN
Ping host
Page 28 of 35
Date: 01 June 2012
RTM-T User Guide
D-TACQ Solutions Ltd
8 Appendix: Fault finding sequence
8.1 Can Linux see the device?:
Device: Xilinx/0007 , Subsystem d1ac:4000
14:00.0 RAM memory: Xilinx Corporation Unknown device 0007
Subsystem: Unknown device d1ac:4000
Flags: bus master, fast devsel, latency 0, IRQ 106
Memory at fdeffc00 (32-bit, non-prefetchable) [size=512]
Memory at fdeff800 (32-bit, non-prefetchable) [size=512]
Capabilities: <access denied>
15:00.0 RAM memory: Xilinx Corporation Unknown device 0007
Subsystem: Unknown device d1ac:4000
Flags: fast devsel, IRQ 114
Listing shows two devices.
8.2 Did the device driver load?
dmesg | less
tg3: eth0: Flow control is on for TX and on for RX.
rtm_t_init_module: rtm_t D-TACQ RTM-T Driver B1027 Dec 31 2010
Copyright (c) 2010 D-TACQ Solutions Ltd
ACPI: PCI Interrupt 0000:14:00.0[A] -> Link [LNEC] -> GSI 18 (level, low) -> IRQ
177
rtm_t_id: REVID :aa010005 PCIECSR:14021600
ACPI: PCI Interrupt 0000:15:00.0[A] -> Link [LNEA] -> GSI 17 (level, low) -> IRQ
185
rtm_t_id: REVID :aa010005 PCIECSR:14021600
Log shows driver sign-on and initialization message for both devices.
8.3 Did the hotplug scripts execute?
[dt100@argon ~]$ ls -l /dev/ | grep rtm | cut -c -30,46crw-rw-rw- 1 root root 253, 2 rtm-t.0
lrwxrwxrwx 1 root root
rtm-t.0.ctrl -> /sys//class/rtm-t/rtm-t.0/device
drwxrwxrwx 2 root root
13 rtm-t.0.data
crw-rw-rw- 1 root root 253, 2 rtm-t.0.fifo_histo.data
crw-rw-rw- 1 root root 253, 2 rtm-t.0.fifo_histo.desc
crw-rw-rw- 1 root root 253, 2 rtm-t.0.regs
crw-rw-rw- 1 root root 252, 2 rtm-t.1
lrwxrwxrwx 1 root root
rtm-t.1.ctrl -> /sys//class/rtm-t/rtm-t.1/device
drwxrwxrwx 2 root root
13 rtm-t.1.data
crw-rw-rw- 1 root root 252, 2 rtm-t.1.fifo_histo.data
crw-rw-rw- 1 root root 252, 2 rtm-t.1.fifo_histo.desc
crw-rw-rw- 1 root root 252, 2 rtm-t.1.regs
Rev 7
Page 29 of 35
Date: 01 June 2012
RTM-T User Guide
D-TACQ Solutions Ltd
8.4 Are the remote devices working?
[dt100@argon ~]$ hexdump /dev/rtm-t.0.regs
0000000 1600 1402 0000 0000 0005 0001 0000
0000010 0000 0000 0001 0000 55aa 55aa d485
0000020 0000 0000 0000 8000 0000 0000 0000
0000030 0000 0000 0000 0000 0000 0000 0000
0000040 0005 aa01 0001 0000 0507 0000 2810
086a
0061
0000
0000
0000
A display with all ffff values indicates a dead remote. In that case, please reboot and
retry.
8.5 Did Interrupt assignment succeed?
[dt100@argon ~]$ grep rtm /proc/interrupts
106:
0
PCI-MSI rtm-t.0
114:
0
PCI-MSI rtm-t.1
8.6 Did UART assignment succeed?
[root@neon ~]# ls -l /sys/class/rtm-t/rtm-t.?/device/tty/
total 0
drwxr-xr-x 3 root root 0 2011-01-28 17:36 ttyS1
8.7 Did Private backplane network configuration succeed?.
root@neon ~]# /sbin/ifconfig sl0
sl0
Link encap:VJ Serial Line IP
inet addr:10.0.196.200 P-t-P:10.0.196.100 Mask:255.255.255.255
UP POINTOPOINT RUNNING NOARP MULTICAST MTU:296 Metric:1
RX packets:3967679 errors:0 dropped:0 overruns:1442112 frame:0
compressed:0
TX packets:3989802 errors:0 dropped:0 overruns:879329 carrier:0
collisions:260562 compressed:0 txqueuelen:10
RX bytes:498208985 (475.1 MiB) TX bytes:348197772 (332.0 MiB)
The OS will assign sl0, sl1, sl2 etc in sequence for each card.
ping test:
ping $(rtm-t-host 100) or
ping rtm-t0
If ping fails, it can help to re-run rtm-t-connect SLOT
Rev 7
Page 30 of 35
Date: 01 June 2012
RTM-T User Guide
D-TACQ Solutions Ltd
9 Firmware Update
9.1 RTM-T.
The RTM-T FPGA firmware may be updated from ACQ196CPCI as follows.
scp images/acq196cpci_rtm_t.bit root@$rtm-tN:/tmp
ssh root@$rtm-tN md5sum /tmp/acq196cpci_rtm_t.bit
# compare with vendor supplied checksum
ssh root@$rtm-tN /extra/local/CARE/rtm-t_flash
Follow the menu prompts and check for any error messages – if there is any error,
please do not power off, but send a transcript of the session to D-TACQ and wait for
instructions.
If no errors, power cycle the CPCI crate and reboot the HOST to pick up the new
firmware.
It is necessary to power cycle (power OFF, power ON), a soft reboot will not cause
FPGA reload.
It's only necessary to update RTM-T firmware when advised by D-TACQ.
NB: the FPGA image for RTM-T is held in a discrete flash memory on RTM-T,
enabling RTM-T to boot at power up independently of the front side card. The
hardware comes out of reset and immediately loads the FPGA. This is different to
the mechanism on the ACQ196CPCI family, where the FPGA image is held in flash
memory, and the FPGA is loaded under software control after the OS has loaded.
9.2 Storing multiple FPGA images on ACQ196 card
Multiple FPGA images (eg DRUID DSP images) may be stored ACQ196CPCI nonvolatile file space, store the images in /bigffs/RTM_T_FIRMWARE/ .
The ACQ196 script /extra/local/CARE/rtm-t_flash handles this and prompts the
user accordingly. /extra/local/CARE/rtm-t_flash_compare identifies the FPGA
image that is currently programmed in the RTM-T flash memory.
Typical rtm-t_flash session:
usr/local/CARE/rtm-t_flash
Choose source image:
1: stored image: /bigffs/RTM_T_FIRMWARE/acq196cpci_rtm_t-20120509.bit
2: stored image: /bigffs/RTM_T_FIRMWARE/acq196cpci_rtm_t-rev17-dec10.bit
3: stored image: /bigffs/RTM_T_FIRMWARE/acq196cpci_rtm_t.aa010017.bit
4: stored image: /bigffs/RTM_T_FIRMWARE/acq196cpci_rtm_tem.bit
Rev 7
Page 31 of 35
Date: 01 June 2012
RTM-T User Guide
D-TACQ Solutions Ltd
9.3 ACQ-FIBER-HBA
The firmware on ACQ-FIBER-HBA may be updated direct from the HOST
computer as follows:
# stub normal driver load and reboot
# build SPI driver (see README for details,
# requires addiional linux packages
./test-scripts/load.flash_device
./test-scripts/acq-fiber-hba_flash
# Ensure new firmware file in current directory
./test-scripts/acq-fiber-hba_flash
Y
Programming /dev/mtd0 with acqfiber_hba_top.bit ?
y/N:BF:acqfiber_hba_top.bit FD:/dev/mtd0
flash_erase $FD 0 0
Erasing 64 Kibyte @ 7f0000 — 100 % complete
dd if=$BF bs=8 skip=15 of=$BF.strip
185559+0 records in
185559+0 records out
1484472 bytes (1.5 MB) copied, 1.10376 seconds, 1.3 MB/s
cp $BF.strip $FD
dd if=$FD bs=$(len $BF.strip) count=1 of=$BF.copy
len $BF.strip
1+0 records in
1+0 records out
1484472 bytes (1.5 MB) copied, 7.69712 seconds, 193 kB/s
cmp $BF.strip $BF.copy
rm $BF.*
Programming ACQ-FIBER-HBA takes 30s.
Power cycle the host to reload the firmware personality.
Rev 7
Page 32 of 35
Date: 01 June 2012
RTM-T User Guide
D-TACQ Solutions Ltd
10 Appendix : turnkey two card example
10.1 xterm 1:
Stream data from “card 100”
stream-to-ramdisk 100
none on /mnt/disk type tmpfs (rw,size=256M)
10.2 xterm 2:
Stream data from “card 101”
stream-to-ramdisk 101
10.3 xterm 3:
Start a capture:
setup-host-trigger-example 100 101
10.4 xterm 4:
Check that the process is working:
ls -l /mnt/disk/acq196_285/000000/
...
-rw-r--r-- 1 root root 1048576 Feb 16 22:52 1.64
-rw-r--r-- 1 root root
49 Feb 16 22:52 1.64.id
-rw-r--r-- 1 root root 1048576 Feb 16 22:52 1.65
-rw-r--r-- 1 root root
49 Feb 16 22:52 1.65.id
grep rtm /proc/interrupts
106:
23108
PCI-MSI
114:
23099
PCI-MSI
grep rtm /proc/interrupts
106:
23236
PCI-MSI
114:
23227
PCI-MSI
rtm-t.0, serial
rtm-t.1, serial
rtm-t.0, serial
rtm-t.1, serial
inotifywait -m -e close /mnt/disk/acq196_285/000000/1.00
Setting up watches.
Watches established.
/mnt/disk/acq196_285/000000/1.00 CLOSE_WRITE,CLOSE
/mnt/disk/acq196_285/000000/1.00 CLOSE_WRITE,CLOSE
/mnt/disk/acq196_285/000000/1.00 CLOSE_WRITE,CLOSE
/mnt/disk/acq196_285/000000/1.00 CLOSE_WRITE,CLOSE
Rev 7
Page 33 of 35
Date: 01 June 2012
RTM-T User Guide
D-TACQ Solutions Ltd
11 Appendix: Fiber-optic channel diagnostics
ACQ-FIBER-HBA allows a HOST computer to connect to a remote RTM-T using
fiber-optio cable. The cable transceiver is a plug-in SFP module. ACQ-FIBER-HBA
and RTM-T contain matching Spartan 6 FPGAs, which communicate on the fiber
using Aurora protocol. The following diagnostics are available at each end of the
link:
11.1 Link Layer Diagnostic
The FPGA provides status about the Link and SFP as follows:
get.rtm-t aurora0
0x00000063 +PRESENT HARD_ERR SOFT_ERR +CHANNEL_UP +LANE_UP
+PRESENT: SFP Present
+LANE_UP : Aurora Lane is UP
+CHANNEL_UP : Aurora Channel is UP
# in this implementation, a Channel comprises a single Lane.
# Please IGNORE HARD_ERR, SOFT_ERR
11.2 Physical Layer Diagnostic
SFP devices include condition monitoring. D-TACQ supports the
AVAGO AFBR-57R5APZ module.
avago-monitor
Temp: 30.23 C
VCC: 3.34 V
Tx Bias:1348.50 uA
Tx Power: 351.00 uW
Rx Pwr: 340.00 uW
Rev 7
Page 34 of 35
Date: 01 June 2012
RTM-T User Guide
D-TACQ Solutions Ltd
12 Current restrictions
12.1 Running with Linux 2.6.18 :
•
Tested good: i386 .
•
Untested: x86_64 untested, but believed to work.
•
SMP works well
12.2 Running with Linux 2.6.30+ :
•
Rev 7
Tested good with Centos6, 64 bit, SMP, requires RTM-T firmware rev17 or
greater.
Page 35 of 35
Date: 01 June 2012