1
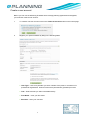
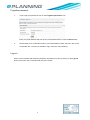
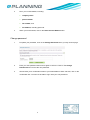
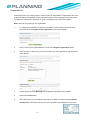
ePlanning Scotland User guide Introduction We have designed the ePlanning Scotland website to provide an efficient and supportive process for members of the public and professional services (such as architects and agents) to apply for planning permission or appeal against permission which has been refused or against conditions applied when permission is granted. The online process provides easy-to-use forms to allow you to send in planning applications and appeals online and helps you to send in the relevant form, documents and correct fee. This guide describe how to use the site. Contents (click on the subject to go straight to that heading) Create a user account 3 Log-in 5 Timeout 5 Forgotten password 6 Log-out 6 My account 7 Change password 8 Unregister 9 Sharing 10 Receiving a sharing invitation 11 Sending a sharing invitation 11 Modify proposal users 12 Organisations 14 Joining an organisation 15 Managing organisations 15 1 Contents continued (click on the subject to go straight to that heading) Proposals 17 My proposals 18 Creating a proposal 19 Address search 19 Easting and northing search 22 Map search 23 No exact address 25 Confirm planning authority 26 Name proposal 26 Select forms 27 Completing a proposal 30 Filling in a form 32 Location Plan 33 Buy the location plan 34 Attach location plan 38 Application form 39 Supporting documentation 40 Adding documents after submitting an application 42 Email notification 43 Fee 44 Payment method 45 Sending in the application 46 Deleting proposals 48 2 Create a user account Before you can use the ePlanning Scotland site to manage planning applications and appeals, you must first create a user account. 1. To create a new user account click on the Create an Account button on the Home page. 2. Register your personal details by filling in the following fields. User Type – click to say whether you are a member of the public or a member of a professional organisation. Historic Environment (Amendment) (Scotland) Act 2011 Title – Select the title you want to be addressed by. First Name – enter your first name. Surname – enter your surname. 3 3. Your log-in details are the details that you will use to access ePlanning Scotland. Email Address – enter your email address. Enter it again below to confirm that it is correct. Password – enter a password that will allow only you to access your ePlanning Scotland account. Note Passwords must be at least five characters long and must not contain spaces. Enter the password again below to confirm that it is correct. 4. Click to read the terms and conditions that apply when you use this site. When you have read them, tick the box to show that you agree to them. 5. When you have entered your personal and log-in details, click on the Save Account Details button. 6. We will send you an email to the address you entered. This provides final confirmation that you want to create an ePlanning Scotland account. When the email arrives, click on the link to be returned to the ePlanning Scotland site. 7. When you click on the link, you will be brought back to the last step of setting up your account. You will need to add your address and phone number then click Save Account Details to finish. 8. Your account is now complete and you may log in and start using it. 4 Log-in To use ePlanning Scotland, you need to log in to the site using the user name and password you provided when you created your account. 1. 2. Click on the Log-in button on the home page. Enter your user name and password, then click on the Log-in button. Timeout After a period of inactivity (usually 30 minutes), your session will automatically be logged out. To continue working, you must log in again. Once you have done that you will be returned to your My proposals page. 5 Forgotten password 1. If you forget your password, click on the Forgotten password? Link. Enter your email address and then enter a new password twice. Press the Save button 2. We will send you a confirmation email to your email address. When it arrives, click on the confirmation link. You will now be able to log in with your new password. Log-out When you are finished with ePlanning Scotland, remember to log out by clicking on the Log-out button in the menu bar on the left-hand side of the screen. 6 My account Once your account has been created it is a good idea to add further details, such as your address, which you can include in your applications. You can access the My Account page at any time to allow you to update any of your account details. 1. To access your My Account page, click on My Account in the left-hand menu bar. 2. Your personal details and Log-in details will be filled in already, but you can edit these at any time. 7 3. 4. Fill in your contact details, including: company name phone number fax number, and full address, including postcode. When you have finished, click on the Save Account Details button. Change password 1. To update your password, click on the Change Password link in your My account page. 2. Enter your new password then enter it again to confirm it. Click on the Change Password button to save the new password. 3. We will send you a confirmation email to your email address. When it arrives, click on the confirmation link. You will now be able to log in with your new password. 8 Unregister If you no longer want to use ePlanning Scotland, you can remove your details by unregistering. Note If you are an organisation administrator, you must first transfer your administrator rights to another user or delete the organisation before you can unregister your details. 1. To unregister your details, click on the Unregister link in your My account page. 2. Confirm that you want to remove your details from ePlanning Scotland by entering your password in the Confirm Password box. 3. Click on the Confirm button. 9 Sharing It is often helpful to involve other people in your proposals to receive their opinions and help. The advice of architects and planning professionals can be invaluable, while neighbours may appreciate being able to view your plans while the planning process is ongoing. You can invite other people to become ePlanning Scotland users and allow them either to view or edit your proposals, and other users can offer you the same invitation. Professional users can create groups of users from their organisation who can automatically view proposals created by other members. Receiving a sharing invitation When someone sends you an invitation to view an application, we will send you an email telling you about this. 1. Log in to ePlanning Scotland. 2. You will be asked if you want to accept or refuse the invitation. Click on Accept. 10 Sending a sharing invitation Once you have created a proposal, you can invite others to view it by going to the Proposal users section in the Proposal summary page. You may invite as many users as you like. 1. On the Proposal summary page click on Send Invitation. 2. Enter the name of the person you want to invite and then enter their email address. 3. Type a short note in the Message box to explain the purpose of the invitation. 4. Select the role that you want this user to have by choosing Viewer or Editor for User Role. 5. Click on the Invite button. 11 Modify proposal users Once you have invited people to view your application, they will be entered into the proposal’s ‘Users invited to share’ area until they either accept or refuse the invitation. The number of pending invitations is displayed in the Proposal users area of the Proposal summary. You can modify the viewing rights for users who accept the invitation, and allow some of them to edit your proposal if you want to. 1. Click on Modify Proposal Users on the Proposal Summary page. 2. To change a user’s rights from viewing to editing, select them and press Set as Editor. 3. To change a user’s rights from editing to viewing, select them and press Set as Viewer. 4. To delete a user’s ability to view your proposal, select them and press Remove user. 5. Users invited to share gives you a list of the users you have sent an invitation to but who have not yet accepted or refused. You can send a user a reminder email by selecting them in this section and clicking on the Send Reminder button. To withdraw the invitation, select the user and click on the Cancel Invitation button. 12 6. If you are a member of an organisation, your proposals will be accessible by all of your organisation’s members. These users will have one of the following roles. Primary Contact – the main user involved in the proposal. Only the Primary Contact can carry out the user roles for this proposal. If you created the proposal, this will be you unless you make another user the primary contact. Primary Contact – the main user involved in the proposal. Only the Primary Contact can carry out the user roles for this proposal. If you created the proposal, this will be you unless you make another user the primary contact. Editor – a user who can work on the proposal, editing the proposal details and filling in the attached forms. Viewer – a user who is not directly involved in completing the proposal but is allowed to view the proposal for information purposes only. 7. To make another member of your organisation the primary contact, select them and click on the Set as Primary Contact button. Note When you transfer primary contact status to another user, you will automatically lose the ability to change the user status of that proposal unless you’re the administrator of the organisation. 8. To allow a member of your organisation to edit the details of the proposal, select them and click on Set as Editor. 9. To restrict a member of your organisation to only viewing this proposal, select them and click on Set as Viewer. 13 Organisations Professional users can create groups of users, known as organisations. Organisations are used to allow members to collaborate on the proposals created by their colleagues. Generally these correspond to a business organisation or group of individuals who often work together. Note Users can only belong to one organisation. 1. To register an organisation on ePlanning Scotland, click on Sharing in the left-hand menu then click on Register a new organisation on the Sharing page. 2. Enter a name for the organisation then click on the Register Organisation button. 3. Enter the name of the person you want to invite to join the organisation, then enter their email address. 4. Type a short note in the Message box to explain the purpose of the invitation. 5. Click on the Invite button. 6. Users who have not yet accepted or refused the invitation are listed under Invitations Already Sent. Those who choose to join the organisation will disappear from this list. 14 Joining an organisation If you are invited to join an organisation, you will be sent an email. You can accept or refuse the invitation. Once you have accepted the invitation, the organisation’s details will be shown in your Sharing page and all of the proposals that belong to the members of the organisation will be available in your My proposals page. Notes You cannot remove yourself from an organisation. Only the organisation’s administrator can do that. If the organisation is deleted, all users that belong to it (except the administrator) will lose access to the proposals. Managing organisations When you create an organisation, you are automatically made the organisation’s administrator. This allows you to invite further users, remove existing users, or transfer the administrator role to another user. 1. To invite another member to the organisation, click on Invite Member and enter the name, email address and invitation message. Then press Invite. 2. To remove a user from the organisation, click on the Remove button next to their name. 3. To transfer administrator rights to another organisation member, click on Set as Admin next to their name. 15 4. Pending organisation invitations shows you the list of users you have sent an organisation invitation to but who have not yet accepted or refused. You can send a user a reminder email by clicking on Send Reminder. Or, to withdraw the invitation, click on the Remove button. 5. Pending organisation invitations shows you the list of users you have sent an organisation invitation to but who have not yet accepted or refused. You can send a user a reminder email by clicking on Send Reminder. Or, to withdraw the invitation, click on the Remove button. 6. If the organisation is no longer needed, you can delete it by clicking on Delete Organisation. When you delete an organisation, you will also be given the option of deleting the user accounts of the organisation’s members. If you delete the user accounts, the proposals that were shared by the organisation become the property of only the administrator. If you do not take this option, the proposals go back to their original owners. 16 Proposals The main purpose of ePlanning Scotland is to help you create, manage and send in planning applications and appeals. All of this is done in your My proposals area. A proposal includes a number of activities. Your My proposals area provides a number of tools to help you to work out which activities you need to do and allows you to keep track of their status until your proposal is ready to send in. Proposal activities You may need to carry out the following activities to complete your proposal. Do you need planning permission? – decide whether your proposal needs planning permission. Do you need planning permission? – decide whether your proposal needs planning permission. What is the address of the proposal? – choose which address or location the proposal refers to. Fill in appropriate forms – decide which forms you need for your proposal and fill them in. Attach location plans – decide whether you need location plans. If you do not already have access to location plans, you can buy and print them off via ePlanning Scotland. Attach supporting documents – if you need additional drawings, plans, images or reports to support your application, you can upload these and submit them with your application forms. Send in certificates – sign and send in any certificates which are needed. Pay fees – work out which fees will apply and pay the total amount. As your proposals will stay active until you send them in, you can carry out these activities at different times until your proposal is ready. Once you have submitted your application, if you find that you need to add more supporting documents, you can do this from the Proposal Summary area. 17 My proposals Your My Proposals list displays all of the proposals in which you have some involvement. 1. Under Show Proposals, click on All to display all of the proposals available to you. These will include your own proposals, as well as proposals that you have been invited to contribute to, either as a viewer or an editor. 2. Click on I manage to display only the proposals you are the primary contact for. 3. Click on I can edit to display the proposals you have been allowed to contribute to as an editor. You can sort the listed proposals in a number of ways. Proposal Name – sort alphabetically by the name of the proposals. Planning Authority – sort alphabetically by the planning authority. Primary Contact – sort alphabetically by primary contact. Proposal Reference – sort by the proposal reference. Date Started – sort by the date you made your proposals (this only applies to proposals you own). Active proposals are proposals currently in progress. When a proposal has been completed and sent in, you can delete it. You can see proposals deleted during the last 90 days in the Deleted area. 18 Creating a proposal 1. To create a new proposal click on New Proposal in the My proposals page. 2. Identify the location of the proposal site. There are four ways of doing this. Address Search – the address of the property. Easting and Northing – the easting and northing references of the proposal location. Map Search – an interactive map used to find a property when you do not know the exact address. No Exact Address – you would use this option to identify a location where you cannot find an exact address or where the development covers several addresses. What is the address of the proposal? Address Search If the address of the proposal is a building and you know the address or part of the address, you can enter that here. 1. If you know the postcode, enter it into the Postcode box and click on Postcode Search to display the search results list. 2. Or enter at least two pieces of information into the Address search fields then click on the Address Search tab. 19 3. You don’t have to enter information in every field, but the more information you supply the easier it will be to find the correct address. 4. Click the Address Search button to display the search results list. 5. Find the correct address in the list. If necessary, sort the list according to the address, the town or the postcode by clicking on the links at the top of the list. 6. If there are lots of results, you can choose how many to display on one page by clicking on a Page Size button. Move between pages by clicking on the Results Page number you need. 7. When you have found the correct address, click on its name. 8. Review the details then click on the Confirm Address button (now see Confirm planning authority). Note If you discover a minor mistake in your address details, we recommend that you complete your proposal and then email your planning authority to report the mistake. 9. If there are too many results in the list, click on the Refine Search button to return to the Address Search page and enter more information. 10. If you cannot find a match, click on the No Exact Address button. If you have a broadband connection, you can select I can use the mapping tool to use the interactive map tool to find the address (see Map search). Click on Continue. 20 11. Otherwise, select I cannot use the mapping tool and click on Continue. This allows you to contact your planning authority to get information on the address that you can use in your proposal. 12. To contact your planning authority, select Not Yet and click on Continue. Select the appropriate planning authority and use the contact details to ask for the information you need. Either click on the Return Later button to leave the proposal so that you can go back to it when you have the information, or if you get the information immediately, click on the Previous button and continue. 13. When you have the information you need, you can return to this page, click on Yes and enter the information you have been given. Click on Use as Site Location, then click on Confirm Address (now see Confirm planning authority). 21 Easting and northing search Eastings and northings are map references that you can use to point to a precise location. This search method is useful when you want to give a proposal location that does not currently have an address (for example, a plot of land). 1. If the easting and northing search fields are not displayed, click on the Easting and Northing search tab. 2. Enter the easting value (between 0 and 500000) in the Easting box. 3. Enter the northing value (between 500000 and 1300000) in the Northing box. 4. Give a brief description of the location. 5. To use these references to define the proposal location, click on Save. 6. Click on the Confirm Address button (now see Confirm planning authority). 7. To check that these references have given you the correct location, you can view it on the interactive map. Click on the Use Map button (see Map search). 22 Map search If your area of interest to the proposal is on open land, you can use the Map search feature to identify the location using an interactive map. Note This feature is only recommended if you have broadband. 1. If the interactive map is not displayed, click on the Map Search tab. 2. The interactive map contains a number of tools to help you zoom in and find the correct address. Initial map view – click this to zoom the map out to show the whole of Scotland. Zoom in – select this tool then click a point on the map that you want to zoom in to. Zoom out – select this tool then click on the map to zoom out. Pan mode – to move around the map, select this then click on the map. Keeping the mouse button pressed down, drag the cursor in the direction that you want to pan. Zoom to rectangle – to zoom in on a certain area, select this tool then click and drag the cursor to draw an area on the map. Previous view – to return to the previous view, click on this tool. 23 Next view – when you have used the Previous view tool, click on this button to go to the view that followed the one that is currently displayed. Select address – to identify a location on the map that you want to use for the proposal location, select this tool and click on the desired point on the map. If you click on a building, the address will be displayed. If you click anywhere else, only the easting and northing reference will be displayed. Eastings and northings reference – displays the easting and northing reference of the place on the map that the cursor is currently pointing at. 3. Map area – displays the dimensions of the area displayed by the map. Use these tools to find the correct property. Click on the Select Point Location for Proposal button, then click on the map to identify the property. 4. To use the exact easting and northing reference as the proposal location, click on Use this point as site location. 5. Click on Confirm Address. 24 No Exact Address If there is no postcode address for the area that your site covers, you can enter a description of a site location here. Also. if your development covers several addresses, you can use this option to describe the site area. 1. Select the No Exact Address tab and click on Continue 2. If your area of interest to the proposal is on open land, you can use the Map search feature to identify the location using an interactive map. Select I can use the Mapping Tool and click on Continue (please refer to Map search above). Note The interactive mapping tool is only recommended if you have broadband. If you do not have broadband or if your site location covers several addresses, select I cannot use the Mapping Tool and click on Continue. 3. You will need to discuss with your local planning authority and agree the description of the site location that you are going to use. Select Yes and click on Continue if you have already done this. Otherwise, select Not Yet and click on Continue. You will then be given a drop-down list of contact details for all local authorities so that you can contact them to discuss. 4. Once you have agreed a description of the site location with the local authority and selected Yes at the above stage you will be given a drop-down list of authorities. Select the authority that the site location comes under and enter your description in the box. Click on Use as Site Location. 5. You will be asked to check and confirm the description that you entered, click on Confirm Address. 25 Confirm planning authority Once you have chosen the proposal location, the appropriate planning authority will be displayed. 1. Check the planning authority that is suggested. 2. If this is correct, click on the Next button. 3. If it is not correct, please contact the relevant authority direct. You can find the authority contact details by clicking on Authority Contact Details. Name proposal You now need to name the proposal and give it a short description. 1. Enter a name for the proposal in the Proposal Name box. 2. Briefly describe the proposal in the Proposal Details box. 3. Click on Confirm Details. 26 Select forms At this stage you can choose which forms you will need to fill in and send with the application. You do not have to do this at this stage, but you may find it easier if you do. 1. From the options provided, choose one of the following and press Select. 2. Select forms using a wizard – we recommend this if you are not sure about the planning process. The ‘Which form?’ wizard leads you through a number of questions related to the nature of your proposal. Once you have answered the questions on each page, the wizard will recommend one or more forms you need to fill in with your application or appeal. The ‘Which form?’ wizard selects only the forms you need. It does not offer forms that might be suggested as possible or optional. You can access the ‘Which form?’ wizard at any time by clicking on the ‘Which form?’ wizard link in the left-hand menu bar. If you have already used the ‘Which form?’ wizard for this application, the forms you need will have already been chosen. 27 3. Select forms from a list – if you are a little more experienced with the planning process and know which forms you will need, you can choose the forms appropriate to your application direct. Once you have chosen the correct forms, click on the Add Forms button. 4. Create proposal without forms – instead of adding the forms now, you can choose to skip this step. You can then add the forms later or copy them from a previously created proposal by choosing this option. 28 Create proposal The final step in creating your proposal is to check the proposal summary and enter the proposal into your My proposals area. 1. Read carefully through the proposal summary and the list of selected forms and make sure that these are accurate. 2. If you need to make any changes, click the Previous button and step back through the process to the step that needs changing. 3. When you are happy that the proposal details are correct, click on the Create Proposal button. 29 Completing a proposal In My proposals, click on a proposal name to view its Proposal Summary. In this area you can: fill in the application forms you selected when you created the proposal add new forms or copy existing ones review forms that you have already sent in edit the proposal details edit the proposal site location invite people to view the proposal and manage their roles (see Sharing), and contact the relevant planning or appeals authority. 30 Filling in an application To send in your proposal you need to fill in all of the relevant application forms. This process may include filling in the individual forms, providing supporting material such as location plans, providing certificates, and paying fees. Application forms If you have not filled in a form fully, it will be listed in the Draft Forms section of the Proposal summary page. You can delete any draft form by clicking on the Delete button. Forms which you have completed will be listed in the Submitted Forms area. These forms are kept for up to 90 days during which you can refer to them for information or copy them for use in other applications. 90 days after you have sent a form in it will be deleted from your application. 31 Filling in a form 1. In the Draft forms area of the Proposal summary click on the name of the application to access the Application Summary page. 2. Each element of the application has a status displayed. You need to fill in each element and change all of the status indicators to ticks. Remember that you do not have to fill in an application all at once, you can log out and return to fill more of it in at a later time. 32 Location plan You have to fill in the location plan as part of your application, because it shows clearly the property that is covered by the proposal. ePlanning Scotland offers you the choice of: buying and marking up the plan online, or attaching an existing plan and sending it either by online upload or post. Note if you used the ‘No Exact Address’ tab when creating your proposal and entered a description of the location, there will not be the option here to buy a map. You will need to either attach or post in your own location plan. 1. Click on Location Plan in the Proposal summary. 2. Select whether to buy the plan online or attach an existing one. 33 Buy the location plan 1. If you are not used to making planning applications, we recommend that you buy a location plan from ePlanning Scotland, mark it up with the relevant information and attach it to your application. To do this, select Purchase Location Plan, then click on Continue. Note This opens the interactive mapping tool. (Not suitable if you don’t have broadband.) 2. The interactive map tool displays the area around the proposal location. You can adjust this using the zoom and pan tools if you like. 3. Select the map area size that you want to buy then click on the Purchase button. Use the online payment tool to buy the plan you asked for. 4. Once you have bought a map, you can use it to show the planning information relevant to your proposal. Click on Next. You will be able to: add a Site Boundary to show the proposal site show the boundaries of Adjacent ownership properties, and Review and confirm what you have added. 34 5. The process will instruct you on how to add each of the mark-up options in turn. You can use Previous or Next to navigate backward or forward through the options. If you need to leave the mark-up process without finishing it, you can click Save & Exit to save what you have done and return later. 6. Click on Start> to begin. 7. You can show the Site boundary by drawing a shape around the site on your map. 35 8. Press the Add Site Boundary button. Draw a boundary line around the property by clicking to place points on the map. The boundary line is automatically created between consecutive points. Continue, moving anticlockwise to place the corners of the site boundary (take care not to make the line cross itself). To place the last point and complete the shape, hold down the CTRL button when clicking. Note If you are using an Apple Mac, to place the last point and complete the shape, hold down the SHIFT and CMD buttons when clicking. If you want to redo the boundary, click on Delete Site Boundary then click inside the red boundary line to delete it. You can then draw the boundary again. 9. When you are finished, click on Next. 10. If you own land next to the site of the proposal, you can show this on the map as well by adding Neighbouring land. 11. You can create a neighbouring land boundary by drawing a shape around the site that is next to the proposal site. Draw a boundary line around the area by clicking to place points on the map. The boundary line is automatically created between consecutive points. Continue, moving anticlockwise to place the corners of the site boundary (take care not to make the line cross itself). To place the last point and complete the shape, hold down the CTRL button when clicking. Note If you are using a Mac, to place the last point and complete the shape, hold down the SHIFT and CMD buttons when clicking. 36 12. If you want to do the boundary again, click on Delete Neighbouring Land, then click inside the red boundary line to delete it. You can then draw the boundary again. 13. When you are happy with the boundary, Click on Next 14. When you have finished marking up the plan, you can download and review the information that you have entered to confirm that it is correct. You may find it useful to save some of this information somewhere else for future use. 15. To save a PDF copy if the marked-up map, click on the Download button. 16. When you have finished, click the Finish button. Your marked-up location plan will now be automatically attached to your proposal. You can change your location plan at any point until you have sent in your application. If you change your location plan, you must complete all steps and click the ‘Finish’ button to make sure you have created a new PDF. 37 Attach location plan 1. If you already own the location plan, you can choose to send this in by selecting Attach Location Plan on the Add location plan options page. 2. Click on whether you want to Upload an electronic copy of the location plan or Post in a hard copy. 3. To upload the plan, enter the document title and find the file. Select the paper size of the plan and what kind of document it is. It is important that these details are correct. Tick the boxes to show that you have printed the file and checked it contains the correct scale and dimension details, then click on the Upload button. 4. To show that you are going to post a hard copy of the plan, enter the document title, select the paper size of the plan and what kind of document it is. It is important that these details are correct. Tick the check box to show that you have followed these instructions, then click the Save button. 5. Once uploaded, you can view or remove a location plan by clicking on Location Plan in the Application summary. 38 Application form The application or appeal form itself has a number of different parts. You need to fill in each of these sections. Depending on the type of application, these may include the following. Main Details – the main body of the application form. Certificates of ownership – shows you the certificates of ownership you may need to provide and allows you to sign them electronically. Checklist – provides a checklist of items and activities which you need for this application before it can be completed. Declaration – allows you to review the application and sign an electronic declaration that it is accurate and a true representation of the information that you want to provide. 1. You can fill in each of these parts using a form wizard. Click on the part to open the wizard. 2. Navigate through the form using Next and Previous buttons, answering the questions (if there are ‘mandatory questions’ on the page you will not be able to go any further until you have answered these). The Progress bar at the top shows how far through the process you are. 3. You can clear the current page by clicking on the Clear Page button. 4. You don’t have to fill in part of a form all in one sitting. You can save what you have done so that you can come back to it later by clicking on Save and Exit. 39 Supporting Documentation You may want to upload or post other documents to support your application (for example, site photographs or architects’ reports). The contact details of the planning authority are provided for your information. 1. To do this, click on Supporting Documentation in the Application summary page. 40 2. Click on the Add Document Details button. 3. Enter the Document title and a short Description. 4. Browse to find the file on your PC. 5. Select the paper size of the document and select what kind of document it is. It is important that these details are correct. Tick the box to show that you have followed these instructions, then click on the Upload button. 6. If you want to record on the form that you want to post a document, select the option to post documents, then select the paper size of the document and select what kind of document it is. It is important that these details are correct. Tick the box to show that you have followed these instructions, then click on the Upload button. 7. Once documents have been uploaded or marked for posting, you can edit or delete them by entering the Supporting Documentation page again from the Application summary. 41 Adding documents after submitting an application If you find that you need to add documents after you have sent your application, or you have been asked to replace a document. you can do this from the proposal you have already created 1. In the Draft forms area of the Proposal summary click on the Add Additional Forms link and then select the option ‘Select forms from a list’. Scroll down the list, select Post Submission Additional Documents and click on Add Forms. 2. You will be returned to the Proposal summary page once you have added the Post Submission Additional Documents form, you will now have the form in the Draft forms section of the Proposal summary page. 3. Click on this form to access the Application Summary page. 4. Each element of the application has a status displayed. You need to fill in each element and change all of the status indicators to ticks. 5. Please refer to the notes in the section above on how to add supporting documents. 6. Remember that you do not have to fill in an application all at once, you can log out and return to fill more of it in at a later time. 42 Email Notification If you want to let people know when you send in this application, you can enter a list of email addresses in the Email Notification tool. 1. Click on Email Notification in the Application and appeals summary page. 2. Enter a list of email addresses in the box provided. Separate each address with a semicolon (;). 3. Tick the checkbox to send the emails, then click on the Confirm button. 4. If you do not want to send any email notices, remove the tick from Copy Notification Emails to Other Email Addresses and press Confirm. 43 Fee The Fees part lists the chargeable parts that apply to your application, helps you to work out the total due and allows you to pay online. You can use the fee calculator to work out what you need to pay. Note Not all applications or appeals have a fee. If this is the case, this option will not be present. 1. Click on Fee in the Application summary. 2. To work out the fee that you need to pay, click on Fee Calculator (this is also available direct from the left-hand menu). Or, if you already know what the fees are, you can type them into the box. 3. Follow the wizard through, answering all of the questions to arrive at the charges that apply. Click on Return to the Fees Page and you will find that the fee amount is in the Application/Appeal Fee box. 4. Click on the Confirm button. 44 Payment method In the Application summary page click on Payment Method. Choose how you want to pay the fees. Your application or appeal will not be processed until payment is received. Online – pay using a credit or debit card when you send in the application. Cheque – send a cheque to your local authority. Departmental Charge Code – for local authority departments to register an internal payment. Telephone – make a payment over the phone. Note Your planning authority may offer all or only some of these options. 45 Sending in the application 1. Once you have filled in all of the parts of the application or appeal, you have a new option to continue to the next page and send in the application. 2. Click on the Next button. Review the Submission summary page. If you are happy that the application is as you want it, click on the I Accept button and then the Submit button. 3. If you chose to pay any fees online, do this now. If you chose to pay by cheque or phone, enter the details in the Submission payment screen. 46 4. Once you have filled in the relevant sections, press Proceed. 5. If you chose to send email notices to other users, they will be sent an email now. 6. The completed Submission summary page displays all of the relevant information about your appeal or application. You can view the application in PDF format by clicking on View Form PDF (opens in a new window). 7. Your application or appeal will be kept on the system for 90 days after you send it. To keep a copy for your records, click on Download a copy of my submission and save the file to your PC. Or, you can get a printed copy of the summary by clicking on Printable Version (opens in new window) and pressing Print. 47 Deleting proposals 1. If you no longer need a proposal, you may decide to move it from the Active list in the My proposals page to the Deleted tab. This removes the proposal, but allows you to refer to it for up to 90 days after it was deleted. To do this, click on Delete Proposal in the Proposal summary page. 2. To view deleted proposals, click on the Deleted tab in the My proposals page. 3. Under Show proposals, click on All to display all of the proposals that were available to you or click on I manage to display only the proposals for which you were the primary contact. 48 4. You can sort the deleted proposals in a number of ways Proposal Name – sort alphabetically by the name of the proposals Planning Authority – sort alphabetically by the planning authority Primary Contact – sort alphabetically by the primary contact Proposal Reference – sort by the proposal reference Date Deleted – sort chronologically by the date your proposals were deleted. 5. Once a proposal has been deleted, you can return it to the Active list again by opening the proposal and clicking on Restore Proposal. 49