1
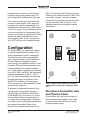
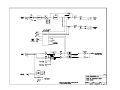
applications may benefit from selecting a
larger case that would also hold a related
headset, cables, etc. A larger case could
also be selected that would hold multiple
Model 210 units. Pelican sells their products through a dealer network, many of
which can be located via a web search.
Connecting Line-Level Inputs
The Model 210 is designed to directly
connect with “wet” broadcast IFB circuits.
However, there may be applications where
it would be helpful to also be able to connect standard line-level audio sources.
If it’s anticipated that line-level audio
sources will frequently need to be connected to the Model 210, one or two
line input cards can be installed. These
cards, available from Studio Technologies
and purchased separately (part number
31084), are mounted into the spare connector locations that are provided on the
Model 210’s back panel. Each line input
card contains passive circuitry, including
a 3-pin female XLR-type connector and
a 10 k ohm to 10 k ohm isolation transformer. Once installed, balanced or unbalanced line-level audio sources can
be directly connected. Note that in cases
where only line-level signals are connected an external source of 24 volt DC power
is required. This shouldn’t pose a problem
as a 24 volt DC power supply is included
with each Model 210.
Each line input card kit contains a printed
circuit board assembly, an interconnecting cable, and hardware. To install the kit
is very simple. The XLR-type connector is
mounted into one of the spare connector
locations on the Model 210’s back panel.
This secures the connector and associated printed circuit board to the enclosure. The interconnecting cable is then
Model 210 User Guide
Studio Technologies, Inc.
used to link the card and the Model 210’s
main printed circuit board assembly. One
end of the cable is plugged into the line
input card’s 3-position “header” that is
labeled OUT. The other end of the cable is
plugged into the desired 3-position header
located on the main printed circuit board.
The header associated with auxiliary input
1 is labeled P11. The header associated
with auxiliary input 2 is labeled P10.
Note that the unused header remaining
on the line input card has its pins “multed”
with the leads on the 3-pin female XLRtype connector. It is provided for other
applications that may need it. Additional
installation details are provided in the next
section of the user guide. Included is a
recommended connector labeling method
that is appropriate when line input cards
are installed.
For balanced audio sources the mating
connector (3-pin male XLR-type) should
be wired so that signal high (+ or hot) is
connected to pin 2, signal low (– or cold)
is connected to pin 3, and shield is connected to pin 1. Unbalanced sources
should be wired so that signal high is on
pin 2, and signal low/shield is connected
to both pins 1 and 3. If this results in hum
on the input, try connecting signal high to
pin 2, signal low/shield to pin 3, and pin 1
left unterminated (“floating”).
Several things are worth mentioning when
it comes time to actually using a line input
card. The input is transformer coupled
with a nominal input impedance of 10 k
ohms. Capacitors in series with the transformer’s primary provide protection again
accidental connection of a cable that has
DC voltage present on it. The nominal
input level is +4 dBu but should work correctly with signal levels down to nominal
Issue 4, October 2008
Page 29