1
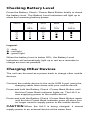
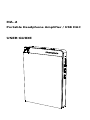
HA-2 Portable Headphone Amplifier / USB DAC USER GUIDE 1. Important Information The exclamation point within an equilateral triangle is intended to alert the user to the presence of important operation and maintenance (servicing)instruction in the literature accompanying the appliance. WARNING: TO REDUCE THE RISK OF FIRE OR ELECTRICSHOCK, DO NOT EXPOSE THIS APPLIANCE TO RAINOR MOISTURE. DO NOT OPENTHE CABINET. REFER SERVICING TO QUALIFIEDPERSONNEL ONLY.THE APPARATUS SHALL NOT BE EXPOSED TODRIPPING OR SPLASHING AND THAT NO OBJECTSFILLED WITH LIQUIDS, SUCH AS VASES SHALL BEPLACED ON THE APPARATUS. 1. Read these instructions. 2. Keep these instructions. 3. Heed all warnings. 4. Follow all instructions. 5. Do not use this device near water. 6. Clean only with a dry cloth. 7. Do not install near any heat sources such as radiators, heat registers, stoves, or other apparatuses (including amplifiers) that produce heat. 8. Only use attachments and accessories specified by the manufacturer. 9. Refer all servicing to qualified service personnel. Servicing is required when the apparatus has been damaged in any way, such as when the power supply cord or plug is damaged, liquid has been spilled or objects have fallen into the apparatus, the apparatus has been exposed to rain or moisture, does not operate normally, or has been dropped. WARNING: To prevent possible hearing damage, do not listen at high volume levels for long periods. Caution should be taken when using earphones or headphones with the product because excessive sound pressure (volume) from earphones or headphones can cause hearing loss. Legal Notice “Made for iPod”, “Made for iPhone”, and “Made for iPad” mean that an electronic accessory has been designed to connect specifically to iPod®, iPhone®, or iPad®, respectively, and has been certified by the developer to meet Apple performance standards. Apple is not responsible for the operation of this device or its compliance with safety and regulatory standards. Please note that the use of this accessory with iPod, iPhone, or iPad may affect wireless performance. iPad, iPhone, iPod and iPod touch® are trademarks of Apple Inc., registered in the U.S. and other countries. Compatible iPod/iPhone/iPad Models USB works with iPhone 6, iPhone 6 Plus, iPhone 5S, iPhone 5C, iPhone 5, iPhone 4S, iPad (4th generation), iPad mini, iPod touch (5th generation). Android™ Compatibility USB works with Android devices that support USB OTG (USB On-The-Go) and USB Audio Class. Not all devices are compatible. Android is a trademark of Google Inc. 2. Introduction Thank you for choosing the OPPO HA-2 portable headphone amplifier and USB DAC. The HA-2draws upon the success of the HA-1 desktop headphone amplifier, and is optimized for portable use. Featuring a hybrid class AB amplifier and a USB DAC supporting 384 kHz PCM and DSD256, the HA-2 offers high performance digital-to-analog conversion for both Apple’s iPhone/iPod and many Android devices. A 3.5 mm input works with the remaining portable music players that do not have a USB-compatible digital output. Convenience features such as VOOC rapid charging and a mobile device power bank make the HA-2 a true companion for music on the go. Accessories Ensure that the following accessories have been included with your OPPO HA-2: 1x USB A – Lightning data cable 1x USB micro-B –USB micro-B data cable 1x 3.5 mm – 3.5 mm stereo audio cable 1x USB A –USB micro-B data and rapid charging cable 1x VOOC rapid charger 2x Silicone rubber bands This user guide Features Digital-to-Analogue conversion by ESS Sabre32 Reference ES9018-2M DAC chip Supports PCM audio up to 384 kHz / 32-bit, DSD audio up to 12 MHz (DSD256 or DSD4x) Supports multiple device types for digital-to-analogue conversion via USB: iPod / iPhone / iPad, smartphones with USB OTG feature, PC and Mac computers Stereo headphone output and line-out Two gain settings for optimal headphone matching Bass boost OPPO VOOC rapid charging Mobile power bank for charging other mobile devices Names and Functions of Parts Top: 1. Power/Volume Knob: Turn this knob clockwise to turn on the unit and increase the volume. Turn it counterclockwise to decrease the volume. Turn it counterclockwise until it clicks to turn off the unit. 2. Power Indicator: A green light indicates that the power is on. The light also serves as a reference point for the scale on the Volume Knob. 3. Audio-in / Line-Out Jack: When the Source Selector is set to “C”, this jack can be connected to an analog audio source, such as a portable music player. When the Source Selector is set to “A” or “B”, this jack acts as the line-out for the USB DAC. 3. Headphone Jack: Plug your headphones into this jack. CAUTION: Always reduce the volume before plugging headphones in and putting them on. While wearing headphones, do not connect or disconnect them. Doing so could result in a sudden loud noise that could harm your hearing. Bottom: 4. Source Selector: Select one of the three input sources: USB A port, USB micro-B port, or Audio-in. 5. USB A Port: For connecting to an iPod, iPhone or iPad; or for charging a mobile device when using the power bank function. 6. USB micro-B Port: For connecting to a PC, Mac, or smartphone with USB OTG feature. This port is also used for charging the HA-2’s internal battery. Side: 7. Power Bank Indicator: A blue light indicates that the HA-2 is supplying power to a connected device via the USB A port. 8. Battery Level / Charging Indicators: Four green lights indicate the HA-2’s internal battery level. When charging, these lights also indicate the charging status and currently charged capacity. 9. Battery Check / Power Bank Button: A single press of this button lights up the Battery Level Indicators to show the HA-2’s internal battery level. Press and hold this button to turn on/off the power bank function, as indicated by the Power Bank Indicator. 10. Bass Boost Switch: Allows you to enable the Bass Boost feature. A visible green bar means Bass Boost is enabled. 11. Gain Switch:Allows you to select low (L) or high (H) gain for the headphone output. 12. Charging and Battery Use This unit has a built-in rechargeable lithium polymer battery. It should be charged before use. VOOC Rapid Charging Connect the USB micro-B port of the HA-2 to the supplied VOOC Rapid Charger using the included USB A – USB micro-B data and rapid charging cable. Plugging the charger into a power outlet will begin charging the HA-2’s battery, and the Charging Indicators on the side of the unit will start to blink. It may take a few seconds to enter the rapid charging mode, which is indicated by the Charging Indicators quickly blinking. When the battery is almost full, rapid charging will change to normal charging automatically, and the blinking speed of the Charging Indicators will slow down. Normal Charging The unit can also be charged by connecting the USB micro-B port to a USB port on a Mac or PC. The Charging Indicators on the side of the unit will blink when the unit is being charged. Rapid charging is not possible using this connection method. Charging Status: The Charging Indicators on the side of the unit may show the following statuses: < 25% 25% 50% 50% 75% 75% 100% Fully Charged ☼ ☼ ☼ ☼ Legend: - dark ☼ - slowly flashing: normal charging; quickly flashing: rapid charging - green light CAUTION: Use only the VOOC Rapid Charger and the USB A – USB micro-B data and rapid charging cable to charge the unit. Make sure the environment temperature is between 10°C 35°C (50°F - 95°F) when charging the unit. If trying to charge outside of this temperature range, charging may not occur properly. If you do not plan to use the unit for a long period of time, please store it in a cool place avoiding high temperatures. Charge the unit at least once every 6 months in order to avoid completely draining the battery. Checking Battery Level Press the Battery Check / Power Bank Button briefly to check the battery level. The Battery Level Indicators will light up to show the remaining battery power: <20% 20% 25% 25% 50% 50% 75% 75% 100% Legend: - dark - red light - green light When the battery level is below 20%, the Battery Level Indicators will automatically light up in red as a reminder to charge as soon as possible. Charging Other Devices The unit can be used as a power bank to charge other mobile devices. Connect the mobile device to the unit’s USB A port using the charging cable that comes with your mobile device. Press and hold the Battery Check / Power Bank Button until the blue Power Bank Indicator lights up. The HA-2 is now supplying power to the mobile device. Press and hold the Battery Check / Power Bank Button again until the blue Power Bank Indicator goes off when you no longer need to supply power to the mobile device. CAUTION:When the HA-2 is being charged, it cannot supply power to an external device at the same time. 13. Source Device Connections It is recommended that you turn the unit off before making the connections. iPod / iPhone / iPad Set the Source Selector to position “A”. Connect the USB A port of the unit to the iPod / iPhone / iPad using the supplied USB A – Lightning data cable, or the cable that comes with your iPod / iPhone / iPad. Smartphones with USB OTG Feature Set the Source Selector to position “B”. Connect the USB micro-B port of the unit to the smartphone using the supplied USB micro-B – USB micro-B data cable. Computers Set the Source Selector to position “B”. Connect the USB micro-B port of the unit to a USB port on the computer. For Mac, no driver is required. You may need to select the HA-2 as the sound output device by going into System Preferences / Sound in Mac OS X. For PC, please download the HA-2 USB driver from the OPPO Digital web site (www.oppodigital.co.uk) and follow the instructions to install the driver. Other Playback Devices Set the Source Selector to position “C”. Connect the Audio-in port of the unit to the playback device using the supplied 3.5 mm – 3.5 mm stereo audio cable, or any other audio cable with a 3.5 mm stereo jack. 14. Listening to Music To listen to music, you can connect a pair of headphones to the headphone jack, or connect an amplifier or a pair of powered speakers to the line-out jack. Using Headphones Plug the headphones into the Headphone Jack of the unit. Connect the unit to your music source according to the connections described above. Set the Source Selector to the correct position. Turn on the unit by rotating the Power/Volume Knob clockwise. Start music playback from the source device. Put on the headphones and adjust the volume. Turn on Bass Boostif desired Using Line-out Connect the line-out jack to the stereo audio input of your amplifier or powered speakers. Connect the unit to your music source according to the connections described above. Set the Source Selector to the correct position. Please note that the Line-out is only active when sources A or B are selected. Turn on your amplifier or powered speakers and set at minimum volume. Turn on the unit by rotating the Power/Volume Knob clockwise. Start music playback from the source device. Gradually increase the volume on your amplifier or powered speakers to a comfortable listening level. CAUTION: When both the Headphone Jack and the Line-out Jack are plugged in, only the Headphone Jack will output sound. Please do not plug in headphones if you need to use the Line-out Jack. The Line-out is at a fixed volume level. The Power/Volume Knob of the unit does not affect the volume of the Lineout. Please use the volume control on your amplifier or powered speakers. Quick Reference Chart Input, Output, and Source Selector for various sources: Playback Source Source Selector Input Port Output Jacks iPod, iPhone, iPad A (left) USB A Headphone or Line-out Other Smartphone s B (center) USB micro-B Headphone or Line-out Computers B (center) USB micro-B Headphone or Line-out Other Devices C (right) Audio-in Headphone Gain Selection The HA-2 has two gain levels. The low gain (L) level is intended for use with high sensitivity headphones and In-Ear Monitors (IEMs). The high gain (H) level can be used for other headphones if you feel that the volume is too low in low gain level even when the Power/Volume Knob has been rotated to the maximum volume position. Please follow this procedure to safely change gain level: Turn off the unit first. Flip the Gain Switch to the high gain (H) position. Turn on the unit and gradually adjust the volume. Remember to reset the Gain Switch to low gain (L) position if you switch to a new pair of headphones. For certain IEMs, if at the low gain setting the volume is still too loud, you can adjust the volume control on your playback device. For Apple products connected to the USB A port or playback software that supports USB volume, the HA-2’s internal 32-bit digital volume control will be usedso there will be no loss of resolution or truncation of audio samples. CAUTION: Changing the gain level on the fly may result in a sudden increase of the output power, and may damage your headphones and hearing. Bass Boost If you like to listen to music with a strong bass effect, you may turn on the Bass Boost function of the unit. To do so, flip the Bass Boost switch so a green bar is shown. 15. Troubleshooting Use this chart to resolve general operational problems. If there are any problems that you cannot resolve, please contact your OPPO service center. Symptom: No sound Possible Cause and Solution: The unit is not turned on. Turn on the unit by rotating the Power / Volume Knob The battery is completely drained and the Power Indicator does not come on. Charge the unit until the battery is full before using. The volume is too low. Adjust the volume of the source device, and/or adjust the volume of the HA-2. Incorrect connection to the source device. Please check the connection by referring to the “Source Device Connection” section of this guide. Incorrect Source Selector position. Check which input source is in use and set the Source Selector accordingly. Line-out is muted when headphones are plugged in. Unplug the headphones if you wish to use line-out. Symptom: The unit fails to charge Possible Cause and Solution: Incorrect cable connection. Check the cable connection and reset all cables. Incompatible charger or cable. Please use the supplied original VOOC rapid charger and data / charging cable. Reset required. Please press and hold the Battery Check / Power Bank button for 20 seconds. Any lit indicator light will go dark and then come back on again after a successful reset. Symptom: Temporary malfunction Possible Cause and Solution: The protection mechanism is triggered. Please turn off the unit, remove all connections, and wait for 30 seconds before trying again. Interference from other devices. Identify interference by turning off other devices, and then relocate or replace the offending device. 16. Specifications General Dimensions (W x H x D) 2.5 x 6.2 x 0.5 inches, 68x 157 x 12mm Weight 6.2 oz, 175 grams Frequency Response 20 Hz – 200 kHz Audio-in Level 1 Vrms Line-out Level 1Vrms @ 0 dBFS Recommended Headphone Impedance 16 Ohm – 300 Ohm Maximum Headphone Output Power 300 mW into 16 Ohm 220mW into 32 Ohm 30mW into 300 Ohm Output Jacks 3.5 mm stereo headphone 3.5 mm stereo line-out Input Ports Analog: 3.5 mm stereo audio-in Digital: USB A for iPod / iPhone / iPad; USB microB for smartphones with USB OTG feature and computers. DAC Chip ESS Sabre32 Reference ES9018-2M Input Format Stereo PCM, Stereo DSD (DoP v1.1 or native) PCM Sampling Frequencies 44.1 kHz - 384 kHz, 16 / 24 / 32bit DSD Sampling Frequencies 2.8224 MHz (DSD64), 5.6448 MHz (DSD128),11.289 6 MHz (DSD256, native mode only) Profile USB 2.0, USB Audio 2.0 Battery Built-in Battery type 3000 mAh lithium polymer rechargeable battery Battery Operation Time Approx. 13 hours for analog source via Audio-in; approx. 7 hours for digital sources via USB Approx. 1 hour 20 minutes Designs and specifications are subject to change without notice. Charging Time © 2014 All rights reserved. OPPO Digital UK Ltd 42 Hellesdon Park Road, Norwich, Norfolk, NR6 5DR. www.oppodigital.co.uk [email protected] +44 0845 060 9395 51980338V1.0 www.oppodigital.co.uk