1
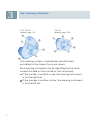
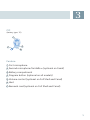
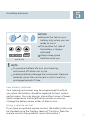
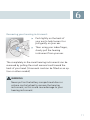
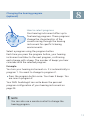
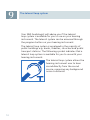
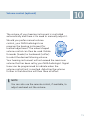
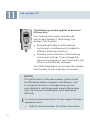
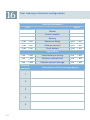
IMPACT Custom Instructions & Guidance A 1 Introduction Your new hearing instrument Your NHS Audiologist will have guided you through the use of your new hearing instruments; this booklet is intended as a supplement to that information. In this booklet you will find instructions about insertion, removal and use of your hearing instrument. There are also tips and information on proper handling, cleaning, care and changing of the batteries. In addition, a troubleshooting section is offered for your reference. Your hearing improvement depends on the fit of the hearing instrument, the type and degree of hearing loss, and proper diagnostic testing. Of course, a hearing instrument cannot restore normal hearing, and not everyone will benefit equally. Remember, a hearing instrument is a finely-tuned device that has been specially designed and expertly adjusted for your individual needs. Proper care and handling will ensure the best possible performance of your hearing instrument. 2 2 Contents 3 Your hearing instrument 4 4 Intended use 6 5 Handling batteries 7 6 Inserting and removing your hearing instrument 10 7 Turning your hearing instrument on and off 12 8 Changing the hearing program (optional) 13 9 The telecoil loop system (optional) 14 10 Volume control (optional) 15 11 e2e Wireless 2.0 16 12 Maintenance and care 17 13 Troubleshooting tips 20 14 General notes on safety 22 15 Disposal information 23 16 Your hearing instrument configuration 24 17 Tek wireless enhancement 25 3 3 Your hearing instrument Full Shell Canal (battery type: 13) (battery type: 312) 4 1 2 1 4 2 3 3 6 6 5 5 Your hearing system is individually manufactured according to the shape of your ear canals. Each hearing instrument can be identified by the serial number located on the outside of the instrument. If the number is written in red, the hearing instrument is for the right ear. If the number is written in blue, the hearing instrument is for the left ear. 4 3 CIC (battery type: 10) 1 7 3 6 Feature 1 First microphone 2 Second microphone TwinMicTM (optional on Canal) 3 Battery compartment 4 Program button (optional on all models) 5 Volume control (optional on Full Shell and Canal) 6 Vent 7 Removal cord (optional on Full Shell and Canal) 5 4 Intended use Hearing instruments are intended to improve the hearing of hearing impaired persons. Diagnosis and prescription of a hearing instrument must be performed by hearing health specialists, e.g. ENT doctors, audiologists. Read and follow the instructions of this user guide to avoid injuries or damage to the hearing instrument. Symbols: Be aware of information marked with the warning symbol WARNING, CAUTION or NOTICE! WARNING points out a situation that could lead to serious injuries, CAUTION indicates a situation that could lead to minor and moderate injuries. NOTICE NOTICE indicates possible property damage. Advice and tips on how to handle your hearing instrument better. Instruction. Indicates that something has to be done. 6 5 Handling batteries General notes on safety NOTICE Remove the tab on your battery only when you are ready to use it The positive (+) side of the battery is always indicated 10 312 13 actual size Always keep spare batteries with you NOTE To preserve battery life turn your hearing instrument off when not in use Leaking batteries damage the instrument. Remove batteries when the instrument is not in use for a prolonged period of time Low battery indicator Your hearing instrument may be programmed to inform you when the battery should be replaced for best system performance. You may hear an intermittent series of beeps and/or experience low amplification power or volume. Change the battery when either of these occur. Using a remote control If you have an optional remote control, the battery status can be checked using the "battery read out" function. (See the remote control user guide for more information.) 7 5 Handling batteries Inserting the battery: Completely open the battery compartment with your fingernail as shown in the illustration. Insert the proper size battery into the compartment, small end first so that the "+" mark is visible. Close the battery compartment by gently pressing the bottom of the door upward with your finger tip. Do not force the door shut. If it does not close easily, check to see if the battery was inserted properly. When the battery door is completely closed, your hearing instrument is ready for use. 8 Handling batteries 5 Removing the battery: Completely open the battery compartment. Lightly push the battery out with your finger or a pencil, do not use any metallic implements or tools that may damage the battery door. WARNING Choking hazard posed by small parts Keep batteries and instruments out ot the reach of children. If swallowed consult a physician or a hospital immediately If infants, small children or disabled persons need to wear hearing instruments ensure adequate supervision Check the integrity of the hearing instruments regularly Consult your NHS Audiologist if the housing is deformed NOTICE Batteries may contain harmful substances that pollute the environment. Do not throw away batteries into household waste Dispose batteries according to national regulations or return to your NHS Audiologist 9 6 Inserting and removing your hearing instrument Inserting your hearing instrument: Holding the hearing instrument with your thumb and index finger, carefully push the instrument in the ear canal. Gently work it into its proper position by slightly twisting until it is firmly seated. Lightly press inward for a secure and comfortable fit. You may find it helpful to pull your ear slightly upward or to the back. Once inserted, you should be able to feel if the hearing instrument is correctly positioned. 10 6 Removing your hearing instrument: Push lightly on the back of your ear to help loosen it or pull gently on your ear. Then using your index finger, slowly pull the hearing instrument from your ear. The completely-in-the-canal hearing instruments can be removed by pulling the small removal cord toward the back of your head. (A removal cord can be fitted as an option on other models) WARNING Never pull on the battery compartment door or volume control wheel to remove the hearing instrument, as this could cause damage to your hearing instrument. 11 7 Turning your hearing instrument on and off Using the battery compartment Turn on: Insert the battery and close the compartment door completely. Your hearing instrument turns on automatically. Turn off: Open the compartment completely. Using the program button (optional) Your NHS Audiologist can also program your hearing instrument to be turned on and off using the program button. Turn on: Press and hold the program button for approximately 3 seconds. Turn off: Press and hold the program button for approximately 3 seconds. If you turn your hearing instrument off this way you must wait approximately 10 seconds before you can turn it on again using the program button. Power-on delay Your hearing instrument is equipped with a "poweron delay" feature that can be activated by your NHS Audiologist. This allows you to turn the hearing instrument on with an automatic delay of 12 seconds, so that you may insert the hearing instrument into your ear without experiencing unpleasant feedback (whistling). 12 Changing the hearing program (optional) 8 How to select programs Your hearing instrument offers up to five hearing programs. These programs change the characteristics of the sound coming through the hearing instrument for specific listening environments. Select a program using the program button. Each time you press the program button, your hearing instrument switches to the next program, confirming each change with a beep. The number of beeps you hear coincides with the selected program. Example You turn your hearing instrument on. It is automatically in program 1. You want to change to program 2. Press the program button once. Your hear 2 beeps. You are now in program 2. Your NHS Audiologist can write down the personal program configuration of your hearing instrument on page 24. NOTE You can also use a remote control to change the hearing program. 13 9 The telecoil loop system Your NHS Audiologist will advise you if the telecoil loop system is available for you to use on your hearing instrument. The telecoil system can be accessed through the program button on your hearing instrument. The telecoil loop system is employed in the majority of public buildings e.g. banks, theatres, churches and public transport stations. The following symbol indicates that a telecoil loop system is available for you to use with your hearing instrument: The telecoil loop system allows the hearing instrument user to hear sound directly from the sound source, removing any background noise or distance. 14 Volume control (optional) 10 The volume of your hearing instrument is controlled automatically and there is no need to manually adjust it. Should you prefer manual volume control, your NHS Audiologist can program the hearing instrument for manual adjustment. The wheel shaped volume control can then be used. Rotate forwards (louder) or backwards (softer) to select the desired listening volume. Your hearing instrument will not exceed the maximum volume that has been set by your NHS Audiologist. Signal tones can be programmed to indicate when the volume control limit is reached. Adjusting the volume further in that direction will then have no effect. NOTE You can also use the remote control, if available, to adjust and read out the volume. 15 11 e2e wireless 2.0 The following section applies to binaural fittings only. Your hearing instrument includes e2e (ear-to-ear) wireless™ technology. The wireless functionality: Automatically adjusts both hearing instruments simultaneously to adapt to different listening situations Provides synchronisation of the hearing instrument settings. If you change the volume or program on one instrument, the other is automatically changed Your NHS Audiologist can activate the wireless functionality of your hearing instruments. NOTICE The performance of the e2e wireless system could be affected by electro-magnetic interference, such as computer monitors or halogen lamp systems controlled by a switching power supply. Move away from the source of interference if you experience difficulty. In some countries restrictions for the usage of wireless equipment exist. 16 Refer to local authorities for further information Maintenance and care 12 Your hearing instrument is a highly sensitive system. Proper care and handling will ensure the best possible performance. If soreness or skin irritation develops in the ear, discontinue wearing your hearing instrument, and bring it to your NHS Audiologist. Minor fit adjustments and polishing can often correct this condition. If soreness persists, discontinue wearing the hearing instrument and see your physician. If excessive earwax accumulates when wearing your hearing instrument, consult your NHS Audiologist. NOTICE Do not put the hearing instrument in water. 17 12 Maintenance and care Cleaning your hearing instrument Your hearing instrument is a sophisticated listening instrument but without proper care and good maintenance, it may function badly or not at all. Earwax often causes problems for hearing instrument users as it collects around the microphone opening, the vent and the wax guard. Clean your hearing instrument regularly with a soft, dry cloth or tissue to prevent damage to the hearing instrument and to avoid health problems. Place your hearing instrument in a "dry aid kit" with a special moisture-attracting capsule overnight. The microphone opening To remove any debris or earwax built up around the microphone: Use a soft, dry cloth or small soft brush to gently clean around the opening The vent Your hearing instrument may have a small ventilation tube that is visible as an opening or hole next to the sound outlet: Use a soft, dry cloth or small soft brush to gently clean around the ventilation opening 18 Maintenance and care 12 The wax guard Your hearing instrument is fitted with a sieve, recess or guard in the sound outlet. Its purpose is to prevent earwax from entering the hearing instrument. Use a soft, dry cloth or small soft brush to gently clean around the sound outlet Occasionally take your hearing instrument to your NHS Audiologist so that the wax guard can be changed and thorough cleaning of the ventilation channel, the microphone and sound outlets can take place, and for general system maintenance. If excessive wax accumulates when wearing your hearing instrument consult your NHS Audiologist. 19 13 Troubleshooting tips Your hearing instrument is an extremely reliable device. Should a problem occur, it can usually be corrected quickly. Use these troubleshooting tips to resolve simple issues. Problem Cause System has no sound or sound is weak Battery polarity reversed Weak or dead battery Instrument not turned on Instrument clogged Volume too low Instrument whistling Improper seating in ear Clogged with wax or excessive wax in ears Sound is distorted or intermittent Volume control too high "Buzzing" or "whistling" sound Battery compartment is not completely closed Weak battery Weak battery Change to another program Hearing instrument does not work 20 Hearing instrument not turned on Battery compartment is not completely closed Dead battery 13 Possible Solution Make sure battery is inserted correctly Replace with new battery Close battery door completely or press and hold program button (if present) for 3 seconds Clean system/exchange wax protection guard Turn up volume control (if present) Try reinserting the instrument until it fits securely Clean your instruments or see your NHS Audiologist Lower volume (if present) Replace battery Gently close the battery compartment completely Replace battery System is in telecoil mode Turn on hearing instrument Gently close the battery compartment completely Replace with new battery If you still encounter problems after trying these suggestions, take the system to your NHS Audiologist. 21 14 General notes on safety NOTICE Your hearing instrument is sensitive to extreme heat, high humidity, strong magnetic fields (> 0.1T), X-rays and mechanical stress. Do not expose your hearing instrument to extreme temperature or high humidity. Do not leave it in direct sunlight. Do not wear it in the shower or when you apply make-up, perfume or aftershave, hairspray or suntan lotion. Do not wear your hearing instrument when you are exposed to short-waves, a strong magnetic field, a high frequency field, X-rays or MRI scans. Do not place your hearing instruments in a microwave oven. This device complies with Part 15 of the FCC Rules. Operation is subject to the following two conditions: (1) this device may not cause harmful inerference, and (2) this device must accept any interference received, including interference that may cause undesired operation. Changes or modifications not expressly approved by the party responsible for compliance could void the user's authority to operate the equipment. WARNING Hazard of explosion! Do not use your hearing instruments in areas where there is a danger of explosions (e.g. mining) 22 15 Disposal information Within the European Union, the marked equipment is covered by "Directive 2002/96/EC of the European Parliament and of the Council of 27 January 2003 on waste electrical and electronical equipment." Amended by "Directive 2003/108/EC" (WEEE). NOTE Recycle your hearing instrument according to national regulations. For proper disposal, please return to the audiology clinic, distributor or the shop where it was purchased. With the CE marking Siemens confirms compliance with the European Directive 93/42/ EEC concerning medical devices. 0123 Subject to change without prior notice. 23 16 Your hearing instrument configuration Hearing instrument LEFT RIGHT Model Serial number Battery yes no Power on delay yes no yes no Volume control yes no yes no Push button yes no Signal tones on off Low battery warning on off on off Volume control limit on off on off Volume control change on off Hearing program 1 2 3 4 5 24 Description of the hearing program 17 Tek wireless enhancement P2 P1 P3 P4 P5 Aux in Your IMPACT hearing instrument can be used with the Tek wireless enhancement system. The Tek is a complete solution that allows Bluetooth devices to communicate with a hearing instrument and through the use of the Tek transmitter allows a non Bluetooth enabled device to make use of this excellent solution. The Tek package comprises the Tek Connect itself which controls the hearing instruments, a Tek transmitter and all cables necessary to link the Tek into a variety of devices such as TVs, MP3 players, etc. NOTICE Tek is an additional product to your hearing instrument; if you think it would assist you in your day-to-day life talk to your NHS Audiologist about how you can obtain a Tek or for further information take a look at our website www.siemens.co.uk/hearing or e-mail [email protected] Siemens Hearing Instruments will also be offering accessories and care products. Please visit the website or call 01293 423700. 25 26 27 © Siemens AG Printed in UK Issue 2: July 2010 | JN5319 | Pt No: 00080252 Siemens Hearing Instruments Ltd. Alexandra House, Newton Road Crawley, West Sussex RH10 9TT Tel: 01293 423700 Fax: 01293 403080 Email: [email protected] www.siemens.co.uk /hearing