1
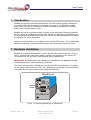
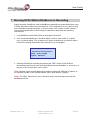
User Guide
Time-Lapse DVD Recorder
MultiBurner
Multiple DVD Burner
User Guide
Ovation Systems Ltd.
Springfield Barn
London Road
Milton Common
Oxfordshire
OX9 2JY
UK
Tel:
Fax:
Email:
Web:
+44 1844 279 638
+44 1844 279 071
[email protected]
www.ovation.co.uk
Manual Issue: 1-2
Ovation Systems Ltd.
www.ovation.co.uk
Page 1
User Guide
Time-Lapse DVD Recorder
Contents
1 Introduction.................................................................................................................... 3
2 Hardware Installation..................................................................................................... 3
3 Firmware Check ............................................................................................................. 4
4 Basic Function ............................................................................................................... 4
4.1
Local Mode: .............................................................................................................................. 5
5 Loading Blank DVD Disks ............................................................................................. 6
6 Burning Multiple AfterBurner Files............................................................................... 7
7 Burning DVDs Whilst AfterBurner is Recording .......................................................... 8
8 Manually Burning a DVD................................................................................................ 9
9 Burning Multiple Copies ................................................................................................ 9
10 Failed Burn ....................................................................................................................10
11 Specifications................................................................................................................11
Manual Issue: 1-2
Ovation Systems Ltd.
www.ovation.co.uk
Page 2
User Guide
Time-Lapse DVD Recorder
1 Introduction
MultiBurner has been specifically designed for use with Ovation Systems’ AfterBurner
time-lapse DVD video recorder and is capable of burning up to 7 AfterBurner disks
without user intervention. MultiBurner is easy to connect to AfterBurner via a ribbon
cable which is supplied with the unit.
MultiBurner can be used back at base to speed up the download of evidence gathered
from a number of AfterBurners returned from the field or, alternatively, MultiBurner can
be deployed with an AfterBurner where up to 8 DVDs can be automatically burnt without
the need for the user to be present.
Another timesaving feature is the ability to burn multiple DVD copies. This is particularly
useful for producing a master and working copy when preparing evidence for court.
2 Hardware Installation
MultiBurner connects to AfterBurner via the supplied ribbon cable as shown in Figure 1
below. As the length of the ribbon cable is critical to the operation of the system we
recommend only the use of the cable supplied with the MultiBurner.
IMPORTANT 2 Please ensure that AfterBurner or MultiBurner are not powered when
connecting the ribbon cable as damage could occur.
The power requirements for MultiBurner are 10 to 20V DC which should be connected
via the power socket at the rear of the unit. MultiBurner has the same connectivity and
is supplied with the same mains power supply as AfterBurner.
AfterBurner
OUT
IN
VIDEO
Ribbon
Cable
LEFT
OUT
LEFT
IN
RIGHT
OUT
AUDIO
MultiBurner
Figure 1: Connecting MultiBurner to AfterBurner
Manual Issue: 1-2
Ovation Systems Ltd.
www.ovation.co.uk
Page 3
User Guide
Time-Lapse DVD Recorder
3 Firmware Check
It is strongly recommend that AfterBurner is upgraded to the latest firmware before
operation with MultiBurner. AfterBurner firmware is downloadable from
www.ovation.co.uk/AfterBurner/upgrade.asp
Contact [email protected] for a username and password.
NB: The MultiBurner does not contain user upgradeable firmware.
4 Basic Function
MultiBurner consists of 7 DVD drives, numbered 1 to 7 (see Figure 2: below).
DVD Drive
LED
RW
DVD
DVD Drive
Eject Button
RW
1
RW
2
RW
3
RW
4
RW
5
RW
6
RW
7
RW/R
RW
DVD
Drive Select
Switches
RW/R
RW
DVD
RW/R
RW
DVD
RW/R
RW
DVD
RW/R
RW
DVD
RW/R
RW
DVD
RW/R
Figure 2: MultiBurner Front Panel
Manual Issue: 1-2
Ovation Systems Ltd.
www.ovation.co.uk
Page 4
User Guide
Time-Lapse DVD Recorder
Once connected to DC power, and an AfterBurner, MultiBurner is powered-up by
pressing the AfterBurner’s “DVD” button.
Each of the MultiBurner drives has an adjacent coloured Drive Select Switch. The
colour of the switch indicates the state of the corresponding drive as follows:
Drive Select
Switch
Indication
Green (solid):
Tray contains a blank DVD, ready to burn
Green (flashing):
DVD is being burnt
Orange (solid):
Tray is empty
Orange (flashing):
Tray contents unknown
Red (solid):
Tray contains a burnt DVD
Red (flashing):
Burn has failed
Table 1 MultiBurner Switch LED Indications
When MultiBurner is switched on for the first time, AfterBurner checks each DVD drive
in turn to ascertain the status of the tray and then sets the adjacent Drive Select Switch
colour accordingly.
IMPORTANT 2 The initial scanning the drives’ status can take up to 60 seconds and
should not be interrupted.
4.1 Local Mode:
Initially all MultiBurner drives are under the control of the AfterBurner. The MultiBurner
drives can be placed in ‘Local’ mode by pressing Drive Select Switch adjacent to each
drive. The Drive Select Switch then shines brighter and flashes to show the drive is in
Local mode. When in Local Mode, the drive can be opened so that a DVD can be
inserted or removed by pressing the Drive Eject button (see Figure 2)
N.B. Only one drive can be in Local Mode at any one time.
Local Mode is cancelled (and control of the drive returned to the AfterBurner) by again
pressing the Drive Select Switch. When this happens AfterBurner will check the drive
and set the Drive Select Switch colour accordingly.
N.B. AfterBurner is unable to read the status of the drive whilst in Local Mode.
Manual Issue: 1-2
Ovation Systems Ltd.
www.ovation.co.uk
Page 5
User Guide
Time-Lapse DVD Recorder
5 Loading Blank DVD Disks
1 Power up the MultiBurner by pressing the AfterBurner’s “DVD” button.
NB: When the “DVD” button is pressed for the first time, the system checks each
MultiBurner DVD drive in turn to ascertain the status of each tray and the illuminates
the Drive Select Switch accordingly. This operation takes up to 60 seconds and
should not be interrupted.
2 Press the required MultiBurner Drive Select Switch to power-up the drive and to put
the drive in Local Mode. The Drive Select Switch now flashes brightly and the Drive
LED lights. See Figure 2 for the location of the Drive Select Switch and Drive LED
3 Open the DVD drive tray by pressing the drive eject button (See Figure 2).
4
Place a new (blank) DVD disk the open tray and push the tray to close.
5 Press the Drive Select Switch again to exit Local Mode.
6 Repeat for each DVD drive as necessary.
TIP 2 A blank disk can also be loaded into the AfterBurner’s main DVD drive making a
total of 8 disks.
Manual Issue: 1-2
Ovation Systems Ltd.
www.ovation.co.uk
Page 6
User Guide
Time-Lapse DVD Recorder
6 Burning Multiple AfterBurner Files
MultiBurner is designed to speed up the burning of many files recorded on the
AfterBurners hard drive. This is achieved by:
1 Load MultiBurner with blank DVDs as described in Section 5.
2 Press the “Menu” key twice to set / check the AfterBurner’s “Set Burn Mode” mode is
to “auto mode” as shown below.
Set Burn Mode
===================
Burn: auto mode
Eject: manual
3 Press the “Menu” key again to select the first file you wish to burn from the
AfterBurner’s “Set Burn file” menu. MultiBurner will then burn files from the selected
file onwards (i.e. forwards in time).
Set Burn file #001
===================
09:21 05Apr Burnt
09:20 06Apr
no
4 Press the “DVD” button to wake-up the MultiBurner. Press the “DVD” button again to
start the burning process.
TIP 2 Multiple copies of each disk can be made by setting the “MB Num of copies” to
the required number in the “Set Burn Mode” menu. See Section 9, page 9.
TIP 2 The “Eject: When burnt” option in the “Set burn mode” menu will also work with
the MultiBurner drives.
Manual Issue: 1-2
Ovation Systems Ltd.
www.ovation.co.uk
Page 7
User Guide
Time-Lapse DVD Recorder
7 Burning DVDs Whilst AfterBurner is Recording
Whilst recording, AfterBurner (with a MultiBurner attached) can automatically burn up to
8 DVDs without the need of any user attention. This configuration is very useful in longterm surveillance operations where, in 24 hour mode, over a week of video evidence
can be automatically burnt to DVD ready for collection 8 days after the recording
commenced.
1 Load MultiBurner with blank DVDs as described in Section 5.
2 Set / check the AfterBurner’s “Set Burn Mode” mode is “auto mode” or “at given
time”, as shown below. The “at given time” option is used when you want to start a
new DVD recording at the same time each day (e.g. at midnight).
Set Burn Mode
===================
Burn: auto mode
Eject: manual
3 Start the AfterBurner recording by pressing the “REC” button. Each DVD will
automatically be burnt as soon as enough data becomes available, or, at the time of
day set in the “at given time” menu option
TIP 2 Multiple copies of each disk can be made by setting the “MB Num of copies” to
the required number in the “Set Burn Mode” menu. See Section 9, page 9.
TIP 2 The “Eject: When burnt” in the “Set burn mode” menu will also work with the
MultiBurner drives.
Manual Issue: 1-2
Ovation Systems Ltd.
www.ovation.co.uk
Page 8
User Guide
Time-Lapse DVD Recorder
8 Manually Burning a DVD
It is possible to manually burn a disk in a user selected DVD drive.
1 Ensure there is a blank DVD disk in the required drive, shown by static green Drive
Select Switch.
2 Set the burn mode to “manual only” in the “Set burn mode” menu
Set Burn Mode
===================
Burn: manual only
Eject: manual
3 Press the “DVD” button. Use the J K keys to select the required drive. The LCD
shows the drive number selected (Drive 0 is the AfterBurner drive).
4 Press the “DVD” key again to select the file required for burning using the J K
keys.
5 Finally press “DVD” once more to start the burn.
9 Burning Multiple Copies
MultiBurner can burn more than one copy of each DVD. This is especially useful where
a master and working copy are required.
1 Go to the “Set burn mode” menu by pressing the “Menu” key twice. Then press L
twice and use the J K keys to set the number copies required.
Set Burn Mode
===================
MB num of copies: 2
Burn: auto mode
Manual Issue: 1-2
Ovation Systems Ltd.
www.ovation.co.uk
Page 9
User Guide
Time-Lapse DVD Recorder
10 Failed Burn
If a file fails to burn properly then MultiBurner will show this as a flashing red Drive
Select Switch. MultiBurner will not try to re-burn that file although if another copy of the
same file has been requested and there is a blank DVD available, then this burn will be
attempted.
IMPORTANT 2 In the event of a DVD burn failure (as shown by a flashing red Drive
Select Switch) it is recommended that any re-burn attempt should be performed in
manual mode. See Section 8, page 9.
Manual Issue: 1-2
Ovation Systems Ltd.
www.ovation.co.uk
Page 10
User Guide
Time-Lapse DVD Recorder
11 Specifications
Operating temperature range
0 to +40 ºC
Mechanical Size
W: 155mm x H: 120mm x D: 260mm
Finish
Painted aluminium
Weight
2.5 kg approx.
Standard accessories
Mains PSU, UK or EU or US mains lead, ribbon cable,
user guide
Operating voltage range
10 to 20 V DC
Typical power consumption
Standby: 26mA @ 12V (0.3 Watts)
Manual: peak 650mA @ 12V (8 Watts)
Idle: 320mA @ 12V (3.8 Watts)
Burning: 440mA @ 12V (5.5 Watts)
Burning and manual: 900mA @ 12V (11 Watts)
Number of additional drives
7
DVDs supported
+R, -R, -RW, +R dual layer
Max DVD burn rate
x6 (Dual layer x 2.4)
Typical DVD burn time
15 to 20 minutes
Please note, Ovation Systems reserves the right to change specifications without notice. E&OE
Manual Issue: 1-2
Ovation Systems Ltd.
www.ovation.co.uk
Page 11