1
Combined Storage Heaters The input control operates a highly sensitive thermostat which regulates the amount of heat stored.
The discharge is by convection heat which can be partially controlled by use of the output control. Please note that Type SH6M
is fully automatic with no output control.
It is important that the correct rating of heater is installed to provide the selected level of heat. This will ensure the best possible
running costs against other fuels.
To reduce transport problems, the heater casings and storage bricks are packed separately.
You should be aware that Storage heaters, when fully charged, can have high surface temperatures.
2.- INSTALLATION INSTRUCTIONS
1.- Chose the right place to install the heater. It is necessary that a minimum clearance of 50 cm is allowed to ensure the best
heating results. Always maintain a minimum clearance of 50 cm from the heater to any combustible materials such as furniture
and curtains.
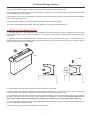
2.- Open the carton at the indicated side and fix the feet without removing the heater casing (fig 1). The screws are in the
accessories bag. Turn the carton upside down to allow the heater to stand on its feet and remove the carton. Check that it is the
correct model and that it is in good condition.
fig 1
fig 2
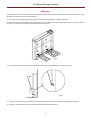
3.- Take off the front panel by removing the two screws at the bottom of the heater.
4.- Set the heater in the selected installation area and mark the fixing points on the wall using a pencil. Use the heater fixing
holes as a template and mark the wall through the fixing holes. Drill the required holes into the wall.
5.- Fix the heater to the wall. Please note the weight of the heater is taken by the feet, the wall fixing screws are only to prevent
the heater overturning. If there is any doubt as to the strength of the wall please consult an expert. Storage heaters are very
heavy and the installer must ensure that they are securely fixed and that there is no possibility of them overturning.
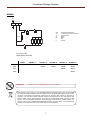
6.- Connect the heater using the enclosed wiring diagram. Ensure that all connections are firm. Use silicone covered wire. Do not
leave any remaining wire inside the heater.
7.- Remove the inner front panel with the attached convector element.
3