1
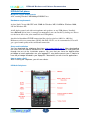
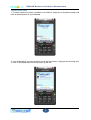
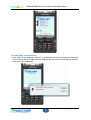
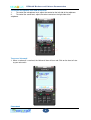
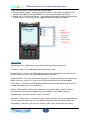
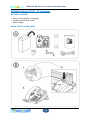
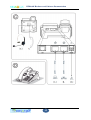
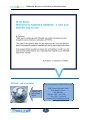
KIDAtalk Hardware and Software Documentation
KIDAtalk – talk all you want
For subscription, CONTACT us at:
158 Victoria Parade. Suva.
P.o. Box 59, Suva,
Fiji Islands.
Phone: 679 - 331 5511
Fax: 679 - 331 2239
Email: [email protected]
Sign up now
and call the
world
1
KIDAtalk Hardware and Software Documentation
KIDAtalk Soft phone
Minimum System Requirements
A PC running Windows ME/2000sp4/XPSP2/Vista:
Hardware requirement:
At least Intel Celeron 300 CPU with 32MB for Windows ME, 128MB for Windows 2000,
256 for Windows XP.
A full-duplex sound card with a microphone and speakers, or any USB phones. Installed
latest DirectX (9.0 at least) is strongly recommended; you can check it by dxdiag.exe. Please
use the latest drivers for your soundcards and USB phones.
Any kind of broadband TCP/IP connection like wired or wireless (802.11x, 802.16x)
Ethernet or wide area connections (WAN) like DSL, E1/T1, etc are recommended. You will
get a good sound quality with a wideband connection.
Setup and Installation
You can download the softphone client from http://www.kidatalk.com.fj. After downloading
the client from the website, doubleclick the .exe file. The file will auto run and guide you
through the rest of the installation process. Be sure that you have the Administrator
priviledge to install applications on your laoptop/PC, else please consult your IT Admin to
have the priviledge included in your laptop/PC. Meanwhile, turn off all music applications.
How to make a Call?
After installing the softphone, you will see a dialer.
KIDAtalk Softphone
2
KIDAtalk Hardware and Software Documentation
To make Local calls
1. To make a local call to either a mobile or to a fixed line, simply key in the phone number and
click on the dial pad or on your keyboard.
2. You will be able to see from the dialer screen that the phone is ringing on the receiving end.
The call is connected once the receiver picks up the call.
3
KIDAtalk Hardware and Software Documentation
To make International Calls/IDD
1. To make international calls, you would need to input a “00” prefix in front of the country code
and the number that you wish to dial to. (For example, to call Sydney in Australia, you need to
dial “00” followed by country code for Philippines “61”, area code for Sydney “2” and the
number you wish to dial to, such as as 00-61-2-XXXXXXXX. Click on “Dial” button to call.
To terminate a call
1. Simply click on the End Call button and the call will be terminated.
To enable Conference Calls
1. Dial the number of the first calling party. When the first calling party picks up the call, you
will see from the dialer screen that the call is in operation.
2. Proceed to dial the number of the next party. When the next party picks up, you can call
conference both parties together by clicking on “CONF” on the softphone.
4
KIDAtalk Hardware and Software Documentation
To enable DND – Do Not Disturb
1. Click “DND” on the softphone. Once this is enabled, all calls will be routed to the Voicemail.
There will be a pop-up window from the softphone that will reflect the called party’s number
if the caller ID is not blocked.
5
KIDAtalk Hardware and Software Documentation
To control microphone level and sound level
1.
To control the microphone level, adjust the control on the left side of the softphone.
2.
To control the sound level, adjust the volume control on the right side of the
softphone.
To access Voicemail
1. When a voicemail is received, the Voicemail icon will turn red. Click on the icon to listen
to your voicemails.
Phonebook
6
KIDAtalk Hardware and Software Documentation
There are a few ways to add a contact to the phonebook.
1. From the dialed number, simply right-click your mouse. There will be an option for the
number to be added to your phonebook. Key in the relevant details and click ok.
2. Another way is to select the number – either dialed, received or missed call and right click
on your mouse. You will see the same pop-up window for inputting the details.
Call Features
Auto Accept Calls – Right click on your phone and select Auto accept calls.
Call Hold – Click on the Hold button to place the call on hold.
Do Not Disturb – Click on the DND button or right click on your phone and select Do not
disturb and all calls to the user will be directed to the voicemail
Conference Call – Place the call on hold. Dial the 2nd number from either the number input
field or from your contact list. Click on the CONF button and the call will be bridged.
Call Transfer – Click on the XFER button and dial the transferring number from either the
number input field or from your contact list..
Jabber – Go to options and then the Jabber tab. Set up the Jabber account. Once it is
connected, you will be able to add and see your contacts in the Jabber Contacts.
Neighborhood – See who’s online in your same LAN.
Voicemail – When there is a voicemail in your mailbox, you will see the message that there
are messages waiting for you. You can either click on the Voicemail button or dial *98.
Call Waiting – When on a call, you can another incoming call flashing on your screen.
7
KIDAtalk Hardware and Software Documentation
ATA – ANALOG TELEPHONE ADAPTOR
Minimum System Requirements
• An active Internet connection
• An active service subscription with KIDAtalk
• You regular telephone set with RJ-11 telephone wire
LINKSYS SPA3102
Voice gateway with Router
8
KIDAtalk Hardware and Software Documentation
9
KIDAtalk Hardware and Software Documentation
Connecting the Voice Gateway
1.
Power off your network devices, including your modem and
PC.
2.
If you have traditional phone service, connect the RJ-11
phone cable (included) to the Voice Gateway’s LINE port and your
telephone wall jack.
3.
Connect one end of a different RJ-11 phone cable to the
Voice Gateway’s PHONE port. Connect the other end to your analog
telephone or fax machine.
IMPORTANT: Do not connect the PHONE port to a telephone
wall jack. Make sure you only connect a telephone or fax machine to
the PHONE port. Otherwise, the Voice Gateway or the telephone
wiring in your home or office may be damaged.
Voice Gateway with Router
4.
Connect one end of an Ethernet network cable (included) to
the ETHERNET port of the Voice Gateway. Connect the other end to
the Ethernet port of your PC.
5.
Connect one end of a different Ethernet network cable to
the INTERNET port of the Voice Gateway. Connect the other end to
your cable/DSL modem.
6.
Power on the broadband modem.
7.
Connect the included power adapter to the Voice Gateway’s
power port, and
then plug the power adapter into an electrical outlet. The power LED on
the
front panel will light up as soon as the Voice Gateway powers on.
8.
Power on your PC.
NOTE: Make sure your PC’s Ethernet adapter is set to obtain an IP
address automatically. For more information, refer to Windows Help.
How to make a Call?
If you currently have a DECT phone at home, you will still use the same
calling pattern and style for local calls (mobile, land line). For IDD calls,
you are required to add the prefix "00"before you input the country code,
area code and number.
10
KIDAtalk Hardware and Software Documentation
SNOM300/Aztech IP150 – IP Telephone
DELIVERY CONTENT
• Base unit with display and keypad
• Handset and Handset cradle
• Power Supply
QUICK INSTALLATION GUIDE
11
KIDAtalk Hardware and Software Documentation
12
KIDAtalk Hardware and Software Documentation
SETTING UP SNOM 300/IP150 – IP PHONE
CONNECTING SNOM 300/IP150 – IP PHONE
13
KIDAtalk Hardware and Software Documentation
14