1
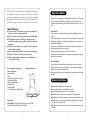
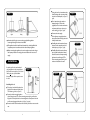
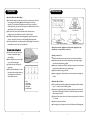
Maintenance
AVCH60 COOKER HOOD
Do not use a corrosive detergent.
Whilst the filters are removed, clean off any residual grease from the
housing unit to avoid the risk of fire.
After cleaning, leave the filters to dry before replacing them on the
appliance.
When replacing the grease filters, ensure that the locking mechanism is
facing down.
For extraction or re-circulation
Installation Instructions and User Guide
Fitting and Replacing the Active Carbon Filter
If the cooker hood is used in re-circulation mode, an activated charcoal
filter must be inserted in addition to the aluminium grease filters. These
charcoal filters are designed to absorb cooking odours and are located in
the canopy above the grease filters.
Before fitting or replacing charcoal filters, the grease filters must first be
removed (see previous section).
The charcoal filter is not washable and should be replaced when it no
longer absorbs kitchen odours effectively. Under normal use, this would
be approximately every 4 to 6 months depending on the amount of use
the appliance gets.
Used charcoal filters can be disposed of with normal household waste.
Replacement charcoal filters are available from Addvent.
IMPORTANT SAFEGUARDS
WHEN USING ANY ELECTRICAL APPLIANCE, BASIC SAFETY
PRECAUTIONS SHOULD ALWAYS BE FOLLOWED.
PLEASE READ ALL INSTRUCTIONS CAREFULLY
AND RETAIN FOR FUTURE REFERENCE
RoHS
COMPLIANT
Waste electrical products should not be disposed of with household waste. Please recycle where
facilities exist. Check with your local authority or retailer for recycling advice
Telephone: 0117 923 5375 Fax: 0117 923 5374
Victoria Road, Avonmouth, Bristol BS11 9DB www.addvent.co.uk
ISSUE 1/0108
IF IN ANY DOUBT ABOUT THE INSTALLATION OR USE OF THIS
PRODUCT, CONSULT A COMPETENT ELECTRICIAN.
The AVCH60 is a 60cm ‘domestic-only’ Stainless Steel cooker hood
for installation over an electric or gas hob. The hood can be used for
extraction to the outside of a building or for recirculation. Equipped
with a powerful 3-speed electric motor, twin 12v lights and non stick
grease filter, it quietly produces strong suction and is easy to clean.
Safety Warning
Operation Modes
This cooker hood is designed to be installed for air extraction or air re-circulation.
For air re-circulation charcoal filters are required. For air extraction, use the
150mm diameter flexible ducting provided. Please call Addvent for advice on 0117 923
5375.
Air Extraction:
The cooker hood is for domestic use only and is not suitable for
barbecues or other commercial purposes.
The cooker hood should only be operated by a responsible adult.
The air is drawn into the appliance and cleaned by the grease filters and directed
outside.
This appliance should be installed by a competent person, if
unsure about installation get a qualified electrician to install the
appliance.
If the on-site ventilation system does not have a non-return flap, the non-return flap
supplied with the appliance must be fitted in the exhaust socket in the motor unit
(see installation instructions).
The cooker hood and filter mesh should be cleaned regularly to
maintain efficient working.
Having a non-return flap fitted to the ducting ensures that air, once ducted to the
outside, cannot get back into the room again.
Before cleaning, please switch the power off at the main supply.
The flap remains closed when the cooker hood is switched off.
Clean the cooker hood according to the instructions.
If there is any fault with the appliance, please call Addvent on
0117 923 9375 for advice.
When the cooker hood is switched on, the non-return flap opens for the cooking
vapours to be ducted away.
Air Recirculation:
Before installation, unpack hood
and check contents.
Appliance Dimensions
You should receive:
Hood
Decorative Chimney (bottom and top)
Hood Mounting Bracket
Chimney Mounting Bracket
Discharge Collar
Installation Manual
2m x 150mm diameter Flexible Ducting
The air is drawn in and cleaned first by the grease filters and then by a charcoal
filter. The cleaned air is then re-circulated back into the kitchen through grilles in
the top of the cooker hood extension piece.
Before using the cooker hood in recirculation mode, ensure that the charcoal filter
is in place.
Before Installation
Before installation, please ensure the area is clean.
After installation, make sure that the extractor is level.
It is prohibited to fit a cooker hood over a solid fuel stove.
All materials used in the fitment of this product must be non-flammable.
This appliance must not be connected to a chimney or vent flue which is in use.
Specification
Model AVCH60: Ratings: 220-240V ~50Hz; Motor input: 125W;
Input: 205W; Air flow: 500m3/h; Lamps: ≤2x40W
Professional advice should be sought if ducting this appliance into a chimney or
vent flue which is no longer in use.
This appliance should not be connected to ducting which ventilates rooms with
fireplaces.
2
3
Figure 1
Attention should be given to ensure that any applicable regulations
concerning discharge of exhaust air are fulfiled.
This appliance should be installed and maintained by a suitably qualified and
competent person in accordance with the relevant safety regulations.
Before connecting the appliance to the mains supply, ensure that the voltage
and frequency details on the rating plate are consistent with the source of
supply.
Installation
As stainless steel hoods scratch and mark
easily, carefully remove the protective plastic
film from all exterior surfaces of the hood and
chimney only prior to final installation.
If using the hood in air extraction mode
fit the discharge collar (non-return flap)
into the air outlet adaptor (see Figure 4,
right).
For air extraction mode, attach an
adequate length of 150mm duct
(supplied) to the air outlet termination,
and connect the duct to the vent (on
wall or ceiling) (see Figure 5, right).
Connect the mains supply.
Fix the chimney mounting bracket to
the top Decorative Chimney piece with
chimney bracket screw.
Carefully place the decorative chimney
bottom into the recessed area of the
hood body top (see Figure 5, right)..
Carefully slide the decorative chimney
top up inside the decorative chimney
bottom. Secure the chimney mounting
bracket to the wall using the ST5 x
50mm mounting screws and dry wall
anchors and located on the wall.
Figure 4
Figure 2
Figure 5
Figure 6
At least two people will be required to mount
the hood.
Installing the hood
The cooker hood should be placed at a
height of 65cm above an electric hob or
75cm above a gas hob (see Figure 2).
Secure the hood mounting bracket to
the wall using the two ST5 x 50mm mounting screws and dry wall anchors.
Align the hood body with the hood mounting bracket. Gently lower the hood
until it securely engages the bracket. (see Figure 3, opposite).
Ensure the hood is level then fasten the hood body with the two screws at the
rear.
4
Figure 3
5
Operation
Maintenance
Operation (Extraction Mode Only)
Care should be taken if operating the cooker hood at the same time, and in the
same vicinity, as other heating appliances which depend on air for their
operation. This may include such appliances as wood, oil, gas or coal-fired
boilers and heaters, gas ovens, hobs and cookers, and continuous flow or other
water heaters. Please seek specialist advice.
The cooker hood, when used in extraction mode, will draw air from
neighbouring rooms in addition to the room in which it is fitted.
In addition, harmful gases from the heating appliance may be drawn from the
chimney / ducting back into the room with potentially fatal consequences.
To ensure safe operation, an under-pressure of 0.04mbar (4pa) is the maximum
permissible in the room. Please seek specialist advice.
Always disconnect the appliance from the mains supply before any
maintenance or repair work is carried out.
To operate your cooking hood:
To start the motor, press the button
to select the required fan speed
(low/mid/high).
Cleaning cooker hood
Stainless steel surfaces and controls are prone to scratches and abrasions.
Press the light button to turn the light
on, to switch off press again.
External surfaces and controls can be cleaned using a warm damp sponge or
soft cloth with a little washing up liquid.
To switch the motor off, press the
stop button.
Always use a well wrung out cloth for cleaning the controls as too much water
can penetrate the electronics and may cause damage.
The fan should be allowed to run for a
few minutes after cooking to allow any
remaining odours and fumes to be
removed from the room.
Wipe the surfaces dry using a soft cloth.
Never use aggressive / abrasive cleaners or solvents as these may damage the
surface.
0
1
2
3
4
6
STOP
LOW SPEED
MEDIUM SPEED
HIGH SPEED
LIGHT BUTTON
Aluminium Grease Filters
The re-usable aluminium filters supplied with this appliance should be cleaned
every 3 – 4 weeks to avoid a build up of grease.
To remove the grease filter, release the locking mechanism at the front of the
filter, lower the filter slightly and unhook it at the back taking care to hold the
filter securely at all times.
To clean the filter, place it into a bowl of warm soapy water and soak for about
2 – 3 minutes
Clean the mesh with a soft brush.
Do not apply too much pressure as the mesh is delicate and will damage easily.
7