1
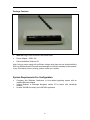
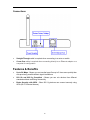
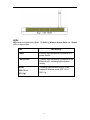
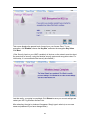
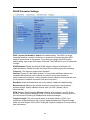
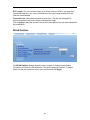
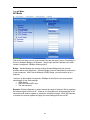
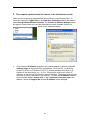
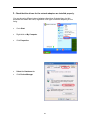
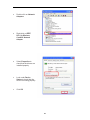
802.11g Wireless
Access Point
User’s Guide
Contents
Contents ............................................................................................................2
System Requirements For Configuration...........................................................4
Introduction........................................................................................................5
Connections ......................................................................................................6
LEDs .................................................................................................................7
Wireless Basics .................................................................................................8
Installation Considerations ..............................................................................10
Getting Started ................................................................................................11
Using the Web Configuration Utility.................................................................13
Setup Wizard...................................................................................................15
Advanced Setup ..............................................................................................17
Configuration ...................................................................................................17
Device Information ..........................................................................................18
WLAN Parameter Settings ..............................................................................19
WLAN Partition................................................................................................20
Configuration: AP Mode ..................................................................................21
Access Control Settings ..................................................................................22
Security Settings .............................................................................................23
Administration..................................................................................................24
Misc .................................................................................................................24
Maintenance/Update Firmware .......................................................................25
Configuration File ............................................................................................25
Restart System................................................................................................26
Statistics ..........................................................................................................26
Throughput ......................................................................................................26
Transmitted .....................................................................................................27
Received .........................................................................................................27
WEP Frame Error............................................................................................28
Troubleshooting...............................................................................................29
Technical Specifications ..................................................................................34
2
3
Package Contents
•
IEEE 802.11g 2.4GHz Wireless LAN Access Point
•
Power Adapter – 5VDC, 2A
•
Quick Installation Guide on CD
Note: Using a power supply with a different voltage rating than the one included with the
802.11g Wireless Access Point will cause damage and void the warranty for this product.
If any of the above items is missing, please contact your reseller.
System Requirements For Configuration
•
•
•
Computer with Windows, Macintosh, or Linux-based operating system with an
installed Ethernet adapter
Internet Explorer or Netscape Navigator version 6.0 or above, with JavaScript
enabled
At least 128 MB of memory and a 500 MHz processor
4
Introduction
The 802.11g Wireless Access Point provides the most expanded user bandwidth
available in an AP. Network members can connect to this AP using any of its channels to
transfer data at speeds never achievable before in a wireless device. The 802.11g
Wireless Access Point operates seamlessly and simultaneously in the 2.4GHz frequency
spectrums supporting the 802.11b and the newer, faster 802.11g wireless standards.
For offices, schools or public hotspots that already use 802.11b devices, the 802.11g
Wireless Access Point is a great way to expand an existing network and enable even
more users to communicate with one another, access data and the Internet. Now, you
can have an AP that will compliment your existing network and protect the investment
you made when you provided the convenience of wireless networking.
The 802.11g Wireless Access Point offers transfer rates up to 54Mbps in the 2.4GHz
band, large data packets travel from the router to a remote desktop or roaming laptop
PC at up to five times the speed of previous wireless devices. Everyone can work faster
and more efficiently or watch a streaming video smoothly. Network administrators can
partition the usage of the 802.11g Wireless Access Point by segmenting the users on
the wireless network by frequency band. Users who require special networking privileges
— access to sensitive information, specific departments or videoconferencing — may
use just the 802.11b and 802.11g channels. This type of user segmentation optimizes
the AP’s performance and delivers the best network experience to each set of users.
The 802.11g Wireless Access Point is ideal for network administrators who require
additional management, firewall, and other network security features. All of the AP’s
settings are easily accessible in the operating system independent, Web-based software
user interface that also features a step-by-step Setup Wizard to get your router up and
running in just a matter of minutes. The 802.11g Wireless Access Point incorporates the
WPA* (Wi-Fi Protected Access) which dynamically encrypts data as it’s being sent.
5
Connections
•
Straight-Through cable is required when connecting to a router or switch
•
Cross-Over cable is required when connecting directly to an Ethernet adapter on a
computer for configuration
Features & Benefits
•
Up to 54 Mbps - Means you can transfer large files up to 5 times more quickly than
was previously possible without signal interference
•
802.11b and 802.11g Compliant - Means you can mix devices from different
standards without sacrificing connectivity
•
Better Security with WPA - Other 802.11g devices can connect securely using
WPA (Wi-Fi Protected Access)
6
LEDs
LED stands for Light-Emitting Diode. The 802.11g Wireless Access Point has 3 Green
LEDs as shown below:
LED
LED Activity
Power
A steady light indicates a connection to a
power source
LAN (10/100)
A steady light indicates a connection to the
Ethernet port; a blinking light indicates
activity
WLAN
A blinking light indicates activity in the
respective wireless mode: 802.11b or
802.11g
(802.11b or
802.11g)
7
Wireless Basics
The 802.11g Wireless Access Point is based on industry standards to provide easy-to
use and compatible high-speed wireless connectivity within your home, business or
public access wireless networks. Strictly adhering to the IEEE standard, the 802.11g
Wireless Access Point will allow you to securely access the data you want, when and
where you want it. You will be able to enjoy the freedom that wireless networking
delivers.
A wireless local area network (WLAN) is a cellular computer network that transmits and
receives data with radio signals instead of wires. Wireless LANs are used increasingly in
both home and office environments, and public areas such as airports, coffee shops and
universities. Innovative ways to utilize WLAN technology are helping people to work and
communicate more efficiently. Increased mobility and the absence of cabling and other
fixed infrastructure have proven to be beneficial for many users.
Wireless users can use the same applications they use on a wired network. Wireless
adapter cards used on laptop and desktop systems support the same protocols as
Ethernet adapter cards.
Under many circumstances, it may be desirable for mobile network devices to link to a
conventional Ethernet LAN in order to use servers, printers or an Internet connection
supplied through the wired LAN. A Wireless Access Point (AP) is a device used to
provide this link.
People use wireless LAN technology for many different purposes:
Mobility - Productivity increases when people have access to data in any location within
the operating range of the WLAN. Management decisions based on real-time information
can significantly improve worker efficiency.
Low Implementation Costs – WLANs are easy to set up, manage, change and
relocate. Networks that frequently change can benefit from WLANs ease of
implementation. WLANs can operate in locations where installation of wiring may be
impractical.
Installation and Network Expansion - Installing a WLAN system can be fast and easy
and can eliminate the need to pull cable through walls and ceilings. Wireless technology
allows the network to go where wires cannot go - even outside the home or office.
Inexpensive Solution – Wireless network devices are as competitively priced as
conventional Ethernet network devices.
Scalability – WLANs can be configured in a variety of ways to meet the needs of
specific applications and installations. Configurations are easily changed and range from
peer-to-peer networks suitable for a small number of users to larger infrastructure
networks to accommodate hundreds or thousands of users, depending on the number of
wireless devices deployed.
8
The 802.11g Wireless Access Point is compatible with the IEEE802.11g wireless
products: 802.11g Wireless Cardbus Adapters used with laptop computers and
802.11g Wireless PCI cards used with desktop computers
Standards-Based Technology
The 802.11g Wireless Access Point utilizes the 802.11b and 802.11g standards.
The IEEE 802.11g standard is an extension of the 802.11b standard. It increases the
data rate up to 54 Mbps within the 2.4GHz band. 802.11g utilize OFDM technology.
This means that in most environments, within the specified range of this device, you will
be able to transfer large files quickly or even watch a movie in MPEG format over your
network without noticeable delays. This technology works by transmitting high-speed
digital data over a radio wave utilizing OFDM (Orthogonal Frequency Division
Multiplexing) technology. OFDM works by splitting the radio signal into multiple smaller
sub-signals that are then transmitted simultaneously at different frequencies to the
receiver. OFDM reduces the amount of crosstalk (interference) in signal transmissions.
The 802.11g Wireless Access Point offers the most advanced network security features
available today, including: WPA.
In addition to its compatibility with 802.11g devices, the 802.11g Wireless Access Point
is compatible with 802.11b devices. This means that if you have an existing 802.11b
network, or a network with a mixture of 802.11g and 802.11b, the devices in that network
will be compatible with the 802.11g Wireless Access Point.
9
Installation Considerations
Desktop and laptop computers with wireless network adapters installed can access the
802.11g Wireless Access Point from virtually anywhere within its operating range. Keep
in mind, however, that the number, thickness and location of walls, ceilings, or other
objects that the wireless signals must pass through, may limit the range. Typical ranges
vary depending on the types of materials and background RF (radio frequency) noise in
your home or business. The key to maximizing wireless range is to follow these basic
guidelines:
1
Keep the number of walls and ceilings between the 802.11g Wireless Access Point and
other network devices to a minimum - each wall or ceiling can reduce your wireless
product’s range from 3-90 feet (1-30 meters.) Position your devices so that the number
of walls or ceilings is minimized.
2
Be aware of the direct line between network devices. A wall that is 1.5 feet thick (.5
meters), at a 45-degree angle appears to be almost 3 feet (1 meter) thick. At a 2-degree
angle it looks over 42 feet (14 meters) thick! Position devices so that the signal will travel
straight through a wall or ceiling (instead of at an angle) for better reception.
3
Building materials can impede the wireless signal - a solid metal door or aluminum studs
may have a negative effect on range. Try to position wireless devices and computers
with wireless adapters so that the signal passes through drywall or open doorways and
not other materials.
4
Keep your product away (at least 3-6 feet or 1-2 meters) from electrical devices or
appliances that may generate extreme RF noise.
10
Getting Started
A. First, connect the power adapter to the receptor at the back panel of
the 802.11g Wireless Access Point and then plug the other end of the power adapter to
a wall outlet or power strip. The Power LED will turn ON to indicate
proper operation.
B. Connect your 802.11g Wireless Access Point LAN port with your straight-through
Ethernet cable into a switch/router. Link LED for the LAN Port will illuminate to indicate a
proper connection.
C. Desktop or laptop computers with 802.11b or 802.11.g wireless adapters can connect
to the 802.11g Wireless Access Point.
Right out of the box, with its default settings, the 802.11g Wireless Access
Point will automatically connect with other wireless products
IP ADDRESS
Note: If you are using a DHCP-capable router in your network setup you will
not need to assign a static IP Address.
If you need to assign IP Addresses to the computers on the network, please
remember that the IP Address for each computer must be in the same IP
Address range as all the computers in the network, and the Subnet mask
must be exactly the same for all the computers in the network.
For example: If the first computer is assigned an IP Address of 10.0.0.2 with
a Subnet Mask of 255.0.0.0, then the second computer can be assigned an
IP Address of 10.0.0.3 with a Subnet Mask of 255.0.0.0, etc.
IMPORTANT: If computers or other devices are assigned the same IP
Address, one or more of the devices may not be visible on the network.
11
An Infrastructure wireless network contains an Access Point or Router. The
Infrastructure Network example, shown here, contains the following network devices:
For a typical wireless setup (as shown above), please do the following:
1.
You will need a broadband Internet access (Cable/DSL) subscription
2.
Consult with your Cable/DSL provider for proper installation of the modem
3.
Connect the modem to an Ethernet broadband router.
4.
Connect the router to the 802.11g Wireless Access Point.
5.
If you are connecting a desktop computer in your network, you can install any 11g
compliant wireless PCI adapter into an available PCI slot, or install a WLAN 11g
CardBus card into a Notebook PC.
12
Using the Web Configuration Utility
The easiest and quickest way to connect to a wireless network using your
802.11g Wireless Access Point is to use the Configuration Utility. Open your webbrowser and type in the IP Address of the 802.11g Wireless Access Point. The 802.11g
Wireless Access Point default IP Address is shown below:
•
Open the web browser
•
Type in the IP Address of the
Access Point
Note: if you have changed the default IP Address assigned to the 802.11g Wireless
Access Point, make sure to enter the correct IP Address.
•
Type admin in the User
Name field
•
Leave the Password blank
•
Click OK
13
Once entered, the Current Status screen will appear.
There are three other options available in this screen: Setup Wizard, Advanced
Setup, and Statistics.
Current Status
The left-hand side of the Current Status screen provides basic information about your
wireless access point, including the MAC Address, IP Address, Subnet Mask and Default
Gateway.
On the right-hand side, you’ll find the SSID (Service Set Identifier), the Channel number,
Rate, and Security Level. Please note this information, since you’ll need it when you use
the Setup Wizard.
All these settings, with the exception of the MAC Address, may be changed or modified
using the Advanced Setup screen.
(If the Security Level on your WAP is enabled, all devices on the network must also be at
the same level of security, using the identical security system and encryption codes. For
initial setup, it is recommended that security be disabled.)
14
Setup Wizard
Using the built-in Setup Wizard is the easiest and quickest way to connect to a wireless
network. To take advantage of this convenient technology, simply click Setup Wizard at
the top of the Current Status screen. The following screen will appear.
Click Next to continue.
Enter the SSID (Service Set Identifier) as displayed on the Current Status screen. You
may either accept the default Channel number, or enter a new Channel number.
Click Next.
15
This screen displays the present level of security on your Access Point. To use
encryption, click Enabled, choose the Key Size, and enter the encryption Key Value.
Click Next.
(If the Security Level on your WAP is enabled, all devices on the network must also be at
the same level of security, using the identical security system and encryption codes. For
initial setup, it is recommended that security be disabled.)
Just that easily, your setup is completed. Click Reboot to save your current settings and
restart your 802.11g Wireless Access Point.
After rebooting, the sign-in window will reappear. Simply type in admin (or a new user
name and password if you have changed them).
16
Advanced Setup
Configuration
To change the configuration of your Access Point, click on Advanced Setup at the top
of the Current Settings screen. The following screen will appear.
This screen displays the default settings of the 802.11g Wireless Access Point and
allows you to change settings and values.
The MAC (Media Access Control) Address is a unique identification number assigned
by the factory and cannot be modified.
Get IP From: Choose Manual or Auto. If you select Manual you will manually input the
IP Address. If you select Auto the DHCP server on your network will automatically
assign an IP Address.
IP Address: The default IP Address is 10.0.0.1.
Subnet Mask: The Subnet Mask is 255.0.0.0
Default Gateway: Input the IP Address of the Default Gateway (the router in the
network).
Click Apply if you have made any changes.
Note: In the Configuration screens that follow, you will be able to configure settings
for 802.11g devices in your network. Settings that you input for 802.11g devices will
also apply to 802.11b devices in your network.
For more detailed information, click on Configuration to bring up the following screen
with an expanded menu.
Click Device Information.
17
Device Information
This screen allows you to modify for the AP System Name and System Contact
information. Just type in your new information in the whiteout fields, and click on Apply
to save the information.
Click WLAN Parameter Settings.
18
WLAN Parameter Settings
SSID: (Service Set Identifier): default is the default setting. The SSID is a unique
name that identifies a network. All devices on a network must share the same SSID
name to communicate on the network. If you choose to change the SSID from the
default setting, input a new SSID name in this field. The SSID can be up to 32 characters
in length.
SSID Broadcast: Enable will allow all WLAN clients to observe its Wireless LAN
network presence. Disable will make the Access Point invisible to any client scanning.
Frequency: The frequency range will be displayed.
Channel: Channel 6 is the default channel. You may select a different channel, but
remember that all devices on the network must be set to the same channel to
communicate on the network. (Current wireless network adapters will automatically scan
for the channel to establish connection with the access point.)
Data Rate: Select the transmission rate for the network. Auto is the default setting.
Beacon Interval: Beacons are packets sent by an Access Point to synchronize a
wireless network. Specify a Beacon interval value (20-1000.) Default (100) is
recommended.
DTIM: (Delivery Traffic Indication Message) Enter a value between 1 and 255 for the
Delivery Traffic Indication Message (DTIM.) A DTIM is a countdown informing clients of
the next window for listening to broadcast and multicast messages.
Fragment Length: This value should remain at its default setting of 2346. If you
experience a high packet-error rate, you may slightly decrease your Fragment Length
within the value range of 256 to 2346. Setting the Fragment Length too low may result in
poor performance.
19
RTS Length: This value should remain at its default setting of 2346. If you encounter
inconsistent data flow, only minor modifications to the value range between 256 and
2346 are recommended.
Transmit Power: Adjust the transmission power here. This tool can be helpful for
security purposes if you wish to limit the transmission range.
Click on Apply to have the Access Point save the new options once you have completed
the modification.
WLAN Partition
The WLAN Partition window allows the user to enable or disable Internal Station
Connection or Ethernet to WLAN Access. The default setting is Enabled. To disable,
simply un-click the check-box next to your selection and click Apply.
20
Click AP Mode.
AP Mode
This device can work not only as an Access Point but also as a Point-to-Point Bridge, a
Point-to- Multipoint Bridge or a Repeater. Simply input the MAC address of the other
remote Conceptronic 108Mbps Access point(s).
Bridge: Wireless Bridge can connect another Wireless Bridge and also connect
wireless clients at the same time. Wireless Bridge is used to transparently connect two
or more networks. With Point-to-Multipoint (PtMP) Bridge, you can connect up to 8
networks.
However, all the bridged Conceptronic 108Mbps Access Point in the same domain
should apply for the same settings.
• WPA disable
• Share the same WEP keys
• The same channel
Repeater: Wireless Repeater is used to extend the range of wireless LAN by repeating
the wireless signal of the root AP. However, the throughput will be dropped due to the
connection with another repeater to extend the wireless coverage. When AP Repeater
is enabled, the remote repeater will apply the same settings from the root AP.
21
Access Control Settings
Control:
Disabled - Disable the Access Control feature
Accept - Accept the MAC Addresses in the list into the network
Reject - Reject the MAC Addresses in the list from participating in the network
Input MAC Address: Input the MAC Addresses into the list. Click “Save” to add the
address into the Current Access Control List.
MAC Address (Media Access Control Address)
A unique hardware address that identifies a device on a network. It is
assigned at the factory and cannot be changed. Usually you will find this
address on a sticker on the device or on the packaging. (Please use the
following format when entering the MAC address- xx:xx:xx:xx:xx:xx)
Current Access Control List: An administrator can view or delete any of the added
item from the table shown here.
22
Security Settings
Wireless Band: IEEE 802.11g will be the only choice here.
Authentication: Select from one of the following:
Open System: the 802.11g Wireless Access Point will be visible to all devices on
the network. Open System is the default setting.
Shared Key: in order to access the 802.11g Wireless Access Point on the network,
the device must be listed in the Key Table for HexValue
WPA: click WPA and Apply. Then, the further settings will come up for WPA
complete settings.
Encryption: Select Enabled or Disabled (the default setting is Disabled)
Encryption Key Type: Select HEX (Hexadecimal) or ASCII
Hexadecimal digits consist of the numbers 0-9 and the letters A-F ASCII (American
Standard Code for Information Interchange) is a code for representing English
letters A-Z..
WEP Key Size: Select 64, 128 or 152 bits
Valid Key: Select the key that you will use from one of the four keys in the Key Table.
Key Table: Input up to 4 keys using the format that you have selected in WEP Key
Type.
23
Administration
User Name: The default User Name is admin.
Old Password: To change your password, first enter the old password.
New Password: Enter the new password.
Confirm New Password: Re-enter the new password.
To save changes, click Save.
Misc
Telnet Service: When enabled, Administrator can access the device configuration via
Telnet operation.
Timeout: Under the Telnet session, the device will log off the administrator if he is
inactive for more than the timeout period specified here.
24
Maintenance/Update Firmware
Update File: Click on Browse to find the new firmware file from your hard drive.
After you find the updated firmware file located on your hard drive, click OK to start the
firmware update process.
Configuration File
Update File: Click on Browse to find the new configuration file from your hard drive.
After you have found the configuration file located on your hard drive, click ‘OK’ to start
the uploading process to the device.
25
Restart System
Apply Settings and Restart: If you have made any changes to the configuration
settings, click Restart to apply the changes.
Statistics
Throughput
Displays the WLAN 11g throughput statistics for received, transmitted and RTS
communications.
26
Transmitted
Displays the 11g WLAN Tx Fragment Count, Multicast Tx Frame Count, Tx Error Count,
Total Tx Retry Count, Tx Multiple Retry Count.
Received
Displays the 11g WLAN Rx Fragment Count, Multicast Rx Frame Count, Rx Frame FCS
Error Count, Rx Frame Duplicate Count and Ack Rx Failure Count.
27
WEP Frame Error
This statistics page displays the counting for: WEP excluded Frames Count and
WEP ICV Error Count.
28
Troubleshooting
This chapter provides solutions to problems that can occur during the installation and
operation of the 802.11g Wireless Access Point. We cover various aspects of the
network setup, including the network adapters. Please read the following if you are
having problems.
Note: It is recommended that you use an Ethernet connection to
configure the 802.11g Wireless Access Point.
1. The computer used to configure the 802.11g Wireless Access Point
cannot access the Configuration menu.
•
Check that the Ethernet LED on the 802.11g Wireless Access Point is ON. If the
LED is not ON, check that the cable for the Ethernet connection is securely
inserted.
•
Check that the Ethernet Adapter is working properly. Please refer to item 3 in this
Troubleshooting section (Check that the drivers for the network adapters are
installed properly) to check that the drivers of the Ethernet Adapter are loaded
properly.
•
Check that the IP Address is in the same range and subnet as the 802.11g
Wireless Access Point.
Note: The default IP Address of the 802.11g Wireless Access Point is 10.0.0.1. All the
computers on the network must have a unique IP Address in the same range, e.g.,
10.0.0.x. They must all have the same subnet mask, e.g., 255.0.0.0. Any computers that
have identical IP Addresses will not be visible on the network.
•
Do a Ping test to make sure that the 802.11g Wireless Access Point is responding.
Go to Start>Run>Type Command>Type ping 10.0.0.1 A successful ping will
show four replies.
Note: If you have changed the default IP Address, make sure to ping the new IP Address
assigned to the 802.11g Wireless Access Point.
29
2. The computer cannot access the Internet in the Infrastructure mode.
Make sure the computer is associated and joined with the correct Access Point. To
check this connection: Right-click on the Local Area Connection icon in the taskbar>
select View Available Wireless Networks. The Connect to Wireless Network screen
will appear. Please make sure you have selected the correct available network, as
shown in the illustrations below.
•
Check that the IP Address assigned to the wireless adapter is within the same IP
Address range as the access point and gateway. (Since the 802.11g Wireless
Access Point has an IP Address of 10.0.0.1, wireless adapters must have an IP
Address in the same range, e.g., 10.0.0.x. Each device must have a unique IP
Address; no two devices may have the same IP Address. The subnet mask must be
the same for all the computers on the network.) To check the IP Address assigned
to the wireless adapter, double-click on the Local Area Connection icon in the
taskbar > select the Support tab and the IP Address will be displayed.
30
3. Check that the drivers for the network adapters are installed properly.
You may be using different network adapters than those illustrated here, but this
procedure will remain the same, regardless of the type of network adapters you are
using.
•
Go to Start
•
Right-click on My Computer
•
Click Properties
•
Select the Hardware tab.
•
Click Device Manager
31
•
Double-click on Network
Adapters
•
Right-click on IEEE
802.11g Wireless
Cardbus Network
Adapter
•
Select Properties to
check that the drivers are
installed properly
•
Look under Device
Status to check that the
device is working properly
•
Click OK
32
4. What variables may cause my wireless products to lose reception?
Wireless products let you access your network from virtually anywhere you want.
However, the positioning of the products within your environment will affect the wireless
range. Please refer to Installation Considerations in the Wireless Basics section of
this manual for further information about the most advantageous placement of your
wireless products.
5. Why does my wireless connection keep dropping?
•
•
•
Antenna Orientation- Try different antenna orientations for the 802.11g Wireless
Access Point. Try to keep the antenna at least 6 inches away from the wall or other
objects.
If you are using 2.4GHz cordless phones, X-10 equipment or other home security
systems, ceiling fans, and lights, your wireless connection will degrade dramatically
or drop altogether. Try changing the Channel on your Access Point and Wireless
adapter to a different Channel to avoid interference.
Keep your product away (at least 3-6 feet) from electrical devices that generate RF
noise, like microwaves, Monitors, electric motors, etc.
6. Everything seems to be properly set up, so why can’t I get a wireless
connection?
Have you enabled wireless encryption? Your Access Point supports wireless encryption
- but remember that to establish a wireless connection while enabling Encryption on the
802.11g Wireless Access Point, you must also enable encryption on all other members
of the network.
•
The Encryption settings are: 64, 128, or 152 bit. Make sure that the encryption bit
level is the same on the Access Point and other network members.
Make sure that the SSID on the Access Point and the computer are exactly the same. If
they are not, wireless connection will not be established. Please note that there are
SSIDs for 802.11g. The default SSID for 802.11g is WLAN.
33
Technical Specifications
Standards
IEEE 802.11g
IEEE 802.11b
IEEE 802.3
IEEE 802.3u
Device Management
Web-Based - Internet Explorer v6 or later; Netscape Navigator v6 or later; or
other Java-enabled browsers
DHCP Client
Network Architecture
Supports Infrastructure Mode
LEDs
Power
WAN
LAN (10/100)
WLAN – 802.11g
Wireless Operating Range*
Indoors - up to 328 feet (100 meters)
Outdoors – up to 1,312 feet (400 meters)
Temperature
Operating: 32ºF to 149ºF (0ºC to 40ºC)
Storing: 4ºF to 167ºF (-20ºC to 65ºC)
Humidity:
95%maximum, non-condensing
* Environmental Conditions may adversely affect wireless signal range
34
Safety and Emissions:
CE
Physical Dimensions:
L = 140mm
W = 110mm
H = 25mm
Wireless Data Rates with Automatic Fallback:
54 Mbps 48Mbps 36Mbps
24Mbps 18Mbps 12Mbps
11Mbps 9Mbps 6Mbps
5.5Mbps 2Mbps 1Mbps
Security:
64, 128, 152-bit WEP (Wired Equivalent Privacy)
WPA - Wi-Fi Protected Access
External Antenna Type:
Detachable Dipole Antenna, Reversed SMA connectors
Wireless Frequency Range:
2.4 – 2.4825 GHz
Modulation Technology:
Orthogonal Frequency Division Multiplexing (OFDM)
PBCC
Complementary Code Keying (CCK)
Media Access Control:
CSMA/CA with ACK
Wireless Transmit Power:
15dBm(32mW)±2dB
Power Adapter:
Ext. Power Supply DC 5V, 2.0A
100V - 240V ~ 50-60Hz
35
Weight:
190g
Receiver Sensitivity:
54Mbps OFDM, 10% PER,-73dBm
48Mbps OFDM, 10% PER,-76dBm
36Mbps OFDM, 10% PER,-82dBm
24Mbps OFDM, 10% PER,-85dBm
18Mbps OFDM, 10% PER,-88dBm
12Mbps OFDM, 10% PER,-89dBm
11Mbps CCK, 8% PER,-91dBm
9Mbps OFDM, 10% PER,-90dBm
6Mbps OFDM, 10% PER,-91dBm
5Mbps CCK, 8% PER,-92dBm
2Mbps QPSK, 8% PER,-93dBm
1Mbps BPSK, 8% PER,-94dBm
36