1
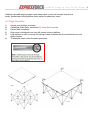
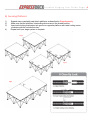
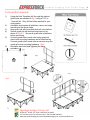
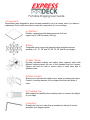
Portable Staging User Guide
Components:
ExpressDeck was designed for quick and easy assembly: set up is a snap, even if you have no
experience! So let’s take a moment to meet the components of your new stage…
A.) Platform
Durable, carpeted modular decks measure 4'x4' and
support up to 2,300 lbs each (1043 kg).
B) Riser
Collapsible risers support the carpeted stage platforms and are
available in 8”, 16”, 24” and 32” (20, 30, 40, and 60 cm) heights.
C) Riser Clamp
Provides increased stability and safety when adjacent risers with
different heights prevent the use of the standard cam lock system.
Clamps can also be used to secure steps to each other and to
adjacent risers.
D) Riser Coupler
Allows you to increase the height of your stage by stacking two risers.
Caution: for safety reasons, do not couple more than two levels of
risers.
E) Coupling Post
Adds support and stability when stacking risers to increase the height
of your stage.
F) Hex Key
Probably the only tool, other than a screwdriver, that you’ll need to
assemble your staging system.
.
Portable Staging User Guide Page |2
Installing a portable staging system never been easier: you're just minutes away from a
sturdy, professional-looking platform that's perfect for nearly any event!
A) Stage Assembly:
1)
2)
3)
4)
5)
6)
Unpack your platform and risers.
If attaching Guard Rails, see section D) Guard Rail Assembly.
Expand riser completely
Align corner locking posts on riser with corner holes on platform
Lock platform to riser by turning the locking screws clockwise with the included hex key until
tightly secured.
To assemble steps, follow the same procedure.
Fig.1
Fig.2
Portable Staging User Guide Page |3
B) Securing Platforms:
1)
2)
3)
4)
Expand risers completely and attach platforms as described in Stage Assembly.
Make sure that the platforms’ interlocking devices are in the closed position.
Insert male locking mechanism into groove on opposite platform and rotate locking screw
clockwise with the included hex key.
Repeat until your stage system is complete.
Fig.1
Fig.2
Fig.3
Portable Staging User Guide Page |4
C) Securing Steps or Risers of Different Heights:
When designing custom stage configurations, you may want to use risers of different heights on
adjacent platforms. Because the interlocking mechanism will not align properly in situations like this,
the staging features an alternate connection method that provides the same level of stability. You
can also use the procedure outlined below to secure steps to each other or to the stage risers.
1)
2)
Expand and align risers. Mount stage platforms as
described in Stage Assembly.
If necessary, loosen clamp by turning knob counterclockwise. Insert clamp between risers and rotate entire
clamp in either direction until aligned properly. (Fig. 3)
Fig.1
Fig.3
Fig.2
Portable Staging User Guide Page |5
D) Stage Riser Coupling
Stacking two risers allows you to extend the height of your platforms.
Caution: do not couple risers more than two levels high!
1)
2)
4)
Expand and both risers completely.
On bottom riser, remove corner locking posts and
replace with bronze coupling posts.
Align coupling posts with holes on bottom of top riser
feet.
Secure stabilizing brackets as illustrated in Fig. 4.
5)
Mount platform as described in Stage Assembly.
3)
Fig.1
Fig.2
Fig.3
Fig.4
Portable Staging User Guide Page |6
D) Guard Rail Assembly:
1)
2)
3)
4)
5)
6)
Using the Hole Template, drill through the marked
guide holes as indicated in Fig.1 using a 7/16” or
11mm drill bit. Only drill the holes required for your
configuration.
Assemble and connect all platforms, risers, and steps
according to the above steps.
Align guard rail with holes and slide rail onto platform.
Secure guard rail with bolt and large hex key as
shown in Fig 2-3. Secure all guard rails to platforms
before continuing.
Connect guard rails to each other using guard rail
side-to-side mounting hardware and a small hex key.
Connect guard rails to each other at corners using the
guard rail corner mounting hardware. Fig 4
Assemble stair hand rails following the same
procedure.
Fig.1
Fig.2
Fig.4
Fig.3
Signature Systems Group, LLC.
50 East 42nd Street, 14th Floor • New York, NY 10017
Tel 212-953-1116 • Fax 212-953-1117 • Toll Free 800-709-8151
www.expressdeckstaging.com www.alphadeckstaging.com www.eventdeck.com