1
Plumbing Connections cont.
Warning: The outlet of the shower acts as a vent and must not
be blocked, restricted or connected to any tap/closure device other
than the handset supplied.
Do not solder within 300mm of the shower unit or allow solder or
flux to fall onto the casings.
Important: An additional independent stop valve complying with the
current water regulations must be fitted in the mains water supply
as a means of isolating the supply to the unit for servicing and/or
maintenance work.
It is essential that all pipe work is flushed through to remove debris
and swarf that could otherwise damage the unit. Once the pipe
work has been flushed through, turn off the water supply at the stop
valve.
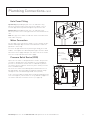
Inlet connector elbow (left side, up, down or rear)
Connect the mains water supply to the inlet port of the shower using
15mm copper pipe (BS EN1057) or 15mm plastic pipe (with insert).
Do not use stainless steel pipe work. If using chrome plated pipe
ensure that the first 25mm of plating is carefully removed to allow
push-fit fitting to grip the inlet pipe.
3
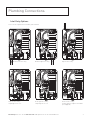
Inlet Entry Options
4
The pipe work can enter the shower unit from 6 different positions.
Bottom left, Bottom right, Top left, Rear left, Rear right or Rear left using an elbow (as shown on page 9).
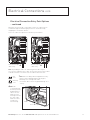
To top or bottom left positions
Outlet connection 5
The shower unit should come supplied with the inlet connection set
for a bottom left position. To change it to a top left position: swivel
the inlet connector elbow from facing downward to facing upward.
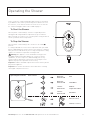
To bottom right position
Unfasten the screw (3) securing the inlet connector elbow clamp
(4), remove the tab from the slot and keep until the inlet pipe is
repositioned. Lift the outlet connection (5) up out of the way from
its position at the bottom of the unit. Pull the inlet connector elbow
towards you and over to the right hand side with the inlet entry
point facing down. Refit the clamp tab (4) into the slot on the right,
refasten the screw (3) and replace the outlet connection (5).
5
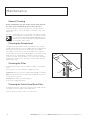
To rear entry positions
Swivel the inlet connector elbow to face a rear entry pipe
connection. If the pipe work entry is from the rear, ensure that
there is space left around the push-fit elbow for future servicing or
alternatively access is possible from the rear. Bring the cold water
pipe to the shower position and connect to the inlet elbow.
4
3
Inlet connector elbow (right side down or rear)
10
Need help? Give us a call on 0844 701 6273 and speak to one of our trained advisors.