1
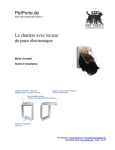
U SER G UIDE
At a glance
Program in new cats
Silent Mode
Night Mode
Vet Mode
Out Lock
In Lock
Porch
with
Reader
and
Light sensor
Page
1
Quick Guide
Function
Button Activation
No rma l Mode
-
This is the default mode on powering up and
requires no button activation. (See also the Help
Section on Page 12.)
Nig ht Mo de
-
Press the Red Button for 1 second:
The red light should then illuminate. During hours of
darkness the green light will illuminate and,
automatically, the system will not allow the cat to go
out.
Vet Mod e
-
Press the Red Button for 5 seconds:
The red light will then flash and the unit will not allow
the cat to go out.
Op en Mo de
-
Press and hold the Red and Green Buttons for
5 seconds:
The green light will flash indicating that the cat flap is
open and any cat can enter.
Sile nt Mo de
-
Press the Green Button for 1 second:
The unit will not beep each time a cat enters.
Pr og ram Mo d e
-
Press and hold the Green Button for 10 seconds:
The green light will flash and you then have 30
seconds to program a new cat by putting the animal
through the cat flap.
Erase Mo de
-
Switch the unit off. Press and hold both the Red and
Green Buttons and then switch the unit on:
The unit will emit a long beep followed by both lights
flashing.
Page
2
Contents
In this guide:
At a glance
1
Quick Guide
2
Contents
3
Introduction
4
-
Safety First
5
6
Installation
Operating Modes:
7
-
9
10
-
13
¾ Programming new cats into the System
10
¾
Normal Mode
10
¾
Night Mode
¾
Vet Mode
11
¾
Silent Mode
11
¾
Open Mode
12
¾
Erase Mode
12
¾
Explanation of LED Indicators
13
10
-
11
Help
14
Technical Information
15
Declaration of Conformity
16
Page
3
Introduction
Your Pet Porte cat flap has been designed to allow your animals easy access
to the outside world whilst keeping other animals out of your house. Unlike
other cat flap products, Pet Porte cat flaps do not require your animal to wear
any collar or bulky accessories that can be disturbing and potentially dangerous
for your animal.
The Pet Porte cat flap uses patented technology and works with the microchip
and its unique identification number that your vet has implanted within your
animal. Whenever your animal is under the porch of the cat flap, the system will
scan the unique identification number and, if that number matches the
identification number already programmed in for that animal, it will unlock the
cat flap and allow that particular animal to enter. If the animal has not already
been programmed into the system, then the cat flap will remain locked and the
animal cannot gain access to the premises.
If you are not sure whether your animal has a microchip then just ask your vet
to scan for it. Most vets recommend that all animals are microchipped as it
increases their chance of being returned to their owners should they get lost; it
is also now a mandatory requirement for the Pet Passport Scheme. The
Pet Porte cat flap is designed to read the most common type of microchip, the
FDX-B; it will not read other types of microchip. If you are not sure what type of
microchip your cat has, then please either ask your vet or visit our website
www.petporte.com and visit the Frequently Asked Questions section
(Question 1 on that page).
Other features the Pet Porte cat flap provides are :1)
Night Mode: Automatically prevents your cat going out during the
hours of darkness. If it is already out, then it can still come in.
2)
Vet Mode: If you want your cat to stay in, even if it is out at the
moment (for example when you want to take your animal to the vet)
then the cat flap will allow your animal to enter but will prevent it from
going out again.
3)
Beep / Silent Mode: This gives the user the ability to switch an audible
beep on or off each time your animal goes in or out.
Page
4
Introduction
Your Pet Porte cat flap should contain the following items. If anything is
missing, please contact your place of purchase immediately.
1)
Interior part of the cat flap, including the transparent flap.
2)
Exterior part of the cat flap.
3)
Porch
4)
Plug-mounted power supply.
5)
12 screws (4 each measuring 50mm, 60mm and 70mm) and 4 nuts
for fixing the cat flap to a door; 8 screw covers.
6)
4 plastic pins and 4 plastic horseshoe-shaped clips.
7)
Instruction manual.
8)
Paper template for drilling and cutting the required holes in the door to
fit the cat flap.
For guarantee purposes proof of purchase is required, so please keep your
receipt.
For a full range of accessories and replacement items for Pet Porte products,
please visit our website:- www.petporte.com
Page
5
Safety First
Pet Porte cat flaps have been designed with safety for you and your animals in
mind. However, please follow these guidelines to ensure your safety, especially
during installation.
1)
Simply clean the cat flap with a damp (not wet) cloth, or antistatic
wipe. Never use household polish as this may damage the product.
2)
Only use the power supply included with the product. Using an
unauthorised power supply will invalidate your guarantee and may
damage the cat flap.
3)
Do not dismantle the cat flap. This could expose you to high voltages
or other risks.
4)
During installation great care must be taken using drills or other
cutting equipment. If you are in doubt then please get a qualified
professional to fit the cat flap for you.
Page
6
Installation
Ple ase note :
Before the cat flap is actually fitted to the required door, it is
recommended that your Pet Porte unit should be assembled, powered up,
programmed for your cat and a check made that the unit works with the
microchip in your animal.
1)
Once you are satisfied that the unit works with your cat’s microchip,
attach the supplied template to the outside of your door, ensuring that
you leave at least 25mm at the bottom of the cat flap so that the power
connector can be fitted. It is recommended that the cat flap should be
installed as low down on the door as is possible.
2)
The template has cross-hair lines in the middle of the page to allow you
to use a spirit level to ensure that the template is fitted level and
perpendicular to the door.
3)
Drill the four holes with a 7mm-diameter drill bit as marked on the
template.
4)
Cut out the large hole as marked on the template by the dashed line,
including the little notch on the top. When cutting this hole keep to the
outside of the dashed line.
5)
Assemble the porch as follows:
i) Cut the plastic tunnel to match the thickness of your door. There
are easy break-out points at 20mm, 25mm and 35mm.
ii) Ensure that the white cable passes through the slot, see Figure 3
overleaf.
Page
7
Installation
5) contd.
iii) Push the porch into place onto the front of the exterior section of
the cat flap, as shown in Figure 1.
Figure 1.
Front of exterior section
Reverse of exterior
section
iv) Insert the four plastic pins through the holes on the reverse side
of the exterior section of the cat flap and through the porch, see
Figure 2.
Figure 2.
The four holes for the plastic pins
Plastic pin (one of four)
Reverse of the exterior section
v) From the inside of the porch, secure the plastic pins in place with
the four horseshoe-shaped clips, as shown in Figure 3.
Figure 3.
Notch for white cable
Horseshoe-shaped clip
(one of four)
Page
8
Installation
6)
Placing the exterior part of the cat flap on the outside of the door, pass
the connector through the large hole that you have cut on the door. Fit
the connector to the electronic board on the interior part of the cat flap.
7)
Select the required length of screw for your particular door and insert
the four supplied screws through the fixing holes of the interior part of
the cat flap and then through the four holes drilled in the door. Offer up
the exterior part of the cat flap so that the screws now go through this
part as well and loosely tighten the supplied nuts onto the ends of the
screws. Ensure that the wire fits into the notch of the large cut-out and it
is not being trapped or squashed anywhere.
8)
Align both parts of the cat flap so that it is straight and level and the flap
can freely move within the cut-out hole. Once this has been done, fully
tighten the screws so that the cat flap is secure on the door.
9)
Fix the eight supplied screw covers to the visible screws.
10)
Attach the power-supply connector and neatly route the wire to the
nearest mains power socket; if required, a five-metre extension cable is
available for purchase from Pet Porte. Plug in the power supply, switch
on and wait for two minutes.
Your Pet Porte cat flap is now ready to accept your first cat.
After installation, Pet Porte recommends that the cap flap be left in
Open Mode for a few days before setting it into Normal Mode, in order
to allow your cat to become familiar with the new cat flap.
Page
9
Operating Modes
Programming new cats into the system:
¾ Because your Pet Porte cat flap is initially supplied unprogrammed, when it is
first powered up both the green and red lights will flash to indicate that there
are no animals programmed in. The door locks will also open, allowing free
access for any cat to enter or exit. Once you have installed your cat flap onto
your door, you must then program the cat flap with all animals that are to use
the cat flap.
¾ When programming the unit with an animal for the first time, ensure that your
pet is nearby as you have 30 seconds in which to introduce the animal
through the cat flap. (You may wish to enlist the help of another person, as
cats are naturally suspicious of anything new!)
¾ Press and hold the green button for about 10 seconds until you hear a beep.
The red light should stop flashing and only the green light should be flashing.
Once you have heard the beep you have 30 seconds to get your pet through
the cat flap. Normally it is easiest to pick up the cat and gently push it through
the cat flap from outside so that it is re-entering the house. As microchips are
normally implanted in the scruff of the neck, it is that part of the animal that
needs to be under the porch area in order to program the unique identification
number for that animal. Once the microchip has been scanned, the cat flap
will beep three times and the green light will stop flashing and remain
constant for another 30 seconds.
¾ If this procedure fails the first time, wait until the green light has extinguished
and repeat the process.
¾ You will need to program the unit with each of your cats by using this method.
Your Pet Porte cat flap can be programmed with up to twelve animals.
Normal Mode:
¾ This is the default mode on powering up the cat flap and will allow only your
cat(s) to enter.
Night Mode:
¾ For a variety of reasons many owners prefer their animals not to go outside at
night. The Pet Porte system provides a mode whereby it will automatically
prevent your pet from going outside during hours of darkness and the cat flap
will automatically unlock when daylight dawns. If your pet is already outside
when darkness falls, the system will still allow the animal to enter.
Page
10
Operating Modes
Night Mode (contd.):
¾ To employ this mode, press the red button for 1 second and then release it.
The unit should beep and the red light will come on to inform you that it is in
Night Mode. When darkness falls, the green light will illuminate, indicating that
the cat flap will be locked. When daylight dawns again outside, the green light
will extinguish, indicating that the cat flap will be unlocked.
Ple ase note :
Night Mode can take up to 30 seconds to start
functioning.
¾ To exit this mode, press the red button again for 1 second and then release it.
The unit should beep and the red light will extinguish.
Vet Mode:
¾ If you are intending to take your pet to the vet, or just want it to stay inside,
then the Pet Porte system provides a mode whereby your cat can enter but
will not be allowed out again.
¾ To employ this mode, press the red button for 5 seconds and then release it.
The unit will beep and the red light will start to flash, indicating that the cat
flap is locked and your cat cannot go out.
¾ To exit this mode, press the red button again for 5 seconds and then release
it. The unit will beep again and the red light will cease to flash.
Silent Mode:
¾ Each time that a recognised animal enters or leaves via the cat flap the unit
will emit a short beep. To silence this beep, press the green button for 1
second and then release it. A beep will be heard, following which no further
beeps will be emitted whenever your pet enters or leaves via the cat flap.
¾ To turn the beep back on, press and hold the green button again for 1
second. The unit will emit a beep, following which a short beep will be heard
whenever your cat enters or leaves via the cat flap.
Page
11
Operating Modes
Open Mode:
¾ In order to give your cat time to adjust to the new cat flap, or in the unlikely
event that you wish your cat flap to be open to any animal entering, the Pet
Porte system provides a mode whereby the cat flap is unlocked and any
animal (microchipped or not) can enter through the cat flap.
Ple ase note :
This mode can be used
whilst waiting to have your
pet microchipped.
¾ To employ this mode, press and hold both the red and green buttons at the
same time for 5 seconds and then release the buttons. The unit will emit a
beep and the green light will flash, indicating that the cat flap is open to all
animals.
¾ To exit this mode, press and hold both the red and green buttons again for 5
seconds and then release the buttons. The unit will emit a beep and the green
light will cease to flash, indicating that the cat flap is back into a normal mode.
Ple ase a lso no te:
Night / Vet Mode can still be used
whilst the Open Mode is in operation.
Erase Mode:
¾ If you wish to erase all programmed animal identification numbers from the
system’s memory, please use the following procedure. However, it must be
noted that once the memory has been erased, you will have to re-program the
unit with any animals that are to use the cat flap. Therefore, please ensure
that you really wish to erase the memory before proceeding.
¾ To erase all microchip numbers, switch the unit off, press and hold both the
green and the red buttons and then switch the unit on. The unit will emit a
long beep followed by both lights flashing.
Remember:
Once the unit’s memory has been erased, it
will have to be reprogrammed before further use!
Page
12
Operating Modes
Explanation of LED Indicators:
FUNCTION
Regular Flash
Regular Flash
Regular Flash
OFF
Learn Mode
OFF
Programming was successful
ON
Night Mode
ON
For 25 seconds
Power on but nothing programmed
OFF (Day)
ON (Night)
OFF
Quick Flash
Vet Mode
Quick Flash
Night & Vet Mode
OFF (Day)
ON (Night)
Quick Flash
OFF
Quick Flash
Quick Flash
OFF
OFF
Open Mode
Open & Vet Mode
Normal Operating Mode
Page
13
Help
If you have any problems whilst using your Pet Porte cat flap, this section will
advise you of the most common solutions. In addition, the Pet Porte website
contains a list of frequently-asked questions and answers which may help you
with your problem. Please visit the website at www.petporte.com.
The most common problem people experience with the Pet Porte cat flap is
that, after entering a number of different modes, they then find it difficult to
return the system to normal mode. This problem is easily remedied by
switching the unit off, leaving it for 10 seconds and then switching it back on
again. The cat flap will then revert to normal mode.
Page
14
Technical Information
Dimensions interior part
(width, height, thickness)
: 195mm, 250mm, 38mm
Dimensions exterior part
(width, height, thickness)
: 195mm, 250mm, 43mm (with maximum
tunnel length).
Dimensions of the porch
: 195mm, 37mm, 142mm.
Power supply
: 12V DC 10.4 Watts
Approval
: BS3535 / EN60742
Readable microchips
: FDX-B in accordance with
ISO 11784 / 11785
This equipment complies with the essential requirements of the RTTE
directive and has been tested to the following standards:
EN3000-2V1.1.1
EN301 489
Patent Number
: 2 381 180
Page
15
Declaration of Conformity
DECLARATION OF CONFORMITY
We,
Pet Porte Limited,
of
La Grande Maison,
Rue de la Grande Maison,
St. Peter,
Guernsey,
GY7 9AL
declare under our sole responsibility that the product,
MODEL:
PP0103
TYPE:
MICROCHIP CAT FLAP
to which this declaration relates, is in conformity with the following standards:
ETS EN 301 489-3
1.2.1 (2000-8)
ETS EN 301 489-3
1.4.1 (2002-8)
ETS EN 300 330-1
1.3.1 (2001-6)
We hereby declare that all essential radio test suites have been carried out and that the
above product is in full conformity.
The TCF for this product is held at the above address.
Name:
N.A.J. Smith
Signature:
Position:
Technical Director
Date:
Page
16
21st October, 2006
Pet Porte User Guide: V1_01_01
2006 : © Pet Porte Limited. All rights reserved.
Page
17