1
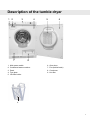
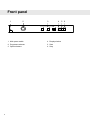
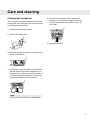
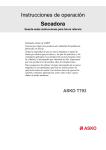
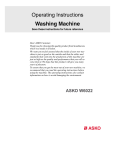
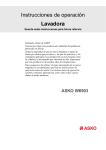
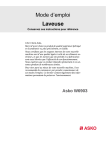
Operating Instructions
Tumble dryer
ISE CD601W
Dear ISE customer!
Welcome to the family of ISE customers.
We hope that you will have many years of use from your new
machine.
The machine has many special functions. To ensure that you
get the most out of these functions, we recommend that you
read the operating instructions before using the machine.
The operating instructions contain information on how to
avoid damaging the environment.
Contents
Before using your machine for
the first time
Do not tumble-dry
Safety instructions
Installation
Safety
Interrupting a programme
Transport/Winter storage
Packing material
Recycling
Child safety
General
Description of the tumble dryer
Front panel
Advice and tips before you
tumble-dry
Have the clothes been spun?
Materials that can be tumble-dried
Materials that must not be
tumble-dried
Static electricity
Tumble drying
Sort your fabrics
Turn on the main power switch.
Open the door, load the items and
then close the door
Select the programme
Selecting Options
Press the Start button
Drying programme finished
Once drying has finished
Care and cleaning
Cleaning the lint filter
Emptying the condensed water
container
Cleaning the outside of the
machine
Cleaning the condenser
2
3
3
4
4
4
4
4
5
5
6
6
7
8
9
9
9
9
9
10
10
10
10
10
12
13
13
13
14
14
14
14
15
Troubleshooting
The machine will not start
Overheating cut-out
Drying takes too long
The washing does not dry, or is
too dry
Error messages
Technical information
Technical data
Standard tests
Service
Before contacting the service
division
Installation
Positioning the tumble dryer
Adjusting the feet
Condensed water
Electrical installation
Door hanging
Follow these instructions:
Quick guide
Fabrics
Turn on the main power switch
Load the garments
Select a programme and any
options
Press the Start button
Drying programme finished
Once drying has finished
16
16
16
16
16
16
17
17
17
18
18
19
19
20
20
21
22
23
24
24
24
24
24
24
24
24
Before using your machine for the first time
Do not tumble-dry
Certain materials are not suitable for
tumble-drying. Always check and follow the
instructions on each item's laundry label. You can
find more information in the chapter "Advice and
tips before you tumble-dry".
Note!
When starting the tumble dryer for the first time
or after a long period without use, you may notice
a slight thumping noise. This noise is completely
normal and will disappear after a few loads.
See the Quick guide on the last page.
3
Safety instructions
Read the operating instructions and
keep them in a safe place!
• Do not install the dryer behind doors with lock,
sliding doors or next to the doors with hinges
so that opening of the dryer door will never be
hindered.
Caution!
• Electrical installation, if required, should be
carried out by a qualified electrician.
• The machine should only be used for
tumble-drying as described in these
instructions.
• Repairs and maintenance relating to safety or
performance must be carried out by a qualified
professional.
• Damaged mains cables must only be replaced
by a qualified electrician.
• Sufficient ventilation is required to prevent
smoke from open fires or fumes from
equipment burning other fuels being sucked
into the room when the tumble dryer is running.
• Do not dry dirty laundry in the tumble dryer.
• Items that are stained with e.g. cooking oil,
acetone, alcohol, petrol, kerosene, stain
remover, turpentine, wax and wax remover
should be washed in hot water with extra
detergent before they go in the tumbler dryer.
• Items such as foam rubber, latex, plastic,
waterproof textiles, rubber-coated items and
clothes and foam-rubber filled cushions must
not be dried in the tumbler dryer.
• Fabric softener or similar products should be
used as per the recommendations of the
detergent manufacturer.
• The machine is not designed to be used by
persons (even children) that are physically or
mentally handicapped or lack experience and
knowledge. Such persons must receive
instruction in how to use the machine from the
person responsible for their safety.
• Children must be watched to ensure they do
not play with the machine.
• Do not let lint accumulate near the dryer
4
Never stop a tumble dryer before the programme
is completed unless you immediately remove all
the laundry and spread it out so that the heat can
disperse.
Installation
See the "Installation" chapter.
Safety
• The machine must not be used for drying items
that have been dry-cleaned at home or fabrics
that may contain residues of flammable liquids.
• The tumble dryer is protected by an
overheating cut-out. This shuts off the machine
if the temperature gets too high.
• A float shuts off the machine in the event of a
blockage in the condensed water hose or if
there is a risk of the condensed water container
overflowing.
Caution!
When the tumble dryer is operating, the back of
the tumble dryer will get very hot. Leave the
machine to cool completely before touching the
back.
Interrupting a programme
You can stop a drying programme by:
• Open the door. The drum will then then stop
automatically.
• Press the main power switch.
• Press the Stop button for three seconds.
When you want to resume tumble-drying, simply
close the door and press the Start button.
Transport/Winter storage
If you need to move your machine or store it over
the winter in unheated premises, make sure that
you drain the condensed water container
beforehand.
Safety instructions
Packing material
Please sort waste materials in accordance with
local guidelines.
Recycling
This machine is manufactured and labelled for
recycling. In order to prevent injuries, the machine
must be made unusable once the decision has
been taken to dispose of it. Contact your local
authority for information about where and how
your machine can be recycled correctly.
5
Child safety
General
Do not allow children to play with the
tumble dryer.
The tumble dryer does not start automatically
when the door is closed (if a child pulls the door
shut from the inside, for example).
6
Description of the tumble dryer
1 2
3
5
6
8
7
1.
2.
3.
4.
5.
4
Main power switch
Condensed water container
Panel
Type plate
Lint filter holder
6.
7.
8.
9.
Outer door
Fan (behind hatch)
Condenser
Lint filter
9
9
7
Front panel
1
2
1 Main power switch
2 Programme selector
3 Options buttons
8
3
4
4 Display window
5 Start
6 Stop
5 6
Advice and tips before you tumble-dry
Here are some tips that may help you before you
begin tumble-drying.
Materials that must not be
tumble-dried
Have the clothes been spun?
Items to be tumble-dried should be spun at 1000
rpm or faster. Higher spin speeds save both
energy and drying time.
Materials that can be tumble-dried
This symbol means that the material is suitable
for tumble-drying. Fabrics best suited to
tumble-drying are cotton fabrics, terry cloth and
synthetic fibres. Garments will be softer and lighter
when tumbled than when hung out to dry.
Note!
The tumble dryer does not cause any significant
wear to fabrics. The lint that is trapped in the lint
filter consists of dust and fibre residues which
form when the items are used.
This symbol means that the material is not
suitable for tumble-drying. Certain materials may
melt or become a fire hazard if exposed to heat,
and others can lose their shape or shrink.
And do not tumble-dry
•
•
•
•
•
materials labelled "Do not dry near heat".
garments that have been dry-cleaned at home.
plastic foam.
fibreglass material.
wool must not be tumble-dried because of the
risk of felting.
Static electricity
To reduce the risk of static electricity in the laundry
after tumble drying you can:
• Use fabric softener when washing.
• Wait five minutes after the drying program ends
before opening the door and removing the
laundry from the dryer.
Note!
If the door is opened during the programme, the
programme will be interrupted and will return to
the start. The clothes may be too damp or too
dry as a result.
9
Tumble drying
Below are step-by-step instructions to help you
achieve the best possible tumble-drying results.
1
Sort your fabrics
You will achieve the most uniform drying
results if the items are made of the same
type of material. Do up zips and buttons, fasten
belts, sort the items and adjust the load and
temperature.
2
3
4
Turn on the main power switch.
Open the door, load the items
and then close the door
Select the programme
Guidelines as to what specific
programmes can be used for.
Auto extra dry
This programme is for items that are particularly
difficult to dry, e.g. jeans with very thick seams.
Note!
Knitted fabrics in particular are prone to
shrinkage. Use the Auto dry, Auto normal dry or
Auto Iron dry programmes for these items.
Stretch clothes back into shape immediately
after drying.
Auto dry and Auto normal dry
These programmes shut off the heat once the
load is dry but before it is "over dry". The Auto dry
programme shuts off the heat slightly later than
Auto normal dry. Use trial and error to find out
what works best. Use these programmes when
you want items to be completely dry.
Auto Iron dry
This programme shuts off the heat once the load
is just damp enough for ironing or pressing.
10
Time programme
The programme length you choose depends on
what you intend to do with the items after drying
them. Use trial and error to find out what works
best. When you use Timed dry to tumble-dry a
load of mixed fabrics, some of the garments may
remain damp. Tumble-dry any damp garments
for a further 30 minutes or so using the Timed dry
programme.
Note!
When using the Timed dry programme, garments
can become “over-dry” if you have selected too
long a drying time. This can cause the items to
shrink or crease and become rough. Synthetic
materials can also become charged with static
electricity.
Revitalise
Use the Air fluff programme when you just want
to refresh, air or soften up items.
Specify the programme time by pressing the
button with the time symbol. The time is shown
on the display and you can choose a programme
time between 30 minutes and 3 hours.
Tumble drying
Programme chart
Here we present a few examples of the energy and time consumption of a few different programme
settings. Consumption can vary according to room temperature, humidity, load, variations in the power
supply and selected options
For the consumption values given below, the requirements are as follows:
Temperature of intake air:
Moisture content of intake air:
Drying temperature:
Heater output:
23°C
55 %
Normal or low
2500W
Programme chart
Program
Material
Temperature
Max. load
(kg)
Auto extra dry
Cotton, linen
Normal
7.0
Auto dry
Cotton, linen
Normal
Auto dry
Crease-resistant, polyester/cotton
Auto normal dry
Cotton, linen
Auto normal dry
Crease-resistant, polyester/cotton
1)
Energy consumption
(approx. kWh)
Programme time
(approx. hrs and min.)
800 rpm
1600 rpm
800 rpm
4.5
3.3
2:00
1:35
7.0
4.2
3.3
1:50
1:30
Normal
3.5
1.9
-
0:55
-
Normal
7.0
3.9
2.8
1:40
1:15
Normal
3.5
1.7
-
0:45
-
1600 rpm
Auto normal dry
Acrylic, rayon, acetate
Low
3.5
2.0
-
1:15
-
Auto Iron dry
Cotton, linen
Normal
7.0
3.0
2.2
1:35
1:10
1
This programme is EN 61121 compliant. During testing, the tumble dryer shall have a 16A connection and Time saver shall be activated.
Energy and time consumption in compliance with EN 61121.
11
Tumble drying
5
Selecting Options
By selecting options, you can tailor a drying
programme to suit your requirements. The
machine remembers which options you choose
for each programme and uses them (with one
exception – Delayed Start) the next time you
select the same programme. You can, of course,
change this if you want.
Temperature
You can choose Temperature Low with all
programmes except Revitalise.
• Select Temperature Low by pressing the button
next to the symbol.
• The lamp next to the button lights when
Temperature Low is selected.
Time saver
You can choose Time saver with all programmes
except Revitalise. The programme is shortened
by about 12 minutes.
• Press the button next to the symbol.
• The lamp next to the button lights when Time
saver is selected.
Anti crease
This option means that the drum will rotate for
three seconds per minute for two hours after the
drying programme has finished. The option
prevents the fabrics from remaining in the same
position and becoming creased, if you are unable
to remove them immediately after tumble-drying
has finished. Cannot be selected with the Air fluff
programme.
• Select Anti crease by pressing the button next
to the symbol.
• The lamp next to the button lights when Anti
crease is selected.
12
Delayed Start
First select which programme you want to use
and then select Delayed Start by pressing the
button next to the symbol. The display shows
Delayed Start in whole hours. Press the button to
select a delayed start of 1 to 24 hours. The lamp
next to the button lights when Delayed Start is
selected. Press the Start button, the machine
counts down 1 hour at a time and starts after the
selected delay. This option cannot be used with
the Timed dry or Air fluff programmes.
Tumble drying
6
Press the Start button
Stopping or changing a programme
Press and hold button the Stop button for
three seconds.
Important!
• Clean the lint filter after each load. See
the "Care and cleaning" chapter.
• Empty the condensed water container
after each load.
Note!
The programme will not be affected if you
change the programme selector after the
programme has started.
Loading or removing washing
You can stop the tumble dryer after starting a
programme by opening the door. Load more
washing or take out the items you want, close the
door and press the Start button. A new estimate
of the remaining programme time will be displayed
after a few minutes.
7
Drying programme finished
The text "End" appears on the display when
the programme is finished. If the Anti crease
option has been selected, the drum will rotate for
three seconds per minute for two hours after the
programme is finished.
Caution!
If the lint filter becomes clogged, the machine’s
automatic overheating cut-out may be triggered.
In order to be able to restart the machine, you
must clean the filter and allow the machine to
cool down for around 30 minutes.
8
Once drying has finished
Turn off the main power switch. Remove
the clothes and close the door to prevent
small children from climbing into the machine.
Condensed water
The condensed water container must be drained
after each load. Remove the condensed water
container, empty out the water and replace the
container. If the condensed water container
becomes full to overflowing, the programme is
interrupted. Empty the container and press the
Start button to continue the programme.
Note!
Do not remove the condensed water container
while the machine is running.
Tip!
As the condensed water is decalcified, it can be
used in steam irons. Pour it through a coffee
filter.
Automatic emptying
If you want the water to empty automatically, see
the "Installation" chapter.
13
Care and cleaning
Cleaning the lint filter
The lint filter must be cleaned after each load. If
you have very hard water, this can cause
limescale deposits in the lint filter. Check for any
limescale deposits when cleaning the lint filter
and, if necessary, wash the filter by hand.
1. Grasp the filter handle and pull it towards you.
2. Pull the filter out of its holder.
Emptying the condensed water
container
The condensed water container must be drained
after each load. Remove the condensed water
container, empty out the water and replace the
container.
3. Open the filter and remove the lint from all
sides of it by hand. Use a soft, dry cloth to
remove any deposits.
If the condensed water container becomes too
full, the programme is interrupted and F10 is shown
in the display. Empty the container and press the
Start button to restart the programme.
Cleaning the outside of the machine
Clean the outside of the machine and the
programme panel with a mild cleaner. Do not use
solvents, as these can damage the machine. Do
not hose down or spray the machine with water.
Note!
4. Replace the filter in its holder.
Note!
If you have hard water, the filter should be
washed with water to get rid of any limescale
deposits. Use a sponge and a little dishwashing
detergent if necessary. Dry the filter carefully
with a towel. If you cannot remove the limescale,
you can buy a new filter from the retailer where
you bought the tumble dryer.
14
Do not allow dust to accumulate around the
machine. Keep the area around the tumble dryer
clean and cool; dust, heat and moisture prolong
drying times.
Care and cleaning
Cleaning the condenser
The condenser should be cleaned at least three
times a year. If you have pets, the condenser must
be cleaned more frequently.
5. Replace the condenser. When refitting the
condenser, check that it is replaced correctly.
The top of the condenser is marked "upp", "up"
and "oben".
1. Turn off the main power switch.
UPP
UP
OBEN
2. Remove the lower plinth.
6. Replace the plinth.
3. Open the condenser panel by turning the two
knobs anticlockwise.
4. Remove the condenser and rinse the lamella
springs clean using a hand-held shower, for
example. Do not touch the lamella springs, as
you may damage the condenser. Do not use
pointed metal objects during cleaning.
Note!
Do not put the condenser in a dishwasher.
15
Troubleshooting
16
The machine will not start
Drying takes too long
Check
• that the door is properly closed.
• that the main power switch is on.
• that the Delayed Start option has not been
selected. If so, the time remaining until the start
will be shown in full hours in the display (e.g.
5, 4, 3h). To cancel Delayed Start, press the
Start/Stop button for 3 seconds.
• that the plug is connected.
• that the fuses (circuit breakers) in your house
are intact. Swap two circuit breakers over to
make sure. You cannot always tell from the
outside if a circuit breaker is broken.
• that the overheating cut-out has not been
triggered (see below).
• Empty the condensed water container and
check that neither the lint filter nor the
condenser are clogged. See the chapter "Care
and cleaning".
• Overly long drying times may also be due to
the tumble dryer being located in a confined
area or room that is too small, causing the air
to become too hot.
• Make sure that the tumble dryer has access
to more cold air, open doors and/or windows.
Overheating cut-out
Error messages
The overheating cut-out shuts off the tumble dryer
if the temperature is too high, e.g. because dust
is clogging the lint filter.
• Clean the lint filter.
• Check also that the condensed water container
is not full and, if necessary, clean the
condenser. See the chapter “Care and
cleaning”.
• The overheating cut-out will reset automatically
once the machine has cooled down.
If F10 flashes in the display, the condensed water
container is full. Empty the container and restart
the programme.
The washing does not dry, or is too
dry
• The door has been opened while the
programme is running, which disrupts the
moisture monitoring function.
If F30 is flashing in the display, the maximum
permitted programme time has been reached.
Read "Drying takes too long" in the
"Troubleshooting" chapter to find out what to do.
Technical information
Technical data
Height:
Width:
Depth:
Weight:
Cylinder volume:
Max. drying capacity:
Speed:
Rated power:
Drum material:
Outer casing material:
850mm
595mm
585mm
47kg
111l
7kg
52 rpm
See type plate.
Stainless steel
Powder-coated and hot-galvanized sheet steel or
stainless steel.
Stacking or freestanding
1.7m polypropylene hose 3/4 BSP connection
Setup
Drain:
2.0m rubber hose
Standard tests
Europe:
Drying performance:
Energy declaration:
EN 611 21 (95/13/EEC).Programme 3 Auto normal dry, 7kg cotton,
temperature Normal, Time saver. The machine has been tested for 1Phase 16 A.
EN 611 21 (95/13/EEC).Programme 3 Auto normal dry, 7kg cotton,
temperature Normal, Time saver. The machine has been tested for 1Phase 16 A.
For switching between 10 A and 16 A, see the "Electrical installation"
chapter.
Test method for noise measure- IEC 60 704-2-6.
ment:
17
Service
Before contacting the service
division
Before contacting the service division, you should
find out whether you can resolve the fault yourself.
See the "Troubleshooting" and "Care and
cleaning" chapters.
If you still need to contact the service division,
make sure that you know the model designation,
type designation and serial number.
The model designation can be found in the
stamped hole on the first page of the operating
instructions and on the machine's panel. The type
designation and serial number can be found on
the type plate.
Type
designation
TD 60.1
Serial number (12 digits)
18
Installation
Positioning the tumble dryer
The tumble dryer can be free-standing or in a
stack. Remember that the tumble dryer produces
heat and should therefore not be located in a room
that is too small. If the room is very small, drying
will take longer due to the limited quantity of air.
How to assemble the stack:
1. Undo the anti-tilt device.
Caution!
• Any electrical installation must be carried out
by qualified professionals.
• The machine must not be installed behind a
lockable door, a sliding door or a door with
hinges on the opposite side to those of the
tumble dryer.
• The tumble dryer's plinth ventilation must not
be blocked by a rug or the like.
2. Undo the two screws indicated on the back of
the washing machine.
Tip!
To improve ventilation, leave the door to the
room where the tumble dryer is located open.
3. Secure the anti-tilt device using the screws as
shown in the picture.
Freestanding
The tumble dryer can be positioned beside the
washing machine.
Stacking
The tumble dryer can be placed on top of a ISE
washing machine. In this case you use the
stacking attachments (foot cups and anti-tilt
devices) that come with the machine. You will find
two foot cups in a bag in the drum and two anti-tilt
devices are attached to the bottom left corner at
the back of the machine. Extending plates can be
ordered from your local retailer.
4. Attach the plastic cups for fixing the tumble
dryer’s front feet to the washing machine’s top
cover. This is essential, as only when the
tumble dryer’s feet are resting in the plastic
cups can you be sure that the dryer is correctly
positioned on the washing machine.
Break off tag A on the cup fitted on the
right-hand side and tag B on the cup fitted on
the left-hand side. Then remove the paper from
the self-adhesive surface under the plastic
cups.
A
A
BB
19
Installation
5. Fit the plastic cups so that the “tags” marked
with arrows are against the front edge or side
edge of the cover and press them firmly onto
the cover. Then break off the remaining tags.
Adjusting the feet
Screw the feet in or out so that the tumble dryer
is steady and balanced on the floor or on the
washing machine. Then tighten the lock nuts.
Locking nut
6. Push out the knock-out hole on the back of the
dryer (you must not remove it, just open it)
using a hammer and screwdriver.
Condensed water
The machine is supplied as shown in Option 1
(inset). This means that the condensed water is
pumped into the condensed water container. This
must then be removed and emptied by hand.
Option 2 allows you to remove the small short
hose from the nipple. Attach the rubber hose
supplied to the same nipple. The water can then
be pumped out into a sink or a floor drain (2a).
2
Max 1000 mm
1
7. Push the tumble dryer in under the metal
brackets. At the same time keep the front edge
raised by 10mm to 20mm.
2a
8. Lower the tumble dryer’s front feet into the
plastic cups and adjust the dryer to ensure that
it is balanced.
20
Installation
Electrical installation
Connect the machine by plugging it into an
earthed wall socket. The electrical wall socket
must be placed outside of the installation area to
be easily accessible.
Connection on delivery
The machine is supplied as 1-Phase, 230V, 50Hz,
heat output 2500W and has a 16A plug. Any
residual current devices must be type A.
Switch-over
It is possible to switch over from 16 A (heat output
2500W) to 10 A (heat output 1950 W).
The switchover must be performed by a qualified
electrician.
1. Turn off the machine using the main power
switch.
2. Press and hold the Anti crease button and then
press the main power switch.
3. If the upper right LED next to the programme
selector and the LED next to the Anti crease
button light up, the machine is connected for
10 A and 1950 W.
If both the upper and lower right LEDs next to
the programme selector and the LED next to
the Anti crease button light up, the machine is
connected for 16 A and 2500 W.
Press the Time saver button once to switch the
heat output.
4. Press the Stop button to save your selection.
Repeat steps 1 to 4 to restore the machine to its
original heat output.
21
Door hanging
1
6
1. Hinge pins (top and bottom)
2. Cover washer
3. Plastic plugs (on the upper
and lower edges)
22
2
3 4
5
4.
5.
6.
Locking hook
Hinges (left + right side)
Plinth
Door hanging
You can choose whether the door is hung on the
right or the left.
Follow these instructions:
1. Remove the plinth.
2. Remove the hinge, two screws.
6. Move the plastic plugs on the upper and lower
edges of the door. Use a flat-bladed
screwdriver to remove the plugs.
7. Refit the door by loosening the hinge screws
slightly, affixing the door and closing it.
Retighten the hinges. Replace the plinth.
3. Lift the door up and remove it. Support the door
at the same time.
4. Remove both door pins (top and bottom). Fit
them on the other side of the machine. Refit
the hinge.
5. Loosen and remove the catch (lift up and pull
out) and the cover plate on the door and the
machine. Switch the catch and the cover plate.
23
Quick guide
1
2
3
4
Fabrics
• Dry fabrics of the same type together to
ensure that they dry as evenly as
possible.
Turn on the main power switch
Load the garments
• Close the door.
Select a programme and any
options
• Turn the programme selector to the
required programme.
• Select any options and settings.
5
6
Press the Start button
Drying programme finished
• "End" appears on the display when the
programme is finished. If the Anti crease
option has been selected, the drum will
rotate for three seconds per minute for
two hours after the drying programme is
finished.
• Clean the lint filter after each load.
• Empty the condensed water container.
7
Once drying has finished
• Turn off the mains power switch and
close the door.
Art. No.: 80 902 00. Rev. 01. We reserve the right to make changes.
Printed on environmentally friendly paper that meets the requirements of MIljöförbundet and Naturskyddsföreningen.
24