1
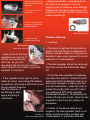
Sequence showing removal of a typical side
repeater:
1
1. Push in direction of
spring clip;
2
2. When fixed clip disengages, pull side repeater outward;
3
3. Remove side
repeater from wing
Side repeater
bulbholder removal
• Have a look at the new
repeaters you want to fit
before you remove the
old ones, so you can
see where the spring clip is and in
which direction you need to push the
repeater to remove it.
• If the repeater is too tight to move
easily by hand, use a large flat-bladed
screwdriver, but wrap a soft cloth round
the tip several times so
that the chance of
scratching or damaging anything is
minimized.
Side repeater
testing via
time-honoured method
• Always remember - excessive force
should not be required. If you’re
applying lots of pressure and nothing’s
happening, stop and make sure you’re
pushing in the right direction before you
break something!
Problem Solving:
Side repeater
bulbholder & o-ring
1. Leaking:
• If moisture is getting into the side repeater, the first thing is to determine if
there is actually a leak or if it’s just condensation (see under general for an explanation of condensation).
• The side repeater should be removed
from the car and the bulbholder taken
off.
• To test the side repeater for leakage,
you have two options: Either fill it with
water and hold it bulbholder side up to
see if any escapes; or place your lips
over the bulbholder - clean the side repeater thoroughly first, we don’t want
you getting an STD (side repeater
transmitted disease) – and sealing the
holder off with your mouth, blow into the
repeater to see if any air comes out
anywhere.
• If either of the above tests prove
negative, the side repeater itself is not
faulty, and the problem is either just
condensation or a problem with the