1
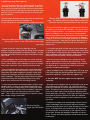
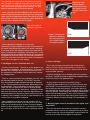
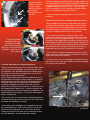
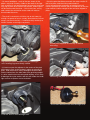
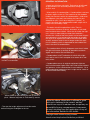
FITTING & TROUBLESHOOTING GUIDE:
HEADLIGHTS
Generally speaking, fitting lights isn’t that complicated;
then again, anything’s easy if you know how! This little
guide provides some general tips for fitting various types
of aftermarket lights, and also what to look for to try and
resolve a problem if things don’t go according to plan.
It won’t make you an auto electrician overnight, nor does
it claim to cover every possibility, but if you’re not sure
where to start, it will certainly give you some ideas to
work with.
Before you begin, please note that working on a car’s
electrical system can be dangerous – both to you and the
car. If you are in any doubt about your ability to follow
any of the techniques detailed below – don’t! Rather
seek professional assistance. This leaflet is offered as a
guide only, and we cannot accept any responsibility if
something you attempt goes wrong.
Fitting tips:
• It’s useful to have an assistant hold the headlight in
place, both when removing and installing, as it could
otherwise fall and be damaged.
• Before tightening anything, make sure that any sealing
gaskets or rubber trim strips are correctly
positioned and securely held in place.
• Make sure that no wires are trapped between the light
and the bodywork.
• When doing up the mounting nuts or screws,
always tighten them all to finger tightness before doing
them up with a spanner. Sometimes it may be necessary
to tighten one and loosen another to get the panel gaps
even.
• Don’t overtighten nuts or screws either, as this can lead
to broken or stripped mountings – which are not covered
under warranty either for obvious reasons.
• Most aftermarket headlights will not fit to exactly the
same standard as the original equipment items in terms
of the panel gaps between the light and the car body. If
the difference between the original and aftermarket lights
is not more than 3 mm, this would be considered to be
within specification.
Problem Solving:
1. Leaking:
• If moisture is getting into the headlight, the first thing is
to determine if there is actually a leak or if it’s just condensation (see general information at the end of this
guide for an explanation of condensation).
• Check that the dustcovers on the back of the light unit
are fitted properly.
Check that
dustcovers on the
back of headlights
are fitted securely,
and that wiring is
connected properly
• Check that the bonding between the lens & housing is
secure all the way round, and that none of the spring
clips are missing.
• Many headlights have vents on the back to allow air to
circulate. These usually have a push-fit curved rubber
tube on them, which should be pointing downward to
prevent water running in. Check to see if any of them are
missing or out of position.
2. Bulbs not lighting up:
• Most headlights are supplied with pre-fitted wiring harnesses, but if a particular bulb doesn’t light up, it’s worth
removing the dust cover and checking that the terminals
are connected properly inside.
• Check that the bulb hasn’t blown. Bulbs are service
items with a finite life, and will only be replaced under
warranty if the bulb is blown on receipt of the light unit.
Bulbs which blow after this are the customer’s responsibility.
3. Angel eye rings don’t light up:
• If only one doesn’t light up, it could possible be a faulty
LED bulb, and these are available as spares. Note, however, that like incandescent bulbs, these are consumable
items with a finite life, and they will only be replaced under
warranty if they are faulty when the item is first received
by the customer.
The bulb might also have come loose from its socket and
be floating around inside the headlight, so
remove the grommet underneath the headlight and check.
Remove rubber grommets underneath the headlight
unit to gain access to the LED bulbs for the angel
eye rings
• If none of the four angel eye rings light up, the
problem is almost certainly with the wiring, as the chances
of all four bulbs being duds is extremely unlikely. It’s also
possible that all four bulbs have been inserted the wrong
way round.
• Many headlights require the angel eye wiring (and that
for the LED sidelights, if present) to be connected before
fitment, either directly to the sidelight circuit or via a separate switch if desired. Check that this has been done.
• If any connections have been made using “Scotchlock”
type inline splicers, butt connectors or any of the crimp
connectors with coloured plastic insulators, check them
carefully for continuity, as these connectors are notoriously unreliable. The best way to join wiring is by soldering and insulating with heatshrink tubing, or by using
proper crimp connectors with insulating sleeves.
• If the wiring has been connected properly and the rings
still don’t work, it’s likely to have been connected incorrectly, either to the wrong wires or the wrong way round
(unlike incandescent bulbs, LEDs are polarity conscious –
if you connect them the wrong way round, they don’t
work. This usually won’t damage them, however, unless
their voltage rating is exceeded).
Resistor box for
angel eye LED bulbs
The two different types of LED bulb for angel eye
rings - the rubber grommets have been removed to
show the resistor (arrowed) fitted to the one type.
• There are two different types of replacement LED bulbs
for angel eye rings and LED sidelights – one has resistors
built in, the other doesn’t. It’s important to establish what
type the headlight uses, as they aren’t interchangeable.
Resistor-type bulbs can be identified by checking to see if
any resistor boxes are fitted to the angel eye or sidelight
wiring, or in the case of the angel eye bulbs, by looking at
the LED bulb itself - slide back the rubber grommet to reveal the circuit board underneath and see if a resistor is
fitted or not.
• If a resistor type bulb is fitted where a non-resistor type
is needed, it will light up but emit a dull yellow- rather than
a white light; if a non-resistor type is fitted where a resistor
type is needed, it will blow instantly - and that won’t be
covered by warranty either, for obvious reasons!
• Note that certain headlights have a number of small
capless bulbs fitted at intervals around the ring. These
can be replaced, but usually the headlight must be disassembled to do so. Instructions on how to do this are
normally included with the lights.
• Some headlights have a non-replaceable LED ring, and
if this fails during the warranty period, the entire unit will
need to be replaced. Check with the supplier first.
4. Car fails MOT because lights are not adjusted
correctly:
• Although most headlights will be reasonably close to the
required setting out of the box, it is imperative that the
beams are checked for correct adjustment once they are
fitted. This doesn’t necessarily require expensive equipment, but it does require that the person adjusting them
knows what they are doing. That means that they need to
know how to measure whether the lights are adjusted
correctly, and which adjusters to turn to achieve the correct result.
• Problems invariably arise when people without the necessary knowledge start turning the adjusters randomly
and end up getting themselves (and the lights) in an awful
mess. If the adjusters are turned too far, the light units
can kink and jam in the housing, or the adjuster can unscrew itself, leaving the headlight impossible to set correctly. Clearly this kind of problem would not be covered
by warranty.
• As a general rule, there will be four adjusters on each
side, two each for dipped & main beam units -although
some of the newer cars have only two adjusters each
side, so that once the dipped beam is set up, the main
beam is automatically at the correct setting.
Adjusting lever
behind dipped
beam unit for setting lights for leftor right-hand drive
use.
• Some units will have three adjusters, but the one in the
middle will be the pivot point for the light unit, and should
under normal circumstances not be moved at all (if it has
been turned, it must be returned to the centre position before any further adjustment can be made).
Typical location of
headlight adjusters
• When adjusting a headlight, it is very rarely
necessary to turn the adjusters very far, as even one turn
will make a big difference to where the beam is pointing.
If you have to turn the adjusters much more than two full
turns, it’s likely there’s a problem somewhere else. If the
adjusting screws are mashed and beaten up, the chances
are good that someone before you has had a twiddlefest
with them, and that’s most likely the cause of the problem.
Can’t blame the lights for that, though.
5. Headlights are for a left-hand drive car:
• Are they really though? Check first, as the problem can
be caused by twiddleitis, as detailed above. Of course it’s
possible for a headlight to be incorrectly labelled, but in
our experience most problems of this nature are caused
by maladjustment.
• There is a common belief that headlights in the UK must
be adjusted to point to the left. This is NOT the case –
they should point straight ahead at an angle of between
1.2 & 1.5 percent below the horizontal, depending on the
car concerned. The cut-off pattern to the left required
under UK law is a factor of the lens or reflector design,
and nothing to do with the adjustment. Holding the headlight level and shining it onto a wall with dipped beam selected will produce a distinctive pattern that can be used
to identify if the headlight is for left- or right-hand drive, as
can be seen in the graphic alongside.
• Some headlights can be set for use on either left- or
right-hand drive cars, either by moving a lever (as in the
image) or by loosening three screws, turning the dipped
beam unit and retightening them. Instructions will usually
be on the lights in the form of a sticker explaining what to
do.
Graphic showing the
difference between
left- and right-hand
drive dipped beam
headlight patterns.
RHD
LHD
6. Lenses melting:
• This is almost always caused by one of two things –
either the fitment of high output bulbs or HID kits, or a
bulb having been fitted incorrectly. None of these will be
covered under warranty.
• Projector headlights use a shaped glass lens to project
the beam, instead of relying on patterned headlight lenses
as was the case in the good old days.
• Anyone who’s ever burned something using a
magnifying glass and the sun’s rays will be familiar with
the concept. Fit a bulb incorrectly, so that it’s sort-of-inthe-housing-but-not-really-secure, only held in place by
the retaining clip, and you’re likely to end up with a melted
lens very quickly. Even though the change in distance between the bulb and projector is only a few millimeters, it
will be enough to focus the light energy on the outer lens
instead of allowing it to pass through, with predictable results.
7. Warning lights show on dashboard after lights have
been fitted:
• This can sometimes be solved by having the vehicle’s
onboard electronic control unit reprogrammed by a dealer;
in other cases this may not be possible, and the lights will
have to be returned to the supplier for inspection.
Incorrectly fitted
bulbs or the use
of high output
bulbs or HID kits
can cause
headlight lenses
to melt.
• Some headlights, particularly those for older models, are
not compatible with electric height adjustment, and the facility will no longer work once they are fitted - although the
headlights themselves will work fine. If electric adjustment is important to you, it’s best to check with the supplier of the headlights before purchasing.
• Electric headlight height adjustment is NOT an MOT requirement.
Transferring an electric headlight adjustment motor:
• Most headlights with electric height adjustment have a
small electric motor fitted onto the back of the headlight
unit (depending on the headlight design, the motor will
sometimes have a manual adjuster on it for inital setting
up of the headlights when they are first installed).
Correctly installed
headlight bulb (top);
incorrectly installed
bulb in bottom photo
will very soon cause the
headlight’s outer lens to
start melting.
8. A Note About Electric Height Adjustment:
• The motor has a rod with a ball on the end, which
locates into a socket on the mounting frame of the headlight units inside the headlight housing. The motor is removed from the original light housing by turning it until the
locating lugs are loose (usually this is about a quarter of a
turn, it may be clockwise or anticlockwise but the direction
should be obvious), and then pulling it gently but firmly
backwards so that the ball releases from the socket.
• There may be a locking tang holding the motor in place,
which must first be lifted up with a screwdriver to allow the
motor to be turned and removed.
• To fit the motor to the new headlights, the pivot that is fitted in place of the motor on the back of the new headlight
unit must first be removed.
• Many cars these days will have an electric height adjustment facility for the headlights, usually in the form of a
thumbwheel on the dashboard near the headlight switch.
This facility is commonly misunderstood, so let’s shed
some light on what it is and isn’t.
Electric height adjustment allows the headlight beam to
be adjusted over a narrow vertical range (i.e. up & down),
and it’s purpose is to allow the driver to compensate for
situations where the rear suspension is compressed,
causing the headlights to shine up into the air (for instance when towing a boat or caravan, or when the car is
fully loaded and the boot is full). It cannot substitute for
manual adjustment, nor can it adjust the headlights in the
horizontal plane (left to right). It is only for load compensation, nothing more.
• As a result, even if a car has electric height adjustment,
the beam adjustment still has to be set in the normal manner when new headlights are fitted.
• Some aftermarket headlights are compatible with electric height adjustment, either because they have an adjusting motor already built in, or (more commonly) by
making provision for the motor to be transferred across
from the old lights - see the guide which follows.
Adjustment motor showing locking tang
(arrowed).
• On some headlights - such as the one shown in the
photo - the pivot is clearly visible on the back of the light
unit; on others it may be necessary to remove a cover that
may clip in place or be held in with screws, and the pivot
will be found under the cover. If this is the case, wiring
and a socket for connection to the motor will also be
found inside the cover.
• Once the pivot has been removed, the motor can be fitted in its place, and the wiring connected to it.
It may sometimes be necessary to hold the light unit
frame in position by hand or with a screwdriver so that the
nylon socket is close enough for the ball to be slipped in
place.
• The pivot is removed in a similar way to the motor, by
turning it a quarter of a turn (usually anticlockwise, but not
always, so check carefully - it should be fairly obvious) to
loosen it before removing it completely.
Screw pivot adjuster all the way in before
removing
Adjustment motor removed from old headlight
unit, locating lugs are clearly visible.
• It’s best to screw the adjuster in the centre of the pivot
all the way in first, as this makes it easier to remove the
pivot. Also note that on many headlights the ball slides
into the socket from the side rather than pushing straight
in, so be careful when removing and refitting, as it is easy
to damage the nylon socket, and this will render the headlight useless as spares are not available.
Removing the pivot from the new headlight unit
Pivot after removal from new headlight unit.
Pivot on rear of new headlight unit.
GENERAL INFORMATION
• Know your left from your right: References to left-hand
& right-hand are as viewed by someone sitting in the
driver’s seat.
Nylon socket showing slot for ball on motor shaft.
• What exactly IS condensation? Condensation is caused
by water vapour in the air. The moisture on the windows
inside your house in winter is conndensation – and when
that happens, you don’t start looking for leaks in your
windows do you? (You’ll be a long time if you do). In
exactly the same way, condensation inside a light unit is
hardly ever caused by a leak.
• The basic scientific explanation is this: There is
always some moisture in the air, and warm air can hold
more moisture than cold air. When the air inside the light
unit – which is warmed by the heat from the bulbs –
touches the inside of the lens (which is at a lower temperature because it is in contact with the colder air outside),
the layer of air against the inside of the lens cools down
as well, and as a result it can no longer retain the moisture it is holding, which is deposited on the inside of the
lens in the form of condensation.
• The condensation will only disappear once the air inside
the light unit warms up enough to absorb the moisture
again, and in winter this can take time.
Holding the frame in position so that the nylon
socket is accessible.
Motor fitted to new headlight unit in place of
pivot. Manual adjuster is indicated by arrow.
• Test that the height adjustment function works
before fitting the headlights to the car.
• Condensation is NOT indicative of a fault with a light
unit, and as such it isn’t accepted as a reason for a warranty return.
• Condensation occurs in original equipment lights as
well, but aftermarket lights often have clear lenses without
any patterns, so the condensation is more obvious. On a
patterned original equipment lens it might not be visible at
all unless one looks closely.
While the above information is offered in good
faith and is believed to be correct, neither
AutoArt nor any of its dealers can accept any responsibility for any consequences, howsoever
caused, resulting from the application of any of
the information detailed in this leaflet.
Copyright 2009 AutoArt Styling Limited.
Unauthorised duplication/distribution prohibited.