1
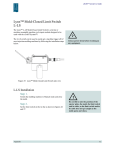
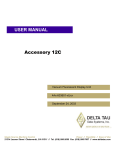
Fitting and Operating Instructions Adjusting a Lynx Backrest Important If you are unsure of any part of these instructions, please contact us. Usage Assess the client out of the seat to establish their sitting ability, and the position you would like to achieve once they are positioned in the seat. Depending on the age of the user, you may find it easier to position them with a colleague to enable one of you to observe the position you are aiming to achieve. With the user out of the seat, observe the seat and back cushions carefully and identify any signs of wear or compression that may indicate areas of higher pressure or shear. Remove the back cushion and position Evazote spacers into the central hole of the Lynx crosses (please contact us if you require some of these). These replace the seat cushion and enable you to feel through the backrest to identify or investigate areas of high or no pressure during the assessment. With the user back in the seat, feel through the Lynx crosses from behind to identify areas of Lynx you want to move in, and those you want to move out. Once you have established your objectives, use the following steps to adjust the backrest. Fitting Instructions 1. 2. The brackets that hold the Lynx onto the backrest tubes need to be loosened in the area Lynx you want to adjust. Loosen the nut and bolt on the top leg of the angle brackets. Do not remove it, loosen it sufficiently to allow it to rotate. Active Design Ltd 68k Wyrley Road, Birmingham. B6 7BN Tel: 0121 326 7506 Fax: 0121 327 8807 E-mail: [email protected] Web Site: www.activedesign.co.uk Loosen the bolt that runs through the backrest in a similar way. You may need to do this with the client out of the seat. If you are unsure of any part of these instructions please contact us. INS137-1.doc 3. 4. Loosen the bolt that fixes the bracket to the clamp on the backrest tube. Active Design Ltd 68k Wyrley Road, Birmingham. B6 7BN Tel: 0121 326 7506 Fax: 0121 327 8807 E-mail: [email protected] Web Site: www.activedesign.co.uk Loosen the Lynx nuts in the area you would like to adjust. Work methodically in either rows or columns. Once loose, pull the Lynx out or push it in until you obtain the required shape. Tighten the Lynx nuts, again working methodically in rows or columns to ensure they are all tight. Repeat the process as required. If you are unsure of any part of these instructions please contact us. INS137-1.doc