1
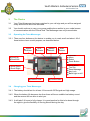
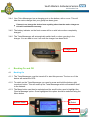
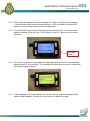
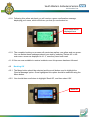
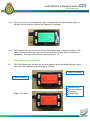
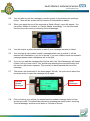
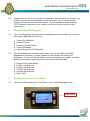
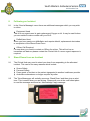
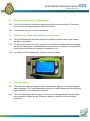
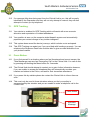
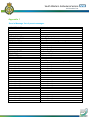
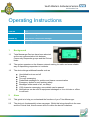
Operating Instructions
Version
1.0
Title
Tetra Messenger Device
Issued by
Rob Horton, Responder Manager
Date Issued
25th August 2014
1
Background
1.1
Tetra Messenger Devices have been selected
as the new communication link between
Community Responder groups and the Clinical
Hubs.
1.2
The system operates on the Airwave network making it a safer and more reliable
way of dispatching responders to incidents.
1.3
The device brings additional benefits such as
Unsolicited book on and off
Tracking
Two way messaging
Predefined messages for quicker and clearer communication
Emergency button for solo working safety
Messages either send or fail, no delays
1000 character messaging, more details can be passed
Notifications can be sent for equipment shortages or for a clinician or officer
to call back
2
Aims
2.1
This guide is to help you understand the functions of your Tetra Messenger.
2.2
The device is fundamentally a two way pager. Whilst this brings benefits to the user
and the Clinical Hub, this document aims to outline the device limitations.
3
The Device
3.1
Your Tetra Messenger has been matched to your call sign and you will be assigned
a day and time for this to be activated.
3.2
You should continue to carry your group mobile phone as this is your verbal means
of communication with the Clinical Hub. The Messenger can only transmit data.
3.3
Operating the Tetra Messenger
3.3.1 There are four buttons on the device to enable you to read; scroll and select. All of
these buttons have a multi-purpose, as described below.
Signal
Indicator
GPS
Indicator
Battery
Indicator
Alert
Volume
Home button
Scroll Up
Scroll Left
Menu
Select
Panic Button
Envelope Button
Scroll Down
Scroll Right
Turn On
Read Message
Key Lock
Back Light on/off
Current Time
3.4
Current Date
Charging your Tetra Messenger
3.4.1 The battery should last for at least 12 hours with GPS signal and high usage.
3.4.2 When the battery life becomes low then there will be an audible low battery sound
and the screen will turn blue to alert you.
3.4.3 It will take 5-6 hours to fully charge. It is good practice for this to be done through
the night to give the flexibility of moving around during the day.
3.4.4 Your Tetra Messenger has a charging port on the bottom, with a cover. This will
take the mains charger that your group has been given.
Please do not charge the device from anything other than the mains charger as
this will invalidate the warranty.
3.4.5 The battery indicator on the front screen will be a solid colour when completely
charged.
3.4.6 The Tetra Messenger will automatically switch itself on when you plug in the
charger. You are able to turn it off once the charger has been fitted.
Charger Port
4
Booking On and Off
4.1
Booking On
4.1.1 The Tetra Messenger must be turned off to start this process. The turn on of the
device will restart the GPS.
4.1.2 To switch on the Tetra Messenger you need to press and hold the bottom right
‘envelope’ button. This will wake up the Tetra Messenger which will establish itself
to the network.
4.1.3 The Menu button can then be selected and the scroll button used to highlight the
‘Send a Message’ option. Once highlighted this option should be selected using the
Menu button.
Scroll Down
Menu
Select
Turn On
4.1.4 The screen will display the entire message list. There are 40 pre-set messages;
1-18 are incident and situation related options, 19-40 are book on and book off
options. A copy of these can be found on Appendix1.
4.1.5 You should then scroll down to highlight, and then select ‘OK’, on the allocated
position between ‘Book on User 1’ and ‘Book on User 20’, which you have been
allocated.
Example
User 1
4.1.6 You will get a yellow acknowledgement message which will show if your message
has been sent or if it has failed. The message will state what you sent if it has been
successfully sent, as below.
4.1.7 If this message is not successfully sent you will receive a yellow message which
states ‘failed message’. Should you receive this you should try again.
4.1.8 Following this yellow ack back you will receive a green confirmation message,
displaying your name, which will inform you that you are booked on.
Your name will be
displayed here
4.1.9 The complete booking on process will create two replies, one yellow and one green.
You can delete these messages should you wish by selecting ‘Delete All’ in the
main menu screen as displayed in 4.1.3, once they have been read.
4.1.10 You are now available to receive incidents once this process has been followed.
4.2
Booking Off
4.2.1 The Menu button should be selected and the scroll button used to highlight the
‘Send a Message’ option. Once highlighted this option should be selected using the
Menu button.
4.2.2 You should then scroll down to highlight ‘Book Off’, and then select ‘OK’.
Book Off
4.2.3 You will receive a yellow ack back if your message was sent successfully and you
will then receive a green ‘Booked Off, thank you’ message.
4.2.4 Once booked off, you should turn off the Tetra Messenger to preserve battery. This
option can be found on the main menu at the bottom and should be selected once
highlighted. The main menu screen can be seen at 4.1.3.
5
Deployment to an Incident
5.1
The Tetra Messenger will alert you by tone together with a red back-lit screen, when
you have been allocated to an emergency incident.
Origin of Incident
Incident number
Page 2 of incident
Nature of Call
Incident Address
Postcode
Patient Age
5.2
You are able to read the message by scrolling down or by pressing the envelope
button. There will be at least two full screens of information as above.
5.3
When you reach the end of the message a ‘Send a Reply’ menu will appear. You
can select ‘Mobile to Incident’ or ‘Cannot Attend’ accordingly. You can also send
this from the main menu by choosing ‘Send a Message’.
5.4
You will receive a yellow ack back to state if your message was sent or failed.
5.5
You must send a successful ‘mobile’ message before you go mobile. It will be
deemed self mobilisation if you fail to do this. If you are unable to send a successful
message please make a telephone call to the Hub.
5.6
If you do not read the message after the first alert, the Tetra Messenger will repeat
its alert until you have read it. You should keep pressing the envelope button until
the send a reply screen appears. This means you have reached the end of the
message.
5.7
The screen will revert back to the home page if left idle. You will need to select the
envelope button to open the message list up again.
Indicates
Unread
Messages
5.8
Read
Messages
Prior to leaving your vehicle you should send an update message that you have
arrived on scene. This should be selected by pressing the menu button; choosing
‘Send a Message’ and then scroll down to ‘Arrived on Scene’.
5.9
Always make a note of your arrived on scene time, this will help if you forget or are
unable to send the status message ‘Arrived on Scene’, so you can phone the
Clinical Hub with this time after the incident. There may also be times when the
GPS Tracking is delayed so your notation of this time will be useful for cross
referencing.
6
Situation Report Messages
6.1
The Tetra Messenger has some useful predefined options to enable you to quickly
and simply update the Clinical Hub.
Cannot Find Address
Nothing Found
Patient in Cardiac Arrest
Patient Deceased
Clinical Supervisor Call Required
6.2
The Tetra Messenger has some other options for use by Officers and Staff
Responders. Should any of these options be sent from a Community First
Responder, the Clinical Hub will make contact to ascertain more details, as these
would not normally be expected from Community First Responders.
Require Police Attendance
P1 Back-up Required
P2 Back-up Required
P3 Back-up Required
No Back-up Required
Red 1 Only
7
Booking Clear from an Incident
7.1
You can do this by selecting ‘Clear Scene’ in the ‘Send a Message’ menu.
Clear Scene
8
Following an Incident
8.1
In the ‘Send a Message’ menu there are additional messages which you may wish
to utilise
Equipment Used
This is for an urgent need to gain replacement Oxygen or kit. It may be useful when
you are unable to make contact with your RLO.
Defibrillator Used
When you have used your defibrillator and require debrief; replacement electrodes
or completion of the Resus Event Form.
Officer Call Required
For use when you need to contact an Officer for advice. This will not be an
immediate call back so please contact the Clinical Hub if a more urgent response is
required.
9
Stand Down from an Incident
9.1
The Clinical Hub may need to stand you down from responding to the allocated
incident. This can be for many reasons which include
Scene Safety
Personal Safety
Down grade of incident or the patient signposted to another healthcare provider
Ambulance attendance no longer required by caller
9.2
The Tetra Messenger will verbally announce ‘Stand Down’ and then give an alert
tone. This is useful when you are driving. Please pull over at the next safest place
to read the message and send an ‘Acknowledge’ reply message.
10
Key Locking your Tetra Messenger
10.1
To lock the buttons on the device press and hold the envelope button. The select
button will need to be pressed to confirm the action.
10.2
It is the same process to unlock the device.
11
Yellow Carry Case and Belt Securing System
11.1
The Tetra Messenger should be kept in the protective yellow case to help reduce
damage or scratches.
11.2
To secure the device on to your belt loop, turn the device upside down and engage
the clip. By twisting the Tetra Messenger you will secure it in place. The unique belt
locking system will ensure it remains connected to you.
11.3
To unlock the Tetra Messenger, simply reverse the action.
12
Loss of Signal
12.1
There may be areas or occasions where the Airwave signal is not strong enough to
pass messages. The Tetra Messenger will alert you with a beep tone and a flashing
signal indicator if you lose Airwave network.
12.2
The Tetra Messenger will inform you if you send a message which cannot be sent
due to system or signal issues. Please try again or contact the Clinical Hub by
telephone.
12.3
If a message fails when being sent from the Clinical Hub to you, this will be easily
identified by the Dispatcher and they will not only attempt to resend, they will also
attempt to contact you by telephone.
13
GPS Tracking
13.1
Your device is enabled for GPS Tracking which will assist with more accurate
allocation and expectation of incident attendance.
13.2
Your position is seen on the computer aided dispatch system and automatically
populates your routed mileage to any incident assigned.
13.3
This system does record the device journeys, which includes route and speed.
13.4
This GPS Tracking can assist you if you need help with locating a property. You can
telephone the Response Desk who could be able to give accurate directions from
your plotted location.
14
Panic Button
14.1
If you find yourself in a situation where you feel threatened and cannot escape, the
Tetra Messenger can send an ‘Emergency Call’ to the Clinical Hub. You can do this
by pressing and holding the Menu button for 3 seconds.
14.2
The Clinical Hub should attempt to contact you to gain further information however,
if you are unable to answer the telephone they will automatically escalate your
location and status to the Police, and ask for their immediate attendance.
14.3
If you press this by mistake please do contact the Clinical Hub to inform them as
such.
14.4
This must only be used in these situations where you feel your safety is
compromised by the situation and you are unable to make a telephone call to the
Clinical Hub.
Panic Button
Ack Back
Message
Appendix 1
‘Send a Message’ list of preset messages
MOBILE TO INCD
CANNOT ATTEND
CANNOT FIND ADDR
ARRIVED ON SCENE
CLEAR SCENE
NOTHING FOUND
PT.CARDIAC ARST
PT.DECEASED
CSUP CALL RQD
REQ POLICE ATND
P1 BACKUP REQ
P2 BACKUP REQ
P3 BACKUP REQ
NO BACKUP REQ
EQUIP REQ
DEFIB USED
ACKNOWLEDGE
OFFICER CALL REQ
RED1 ONLY
BOOKOFF
Bookon User 1
Bookon User 2
Bookon User 3
Bookon User 4
Bookon User 5
Bookon User 6
Bookon User 7
Bookon User 8
Bookon User 9
Bookon User 10
Bookon User 11
Bookon User 12
Bookon User 13
Bookon User 14
Bookon User 15
Bookon User 16
Bookon User 17
Bookon User 18
Bookon User 19
Bookon User 20
Mobile to Incident
Cannot attend this incident
Cannot find address
Arrived on Scene
Clear Scene and available
Nothing Found, clear and now available
Patient in Cardiac Arrest
Patient Deceased
Clinical Supervisor Call Required For Advice
Request Police Attendance
P1 Backup Required
P2 Backup Required
P3 Backup Required
No Back Up Required
Equipment Required
Defibrillator Used
Acknowledge Message
Non Urgent Officer Call Required
Red1 Only Not available for any other type of call
Book Off
Book on User 1
Book on User 2
Book on User 3
Book on User 4
Book on User 5
Book on User 6
Book on User 7
Book on User 8
Book on User 9
Book on User 10
Book on User 11
Book on User 12
Book on User 13
Book on User 14
Book on User 15
Book on User 16
Book on User 17
Book on User 18
Book on User 19
Book on User 20