1
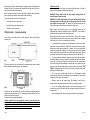
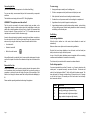
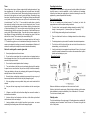
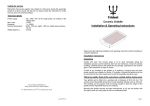
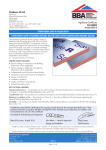
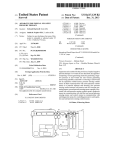
For your own safety As with any electrical appliance there are a number of simple precautions that should be observed. Never Never operate any of the elements if the glass is cracked. Switch off at the mains and contact an authorized service agent. Never allow anyone other than a competent electrician to service or repair your hob. Never remove any part of the hob, or attempt to modify it in any way. Never allow young people to play with or operate the hob unsupervised. Never use a chip pan more than one third full with oil. Never leave a frying pan unattended. Never allow aluminium or plastic to touch the hob while hot. Never cover the hob, or place flammable materials, such as tea towels on the hob, even when not in use. Never store anything flammable in cupboards directly under the hob. Never cook directly on the hob. Never use an asbestos mat, trivet, or rack of any kind under pans on the hob. Take care when touching any part of the hob that may be hot. Keep your hob clean as a build up of grease and fat may be a fire hazard. Switch off at the mains before cleaning the hob. Supervise children near the hob. Use suitable pans. Make sure that all controls are switched off when you finish cooking. Remember that your hob will stay hot for some time after you have finished cooking. Calling for service Remember that service agents may charge for visits (even during the guarantee period) if no fault is found with the hob, so always check the instructions to make sure you have not missed anything! Please read the following installation and operating instructions before installing or using this appliance. Installation Instructions Unpacking Handle with care! The frameless glass is at its most vulnerable during the installation process. Power supply: Max. input: Elements: Nominal dimensions: If there is any damage to the hob, or if anything is missing from the pack, please contact your supplier for advice. If the glass is cracked the hob must not be connected to the mains supply and no part of the hob should be used. Fitting the hob. Read all the instructions carefully before starting work. Your hob can either be mounted proud of the work surface, or rebated into the surface for a flush appearance. Your hob can be fitted into any 600 mm worktop with a thickness of 28 to 40 mm. The surface around the hob should be of a heat resisting material such as Formica. The worktop and its support must be strong enough to take the weight of the hob plus full cooking pans. Clearances and dimensions Technical details Weight (approx.): Installation & Operating Instructions Carefully examine the hob for any damage, particularly to the ceramic glass. There should be no chips or cracks. Always 3 Element Slider Touch Control Ceramic Hob 230 - 240V ~50/60 Hz single phase, as marked on the voltage label 3.6 kW 3 × 1200 W Width - 515 mm, depth - 480 mm, depth below worktop - 45 mm 7 kg Leisure Products (Bolton) Ltd Holly Street, Bolton, BL1 8QR. England. ~~~~ For further details see also www.marinecooker.co.uk 5331v6 Any overhanging surface or cooker hood should be at least 650 mm above the hob. Refer to the manufacturer’s installation instructions when fitting a cooker hood. We do not recommend positioning the hob below wall cupboards, as heat and steam may cause damage. As with any other cooking appliance, walls and other surfaces near the hob must be resistant to heat, steam and condensation. The minimum clearance between the left or right hand edge of the hob and any side walls is 50 mm. This clearance must be maintained up to 420 mm above the worktop. The minimum clearance between the rear edge of the hob and the rear wall is 30 mm. This clearance must be maintained up to 650 mm above the worktop. If the hob is mounted over an oven, allow 10 mm clearance between the top of the oven and the base of the hob. If the base of the hob is accessible in its installed position. (e.g. over a cupboard or drawer), a protective separator made from a sheet of non-combustible material should be fitted below the base. Leave a small air gap at the Page 1 back and at least 10 mm clearance between the upper surface of the separator and the base of the hob. The sheet must be removable but only with the use of tools, to allow access to the hob for future servicing. Before cutting the worktop, make sure that there is sufficient space underneath, with no supports or projections, which might interfere with fitting. Care of your hob You will find it easier to work in the following order WARNING! If a crack should appear on the glass surface, isolate the hob immediately from the mains supply. Do not use any part of the hob. Contact your supplier or service agent. The ceramic hob is hard wearing and with normal use and care will remain in good condition for many years. 1. Cut the aperture in the work-surface. 2. Connect the hob to the electricity supply. 3. Fit the hob in the work-surface. For reasons of hygiene and safety your hob should be kept clean. A build up of grease or fat from cooking could become a fire hazard. WARNING! Always switch off at the mains before cleaning. Never use excessive water to clean your hob. Fitting the hob – 1, proud mounting Before using for the first time give your hob a thorough cleaning with an appropriate hob cleaner and conditioner such as ‘HOB BRITE’. This will leave a residue that helps prevent dirt from sticking to the glass. Your hob can be mounted proud of the work surface as shown in the following sectional view; Make sure the pans you use are clean on the base. This will help to improve contact between the pan and the hob surface, and will ensure that no material from the pan can 'burn-on' or contaminate the hob surface. It is important that any spillage be dealt with before the hob is used again, otherwise it will become baked on. When the hob has cooled, remove any heavy spillage with a metal spatula, palette knife or scraper. Then use any good quality ceramic hob cleaner and conditioner on a damp cloth to remove any remaining marks. Always follow the instructions of the manufacturer of the cleaner. Wipe off any residual cleaner with a soft damp cloth and polish with a soft lint-free cloth. Fig 1 First cut an aperture in the work surface to the dimensions given below ensuring that the clearances detailed on page 1 are maintained. We recommend that cleaning be carried out when the hob has cooled down. Important exceptions to this rule, however, are spillages with a high sugar content, such as jam, or if plastic or aluminium should melt onto the hob. In these cases the hob should be cleaned immediately or damage can occur. Switch off the hob and use a metal spatula, palette knife or scraper to remove the spillage. TAKE CARE! The spillage and the hob will be very hot. When the hob has cooled clean thoroughly as described above. Do not use spray cleaners when the hob is hot. The detergent in these cleaners can burn leaving a tar-like residue, which can be difficult to clean. (White vinegar may help to clean such a residue.) Stubborn stains can be cleaned using "Bar Keeper's Friend" which is manufactured by Homecare Products Ltd., Follow the instructions carefully. Fig 2 Carefully turn the hob upside down. Stick the self-adhesive sealing tape around the edge of the glass as shown in Fig 1, but allowing a slight overhang. Take care to ensure a close fit at the corners. Now connect the hob as described below. Do not use scouring powders or paste, wire wool scouring pads or oven cleaners on any part of the hob as they may damage the surface of the glass or the outer frame. After cleaning polish the hob using a ceramic hob cleaner and conditioner. Carefully replace the hob in the aperture. Secure in place using the four brackets and screws provided. The brackets can be used in a number of orientations, depending on the thickness of the worktop. Do not over-tighten as this may damage the hob. The hob is now ready for use. Page 2 Page 11 Suitable Pans Fitting the hob – 2, flush mounting To get the best results from your ceramic hob you should use pans of the correct size and type. Unsuitable pans can cause the safety cutout to operate, and can lead to less efficient cooking. The pans should be approximately the same size and diameter as the element. A pan that is too small wastes heat and may cause boiling over. Pans with a base larger than 250 mm diameter should not be used. Your hob can be flush mounted into any solid work surface. Flush mounting is not recommended in any type of work surface that may be prone to deformation as a result of the ingress of moisture e.g.; many chipboard based worktops. If in doubt ask the manufacturer or supplier of your worktop. Caution: Flush mounting the hob requires very accurate workmanship. If you are not familiar with using a router you may prefer to call in a professional fitter. For efficient cooking the base of the pan must make good contact with the ceramic hob. Use only pans with a flat base - pans with bowed or ridged bases, or those with a rim (like some kettles) will not work as well as good quality pans with flat bases. Some copper based pans can cause inefficient cooking since although flat when cold, they become concave when heated. New pans are not necessarily flat. Check by holding a straight edge, such as a ruler, against the bottom of the pan. The straight edge should touch all the way across, with only a small gap allowed. To avoid damage to the hob surface, always make sure that the base of any pan is smooth, with no 'burrs' that could cause scratching. Make sure that the surface of the hob is free from any dirt or grit, and NEVER chop or cut food on the hob surface. Always lift pans gently on and off the hob surface, never drag then across. Woks: Never use a conventional round bottom wok on your ceramic hob. Only the flat-bottomed types are suitable. Do not use any type of stand or rack under pans on the hob. Pressure cookers: Ensure that the base is flat Preserving pans: Use a good quality pan having a flat base with a diameter no larger than 250 mm. Griddles: Ensure that the base is flat and smooth so that there is no danger that the hob will be scratched. Do not use a griddle with feet. Frying & Chip pans: Use a good quality pan with a flat base. Use the larger rings. Never fill a chip pan more than one third full of oil. Never leave frying unattended, even for a short time. Never cook directly on the hob. It is dangerous and can cause damage to the hob. Flush mounting of the hob is demonstrated in the following sectional view, Fig 3 Fig 3 Start in the same way as for proud mounting by cutting an aperture in the work surface to the dimensions shown in Fig. 2 ensuring that the clearances detailed on page 1 are maintained. Next, using a 12 mm dia. router bit, cut a rebate as shown below in Fig 4. The overall size of the rebate will be 521 mm x 486 mm. Check the dimensions against the appliance before cutting! Fig 4 Stick the self-adhesive sealing tape around the edge of the glass as shown in fig 1, but allow a slight overhang. Take care to ensure a close fit at the comers. The hob should now be connected to the mains supply as described below. Carefully position the hob into the rebate, ensuring an even gap of 3 mm all round. Secure in place using the four brackets and screws provided. The brackets can be used in a number of orientations depending on the thickness of the worktop. Do not over tighten as this may damage the hob. Fill the gap with high temperature waterproof silicone sealant. Using a solution of washing up liquid in warm water, wash away any surplus sealant on the hob or work surface. Allow at least seven hours for the silicone sealant to harden before using the hob. Page 10 Page 3 Connecting the hob (This should be done after the aperture is cut but before final fitting.) For your own safety, we recommend that your hob be connected by a competent electrician. The installation must comply with current I.E.E. Wiring Regulations. WARNING! This appliance must be earthed! The hob must be connected to the correct electrical supply as stated on the voltage label, through a suitable cooker control unit incorporating a double pole switch with a contact separation of at least 3 mm in all poles. We recommend that the circuit is rated to 16 Amps, and that 1.5 mm2 P.V.C. insulated twin and earth cable be used to connect the hob to the mains supply. Access to the mains terminal is gained by removing the small base cover plate on the under-side of the hob. Pass the mains cable through the grommet provided and secure it by using the cable clamp. Connect the mains cable as follows To save energy Always position pans centrally over the heating area. Put lids on saucepans and only heat the amount of liquid you need. When liquids boil, reduce the control setting to maintain a simmer Consider the use of a pressure cooker for the cooking of a complete meal Vegetables will cook quicker if chopped in smaller pieces. Larger heating elements are ideal for faster cooking methods - such as boiling or frying, and larger pans. Smaller heating elements are ideal for simmering and stewing, and for smaller pans. Faultfinding Faults during calibration Live to terminal L When the hob is switched on at the mains, basic calibration is carried out automatically. Neutral to terminal N Make sure there are no objects over the sensors during calibration. Earth to the earth terminal Should a fault occur during calibration, a tone will sound, and a fault code (see table) is shown for as long as the fault is present. Allow sufficient cable to enable the hob to be removed for maintenance, but make sure that it is looped to the back of the cabinet and is kept clear of the base of the hob. In case of a fault, the basic calibration process is repeated until the surrounding conditions enable calibration to be carried out successfully. The hob can only be used when all the sensors have been calibrated. Removal of the hob Faults during operation Always lift the hob from under the worktop, pushing the metal box upwards. Under no circumstances should you attempt to prize the hob from above by pushing a screwdriver or similar tool under the edge of the glass. When removing a flush fitted hob, cut through the silicone sealant with a sharp knife before attempting to lift. If a sensor is operated for more than 10 seconds - e.g. if a pan is placed over the control panel - or operated incorrectly, an alarm will sound. All elements will switch off, and the display will flash 'F' (fault) until the fault has been removed. The alarm will sound for 5 seconds, and repeat every 30 seconds for up to 15 minutes or until the fault is found. The second part of the fault code is used to identify which sensor has the fault. Please read the operating instructions before using this appliance. Page 4 Display Fault code F1 F2 Background light intensity too strong Strongly pulsating light (fluorescent lamp) F3 Sensor covered with a light coloured object F4 Large variation in background light intensity Page 9 Timer Operating Instructions The cook top control can run 4 timers, assigned to the heating elements and 1 egg timer simultaneously. For both the egg timer and the heater timers, the display shows “00” if no time has been chosen. After touching the timer sensor once, the time value for the egg timer can be set by using the sliding. After setting the egg timer value, the time starts to count down. The egg timer function does not depend on any heater. However, heater timers can only be set for active heaters running in levels between “1” and “9” or “u”. You can switch to another timer or show the timer values by touching the timer sensor to cycle through each timer. The cook top control each time indicates which timer has been chosen by the decimal point or the relevant flashing LED. You can set time values for both the egg timer and the heater timer(s) that will count down at the same time. If both heater timers are running, both LED are statically lighted. 10 sec after the last sensor operation, the timer display will change automatically to the remaining time value of the timer which will run out next. This is shown by the relevant flashing LED. This appliance is not intended for use by persons (including children) with reduced physical, sensory or mental capabilities, or lack of experience or knowledge, unless they have been given supervision or instruction concerning the use of the appliance by a person responsible for their safety. The touch control hob This hob is controlled using infrared sensors. To activate, just touch the appropriate sensor until the required setting is achieved. The touch ‘slider’ control operate the heating elements from setting '0' (off), through ‘u’ warming mode to ‘1’ (minimum) and up to '9' (maximum.) An LED display shows setting chosen for each element. After reaching the “00” of a heater timer, the assigned heater level will be set to “0”. The heater or egg timer run out is indicated acoustically by a buzzer tone. This sound can be stopped by touching any sensor for acknowledgement. After about 2 minutes, the cook top control stops the acoustical indication automatically. The heating elements cycle on and off to maintain the selected temperature. Advice for cooking with a ceramic glass hob Never place objects over the control area. Do not use the ceramic hotplate surface for storage. Do not use the ceramic glass hob as a work surface or chopping board, as this will damage the surface. Also, if any plastic utensils come into contact with a warm hob, they may melt onto it. There is a 'heat boost' function on all heating elements for a faster heat-up time. The hob has a 'lock' function, which can be used to lock the controls onto a desired setting, or to lock the hob 'off'. A safety cutout device is incorporated in each element. Even so, it is not good practice to operate the elements for more than a few seconds without a pan in position, as overheating may occur. Operating the hob Turn pan handles so that they are not overhanging the edge of the worktop. As pans are on a smooth surface, they will move easily if knocked accidentally. Turning pan handles so they are not overhanging will help prevent this happening and keep them out of the reach of children. Be careful when cooking foods containing large amounts of sugar or syrup, if these are spilt onto hot areas of the hob they may damage the glass. Wipe any spillage as soon as possible, taking care to avoid contact with hot surfaces. Use pans that are large enough to avoid overflows onto the ceramic glass hob. Make sure that there are no objects over the sensors or on the hob. Lift pans on and off the hob, rather than sliding them across the surface, to avoid marks and scratches. Switch on the hob at the mains supply. When the hob is switched on at the mains, basic calibration is carried out automatically - this will take about 5 -10 seconds. The hob is now in 'standby' mode. Standby mode. The hob is switched on at the mains supply. All heating elements are switched off, and displays are not illuminated. Touch the main 'on / off' sensor to bring the hob to the 'ready' mode. Aluminum foil must not be placed on the hob, as it will reflect any heat back into the element, which can damage it. Leaving a hotplate on for a length of time without a pan in place - can cause overheating of surrounding areas, which could damage the glass. Page 8 Page 5 Ready mode When the hob goes to the ‘ready’ mode, ‘0’ appears in each heating element display for 10 seconds. If no sensor is touched within 10 seconds the hob returns to ‘standby’. If a hob select sensor is touched while the hob is in ‘ready’ mode, the hob will go into ‘operating’ mode. Operating mode When at least one heater is on (setting u, 1 – 9), the hob is in the ‘operating mode’. If no heating elements are switched on, and no sensor is activated within 10 seconds, the hob returns to ‘standby’. To switch on a heating element Touch the main ‘on/off’ sensor to bring the hob into ‘Ready’ mode. All heating element indicators will come on to ‘0’, and remain on for 10 seconds. While ‘0’ is showing on the display, any heating element can be selected. Touch the hob select sensor relating to the element you want to switch on. The selected hob is indicated by the illuminated point ’●’ after the heat setting. Within five seconds touch the heat select slider and that element will come on at the setting relevant to that position on the slider. By moving a figure up and down the slider the desired heat setting can be selected. To switch on another element, touch the hob select sensor relating to that element. ‘0’ will appear in its display and the element can be controlled as described above. A selected hob can be de-selected to avoid accidently changing the heat setting by pressing the relevant hob select sensor. The hob indicator ‘●’ will switch off. Only one hob can be controlled at any time. Heat boost: The “heat boost” function provides a faster element heat up time. The function simulates switching an element on at full power, and then turning down to lower power to maintain a simmer. To activate the heat boost function, switch on the selected heating element by touching the hob select sensor. While ‘0’ is showing on the display, touch the slider at the required setting. The display will show a setting value alternating with ‘A’ for 10 seconds. The operating time for the heat boost function varies according to which final heat setting is selected. To switch off To switch off an individual heating element, touch the hob select sensor so the hob indicator ‘●’ is on. Touch the slider at the lowest position, the number in the display should be ‘0’, if required touch the slider further to the left. To switch off all heating elements, touch the main ‘on/off” sensor – this will return the hob to ‘Standby’. After a heater has been switched off, the display will show ‘H’ (hot) until the glass has cooled. We recommend that you switch off the hob at the mains when it is not in use, to avoid accidental activation of the sensors. Please note that if the elements are still hot when the power is switched off, the ‘H’ symbol will disappear, and will remain off until the power is restored. If the power is switched off whilst the ‘H’ symbol is displayed, the symbol will return when the hob is switched on again, even if the elements have had time to cool. The ‘H’ symbol will flash to indicate there has been a break in the power supply. ‘F’ fault indicator If a sensor is covered for more than 10 seconds - e.g. if a pan is placed over the control area, or if the hob is operated incorrectly - a fault condition will occur. An alarm will sound, all heating elements will switch off, and the display will flash ‘F’ (Fault) until the fault has been removed. The alarm will sound for 5 seconds, and repeat every 30 seconds for up to 15 minutes or until the fault is removed. ‘Lock’ function The ‘Lock’ function can be used to prevent the hob from being switched on unintentionally. With the unit in ready mode, the ‘Lock’ sensor must be touched for approximately 3 seconds. The ‘Lock’ LED will come on for 5 seconds, and a tone will sound. If an attempt is made to operate the hob when it is in the ‘Lock’ mode, the ‘Lock’ LED will come on for 2 seconds. The ‘Lock’ sensor can also be used to lock the heating elements onto the selected temperature setting. After selecting the desired heating element setting, touch the ‘Lock’ sensor for 3 seconds until the alarm sounds and the ‘Lock’ LED illuminates. Once the heating element has reached the selected heat setting, the boost function will switch off, and the ‘A’ will disappear from the display. The hotplate is now in normal operating mode. Heating elements cannot be switched on when the hob - or one or more elements - is in ‘Lock’ mode, but the hob can still be switched off with the main ‘on/off’ sensor. Warming Zone: To deactivate the ‘Lock’ function, touch the ‘Lock’ sensor for at least 3 seconds and the ‘Lock’ LED will go out. The warming zone function allows an additional heat level called "u" between "0" and "1" in order to keep food warm in a pot on the related heater. Page 6 If the appliance is disconnected from the mains supply, the lock function will be deactivated. Page 7