1
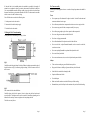
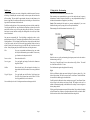
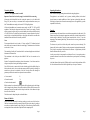
Care of your hob For reasons of hygiene and safety your hob should be kept clean. A build up of grease or fat from cooking could become a fire hazard. WARNING! Always switch off at the mains before cleaning. Never use excessive water to clean your hob. WARNING! If a crack should appear on the glass surface, isolate the hob immediately from the mains supply. Do not use any part of the hob. Contact your supplier or service agent. The ceramic hob is hard wearing and with normal use and care will remain in good condition for many years. It is important that any spillage be dealt with before the hob is used again, otherwise it will become baked on. When the hob has cooled, remove any heavy spillage with a metal spatula, palette knife or scraper. Then use any good quality ceramic hob cleaner and conditioner on a damp cloth to remove any remaining marks. Always follow the instructions of the manufacturer of the cleaner. Wipe off any residual cleaner with a soft damp cloth and polish with a soft lint-free cloth. We recommend that cleaning be carried out when the hob has cooled down. Important exceptions to this rule, however, are spillages with a high sugar content, such as jam, or if plastic or aluminium should melt onto the hob. In these cases the hob should be cleaned immediately or damage can occur. Switch off the hob and use a metal spatula, palette knife or scraper to remove the spillage. TAKE CARE! The spillage and the hob will be very hot. When the hob has cooled clean thoroughly as described above. Do not use scouring powders or paste, wire wool scouring pads or oven cleaners on any part of the hob as they may damage the surface of the glass or the outer frame. Calling for service Remember that service agents may charge for visits (even during the guarantee period) if no fault is found with the hob, so always check the instructions to make sure you have not missed anything! Technical details Power supply; Max. input; Elements; Nominal dimensions; Weight (approx.); 230 - 240V ~50 Hz single phase, as marked on the voltage label 2.4 kW Back 1200 W Front 1200 W Width - 280 mm, Depth.- 510 mm, Depth below worktop - 45 mm 3 kg Leisure Products (Bolton) Ltd Holly Street, Bolton, BL1 8QR. England. ~~~~ For further details see also www.marinecooker.co.uk 5311v3 Installation & Operating Instructions Two Element Rotary Control Ceramic hob Please read the following installation and operating instructions before installing or using this appliance. Installation Instructions Unpacking Handle with care! The frameless glass is at its most vulnerable during the installation process. Carefully examine the hob for any damage, particularly to the ceramic glass. There should be no chips or cracks. If there is any damage to the hob, or if anything is missing from the pack, please contact your supplier for advice. If the glass is cracked the hob must not be connected to the mains supply and no part of the hob should be used. Installing the hob - Read all the instructions carefully before starting work. Your hob can either be mounted proud of the work surface, or rebated into the surface for a flush appearance. Mounting the hob requires accurate workmanship. If you are not familiar with this type of work you may prefer to call in a professional fitter. Locating the hob Your hob can be fitted into any 600 mm worktop with a thickness of 28 to 40 mm. The surface around the hob should be of a heat resisting material such as ‘Formica’. The worktop and its support must be strong enough to take the weight of the hob plus full cooking pans. Any overhanging surface or cooker hood should be at least 650 mm above the hob. Refer to the manufacturer’s installation instructions when fitting a cooker hood. We do not recommend positioning the hob below wall cupboards, as heat and steam may cause damage. As with any other cooking appliance, walls and other surfaces near the hob must be resistant to heat, steam and condensation. The minimum clearance between the left or right hand edge of the hob and any side-wall is 50mm. This clearance must be maintained up to 420mm above the worktop. The minimum clearance between the rear edge of the hob and the rear wall is 30mm. This clearance must be maintained up to 650mm above the worktop. Before cutting the worktop, make sure that there is sufficient space underneath, with no supports or projections, which might interfere with fitting. Page 1 If, when the hob is in its installed position, the underside is accessible, (for example, if mounted over a cupboard or drawer), a protective sheet must be fitted below the hob base. Use a non-combustible material, allowing a small air gap at the back and at least 10mm clearance from the lowest point on the underside of the hob. The sheet must be removable to allow access to the hob for future servicing. You will find it easier to work in the following order For Your own safety As with any electrical appliance there are a number of simple precautions that should be observed. Never Never operate any of the elements if the glass is cracked. Switch off at the mains and contact an authorised service agent. 2. Connect the hob to the electricity supply. Never allow anyone other than a competent electrician to service or repair your hob. 3. Fit the hob in the work-surface. Never remove any part of the hob, or attempt to modify it in any way. Never allow young people to play with or operate the hob unsupervised. Never use a chip pan more than one third full with oil. Never leave a frying pan unattended. Never allow aluminium foil or plastic to touch the hob while hot. Never cover the hob, or place flammable materials, such as tea towels on the hob, even when not in use. Never store anything flammable in cupboards directly under the hob. Never cook directly on the hob. Never use an asbestos mat, trivet, or rack of any kind under pans on the hob. 1. Cut the aperture in the work-surface. 1. Fitting the Hob - Proud mounting Cut an aperture to the dimensions given in Fig. 1 below. (Fig 1) Carefully turn the hob upside down. Stick the self-adhesive sealing tape around the edge of the glass as shown in Fig 2, but allowing a slight overhang. Take care to ensure a close fit at the corners. Always Take care when touching any part of the hob that may be hot. Keep your hob clean as a build up of grease and fat may be a fire hazard. Switch off at the mains before cleaning the hob. Supervise children near the hob. Use suitable pans. Make sure that all controls are switched off when you finish cooking. Remember that your hob will stay hot for some time after you have finished cooking. (Fig 2) Now connect the hob as described below. Carefully replace the hob in the aperture. Secure in place using the four brackets and screws provided. The brackets can be used in a number of orientations, depending on the thickness of the worktop. Do not over-tighten as this may damage the hob. The hob is now ready for use. Page 2 Page 7 Suitable pans 2, Fitting the hob - Flush mounting To get the best results from your ceramic / halogen hob you should use pans of the correct size and type. Unsuitable pans can cause the safety cut-out to operate, and can lead to less efficient cooking. The pans should be approximately the same size and diameter as the element. A pan that is too small wastes heat and may cause boiling over. Pans with a base larger than 250 mm diameter should not be used. Your hob can be flush mounted into any solid work surface. For efficient cooking the base of the pan must make good contact with the ceramic hob. Use only pans with a flat base - pans with bowed or ridged bases, or those with a rim (like some kettles) will not work as well as good quality pans with flat bases. Some copper based pans can cause inefficient cooking since although flat when cold, they become concave when heated. Flush mounting is not recommended in any type of work surface that may be prone to deformation as a result of the ingress of moisture, e.g.; many chipboard based worktops. If in doubt ask the manufacturer or supplier of your worktop. Caution: Flush mounting the hob requires very accurate workmanship. If you are not familiar with using a router you may prefer to call in a professional fitter. Flush mounting of the hob is demonstrated sectional view, Fig. 3. New pans are not necessarily flat. Check by holding a straight edge, such as a ruler, against the bottom of the pan. The straight edge should touch all the way across, with only a small gap allowed. To avoid damage to the hob surface, always make sure that the base of any pan is smooth, with no 'burrs' that could cause scratching. Make sure that the surface of the hob is free from any dirt or grit, and NEVER chop or cut food on the hob surface. Always lift pans gently on and off the hob surface, never drag then across. Woks: Never use a conventional round bottom wok on your ceramic hob. Only the flat-bottomed types are suitable. Do not use any type of stand or rack under pans on the hob. (Fig. 3) Pressure cookers: Ensure that the base is flat. Start in the same way as for proud mounting by cutting an aperture in the work surface to the dimensions given in Fig 1. Preserving pans: Use a good quality pan having a flat base with a diameter no larger than 250 mm. Next, using a 12 mm dia. Router bit, cut a rebate as shown in Fig. 4 below. The overall size of the rebate will be 286 x 516 mm. Griddles: Ensure that the base is flat and smooth so that there is no danger that the hob will be scratched. Do not use a griddle with feet. Check the dimensions against the appliance before cutting! Frying & Chip pans: Use a good quality pan with a flat base. Use the larger rings. Never fill a chip pan more than one third full of oil. Never leave frying unattended, even for a short time. Never cook directly on the hob. It is dangerous and can cause damage to the hob (Fig 4) Stick the self-adhesive sealing tape around the edge of the glass as shown in fig 1, but allow a slight overhang. Take care to ensure a close fit at the comers. The hob should now be connected to the mains supply as described below. Carefully position the hob into the rebate, ensuring an even gap of 3 mm all round. Secure in place using the four brackets and screws provided. The brackets can be used in a number of orientations depending on the thickness of the worktop. Do not over tighten as this may damage the hob. Fill the gap with high temperature waterproof silicone sealant. Using a solution of washing up liquid in warm water, wash away any surplus sealant on the hob or work surface. Allow at least seven hours for the silicone sealant to harden before using the hob. Page 6 Page 3 Connecting the hob Operating Instructions WARNING! This appliance must be earthed! Please read the following operating instructions before using this appliance. Important: Ensure that the electricity supply is switched off before connecting This appliance is not intended for use by persons (including children) with reduced physical, sensory or mental capabilities, or lack of experience or knowledge, unless they have been given supervision or instruction concerning the use of the appliance by a person responsible for their safety. (Connecting the hob should be done after cutting the aperture is cut, but before final fixing.) For your own safety, we recommend that a competent electrician connect your hob. The installation must comply with current I.E.E. Wiring Regulations. All electrical installations and connections must comply with BS 7671 1992 and lEE regulations. Check that the voltage stated on the hob is correct for your supply. This hob must be connected to fixed wiring via a switched double pole fused spur outlet fitted with a 13A BS1362A fuse. The double pole switch must have a contact separation of at least 3 mm in all poles, and preferably should have a pilot light, which must be accessible after installation. Ensure that the switch is readily accessible. Notes: We recommend that the circuit is rated to 13 Amps, and that P.V.C. insulated twin and earth cable be used to connect the hob to the mains supply. The minimum size of cable that can be used is 1.5 mm2. The terminology “double pole” means that both live and neutral supplies are switched and disconnected at the same time. Controls Symbols showing which control relates to each element are printed on the hob surface. The elements are operated by turning the appropriate control knobs in either direction until the desired setting is indicated by the scale printed around the knob; 0 for off - from low simmering to fast simmering and boiling. The controls can be set to any position between off and full on. The elements in your hob are fitted with special controls to prevent overheating. The elements will switch on and off during use as the temperature is maintained automatically. This 'cycling' is a normal part of the operation of the elements. A slight hum may be heard from the elements while they are in use. The terminations in the fused spur outlet labelled LOAD are for connection to the appliance. A safety cut-out device is incorporated in each element. Even so, it is not good practice to operate the elements for more than a few seconds without a pan in position, as overheating may occur. Switch off at the mains before making any electrical connection. Cover the bare earth wire with green and yellow sleeving when making a connection. A hob-hot indicator light is provided. While the hob is in use the hob-hot indicator will be lit. After the elements are switched off this light will stay on for up to 30 minutes. You will find it easier to connect the hob to the electrical supply before finally fixing the hob into the work surface. Access to the mains connector block is gained by removing the terminal cover plate on the underside of the hob. Pass the mains cable through the grommet provided in the terminal cover plate and connect as follows: Live to terminal L Neutral to terminal N Earth to the earth terminal Refit the terminal cover plate and secure the mains cable by tightening up the cable clamp, which is integral to the grommet. Allow sufficient cable to allow the hob to be removed for maintenance, but make sure that the cable is looped to the back of the cabinet and is kept clear of the base of the hob. The hob can now be clamped into place as described above. Removal of the hob Always lift the hob from under the worktop, pushing up on the centre of the base box. Under no circumstances should you attempt to prize the hob up from above by pushing a screwdriver or similar tool under the edge of the glass. When removing a flush fitted hob, cut through the silicone sealant with a sharp knife before attempting to lift. Page 4 Page 5