1
AS800 PRESSURE SEALER
Operating Instructions
AS800 PRESSURE SEALER
OPERATING
INSTRUCTIONS
CONTENTS
SECTION
1.1.1
1.1.2
1.1.3
1.1.4
Machine Specification Sheet
Technical Specification
Control Panel Layout
Button Explanation
Machine Layout Diagram
1.2.1
1.2.2
1.2.3
1.2.4
1.2.4
Machine Setup and Operation
Hand-feed Operation
Clearing a Document Jam
Double Document Condition
Supervisor Mode
1.3.1
1.3.2
Operator's Troubleshooting Guide
Operator Maintenance
1.4.1
Display Panel Error Messages
Page - 1
ISSUE 1
APR 2002
Operating Instructions
AS800 PRESSURE SEALER
MACHINE SPECIFICATION SHEET
1.
CAUTION:
In order to ensure correct safety and operation, this machine must be
installed and maintained by an authorised Service Engineer.
2.
CAUTION:
Should any cover or safety interlock be damaged, the machine must
not be used until service repairs have been completed.
3.
CAUTION:
This machine must be earthed. The wire colours in the mains cord are:
(Green 110v) (Green/Yellow 220/240V) which must be connected to Earth (Ground).
(White 110v)
(Blue 220/240v) which must be connected to Neutral.
(Black 110v)
(Brown 220/240v) which must be connected to Live (Line).
4.
CAUTION:
5.
6.
This machine must not be used if the mains cord becomes damaged. It
must be replaced with a similar mains cord:
(Part No. 141-162-321 U.S.).
(PFE Part No. 162-210 U.K.).
(PFE Part No. 162-311 EURO).
CAUTION:
For continued protection against risk of fire, replace with same type
and rating of fuse. The fuse rating and type for this machine is :
T 3.15 A Amps 220/240Volts (PFE Part No. 141-135-103).
T 6.3 A Amps 110Volts (PFE Part No. 141-135-106).
Model Details:
Model Name:
Pressure Sealer
Model Number:
AS800
Input Voltage:
220/240 Volts @ 50 Hz
Input Voltage:
110 Volts @ 60 Hz
Input current:
2 Amps
Input current:
4 Amps
Input Power:
480 Watts
Input Power:
480 Watts
Sound Reading: 75dBA
(measured at a distance 1 metre from the nearest cover and 1.6 metres from the ground)
7.
The use for this machine is pressure sealing documents.
8.
The weight of this machine is: 176 kgs. (unpackaged)
210 kgs. (packaged, with accessories)
Lifting or handling must only be carried out by competent persons using appropriate means.
Distributor and Service contact:
ISSUE 1
APR 2002
1a
Page - 20
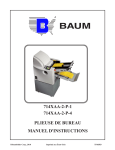
AS800 PRESSURE SEALER
Operating Instructions
IMPORTANT NOTICE
Before connecting the machine to a power source,
please read the Machine Specification Sheet opposite.
Ensure that the power cord is undamaged.
Page - 19
ISSUE 1
APR 2002
AS800 PRESSURE SEALER
Operating Instructions
1.1.1 TECHNICAL SPECIFICATION
Machine type
Low volume pressure sealer
Speed
Variable, up to 6000 documents per hour
Volume to a maximum of:
7,000 documents per day
21,000 documents per week
1 million documents per year
Document dimensions (folded flat):
ISSUE 1
APR 2002
Page - 2
Operating Instructions
AS800 PRESSURE SEALER
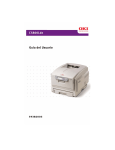
1.1.2 CONTROL PANEL LAYOUT
12
1
2
1.
2.
3.
4.
5.
6.
7.
8.
9.
10.
11.
12.
10
3
5
11
4
6
12
7
8
9
Stop button
Start button
Speed decrease button
Speed increase button
Speed indicator
Setup button
Hand feed button
Jog reverse button
Jog forward button
Zero reset (in-count) button
Zero reset (out-count) button
Display panels
A detailed description of each button function is given
in the following section.
Page - 3
ISSUE 1
APR 2002
AS800 PRESSURE SEALER
Operating Instructions
1.1.3 BUTTON EXPLANATION
1.
Stop button: Allows documents currently passing through machine to
continue to output, then halts operating cycle.
2.
Start button: Starts machine into continuous running, and also cancels
any errors which may be indicated after the cause of the problem has
been cleared by the operator.
3.
Speed decrease button: Decreases speed in steps down to 0, shown on
speed indicator display.
4.
Speed increase button: Increases speed in steps up to
speed indicator display.
5.
Speed indicator: Indicates speed in steps from 0 to 9 (max.)
6.
Setup button: Feeds through a single document in order to calibrate
document length and weight. This is for double document detection.
Document is diverted before sealing to enable fold lengths to be
checked.
7.
Hand feed button: Allows single document to be fed through pressure
rollers. Note: document must be pre-folded by hand, and placed in
folder bypass chute.
8.
Jog reverse button: "Jogs" document back through machine in small
steps. Used for clearing jams. Note: after operating, there is a 2 second
pause before button can be operated again.
9.
Jog forward button: "Jogs" document forward through machine in
small steps. Used for clearing jams. Note: after operating, there is a 2
second pause before button can be operated again.
10.
Zero reset (in-count) button: Zeroes counter display for documents fed
in (machine must be stopped). Note: count will maintain until zero
reset is pressed, even when machine is stopped or switched off.
9, shown on
11.
Zero reset (out-count) button: Zeroes counter display for documents
fed out (machine must be stopped). Note: count will maintain until
zero reset is pressed, even when machine is stopped or switched off.
12.
ISSUE 1
APR 2002
Display panels: Displays in or out count, and also error messages.
Page - 4
AS800 PRESSURE SEALER
Operating Instructions
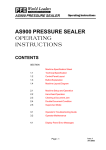
1.1.4 MACHINE LAYOUT DIAGRAM
Page - 5
ISSUE 1
APR 2002
Operating Instructions
AS800 PRESSURE SEALER
1.2.1
MACHINE SETUP AND OPERATION
1.
Plug in machine, switch on at power switch and release emergency stop button.
2.
Adjust the separator gap to suit the document form, as shown below.
Turn the separator adjustor until there is
sufficient gap between the grip roller and
the pick-up roller below it to allow one
form only to pass through. This is
achieved by moving the form back and
forth between the rollers until resist- ance
is just felt and the rollers lightly grip the
form.
Stack guide
Grip roller
Centrally place a form in the insert tray
and move both side guides to leave a gap
of 1/16" (1-2mm) either side of the form.
Note: guides will self center.
Stack bridges
Insert tray
3.
Establish fold type and length required, raise the folder cover and set the fold plates as described below:
Fine adjustment knob
Lock screw
Fold plate 1
Squareness adjuster
Pointer (align
inside edge
with scale)
Stop
Fold plate 2
ISSUE 1
APR 2002
Page - 6
AS800 PRESSURE SEALER
Operating Instructions
The fold plate stops are adjusted by loosening the lock screws, sliding the stop to the required
position as indicated by the pointer against the scale, and retightening the lock screws. A fine adjustment is provided by turning the knob shown. This will adjust the fold position by small amounts if a
running test shows this to be needed.
Additionally, the squareness of the stop can be adjusted by loosening the squareness adjuster lock
screw and turning the knurled cam knob below it. This may be required if running tests reveal that
the documents are being folded 'skewed'. Retighten the lock screw after any adjustment is made.
The scales accord with the exact measured position of the required fold on the document, and the
inside edge of the pointer is aligned with the scale measurement (see diagram on previous page).
For example, if the first fold is required at 4" (102mm) down from the leading edge of the document,
set fold plate 1 at this position. The crease then becomes the leading edge for the second fold position, so if the second fold is required at 4½" (114mm) from the crease, set fold plate 2 at this position. Note that if the squareness adjuster has been moved at any time, the pointer position will
change, and this will have to be compensated for when measuring fold positions. Running tests will
reveal to what extent.
The fold plates are removable and are retained by clips. If the document requires only a single center
fold, slide out fold plate 2. Turn it round the other way and also turn it over, then slide it back into
position. This then acts as a blanking plate and the document will bypass it. Set the stop of fold plate
1 to half the length of the document.
The three types of fold which may be used are shown overleaf:
Page - 7
ISSUE 1
APR 2002
AS800 PRESSURE SEALER
Below are shown the three types of fold which may be used:
1.
Letter (or Wallet) Fold
2.
Accordian (or 'Z') Fold
3.
Single (or Half) Fold
ISSUE 1
APR 2002
Page - 8
Operating Instructions
AS800 PRESSURE SEALER
4.
Operating Instructions
Set the output conveyor rollers and bridge as shown below:
Roller bar
Bridge (fold outwards)
Pointer
Scale
Fold the bridge outwards to provide a stop for the accumulating stack of forms. Slide the roller bar
to align the pointer with the measurement on the scale that accords with the finished length of the
folded and sealed document. In most cases this is the same as the length of the second fold.
5.
When setting up for the first time, load one document and press the setup button
to
begin calibration cycle. A message
on the display panel will request confirmation that you wish to calibrate. Press again to confirm. A message
will be momentarily displayed and the document will be fed. The double document and form length sensors
will measure the length and average thickness of the document. This will act as a gauge for all future
documents of that size, and hence is only done once until the document size is changed. The gauged
document will be ejected via the divert chute. At the end of a successful calibration cycle, a message
will be displayed. In the event of a calibration failure, the relevant error message
will be displayed. (See section 1.4.1).
Note: If the 'Auto-calibrate' DIP switch on the CPU circuit board has been set, the machine will
automatically enter the setup mode either after power-up or when re-starting after hopper empty
condition. Setting of the switch is not an Operator function - it must be set by a Customer Service
Engineer.
Page - 9
ISSUE 1
APR 2002
AS800 PRESSURE SEALER
Operating Instructions
6.
Place a stack of documents in the insert tray. Forms must be orientated according to fold type
and print direction. Ensure that the leading edges of the stack of forms are against the stack guide.
Adjust the stack bridges to support
the backs of the forms. Further readjustment may be required for
reliable feeding.
7.
Set the required speed using the
(speed increase) or
(speed decrease) buttons. The speed increments in steps 0-9, as shown on the indicator panel between the two buttons.
The speed may be varied whilst machine is running.
8.
Now that form calibration, fold plates and speed are all set, press the start button
and
the documents will begin feeding. Note that the count of the documents fed in and fed out is displayed on the left and right display panels respectively
When the run of documents has finished, either or both of the count displays may be zeroed by
pressing 'in count' or 'out count' buttons
9.
When the document run has finished (or the feeder tray runs out) the machine will stop operating after about 3 seconds and the message
will show on the display. Press the
stop button
to clear the display.
NOTE: IN THE EVENT OF ANY EMERGENCY, OR TO
STOP THE MACHINE FOR ANY OTHER REASON,
PRESS THE RED EMERGENCY STOP KNOB ADJACENT
TO THE CONTROL PANEL
ISSUE 1
APR 2002
Page - 10
AS800 PRESSURE SEALER
1.2.2
Operating Instructions
HANDFEED OPERATION
If required, a single document may be hand fed for sealing only. First fold the document as desired
(see previous section) and place it in the folder bypass chute immediately in front of the folder cover.
Press the handfeed button
and the folded document will pass through the sealing rollers.
Insert document
crease downwards.
1.2.3
CLEARING A DOCUMENT JAM
A document jam may be caused by a number of conditions, such as a damaged or crumpled edge,
incorrect fold etc. Whatever the cause, a jam will result in the machine stopping automatically, and an
error message will be shown on the display panel.
To free the jammed document, switch the machine off, raise the folder and feed roller covers to
ascertain the position of the jammed form. This will determine whether the form should be moved
forwards or backwards to clear the rollers for retrieval. Close the covers, switch back on and press
the jog forward
or jog backwards
buttons as required. This will operate the machine
in short, slow 'spurts' to clear an edge of the damaged document. Raise the covers again and pull the
freed document out. It may be necessary to repeat this operation more than once until the damaged
document is fully clear.
NOTE: THE MACHINE WILL NOT RUN WITH THE COVERS
OPEN, DUE TO SAFETY MICROSWITCHES
Access to the outfeed roller area can be gained
by removing the guide/static brush carrier.
Replace before running machine.
Page - 11
Outfeed guide fixings.
ISSUE 1
APR 2002
AS800 PRESSURE SEALER
Operating Instructions
1.2.4 DOUBLE DOCUMENT CONDITION
If more than one document is fed at one time, such as if two are stuck together, they will not pass
through the sealing rollers, but will be diverted to the divert chute. The machine will stop, and an
error message
will appear on the display. The diverted document can be
retrieved from the divert chute opening at the rear end of the machine. This is the default condition.
The machine can also be set for an alternative double document condition. In this mode, when a
double document is fed, it will be directed to the divert chute and the machine will carry on operating
normally. The diverted document will not register on the count display. If a second double document
is then fed immediately afterwards, the machine will stop and the error message
will appear on the display. This alternative mode is selected via a DIP switch on the CPU board,
and should only be set by a Customer Service Engineer.
Note that in both modes, pressing the start button will restart the machine and clear the display,
which will then revert back to document count.
If several double documents occur in a short space of time, the cause should be investigated. It may
be that that the separator is incorrectly set (see section 1.2.1, para 2) or that the stack of documents
needs 'rifling' for proper separation.
1.2.5
SUPERVISOR MODE
The Supervisor Mode will allow the display of the total machine running time to date. The total
forms count to date can also be displayed. Press the stop
and jog-forward
buttons
simultaneously to enter the mode. Successful entry into the mode will be confirmed by the display:
Press the jog-forward button again to show the total hour count to date (to within 1/10th hour) in the
following format on the display:
Press the jog-forward button again to show the total forms count to date as a ten-digit number in the
following format on the display:
Press the jog-forward button again to cycle back to the
Press the stop
ISSUE 1
APR 2002
button to exit Supervisor Mode.
Page - 12
display.
AS800 PRESSURE SEALER
1.3.1
Operating Instructions
OPERATOR'S TROUBLESHOOTING GUIDE
1. Documents not feeding.
Possible cause:
Separator gap incorrectly set
Possible remedy:
Adjust separator as in section 1.2.1, para. 2
2. Slow feeding of documents
Possible cause:
Feed rollers need cleaning
Possible remedy:
Clean all rubber rollers as in section 1.3.2
3. Documents jam in folder.
Possible cause:
i) Side guides incorrectly set
ii) Documents incorrectly stacked
iii) Curled or damaged edges on
document
Possible remedy:
i) Reset side guides
ii) Check forms and re-stack
iii) Remove damaged documents
4. Documents incorrectly folded.
Possible cause:
i) Fold lengths set too long or short
Possible remedy:
i) Re-measure fold lengths and re-adjust as shown
in section 1.2.1, para. 3
ii) Reset side guides
iii) Adjust squareness of stop as shown in section
1.2.1, para. 3
ii) Side guides set too wide
iii) Documents out of square ('skewed')
5. Documents not sealing
Possible cause:
i) Defective adhesive on document
ii) Sealing rollers incorrectly set
Possible remedy:
i) Test documents from a different batch
ii) Contact service department
6. Repeated double document condition
Possible cause:
i) Separator gap incorrectly set
ii) Documents sticking together
Possible remedy:
i) Adjust separator as in section 1.2.1, para. 2
ii) 'Rifle' document stack
contd.
Page - 13
ISSUE 1
APR 2002
AS800 PRESSURE SEALER
7. Double documents fail to divert
Possible cause:
i) Documents jamming in diverter
ii) Diverter not working
8. Double document will not set
Possible cause:
Documents already held in hold point
9. Documents jamming on output
conveyor
Possible cause:
Roller position on conveyor set
incorrectly
10. Bad folding or jamming in
folder
Possible cause:
Folder rollers need cleaning
11. Error message showing on
display panel when there are
no documents in machine
Possible cause:
i) Dirty sensors
ii) Cover(s) not properly closed
ISSUE 1
APR 2002
Operating Instructions
Possible remedy:
i) Check edges of documents for curling or
damage
ii) Solenoid malfunction - contact Service Dept.
Possible remedy:
Open covers and remove offending document. If
necessary, use 'jog' buttons as described in section
1.2.3
Possible remedy:
Reset roller as shown in section 1.2.1, para. 4
Possible remedy:
Clean folder rollers as in section 1.3.2
Possible remedy:
i) Clean all sensors. Refer
sensor positions
to sections 1.3.2 for
ii) Check both top covers are fully closed
Page - 14
Operating Instructions
AS800 PRESSURE SEALER
1.3.2 OPERATOR MAINTENANCE
After a period of running, especially if the machine is heavily used, the sensors will tend to become
obscured with paper dust. This may lead to erratic operation of the machine, and so the sensors must
be regularly cleaned. This particularly applies if the machine appears to be malfunctioning in any way,
and cleaning of the sensors should always be carried out before alerting the Service Department of any
faults. The sensors should always be cleaned before starting a long continuous machine run.
The locations of the sensors are illustrated below:
2
3
1
4
6
5
1.
2.
3.
Folder Input Sensors
Folder Output Sensors
Output Sensors
4.
5.
6.
Divert Sensors
Doubles Detect Sensors
Folder Hold Point Sensors
ROLLER CLEANING
At the same time that the sensors are cleaned, all visible rubber rollers and feed wheels should also be
cleaned. Ensure that the roller and wheels are cleaned round their full circumference.
Page - 15
ISSUE 1
APR 2002
AS800 PRESSURE SEALER
1.4.1
Operating Instructions
CONTROL PANEL ERROR MESSAGES
If any of the following error messages occur, do not attempt to continue the run, but switch off the
machine and take the remedial action stated. If this or any other obvious solutions do not clear the
fault, the service department must be contacted.
Documents not being fed. This message occurs if no document
is fed after about 3 seconds, such as if the feed tray is empty.
Hand-feed load has failed. May be caused by incorrect insertion
of the document into the hand-feed chute.
Double document feed has occurred. Separator gap may be
incorrectly set, or documents need 'rifling'.
Attempt to divert a double document has failed, and document
has passed through sealing rollers instead. Diverter solenoid may
be stuck.
Folder input sensor blocked. If no visible obstruction, sensor
may require cleaning.
Folder exit sensor blocked. If no visible obstruction, sensor
may require cleaning.
Divert sensor blocked. If no visible obstruction, sensor may
require cleaning.
Ouput sensor blocked. If no visible obstruction, sensor may
require cleaning.
contd.
ISSUE 1
APR 2002
Page - 16
AS800 PRESSURE SEALER
Operating Instructions
Diverter has actuated, but document has not passed through.
Document may be damaged and stuck in diverter.
Document jammed in feeder rollers. Clear jam before continuing.
Document jammed in folder rollers. Clear jam before continuing.
Document jammed in sealer rollers. Clear jam before continuing.
Document jammed on conveyor. Clear jam before continuing.
The following messages indicate a machine fault, rather than an operating fault.
Folder cover open
Sealer roller cover open.
Motor has failed to start. Contact the Service Department.
Motor has stalled. Contact the Service Department.
Motor has failed to stop. Contact the Service Department.
contd.
Page - 17
ISSUE 1
APR 2002
AS800 PRESSURE SEALER
Operating Instructions
Of the following three messages in the left hand display panel, any of the five messages shown
below may occur in the right hand display.
Unexpected arrival at a sensor. Remove all documents passing
through machine and restart cycle. If message still occurs, contact the Service Department.
Unexpected departure from a sensor. Remove all documents
passing through machine and restart cycle. If message still
occurs contact the
Service Department.
Document tracking failure. Remove all documents passing
through machine and restart cycle. If message still occurs, contact the Service Department.
Pertaining to folder input sensor.
Pertaining to folder output sensor.
Pertaining to roller sensor.
Pertaining to hold point sensor.
Pertaining to divert sensor.
ISSUE 1
APR 2002
Page - 18