1
Assembly - Burner Installation
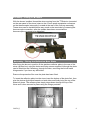
Ensure all components are present prior to commencing assembly (See Packing
List on page 3). You will need a short pozi-drive screwdriver and a set of
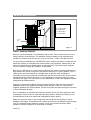
spanners. On the Lincoln the gas burner is fitted into the stove body through the
top of the stove (by removing the lid). On the Canterbury you can fit the burner
through the main door (by unwinding the handle anti clockwise).
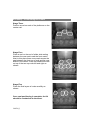
1) Remove the stove body from its packaging and lay it down on its back.
2) Attach the four legs using the supplied bolts.
3) Stand the stove up on its legs. On the Lincoln & Stamford remove the lid by un-doing
the four fixing bolts. For the Canterbury simply open the main door.
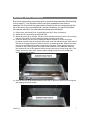
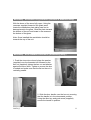
4) Insert the burner into the stove locating the burner bracket on to the fixing lugs
provided. Insert the burner end with the control knob first followed by the other end of
the burner locating the burner bracket onto the up stands provided. Please note with
the Lincoln and Stamford models 2 spacers are required. These spacers are to be
located on top of the lugs and under the burner brackets (2 off additional washers
are required on top of the spacers before securing the burner to the fixing lugs). The
longer screws are then used. Use the burner fixing screws and 2 off washers to
secure the burner in place.
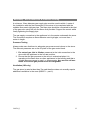
5) Next fix the rear of the burner bracket to the rear of the stove (dilution box) using the
self tapping screws provided.
200704_3
7