Transcript
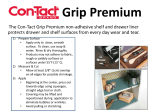
Installation Manual
CHOOSE YOUR SPOT TO SHOW YOUR PROMOTIONS!
Pick a smooth, dry and clean surface – the most traditional places are on any wall, door, window or car (do not block
windshield). When placing your WallATac on a standard painted wall, make sure the wall had been previously primed prior to
painting (otherwise the paint may possibly come off).
If you place your WallATac on a pebbly, textured or porous surface (i.e. brick or cement walls), you may receive poor results,
but in most cases it has worked.
CLEAN IT BEFORE YOU STICK IT
Use a warm, damp cloth or sponge to clean the wall surface or window and allow it to completely dry. You can remove and
effective, and the WallATac may not stick as well to your surface.
PEEL AND STICK IT
Depending on the size of your WallATac it may be helpful to have two people install it. Try not to let the adhesive come
together, or the WallATac to fold up against itself. It’s okay if it does, you can separate it by carefully pulling it apart so you do
not ruin the print.
Start at the top of your WallATac and pull down approximately 2-3” of the backing. By lightly pressing and smoothing, apply the
2-3” exposed adhesive area of your WallATac to your chosen surface area. Then continue to slowly pull the backing downward
in 2-3” increments smoothing the WallATac as you go.
Once the WallATac is started, it may be helpful if another person holds the bottom and pulls down slightly giving some tension
and keeping it straight and easier to apply.
If there are any bubbles or wrinkles, you can lightly press or smooth them out, or just peel back that area and re-apply.
Please Note: Pressing too hard will not damage the WallATac however, it may cause your hands to gather ink (due to the natural
oils on your hands), and it could transfer from your hands onto another surface.
SUGGESTIONS
If a bubble re-appears over the next day or two, you can remove it by pressing and lightly rubbing it. This may happen
occasionally because oil, dirt or dust could be on your surface. You can use a pin to pop the bubble and then smooth it out with
If you have any questions email us at [email protected]
Forest Building
01246 570570
www.wall-a-tac.co.uk
[email protected]