1
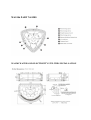
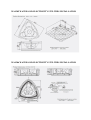
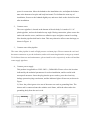
USER MANUAL AND FITTING
INSTRUCTIONS OF MASSAGING
BATHTUB WA SYDNEY SERIES
WA1501/ WA1502/ WA1503/ WA1505/ WA1506
CONTENTS
Preface…………………………………………………………………………………………… 2
Safety precautions……………………………………………………………………………….. 2
Installation preparations …………………………………………………………….……………2
WA1501part names ………………………………………………………………………………3
WA1502part names ……………………………………………………………………………....3
WA1503part names ………………………………………………………………………………4
WA1505part names ………………………………………………….………….……………….4
WA1506part names ………………………………………………………………………………5
WA1501water and electricity utilities installation ………………………………………………5
WA1502water and electricity utilities installation………………………………………………. 6
WA1503water and electricity utilities installation………………………………………………. 6
WA1505water and electricity utilities installation…………………………………..………….. 7
WA1506water and electricity utilities installation……………………………...……………… 7
Principle diagram for conversion tap piping……………………………………………………. 8
Installation procedures………………………………………………………………………….. 8
Usage ……………………………………………………………………………………………10
Water level detection description………………………………………………………………. 11
Maintenance description……………………………………………………………………….. 11
Function description of electric control systems UP903 and UP903A (without foam bath) …..12
Function overview………………………………………………………………….……….. 12
Electric parameters…………………………………………………………………..……… 12
Composition of control system…………………………………………….….……………..12
Features of control system …………………………………………………….……….……12
Features of remote control… …………………………………………………….….………12
Control devices for controlled system …………………………………………..….….…… 12
Wiring diagrams for UP903 and UP903A…………………………………….……….…… 13
Computer board LCD for UP903 and UP903A……………………………….…..….….…. 14
Control panel keys for UP903 and UP903A………………………………………….…….. 14
Remote control keys for UP903 and UP903A……………………………………...…….… 15
Function description of computer massaging tubs of UP903 and UP903A …………….….…...15
Function description of electric control systems UP933 and UP933A (with foam bath)……… 18
Function overview …………………………………………………………………………..18
Electric parameters…………………………………………………………………………. 18
Composition of control system ……………………………………………………………..18
Features of control system ………………………………………………………………….18
Features of remote controller ……………………………………………………………….18
Control devices for controlled system ……………………………………………………………..…18
Wiring diagrams of UP933 and UP933A ………………………………………………… 19
Computer board LCD of UP933 and UP933A……………………………………………. 20
Control panel keys of UP933 and UP933A ………………………………………………. 21
Remote controller keys of UP933 and UP933A …………………………………………. 21
Function description of computer massaging tubs of UP933 and UP933A………………25
PREFACE
Thank you for selecting massage bathtub WA series from our company. For your benefit,
please carefully read the manual and instructions before installing and using the product
1. We will provide quality warrant service. Please carefully fill in the Product Warrant Card.
If you require other services, please directly contact the distributor of our company.
2. Our warrant service doesn't include the damages or faults caused by incorrect installation
by yourself or operation which is not described in the User's Manual.
3. Only use the original parts from our company in order to enable the product to achieve the
best performance.
PRECAUTIONS IN INSTALLATION
Danger: This symbol is used to remind users that the product bears dangerous voltage!
Alarm: This symbol is used to remind users that the product is attached with important
operation and maintenance description!
1. The electrical installation and testing of this product have to be done by qualified
electricians or professionals appointed by the dealers.
2. The electrical sources connected to the product must comply with national safety standards
and the voltage as well as frequency of the power shall be compatible with this product. The
facility must be installed along with protection circuitries such as leak electricity protection
switch RCD) over current and overload fuse etc. and the normal operation of these units shall
be ensured.
3. Upon installation and application, it is strictly prohibited to cut off any lead connection of
the product and to take apart computerized master controller and control panel (the
computerized master controller and control panel contain no parts dismountable by users
themselves).our company shall assume no responsibility for any fault, leak electricity or
electric shock accident caused by the foresaid false actions.
4. Users have to use power cords in compliance with GB 3 x 2.5mm or those with a larger
diameter.
5. Users have to purchase air switches or creepage switches in compliance with the national
standard (GB) of 16A or above.
6 .Only fully qualified persons can carry out the installation of our products
7. It is strictly prohibited to elongate the main power cable without professional permission.
The motor must have reliable grounding with at least 1mm 2 steel-core wire.
8. Prior to installation of the product, please first be sure that you have correctly prepared the
water supply, power supply and waste pipe on the site for installation. G1/2" pipe thread cold
and hot water connectors are employed for the water supply. To facilitate maintenance in the
future, it is suggested that you install a triangle maintenance valve. 220V-240V , 50Hz/60Hz
power supply is employed. For electrical connection, please refer to the electrical
performance parameters table. Tubes with an outer diameter of 11/4'' ( 42mm) are employed
for the drainage pipes of the products with the parameters. Please be sure that they can be
connected with your waste pipelines.
9. After unpacking the package, please carefully check if the parts are complete, if they are
damaged in transportation. If you have any other problems, please contact the distributor or
our company.
10 The floor or the surface will load the total weight of the bathtub+water+the user,make sure
that the installation position is solid enough.
MATTERS FOR ATTENTION DURING USE AND MAINTENANCE
1. Trip test of the leak electricity protector shall be carried our prior to each application.
2. Qualified installation person to sign off all the required documents
3. Children are forbidden using the massage tube without guardians.
4. Aged and disabled people shall be very careful with using the massage tube.
5. When laying up the product, please maintain a ventilated, dry condition free of corrosive
gas and cut off power and water supply.
6. For storage, please do not place the upside down or slant the product and no sundries shall
be piled up on it. Please do not put it together with methanoic acid and/or formaldehyde
organic solvents. Handle gently and make it free from heavy burden, fierce shake and hit.
7 Non-professional shall not carry out the installation.in case of power line damage or quality
issue of the product, please ask a professional for help.
8 Organic solvents and strong acidic chemical substances like, ammonia and gasoline shall
dissolve the acrylic parts and plated pieces. Therefore, please prevent the product from
contacting these and similar substances in the course of installation.
The company is not held responsible for any results caused by users' violation of the
abovementioned operation specifications
WA1501 PART NAMES
WA1502 PART NAMES
WA1503 PART NAMES
WA1505 PART NAMES
WA1506 PART NAMES
WA1501 WATER AND ELECTRICITY UTILITIES INSTALLATION
WA1502 WATER AND ELECTRICITY UTILITUES INSTALLATION
WA1503 WATER AND ELECTRICITY UNTILITIES INSTALLATION
WA1505 WATER AND ELECTRICITY UTILITIES INSTALLATION
WA1506 WATER AND ELECTRICITY UTILITIES INSTALLATION
PRINCIPLE DIAGRAM FOR CONVERSION TAP PIPING
INSTALLATION PROCEDURES
The various parts of this product employ standard general-purpose parts. During installation,
please refer to the product's technical parameters, following the procedures for installation:
determine the location for installation of the product; install the tub body; connect the water
drainage pipeline; connect the water inlet pipeline; connect the power supply; check and then
apply water for test.
1、 Determine the location for installation of the product
Please refer to the product's technical parameters to deploy the water drainage
pipelines, power socket and water inlet pipes, and check whether there is sufficient
space for connection. Move the bathtub to the installation site, and adjust the balance
nuts at the bottom to keep the tub body horizontal. To facilitate the next step of
installation, first move the bathtub slightly out, and move back to the desired location
after installation.
2、 Connect sewer
The sewer pipeline is located at the bottom of the tub body. It is made of 1 1/4"
plastic pipeline, and can be bended at any angle. During connection, please secure the
outlet end onto the sewer, and then use adhesive tapes and glass cement for sealing.
Note that the pipeline shall not be bent. This may otherwise affect water drainage (as
shown in Figure. 1).
3、 Connect water inlet pipeline
The water inlet pipeline is made of high pressure resistant pipes. Please connect the cool and
hot water connectors as per the indication, and avoid connecting them the wrong way around.
To facilitate future use and maintenance, please install a valve respectively at the cold and hot
water supply pipelines.
4、 Connect power supply
This product is applicable to 220V-240V~,50Hz/60Hz. Please refer to the location
indicated by the technical parameters for socket installation, and be careful with
waterproof measures. Insert the plug into the power socket, press the electricity
leakage protection plug reset button, and the indicator light will turn on (as shown in
Figure.
2). Note: the yellow/green wires out of the motor are used as grounding lines. The
shorter end is connected onto the stainless steel frame, while the other end to the
grounding body from the user's side.
5、 Check and sort out
After the above-mentioned steps are finished, please check whether the various
pipeline connectors are securely sealed. Remove foreign matters from inside, open
the water drainage device and wash with water. Foreign matters of floating objects
may block the pump, pipeline or nozzle, so, they have to be removed.
6、 Water application test
Be sure that the massage tube is free from foreign matters. Shut down the drainer and
begin to store water. Check whether there is water leakage with the tube body. When
the water level is higher than the water level probe, slightly touch any key on the
touch screen to start up the machine, and then use your finger to touch the
key to start up the pump.
7、 WA1501Pillow installation
.
USAGE
1. Taps
2、Water massage
(1) Regulating ejection direction: The effect of water massage is controlled by water and air
circulation, and you can manually adjust the drainage nozzle direction to attain the optimal
ejection result, as shown in Figure4.
(2) Regulating water capacity: You can adjust the water volume by rotating the air
conditioner in the left and right, or manually press the drainage nozzle to rotate in the left and
right to adjust the water volume, as shown in Figure 5.
WATER LEVEL DETECTION DESCRIPTION
Each massaging tub is provided with water level probe, this function is generally equipped
under the drainage controller, the position is a little bit higher than that of the nozzle, the
detecting point is like a round-head screw,the motor starts only after the water in the tub
reaches the water level probe ,as shown in Figure 6.
MAINTENANCE
1. Use liquid detergent and soft cloth for cleaning. Detergents containing acetone, ammonia,
acid and organic solvent are strictly forbidden for cleaning. In case of sterilization, products
containing formic acid or formaldehyde are strictly forbidden, which may otherwise damage
the surface of the bathtub.
2. Avoid excessive sunshine and cold.
3. If the surface is slightly scratched or burnt, you can use 1200# sand paper to grind the
product, and then use 2000# sand paper for grinding, at last, use polishing paste and soft cloth
for polishing.
4. Galvanized part treatment: use velvet to clean the galvanized part slightly, and avoid using
coarse cloth for cleaning.
5. Tub body treatment:When there is scratch on the tub body, you can use 2000# sand paper
for grinding, and then use polishing paste and velvet for polishing.
6. Avoid bumping by sharp objects.
T
h
e
b
a
t
h
t
u
b
e
d
g
e
i
s
~
,
5
0
H
z
/
6
0
H
z
A1
503
wat
er
and
elec
trici
ty
utili
ties
inst
alla
tion