1
Toll Fraud Guard Installation Manual v1.1
Toll Fraud Guard Version 1.2.4
1|Page
Table of Contents
What is Toll Fraud? ................................................................................................................................. 3
Toll Fraud Guard ..................................................................................................................................... 4
PBX Requirements .................................................................................................................................. 5
PBX Configuration ................................................................................................................................... 5
Licensing.................................................................................................................................................. 6
Toll Restriction on the PBX...................................................................................................................... 6
Configure a Restricted Toll Restriction Class ...................................................................................... 7
Configure an Area to Restrict Dialled Numbers .................................................................................. 9
Installing the Guard Application ........................................................................................................... 10
Configuring the Toll Fraud Guard.......................................................................................................... 12
System ............................................................................................................................................... 13
Email Configuration .......................................................................................................................... 15
Backup and Restore .............................................................................................................................. 20
Log Files ................................................................................................................................................. 21
Translating the Guard Application ........................................................................................................ 22
Revision History
Version
Author
Date
Updates
1.0
R Horsley
April 2015
Initial release of Toll Fraud Application 1.1.7
1.1
R Horsley
July 2015
Version 1.2.4 – Add SSL/TLS Support
2|Page
What is Toll Fraud?
Toll Fraud is a term used to describe the occurrence un-authorised calls on a PBX. Switch misuse can
of course originate in-house, for example private calls initiated by an employee, or forwarding of a
DDI to an extension and then on to an external destination. However, the rise in Dial Through Fraud
(DTF) and VoIP security threats reported recently shows us that the worst misuse is likely to be
generated remotely by hackers who exploit any available remote access to the customers PBX to
generate expensive unauthorised calls.
It is important to note that any customer thus affected is still liable for all such call charges and these
can sometimes run can extremely expensive.
DTF can be perpetrated via a number of access methods, examples include IP-PBX systems
reprogrammed remotely, SIP Trunks, SIP Extensions, DISA (Direct Inward Service Access) or
Voicemail.
The hacker has the aim of obtaining access codes and passwords/PINs that will enable unauthorised
calls to be made via a customer’s switch. Often, the hackers then sell on these details to an
organised fraudster for profit.
3|Page
Toll Fraud Guard
The Toll Fraud Guard is an active call monitoring application that can be used to help prevent toll
fraud from happening. It works by monitoring SMDR output provided by the PBX and applies user
configured rules to look for call trends that could be deemed fraudulent. When potential fraudulent
activity takes place the guard can send email notifications to users informing them of the suspicion.
As the application runs on the PBX it has the ability to prevent further fraudulent activity from taking
place by modifying its configuration. If the same extension is making a high number of calls then it
can be moved to a restricted toll restriction class to prevent it from making further calls. Likewise if
the Guard sees many outbound calls to the same number, if can block this number from being
dialled.
There are two stages to the blocking actions for outbound calls, the alerts are first set to warn the
user about the possible fraudulent activity. Secondly an automatic blocking action can be carried
out, this could be to put and extension a restrictive toll restriction class or block a number from
being dialled.
Say for example an alert is configured that provides a warning if 50 outbound calls are made in a 60
minute period and blocks if 100 calls are made in the same time period. When the 50 call limit is
reached by an extension, an email will be sent informing the configured users. If the user replies to
the email then the extension will be moved to a restrictive toll restriction class to prevent it from
being able to dial out. When the 100 call limit is reached, if the user had not replied to the first
email then the extension would be automatically blocked from dialling out. When this happens, an
email is generated saying that the number has been blocked. The user can reply to the email to unblock the action. A similar concept exists to block an actual number from being dialled rather than
an extension making a high number of calls. This would mean if any extension made calls to the
same number, the number could be added to a restrict table. Further details of the rules and what
they do is available in the End User Guide.
For Inbound calls the Guard will monitor the system for suspicious call patterns and send an email to
warn the user. As such there are no blocking actions that can be carried out for incoming calls, the
Guard just inform the user about the suspicious behaviour.
The Guard requires access to an email server that is enabled for SMTP and POP3, these are used for
email integration to the application, SSL/TLS and unencrypted connections can be used. The
application is accessed using a Web Browser, both Internet Explorer version 11 and Firefox 37 can be
used to configure the Guard.
This manual explains how to install and configure and Toll Fraud Guard application.
4|Page
PBX Requirements
The Toll Fraud Guard Application runs on the CPU of the PBX using its Lua engine. A version of
system software that contains the Lua engine will need to be running on the PBX, the versions of
system software are as follows:
PBX
System Software Version
SV9100
2.00.60 / 3.00.51
SV8100
9.54 / 9.55
SL1100
5.11 / 5.12
On the SV8100 and SL1x00 an ME50 card has to be installed on the CPU to run any Lua applications.
PBX Configuration
The Toll Fraud Guard Application uses the SMDR output from the PBX to gather details about calls
that are made. SMDR output has to be enabled in a particular format that the application will
recognise. There is a PC Pro script that can be run to configure the SMDR into the right format and
enable the output for all extensions and trunks. The Script is called “TollFraudGuard_Setup_V1.pcs”.
In effect the script will enable SMDR Output over TCP Port 4001 for all extensions and trunks.
In order for the Guard application to be aware of the correct time, the Daylight Saving feature has to
be enabled, this is in PC Pro > Easy Edit > Night Service > Daylight Saving Setup or PRG command 1024.
5|Page
Licensing
The Guard Application requires a license in order to run, the license is a normal system license that is
installed on the PBX. The application can be run when the 60 day license is active on the system.
PBX
Part Number
4 Digit Feature Code(s)
SV9100
EU000285
3512, 0041
SV8100
EU000271
3512, 0041, 0008
SL1x00
EU000270
3512, 0041
As the Guard uses SMDR output to work, when you are running the application on an SV8100, you
will need an SMDR license. This is included when you purchase the license for the Toll Fraud Guard.
On the SL1x00 and SV9100, SMDR output is not licensed and therefore you only require the license
to run the application.
The 3512 code can only be displayed in PC Pro, so if you want to check to see what licenses are
installed then look in PC Pro. TelPRO and WebPRO do not show license code 3512.
Toll Restriction on the PBX
Toll Restriction should be enabled as normal on the PBX, on top of that for the Guard to be effective,
some areas of Toll Restriction have to be set aside for it to use. In terms of actions that the guard
can carry out, firstly it can move extensions to a predetermined Toll Restriction Class. This Toll
Restriction Calls should be completely restricted from making any outbound calls apart from calls to
emergency telephone numbers. The second action the guard can carry out is to block certain
numbers from being dialled by putting it in a Restrict Table. A dedicated Toll Restriction Table
should be assigned elected as one that the guard application will use.
6|Page
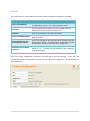
Configure a Restricted Toll Restriction Class
In PC Pro you will need to switch to Easy Edit Mode and be in programming level 3. In there you will
find the Toll Restriction area, alternatively this can be configured in PRG commands 21-xx.
Open the page in Easy Edit > Toll Restriction > Toll Detailed View > Toll Table Assignment. Choose an
unused Toll Restriction Class that the Guard will use and set the following data.
Setting
Value
International Call Restriction Table
Unassigned
International Call Permit Table
Unassigned
Maximum Digit Table Assignment
0
Common Permit Code Table
Unassigned
Common Restriction Table
Unassigned
Permit Code Table
4
Restriction Table
4
Speed Dial Common Restriction
Enabled
Speed Group Dial Restriction
Enabled
Internal Call Restriction
Disabled
PBX Call Restriction
Disabled
TIE Call Restriction
Enabled
This effectively means that the Toll Restriction Class will be permitted to dial any number assigned in
Permit Table 4 and will not be able to dial any numbers in Restriction Table 4.
7|Page
In Toll Restriction > Toll Restriction Detailed View > Restrict Table, enter @ against table 4. This is
effectively treated as a wild card meaning no digits can be dialled. The only override for this rule
would be any numbers entered in the Permit Table.
In Toll Restriction > Toll Restriction Detailed View > Permit Table, enter any emergency numbers that
may need to be dialled. This will allow an extension that has been put into the Toll Restriction Class
that the Guard will use will always be able to make emergency calls.
Once these changed have been applied to the PBX then they should be tested to confirm they are
working as expected. To do this, manually assign an extension to the Toll Restriction Class that the
Guard will use and try to make some outbound calls to any destination number. If you use different
Day and Night modes on the PBX then its good practice to check Toll Restriction in each different
mode that is used. Once you have confirmed the Toll Restriction is working correctly then move the
extension back to its previous class.
8|Page
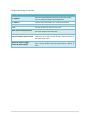
Configure an Area to Restrict Dialled Numbers
Open the page in Easy Edit > Toll Restriction > Toll Detailed View > Toll Table Assignment. Assign a
Restriction Table to all Toll Restriction Classes apart from the one assigned to the Restrictive Toll
Restriction Class. This will prevent any numbers in the restriction table from being dialled, the
example below shows Restriction Table 3 being used for Classes 1-14.
To test that the Restriction Table is working, you can manually enter a number in the Restrict Table
and try is call it.
9|Page
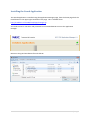
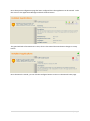
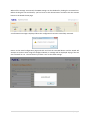
Installing the Guard Application
The Guard Application is installed using the Application Manager page, from the home page click the
Install button in the upper right hand side of the page. This is available from:
http://IP Address of the PBX/html/apps/manager.cgi
You need to enter a username and password from command 90-02 to access the application
manager.
Browse to the guard installation file and click OK.
10 | P a g e
Click the Install button in the lower right hand corner to install the application.
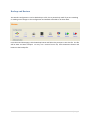
Once the application is installed, the options to Start, Disable, Remove and Configure are available.
When the guard is configured and starts, it will start gathering data and apply and rules that are
configured. Before starting the Guard for the first time, it has to be configured first. If you start it
before configuring it the Guard will stop.
Each time the start is stopped and started, it will start gathering data from scratch. The guard
doesn’t hold historic call information. When the PBX is restarted the Guard will automatically start
unless is has been disabled.
11 | P a g e
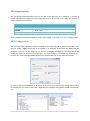
Configuring the Toll Fraud Guard
Click the Configure button on the right hand side to begin setting up the guard application.
You will be prompted to enter a username and password to access the configuration. The default
username and password is:
Username:
tech
Password:
12345678
Enter the username and password then click OK.
Once you have logged in, you will see the configuration home screen. From here you can configure
all the different options that are available in the guard.
12 | P a g e
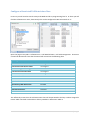
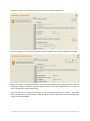
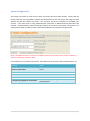
System
The system menu is used to define information used by the guard to integrate to the PBX.
Setting
Value
TCP Port for WebPRO
Enter the TCP Port that WebPRO uses, the default value is 80.
The WebPRO TCP Port is set in PRG command 90-54.
Username
Enter a username that matches an entry in PRG command
90-02, the user level must be Installer Level.
Password
Enter the password for the above username.
TCP port for SMDR Output
Enter the TCP Port for the SMDR output, the Script sets this to
4001 by default.
System Data PRG for the
list of blocked numbers
This is the area where the guard will enter numbers that are
blocked from dialling. This should have already been created
and defined in the PBX’s Toll Restriction configuration.
Restriction Class to Block
Extensions
This is the Toll Restriction Class that has been created for the
Guard to use. It should only be allowed to dial emergency
telephone numbers.
Enter the system configuration parameters and click OK to save the changes. If the user and
passwords have been changed then the next time you logon to the application, you will need to use
these credentials.
13 | P a g e
Once the System Configuration page has been configured then the application can be started. To do
this return to the Application Manager and click the Start button.
The guard will take a few moments to start, when it has started the Start button changes to a stop
button.
Once the Guard is started, you can click the Configure button to return to the Guards home page.
14 | P a g e
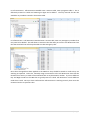
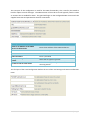
Email Configuration
The Guard uses emails to inform users when Toll Fraud rules have been broken. Emails that the
Guard sends are sent using SMTP, typically the administrator of the mail server will assign an email
address that will be used by the Guard. The username will be the username of the SMTP user
account. If the mail server is using Authentication mode then an SMTP Password will need to be
entered. If Authentication mode isn’t being used then do not enter a password. Encryption is not
supported for SMTP or POP3 so these need to be disabled on the email that the guard uses.
Note! The SMTP Username is used in the SMTP protocol as the sender, this is usually entered in a
format containing the domain name.
If the mailserver is entered as a hostname, then DNS must be entered in PRG command 10-12-13.
Setting
Value
Name or IP Address of the SMTP
Server to send mails
Enter the IP address or hostname of the mail
server.
TCP Port for SMTP
Enter the TCP port for SMTP mail server.
SMTP Username
Enter the username for the SMTP account.
SMTP Password
If required enter a password.
Transport Encryption for sent emails
Select the encryption type that will be used for
sending emails.
15 | P a g e
The next part of the configuration is used for the POP3 functionality, this is used by the Guard to
look for replies to email messages. The administrator of the mail server will typically need to create
an account that is enabled for POP3. The guard will logon to the configured POP3 account with the
supplied username and password to check for new emails.
Setting
Value
Name or IP Address of the POP3
Server to collect mails
Enter the IP address of the POP3 mailserver.
TCP Port for POP3
Enter the TCP port for SMTP
POP3 Username
Enter a username
POP3 Password
Enter a password
Transport Encryption for received
emails
Select the encryption type that
Period to look for new emails
Select the encryption type that will be used for
receiving emails.
The final part of the email configuration defines the rest of the mail settings and some miscellaneous
items.
16 | P a g e
Configure the settings as required.
Setting
Value
To: Address
Enter the email addresses that will receive the emails.
Use ; to separate multiple email addresses.
Cc: Address
Carbon Copy Email addresses can be entered here.
Bcc: Address
Blind Carbon Copy Email addresses can be entered here.
From:
This will be who the email is sent from.
Some Text to Identify the site
Enter a name to Identify the site, this text is included in
the email subject and main body.
Internal between status emails
The Guard will send an ‘On Duty’ email at set intervals to
inform the user that it is still running. Set the interval in
the drop down menu.
Maximum time to trigger
actions by email replies
When an email is generated it will be valid for a period of
time, set the duration that the email will be valid for in
here.
17 | P a g e
When all the settings are entered, the SMTP settings can be validated by clicking the Test Mail icon.
Before clicking the test mail button, you first have to click the OK button and then click the Activate
button in the Guards home page.
A confirmation message is displayed when the configuration has been successfully activated.
Return to the Email configuration page and click and click the Test Mail button and the Guard will
attempt to send an email using the configured details, a message will be displayed saying if the test
was successful or not. The test doesn’t perform a test on the POP3 settings.
18 | P a g e
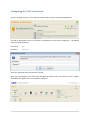
The test email looks like this.
After performing the test, click OK to save the changes and from the home page, click the Activation
button to save the changes to the Email configuration.
For Information on using the Guard application, refer to the separate User Guide.
19 | P a g e
Backup and Restore
The Guard’s configuration is can be backed up to a file, this is particularly useful if you are intending
on making some changes to the configuration and wanted to be able to roll them back.
From the Guard home page, click the Backup button and follow the prompts to save the file. The file
will be date and time stamped. To carry out a restore from a file, click the Restore button and
browse to the backup file.
20 | P a g e
Log Files
Under Administration menu, there is an option to look at log files.
This keeps a log of when the guard started / stopped and carried out and blocking actions.
21 | P a g e
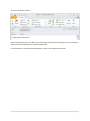
Translating the Guard Application
The guard application can be translated, making the application available to a variety of users. There
are three main steps to translating the application:
1. Export the t file from the application.
2. Edit the text file translating the appropriate text.
3. Import the translated file.
To begin, click the Get Texts Icon and save the file.
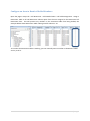
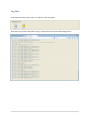
Open the file in a text editor and translate the test that appears between the double square
brackets. Two open square brackets [[ denote the start of a section for translation and two closed ]]
brackets the end. Any text between curly braces { } should not be translated. The picture below
highlights in red boxes which text should be translated for the opening section.
22 | P a g e
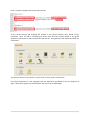
Here is another example from further down the file:
As the words Starting and Stopping fall outside of the square brackets, they should not be
translated. Once the file is translated and saved, then click the Localise button in the guard
application and browse to the translated file and click OK. The application will refresh and show the
translations.
The get texts button can be used to re-export the currently used translation file.
If the Guard application is ever upgraded, then the application will default to use the English text
again. When this happens, the translated file will have to be installed again.
23 | P a g e