1
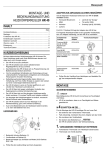
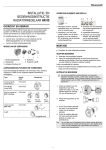
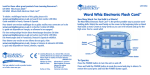
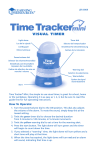
User Manual
Energenie MiHome eTRV
Thank you for buying the MiHome eTRV (Thermostatic Radiator
Valve). Please read through this manual before using the product,
and follow the instructions in it.
This eTRV can be installed as part of the MiHome smart home
network.
This eTRV can only be fitted to a radiator
that already has a thermostatic radiator
valve, as shown opposite. It has been
designed to fit most standard radiators). In
this case, the eTRV is easy to fit and there is
no plumbing work involved
If you have a manual radiator valve, as
shown opposite, you will need to have a
normal thermostatic radiator valve fitted
first. You may need professional help from
a heating engineer or registered plumber.
What is a thermostatic radiator valve (TRV)
TRVs sense the temperature of the air around them and regulate
the flow of water through the radiator accordingly. They do not
control the boiler.
TRVs should be set at a level that gives you the room temperature
you want. These settings may have to be different in each room,
and you should set the TRVs to suit each room and then leave
them to do their job.
Turning a TRV to a higher setting will not make the room heat up
any faster. How quickly the room heats up depends on the boiler
and the size and type of radiator. Turning a TRV to a lower setting
will result in the room being controlled at a lower temperature,
and saves energy.
TRVs need a free flow of air to sense the temperature, so they
must not be covered by curtains or blocked by furniture.
TRVs cannot turn off the boiler when the whole house is warm.
To do that, your boiler will need to be controlled by a thermostat
in a room. The radiator in the room the boiler thermostat is in
should not normally have a TRV. If it does, keep the TRV on the
maximum setting and adjust the boiler’s thermostat as explained
in the instructions for your boiler.
This manual explains how to install, use and maintain the eTRV.
Please keep this manual in a safe place so you can refer to it in
the future if you need to. If you need this guide in large print,
download the instructions from www.mihome4u.co.uk.
2
Using Your eTRV
Each eTRV controls a radiator valve to regulate the heating in the
room, based on timed programmes, set temperatures and how
the room is used under control of the MiHome network. Using
the eTRV improves your comfort and saves energy.
The MiHOME eTRV is controlled remotely via radio control with a
range of 25 metres approximately in open air.
Safety Instructions
If you do not use the eTRV correctly, in line with these operating
instructions:
• the warranty will become invalidated; and
• we will not be liable for any damage or loss
whatsoever, including indirect loss, damage to
property or personal injury.
3
The eTRV, remote control and accessories are not intended for
children and must not be used as toys.
Do not leave packaging material lying around as children might be
tempted to play with it, which is extremely dangerous.
You must only use the product in dry areas indoors, and it must
be protected from moisture and water.
Handle the product with care. It can be damaged through being
hit or dropped, even from a low height.
Do not open the eTRV as it does not contain any parts that you
need to service. If the eTRV arrives faulty, return it to where you
bought it.
The eTRV is protected under GB Patent, number 2452043.
Disposal
The outer box of the packaging is made from 69%
recycled material from managed forests and is 100%
recyclable.
Do not throw this device away with your regular
household waste. You must take electronic
equipment to a local tip to be disposed of in line with
current regulations.Never try to recharge standard
batteries as they may explode.
Do not take batteries apart or throw them into a fire.
Do not short circuit batteries.
Do not put used batteries in your regular household
rubbish. Take them to your local battery-disposal
point.
4
Contents
The box should contain the following items and accessories.
You will need:
•
a Phillips screwdriver
You may need:
•
an adjustable spanner (to remove the existing TRV)
5
Installation
The first step is to remove your existing TRV head.
Step 1 - Turn the TRV thermostat anticlockwise as far as it will go.
Step 2 - Release the base by turning it anticlockwise, by hand or
with a spanner.
Step 3 - Pull the existing TRV thermostat off the valve.
Removing the existing
vertical TRV
Removing the existing
horizontal TRV
The eTRV is compatible with valves made by:
•
•
•
•
•
Barlo
Braukmann
Drayton
Honeywell
Landis & Gyr DuoGyr
•
Myson
•
Pegler
•
Regis (B&Q)
•
Siemens
and many others.
6
The base-rings and spacers allow your eTRV to fit to either 28mm
or 30mm radiator valves, whichever is already on your radiator.
The 28mm ring has notches inside it.
It is important that you use the correct size base ring for your
valve. To check which one to use, remove the existing TRV as
shown earlier.
To identify which base ring to use, take one and screw it onto the
radiator valve, before attaching to the eTRV, to see if it fits.
7
When you have found the correct base-ring, unscrew it so you
can attach it to the eTRV.
Important - Test which base ring fits each radiator valve before
attaching it to the eTRV.
Choosing and Fitting a spacer
In most cases (where the valve pin is
taller than 14mm), you will need to fit a
spacer inside the base ring. The spacer
comes in two thicknesses, 2mm and
3.5mm. It is important that you use the
correct size spacer.
Tip – the 3.5mm-thick spacer is the
same thickness as a £1 coin.
8
If you need to use a spacer, put it in place in the base ring before
you attach the base-ring to the eTRV.
Once the spacer is in place,
attach the base-ring to the
eTRV.
Step 1 - Put the correct
spacer (if one is needed) in
the base ring.
Step 2 - Fit the base ring
onto the eTRV.
Step 3 - Firmly push the
three base-ring pegs into
the slots on the base ring.
9
If you ever need to remove the base ring from the eTRV, follow
the steps below.
Step 1 - Insert a 5mm, thin flat-head screwdriver under the peg.
Step 2 - Prise out pegs from base-ring. Take care not to lose any
of the pegs.
Inserting the Batteries
Step 1 - Using a Phillips screwdriver (one
with a cross tip), unscrew the screw at
the top of the battery-compartment, but
do not remove the screw.
Step 2 - Remove the batterycompartment cover, with the screw still
in it.
Step 3 - Insert the two AA (LR6)
batteries that came with the eTRV into
the battery compartment as shown.
Make sure you put the batteries in the
right way. Inside the battery cover there
10
is a diagram showing which way to fit the batteries when looking
from the front of the eTRV.
Step 4 - Put the battery-compartment cover back on. Hold it in
place while you fully tighten the screw.
The motor will automatically start to retract the stem (pull it in)
after 5 seconds.
Important - The batteries provided with the eTRV will last for up
to 1½ years, depending on how often the motor runs. When you
need to replace the batteries, insert new high-quality AA alkaline
batteries. Do not use rechargeable batteries.
Fitting to the Radiator
You can fit the eTRV vertically or horizontally (see the diagram),
depending on the way the existing radiator valve is pointing.
Attaching the eTRV
Before you attach the eTRV, it is important that the stem is fully
retracted (in), not extended (out). If you have just fitted the
11
batteries, then the stem will have automatically retracted as
shown below.
If the stem is extended (see
above), take the batteries out and
then put them back in again. The
motor will automatically come on
and start retracting the stem after
5 seconds.
Once the stem has fully retracted,
you can safely attach the eTRV to
the radiator valve. Remember to
have it facing forwards, with the
LED indicator pointing forwards.
1
2
Step 1 - Place the eTRV on the valve.
Step 2 - Carefully screw the base ring clockwise by hand until it is
firmly in place.
Please try and ensure the TRV is not blocked by furniture, curtains
and so on to limit localised heating effects and ensure optimum
communications to the Gateway controlling device.
12
Installing on the MiHOME Network
The eTRV operates as part of the MiHome smart home
automation system. This will allow remote control from a smart
device such as a smartphone or tablet or from any browser
connected directly to the MiHome server.
Pair with your Mihome Gateway
1
Once installed the device must be paired with your MiHome
Gateway device which you should have already successfully
installed.
You will need to select the eTRV device to be paired in your smart
device App or in the internet browser. Follow the instructions to
install the eTRV. This will involve pressing and holding the grey
button on the top of the unit for 4 seconds to place it into its
pairing mode.
Button Operation
You can use the grey push button on
the front of your eTRV to
• Pair your device with the MiHome
Gateway.
Pressing the grey push button and
holding it in for four seconds The LED
will go green then flash red indicating
that pairing has started.
• Boost to comfort temperature setting for an hour.
1
Note it is possible to pair the unit with the MiHOME
network before it is installed to the radiator.
13
Pressing the grey push button and holding it in for two seconds
boosts the eTRV to the comfort temperature setting for one hour.
Summary:
1. During normal operation press and hold for 2 seconds for 1
hour boost
2. During 1 hour boost press and hold for 2 seconds to restart 1
hour boost
3. During normal operation press and hold for 4 seconds to
initiate pairing to the Gateway
4. During 1 hour boost press and hold for 4 seconds to cancel 1
hour boost and initiate pairing
What the LED Light indicator means
The LED indicator flashes red, yellow or green to tell you what the
eTRV is doing and it’s setting.
14
Frost Protection
In the OFF setting, the heating in the room will not come on until
the temperature drops to below 10°C. This is to prevent the
water pipes and radiator from freezing. The one-hour boost will
still work so you can boost the heating for one hour, after which
time it will return to the OFF setting.
Remote Control
From your MiHome App or from a Browser connected to the
MiHome server (www.mihome.co.uk) you have the following
controls for the eTRV.
•
Set the Temperature - 4⁰to 30⁰C
•
Exercise the valve – maintenance use
•
Check the battery voltage level (nominally 3.1V)
•
Set the valve to fully open or closed
•
Control using timers to allow zoning for instance
Exercising the valve
Some radiator valves can stick after a long period without
moving. To reduce the risk of this happening (for example, in the
summer when the heating is off), the valve will exercise once a
week. This will happen on Sunday night at midnight. The eTRV will
automatically extend and retract to exercise all parts.
Low battery
When the batteries are low, the red LED light will flash twice
every five seconds. At this point you should replace the batteries.
To change the batteries, see earlier instruction.
Dead battery
15
When the battery does not have enough charge to power the
eTRV motor, the red LED light will flash once every five seconds.
At this point, the eTRV’s stem will automatically retract so heating
will not be controlled.
Technical information
Radio remote control
Radio range
Protocol
Temperature range
Frost-protection temperature
Temperature range for storage
Temperature range working
Maximum circulation temp.
Application group
Zone type
Battery power
Battery life in use
Size without base-ring (HxWxD)
Size with base-ring (HxWxD)
Protection class
FSK, 434.3MHz
Approx. 25m in open air
OpenThings
10°C to 24°C
10°C
-20°C to +60°C
+5°C to +40°C
90°C
Central Generation
Maintained or Intermittent
Two 1.5V AA alkaline LR6
Up to 1½ years
103 x 45 x 45 mm
120 x 45 x 45 mm
IP20
This device meets the regulatory requirements for CE marking.
It complies with the R&TTE Directive.
16