1
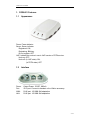
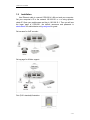
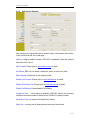
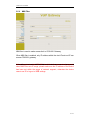
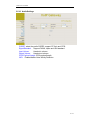
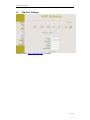
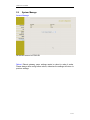
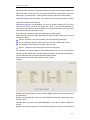
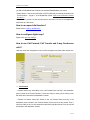
CGW-601 User Manual
CGW-601 User Manual
1 / 43
CGW-601 User Manual
1. CGW-601 Features..............................................................................................4
1.1
1.2
1.3
1.4
1.5
1.6
1.7
1.8
1.9
Appearance .................................................................................................................4
Interface .......................................................................................................................4
Electric characteristic .................................................................................................5
Software.......................................................................................................................5
Standard and Protocols .............................................................................................5
Compliant Standards..................................................................................................6
Operating requirements.............................................................................................6
Package .......................................................................................................................6
Installation....................................................................................................................7
2. Web Configuration ...............................................................................................8
2.1
2.2
2.3
2.4
2.5
Access Web settings page........................................................................................8
Current state................................................................................................................8
Network ......................................................................................................................10
2.3.1
WAN Config........................................................................................ 10
2.3.2
LAN Config ......................................................................................... 11
VoIP ............................................................................................................................12
2.4.1
SIP Config .......................................................................................... 12
2.4.2
Iax2 Config .......................................................................................... 13
Advance .....................................................................................................................15
2.5.1
DHCP Server...................................................................................... 15
2.5.2
NAT .................................................................................................... 16
2.5.3
Net Service......................................................................................... 17
2.5.4
Firewall settings.................................................................................. 18
2.5.5
QoS settings ....................................................................................... 19
2.5.6
Advance SIP settings ......................................................................... 20
2.5.7
Digital Map.......................................................................................... 22
2.5.8
Call Service Settings .......................................................................... 23
2.5.9
MMI Filter ........................................................................................... 25
2.5.10
Audio Settings .................................................................................... 26
2 / 43
CGW-601 User Manual
2.6
2.7
2.8
2.9
Dial-Peer Settings ....................................................................................................27
Config Manage..........................................................................................................28
Update........................................................................................................................29
System Manage........................................................................................................31
3. Use normal phone to pre-configure CGW-601 gateway..............................32
4. Telnet Console ....................................................................................................33
4.1
4.2
4.3
4.4
Introduce ....................................................................................................................33
Tree Structure ...........................................................................................................34
Network Diagnosis ...................................................................................................37
Restore to factory default ........................................................................................38
5. POST Mode(safe mode) ...................................................................................39
6. FAQ.......................................................................................................................40
How many SIP servers may CGW-601 register simultaneously?.................................40
How can I know the CGW-601’s IP address? ..................................................................40
How to use CGW-601’s Lifeline function? ........................................................................40
Why the settings vanish after reboot?...............................................................................40
How to use the dial rule?.....................................................................................................40
How to use speed dial function? ........................................................................................42
How to configure digital map? ............................................................................................42
How to use Call Forward, Call Transfer and 3-way Conference calls?........................42
3 / 43
CGW-601 User Manual
1. CGW-601 Features
1.1
Appearance
Power: Power indicator.
Server: Server indicator.
Registered: ON;
Registering: Blinking;
Do not register: OFF.
VoIP: Indicate the service in use is VoIP service or PSTN service.
Hook-on: OFF;
Hook-off: (In VoIP state): ON;
(In PSTN state): OFF
1.2
Interface
Power:
Port:
WAN:
LAN:
Output Power: 12VDC, 800mA.
RJ11 port. Connect to handset or the Lifeline accessory.
RJ45 port. 10/100M Self-adaptation
RJ45 port. 10/100M Self-adaptation
4 / 43
CGW-601 User Manual
Lifeline accessory:
Use with function
of lifeline port
1.3
z
z
z
1.4
z
z
z
z
z
z
z
z
z
z
z
z
z
z
z
z
z
z
z
z
z
z
1.5
z
z
z
z
Electric characteristic
Adapter: Output 12V 500mA DC
Interface: Two RJ45 ports, one for WAN, one for LAN
FXS: one RJ11 port acts as lifeline function through lifeline accessory
Software
Support two SIP servers running at the same time
Back-up SIP Server support
NAT, Firewall
DHCP client server
Support PPPoE, (used for ADSL, cable modem connecting)
Upgrade firmware through HTTP or FTP
Support major G7.xxx CODEC
VAD, CNG
G.168 compliant 32ms echo cancellation
Tone generation and Local DTMF re-generation according with ITU-T
E.164 dial plan and customized dial rules
Support Lifeline
Hotline
Speed Dial
Call Forward, Call Transfer, 3-way conference calls
Caller ID display
DND (Do Not Disturb), Black List, Limit List
Reverse polarity signal
Web management
Telnet remote management
Adjustable user password and super password
Voice prompt
Standard and Protocols
IEEE 802.3 /802.3 u 10 Base T / 100Base TX
PPPoE: PPP Protocol over Ethernet
DHCP Client Server: Dynamic Host Configuration Protocol
G.711 a/u, G729 audio Codec
5 / 43
CGW-601 User Manual
z
z
z
z
z
z
z
z
z
z
1.6
z
z
z
1.7
z
z
z
1.8
z
z
SIP RFC3261, RFC 2543
TCP/IP: Internet transfer and control protocol
RTP: Real-time Transport Protocol
RTCP: Real-time Control Protocol
VAD/CNG save bandwidth
Telnet: Internet's remote login protocol
DNS: Domain Name Server
TFTP: Trivial File Transfer Protocol
HTTP: Hyper Text Transfer protocol
FTP: File Transfer protocol
Compliant Standards
CE: EN55022, EN55024
FCC part 15
RoHS
Operating requirements
Operation temperature: 0° C to 40° C (32° F to 104°F)
Storage temperature: -30° C to 65° C (-22°F to 149°F)
Humidity: 10% to 90% no dew
Package
Size 12. 8 x 8.5 x 3 cm
Packing List
9
CGW-601 gateway
9
Power adaptor (12v, 500mA)
9
Manual CD
9
Lifeline accessory (optional)
6 / 43
CGW-601 User Manual
1.9
Installation
Use Ethernet cable to connect CGW-601’s LAN port and your computer.
Set your computer’s IP to the network 192.168.10.x x x or using dynamic
obtain IP. Open your web browser and key in 192.168.10.1. Then you will see
the logon page of CGW-601, the default username and password is
admin/admin for administrator and guest/guest for guest.
Set up page for VoIP use only:
Set up page for Lifeline support:
Port (RJ11 standard) illustration:
7 / 43
CGW-601 User Manual
2. Web Configuration
2.1
Access Web settings page
Enter CGW-601 IP address in the web browser (Default IP for LAN is:
192.168.10.1) and press ENTER to go to the log on page, and key in the
username and password to access CGW-601 settings page.
Default username and password is:
Administrator:
Username: admin
password: admin
User:
Username: guest
Username: guest
2.2
Current state
8 / 43
CGW-601 User Manual
This page shows CGW-601’s running state.
Network shows the WAN and LAN port connecting state and current settings.
VoIP part shows the working state of VoIP, you can see whether CGW-601 has
registered the public sip server.
Phone Number shows the public SIP server and the private SIP server phone
numbers.
9 / 43
CGW-601 User Manual
2.3
Network
2.3.1
WAN Config
WAN port network settings page.
Support static IP, dynamic obtain IP and PPPoE.
¾ Configure Static IP:
----Enable Static;
----Set CGW-601’s IP address in the IP Address;
----Set subnet mask in the Netmask field;
----Set router IP address or upper gateway address in the Gateway field;
----DNS Domain;
----Set local DNS server in the Preferred DNS and the Alternate DNS field.
¾ Configure to dynamic obtain IP
----Enable DHCP;
If there is DHCP server in your local network, CGW-601 will automatically obtain
WAN port network information from your DHCP server.
¾ Configure PPPoE:
----Enable PPPoE
----PPPoE server: Enter “ANY” if no specified from your ITSP.
----Enter PPPoE username and pin in the username and password.
CGW-601 will automatically obtain WAN port network information from your ITSP if
PPPoE settings and the setup are correct.
Notice: If user accesses the gateway through WAN port, he should use the new IP
address to access the gateway when the WAN port address was changed.
10 / 43
CGW-601 User Manual
2.3.2
LAN Config
Bridge Mode: Enable this option and switch to bridge mode. Gateway won’t
assign IP for its LAN port in bridge mode and its LAN and WAN port will be in
the same network. (This setting won’t take effect unless you save the config
and reboot the device)
IP, Netmask:
Set the IP and Subnet mask for the LAN
DHCP Server: Enable DHCP service in LAN port
NAT:
Enable NAT.
11 / 43
CGW-601 User Manual
2.4
VoIP
2.4.1
SIP Config
Settings page of public SIP server:
Register Server Addr: Register address of public SIP server
Register Server Port: Register port of public SIP server
Register Username:
Username of your SIP account (Always the same as
the phone number)
Register Password:
Password of your SIP account
Proxy Server Addr:
IP address of proxy SIP server (SIP provider always
use the same IP for register server and proxy server, in this case you don’t
need to configure the proxy server information.)
Proxy Server Port:
Signal port of SIP proxy
Proxy Username:
proxy server username
Proxy Password:
proxy server password
Domain Realm:
SIP domain, enter the SIP domain if any, otherwise
CGW-601 will use the proxy server address as SIP domain.
Local SIP port:
Local SIP register port, default 5060
Phone Number:
Phone number of your SIP account
Register Expire Time: register expire time, default is 600 seconds. CGW-601
will auto configure this expire time to the server recommended settings if it is
different from the SIP server.
Detect Interval Time: Co-work with the Auto Detect Server, if Auto Detect
Server is enable, CGW-601 will periodically detect if the SIP server is available
according this settings.
RFC Protocol Edition: Current CGW-601 SIP version. Set to RFC 2543 if the
gate need to communicate to devices (such as CISCO5300) using the SIP 1.0.
12 / 43
CGW-601 User Manual
Default is RFC 3261.
Enable Register: Enable/Disable SIP register. CGW-601 won’t sent register
info to SIP server if disable register.
DTMF Mode: DTMF signal sending mode: support RFC2833, DTMF_RELAY
(inband audio) and SIP info
User Agent:
Auto Detect server: Co-work with Server Auto Swap and Detect Interval Time.
Tick this option, CGW-601 will periodically detect whether the public SIP
server is available, if the server is unavailable, the CGW-601 will switch to the
back-up SIP sever, and continue detecting the public SIP server. CGW-601 will
switch back to the primary SIP server if the server is available again.
Server Auto Swap: Please refer to Auto Detect server for detail.
2.4.2 IAX2 Config
Setting page of public IAX server:
IAX Server Addr:
Register address of public IAX server
IAX Server Port:
Register port of public IAX
server,default port is 4569
Account Name:
Username of your SIP account (Always the same as the
phone number)
Account Password: Password of your IAX account.
Local port:
Signal port of local, default port is 4569
Phone Number:
Phone number of your IAX account
Voice mail number: If the IAX support voice mail, but your username of the
voice mail is letters which you can not input with the ATA , then you use the
number to stand for your username
Voice mail text: if IAX support voice mail, config the domain name of your mail
13 / 43
CGW-601 User Manual
box here.
Echo test number: If the platform support echo test , and the number is test
form , the config the test number to replace the text format The echo test is to
test the woring status of terminals and platform
Echo test text: echo test number in text format
Refresh time: IAX refresh time
Enable Register: enable or disable register
IAX(Default Protocol): Set IAX2 as the default protocol , if not the system will
choose SIP as default
14 / 43
CGW-601 User Manual
2.5
Advance
2.5.1
DHCP Server
DHCP server manage page.
User may trace, modify or delete DHCP server information in this page.
DNS Relay: Enable DNS relay function. This method allows user’s equipment
which connects with LAN to use the IP of gateway LAN port as DNS server
address directly, default opened. Select it, and will go into effect by clicking
apply.
User may use below settings to add a new lease table.
Lease Table Name: To add Lease table name.
Lease Time: To add DHCP server lease time
Start IP: To add Start IP of lease table. Search the leave unused IP address
and assign to equipment which is using DHCP by LAN port from Start IP when
LAN is assigning address.
End IP: To add End IP of lease table.
Network device connecting to the CGW-601 LAN port can dynamic obtain the
IP in the range between start IP and end IP. (The size of lease table cannot
exceed the amount of address includes in C network segment. Highly
recommend that not to change it but use default lease table.
Netmask: To add Netmask of lease table
Gateway: To add default gateway of lease table
DNS: To add default DNS server of lease table
Adding DHCP lease table by clicking Add for submission
Notice: The settings won’t take effect unless you save the config and reboot
the device.
15 / 43
CGW-601 User Manual
2.5.2
NAT
Advance NAT settings. Maximum 10 items for TCP and UDP port mapping.
IPSec ALG:
FTP ALG:
PPTP ALG:
Enable/Disable IPSec ALG, default opened;
Enable/Disable FTP ALG, default opened;
Enable/Disable PPTP ALG, default opened;
Transfer Type:
Inside IP:
Inside Port:
Outside Port:
Transfer type using port mapping, can be set to TCP or UDP.
LAN device IP for port mapping.
LAN device port for port mapping.
WAN port for port mapping.
Click Add to add new port mapping item and Delete to delete current port
mapping item.
16 / 43
CGW-601 User Manual
2.5.3
Net Service
Configure port of Telnet, HTTP and RTP through this page and check DHCP
lease IP table at the same time.
HTTP Port: Configure HTTP transfer port, default is port 80. User may change
this port to enhance system’s security. When this port is changed, please use
http://xxx.xxx.xxx.xxx:xxxx/ to reconnect.
Telnet Port: Configure telnet transfer port, default is port 23.
RTP Initial Port: RTP initial port.
RTP Port Quantity: Maximum RTP port quantity, default is 200
DHCP lease table: Show IP-MAC corresponding table assigned by DHCP
server.
Notice:
Settings in this page won’t take effect unless save and reboot the device.
If you need to change telnet port or HTTP port, please use the port greater
than 1024, because ports under 1024 is system remain ports.
HTTP service blocked if HTTP is set to 0.
17 / 43
CGW-601 User Manual
2.5.4
Firewall settings
Firewall settings page
User may set up firewall to prevent unauthorized Internet users from accessing
private networks connected to the Internet (input rule), or prevent unauthorized
private network devices to access the internet.
Access list supports two type limits: input_access limit or output_access limit.
Each type supports 10 items maximum.
CGW-601 firewall filter is based on WAN port. So the source address or input
destination address should be WAN port IP address.
Configuration:
in_access enable enable in_access rule
out_access enable enable out_access rule
Input/Output: specify current adding rule is input rule or output rule.
Deny/Permit: specify current adding rule is deny rule or permit rule.
Protocol Type: protocol using in this rule: TCP/IP/ICMP/UDP.
Port Range:
port range if this rule
Src Addr:
source address. Can be single IP address or network address
Dest Addr:
destination address. Can be IP address or network address
Src Mask:
source address mask. Indicate the source is dedicate IP if set
to 255.255.255.255. Otherwise is network ID
Des Mask:
Destination address mask. Indicate the source is dedicate IP if
set to 255.255.255.255. Otherwise is network ID
18 / 43
CGW-601 User Manual
2.5.5
QoS settings
CGW-601 Gateway implements QoS based on 802.1p. The QoS is used to
mark the network communication priority in the data link/MAC sub-layer.
CGW-601 will sort the packets using the QoS and sends it to the destination.
QoS Enable: Enable QoS service.
QoS Table Include: Enable include QoS table, CGW-601 will only provide QoS
service to the network address included in the QoS table. Disable the option.
CGW-601 provides QoS service to the network address outside the QoS table.
QoS Table Item: User can set the QoS Table using IP and Netmask. The IP
can be network address or dedicate IP address (set netmask to
255.255.255.255)
Delete QoS Table: Enter the IP/Netmask configure and select delete to delete
corresponding item.
19 / 43
CGW-601 User Manual
2.5.6
Advance SIP settings
This page is used to set the private SIP server, STUN server, and back up SIP
server information.
STUN Server setting:
STUN Server Addr:
STUN Server Port:
STUN Effect Time:
Enable SIP STUN:
configure stun server address;
configure stun server port default 3478
stun detect NAT type circle, unit: minute.
enable/disable stun.
Public Alter Register:Public Alter server provide redundancy for the public
server, if the public server is unavailable, CGW-601 will use the alter server,
and switch back to the public server when it is available. Account setting in
public alter setting should be the same as the public server.
Please refer to sip conf for the setting for how to set the public alter server.
20 / 43
CGW-601 User Manual
User can register two SIP servers: public SIP server and private SIP server.
These two SIP servers are independent from each other and running at the
same time.
For how to configure private SIP server, please refer to sip configuration
21 / 43
CGW-601 User Manual
2.5.7
Digital Map
Digit map is a set of rules to determine when the user has finished dialing.
CGW-601 supports below digital map:
Digital Map is based on some rules to judge when user end their dialing and
send the number to the server. CGW-601 supports following digital map:
----End With “#”:
Use # as the end of dialing.
----Fixed Length:
When the length of the dialing match, the call will be sent.
----Timeout:
Specify the timeout of the last dial digit. The call will be
sent after timeout
----Prefix: User define digital map:
[ ] represents the range of digit, can be a range such as [1-4], or use
comma such as [1,3,5], or use a list such as [234]
x represents any one digit between 0~9
Tn represents the last digit timeout. n represents the time from 0~9
second, it is necessary. Tn must be the last two digit in the entry. If Tn is not
included in the entry, we use T0 as default, it means system will sent the
number immediately if the number matches the entry.
Example:
[1-8]xxx
All number from 1000 to 89999 will be sent immediately.
9xxxxxxx 8 digits numbers begin with 9 will be sent immediately.
911
Number 911 will be sent will be immediately
99xT4
3 digits numbers begin with 99 with be sent after four
seconds.
22 / 43
CGW-601 User Manual
2.5.8
Call Service Settings
User configure the value add service such as hotline, call forward, call transfer,
3-way conference call .etc in this page
Hotline: configure hotline number. CGW-601 immediately dials this number
after hook-off if it is set.
Call Forward: Please refer to value add service for detail.
No Disturb: DND, do not disturb, enable this option to refuse any calls.
Ban Outgoing: Enable this to ban outgoing calls.
Enable Call Transfer: Please refer to value add service for detail.
Enable Three Way Call: Please refer to value add service for detail.
Enable Call Waiting: Enable/disable Call Waiting
Accept Any Call: If this option is disabled, CGW-601 refuses the incoming
call when the called number is different from CGW-601’s phone number.
No Answer Time: no answer call forward time setting.
Black List: incoming call in these phone numbers will be refused.
23 / 43
CGW-601 User Manual
Limit List:
outgoing calls with these phone numbers will be refused
24 / 43
CGW-601 User Manual
2.5.9
MMI Filter
MMI filter is used to make access limit to CGW-601 Gateway.
When MMI filter is enabled, only IP address within the start IP and end IP can
access CGW-601 gateway.
Notice: If one device visits CGW-601 (should be in the same network segment)
when MMI Filter sets IP range, please make sure the IP address of the device
has been set within the range of network segment, otherwise the device
cannot use IE to log on to WEB settings.
25 / 43
CGW-601 User Manual
2.5.10 Audio Settings
CODEC: select the prefer CODEC; support G711a/u and G729
Signal Standard: Support CHINA, Japan and USA standard
Input Volume:
Handset in volume
Output Volume:
Handset out volume
G729 Payload Length: G729 payload length
VAD: Enable/disable Voice Activity Detection
26 / 43
CGW-601 User Manual
2.6
Dial-Peer Settings
Please refer to “how to use dial rule?” for detail.
27 / 43
CGW-601 User Manual
2.7
Config Manage
Save Config:
Clear Config:
save current settings.
restore to default settings.
Notice: clear config in admin mode, all settings restores to factory default; clear
config in guest modem, all settings except SIP, advance SIP restore to factory
default.
28 / 43
CGW-601 User Manual
2.8
Update
Web Update: update gateway’s settings or firmware. Firmware file is .dlf
extension when configure file is .cfg extension, CGW-601 will auto select
configure update or firmware update according the extension.
FTP Update: back up the configure file to FTP or TFTP server. Or auto
update configure file from your auto update server.
Back up configure file to your FTP/TFTP server.
* configure use .cfg extension.
Auto update: CGW-601 gateway support FTP and TFTP auto update. The
gateway will auto obtain the configure file from your update server if configured.
To obtain the original configure file, you can use the FTP/TFTP back up as
describe above. Configure file using module structure, user may remain the
concerned modules and remove other modules. Put the configure file in the
root directory of update serve when finish editing.
Configure file version was in the <<VOIP CONFIG FILE>> and <GLOBLE
CONFIG MODULE> ConfFile Version
29 / 43
CGW-601 User Manual
For instance:
Gateway original version is:
<<VOIP CONFIG FILE>>Version: 1.0000
<GLOBLE CONFIG MODULE> ConfFile Version:6
User may edit the configure file version to:
<<VOIP CONFIG FILE>>Version: 1.0007
<GLOBLE CONFIG MODULE> ConfFile Version:7
30 / 43
CGW-601 User Manual
2.9
System Manage
Account Manage:
Set access account of CGW-601
Reboot: Reboot gateway, some settings needs to reboot to make it works.
Please always save config before reboot, otherwise the settings will return to
previous settings.
31 / 43
CGW-601 User Manual
3. Use normal phone to pre-configure CGW-601 gateway
User may pre-config CGW-601 gateway using a normal phone connecting to
CGW-601. Please refer the below command:
Notice: all command below can be end with # to speed response.
"#****"
"#*000"
/*reboot gateway*/
/*clear settings*/
"#*100"
"#*101"
"#*102"
/*set the IP type to static ip */
/*set IP type to DHCP */
/*set IP type to PPPoE*/
"#*111"
"#*222"
/*prompt gateway ip*/
/*prompt phone number*/
Below setting need reboot to take effect
"#*103" /*change to bridge mode*/
"#*104" /*change to router mode*/
"#*50192.168.1.117"
"#*51192.168.1.1"
"#*52202.112.10.37"
"#*53255.255.255.0”
set WAN port IP address
set default gateway IP
set dns server
set netmask, use 255.255.255.0 if no be set
32 / 43
CGW-601 User Manual
4. Telnet Console
4.1
Introduce
4.1.1 Basic structure
User may use telnet command to access and manage gateway.
CGW-601 adopts tree structure for telnet. Every node contains its sub-nodes
or local command. User can type “help” or “?” whenever to see sub-nodes and
all local command under current node.
Besides local command, there are some global commands can be used in
each node.
4.1.2
Basic command
Logout: exit telnet mode.
Write: save current settings.
Type sub-nodes name in current node to switch to sub-node.
Type “!” or “exit” in current node to return to parent-node.
Type “help” or “?” can see all sub-nodes and all local command under current
node, every help item has comments such as <command> or <node> to
distinguish sub-nodes and local command. Type “help” or “?” in command can
see all parameters using in this command.
When typing node name or command, user no need to key the full name, use
TAB button will make it more efficient.
There are two types in command parameters: optional and required. “required”
parameter use “-” as prefix and “optional” use “_” as prefix. User may type “-”
or “_” then press TAB button for complementarily.
33 / 43
CGW-601 User Manual
4.2
Tree Structure
4.2.1
Debug (Level 0~7)
path:
<debug>#
show debug setting
[disable]enable debug all modules
[disable]enable debug app module
[disable]enable debug cdr module
[disable]enable debug sip module
[disable]enable debug h323 module
[disable]enable debug tel module
[disable]enable debug dsp module
4.2.2
---show
---[no] all xxx
---[no] app xxx
---[no] cdr xxx
---[no] sip xxx
---[no] h323 xxx
---[no] tel xxx
---[no] dsp xxx
reload
usage: #reload
Reboot system
4.2.3
show system running info
¾
accesslist
path:
<show>#
show: accesslist (firewall) settings
Example: #<show>#accesslist
¾
basic
path:
<show>#
show network status
Example: #<show>#basic
¾
call
path:
<show>#
show current call info
Example: #<show>#call active
¾
capability
path:
<show>#
show CODEC capability
Example: #<show>#capability
¾
debugging
path:
<show>#
show debug info
Example:#<show>#debugging
34 / 43
CGW-601 User Manual
¾
dhcp-server
path:
<show>#
show LAN status and DHCP server info
Example:#<show># dhcp-server
¾
dial-rule
path:
<show>#
show digital-map info
Example:#<show># dial-rule
¾
interface
path:
<show>#
show LAN info
Example:#<show>#interface fastethernet lan
show WAN info
Example:#<show>#interface fastethernet wan
¾
ip
path:
<show>#
show arp table info
Example:#<show>#ip arp
Show DNS gateway info
Example:#<show>#ip dns
Show netstate info
Example:#<show>#ip netstat
Show route info
Example:#<show>#ip route
Show icmp packets Stat.
Example:#<show>#ip icmp
Show igmp packets Stat.
Example:#<show>#ip igmp
Show ip packets Stat.
Example:#<show>#ip ip
Show RTP packets Stat.
Example:#<show>#ip rtp
35 / 43
CGW-601 User Manual
Show TCP packets Stat.
Example:#<show>#ip tcp
Show UDP packets Stat.
Example:#<show>#ip udp
¾
memory
path:
<show>#
show gateway memory
Example:#<show>#memory
¾
nat
path:
<show>#
show NAT information
Example:#<show>#nat
¾
port
path:
<show>#
show caller-ID info
Example:#<show>#port callerID
show dsp info
Example:#<show>#port dsp
show hotline info
Example:#<show>#port hotline
show black list info
Example:#<show>#port in-limit
show outgoing limit info
Example:#<show>#port out-limit
show current phone number
Example:#<show>#port number
show current port status
Example:#<show>#port status
¾
PPPoE
path:
<show>#
show PPPoE info
Example:#<show># pppoe
36 / 43
CGW-601 User Manual
¾
qos
path:
<show>#
show QoS table info
Example:#<show>#qos
¾
sip
path:
<show>#
show sip info
Example:#<show>#sip
¾
udptunnel
path:
<show>#
show UDP tunnel info
Example:#<show># udptunnel
¾
uptime
path:
<show>#
show running time
Example:#<show># uptime
¾
version
path:
<show>#
show gateway version
Example:#<show># version
4.2.4
telnet and logout
Usage: #telnet –target -port
Login:xxx
Password:xxx
#
#logout
4.2.5
tracert trace network path info
usage: #tracert –host
Example:#tracert www.google.com
4.3
Network Diagnosis
There are some telnet commands for checking your network. Now listing below for your
information
Command
Function
Example
ping
Check if the destination is accessible
#ping www.google.com
37 / 43
CGW-601 User Manual
tracert
Show network path info
#tracert www.google.com
show basic
Show network settings
#show basic
show ip route
Show route table
#show ip route
show ip arp
Show arp table
#show ip arp
show ip netstat
Netstat programe
#show ip netstat
telnet
Telnet to another device
#telnet 192.168.1.2
4.4
Restore to factory default
#setdefault clear gateway settings except network part
#setdefault all clear all settings.
38 / 43
CGW-601 User Manual
5. POST Mode(safe mode)
CGW-601 provides safe mode. When there is booting problem because of setting
problem or firmware problem, user can restore the factory default settings or upgrade to a
new firmware to solve this problem.
How to enter safe mode?
In the CGW-601 booting procedure, it use the static ip 192.168.1.179 (WAN port IP) for a
short time, user can telnet to this ip address in this occasion to enter the save mode.
(Remember to change your PC into the network 192.168.1.xx)
Then according to the guide in post mode, user can clear the settings or upgrade the
firmware.
39 / 43
CGW-601 User Manual
6. FAQ
How many SIP servers may CGW-601 register simultaneously?
CGW-601 is able to register two SIP servers simultaneously and one redundancy server,
you can configure the dial rule to route the call between the sip servers. Please see “How
to use the dial rule?” for detail.
How can I know the CGW-601’s IP address?
Pick up the handset and then dial “#*111#”, and the CGW-601 will prompt you its IP
address.
How to use CGW-601’s Lifeline function?
CGW-601 supports Lifeline function, you can use the same handset to make PSTN and
VoIP calls. First, you need to set up the Lifeline with the accessory send with the
CGW-601, connect this accessory to CGW-601’s FXS port, and then connect the handset
to the accessory’s phone port, connect the landline to the accessory’s line port. You can
receive PSNT and VoIP calls simply with configuration. To make the PSTN call, you need
to set up as follow:
----Add a new dial rule in the Dial-Peer setting: set the phone number to *T, and choose the
Lifeline as the Call mode.
----Add new Digital map item in the Advance ÆDigital Map: set Prefix Number to and *,
and the length to 1.
Then when you want to make a PSTN calls, you can first press * to switch to the PSTN
line and then make your call as you normal do.
Why the settings vanish after reboot?
Please go to Config ManageÆSave Config to save your setting always.
How to use the dial rule?
CGW-601 provide flexible dial rule, with different dial-rule configure, user can easily
implement the following function:
----Replace, delete or add prefix of the dial number.
----Make direct IP to IP call
----Place the call to different SIP servers according the prefix.
----Make PSTN calls use Lifeline function (Please refer “How can use the Lifeline function
of CGW-601?”).
You can click “Add” to add a new dial rule. Below is the detail setting of the dial-rule:
Phone Number: The Number suit for this dial rule can be set as full match or prefix match.
Full match means that if the number user dialed is completely the same as this number,
40 / 43
CGW-601 User Manual
the call will use this dial-rule. Prefix match means that if prefix of the number that the user
dials is the same as the prefix, the call will use this dial-rule, to distinguish from the full
match case, you need to add “T” after the prefix number in the phone number setting.
Call Mode: support SIP and Lifeline,SIP means the call will use sip protocol,Lifeline
means the call will use the PSTN line.
Destination (optional): call destination, can be IP or domain. Default is 0.0.0.0, in this
case the call will be routed to the Public SIP server. If you set the destination to
255.255.255.255, then the call will be routed to the private SIP server. Also you can key
other address here to make direct IP calls
Port (optional): Configure the port of the destination, default is 5060
Alias (optional): Set up the Alias. We support four Alias as below. Alias need to co-work
with the Del Length:
¾ add:xxx, add prefix to the phone number, can set to reduce the dial length.
¾ all: xxx, replace the phone number with the xxx, can use as speed dial function.
¾ del, delete the first N numbers. N is set in the Del Length
¾
rep:xxx,replace the first N numbers. N is set in the Del Length.
For Example: Use wants to place a call 8610-62281493, then you can set the phone
number in the dial rule as 010T, and set the Alias as rep:8610, and set the Del Length to 3.
Then all calls begin with 010 will be changed to 8610 xxxxxxxx.
Suffix (optional): Configure suffix, show no suffix if not set
Instance:
2T rule: If the call starts with 2, the first 2 will be deleted, and the rest number will be sent
to private server.
3T rule: If the call starts with 3, the first 3 will be deleted, and the rest number with be sent
to public server.
123 rule: Dial 123 and will send 8675786390888 to your server. Used as speed dial
function
0T rule: If the calls are begin with 0, the first 0 will be replacing by 86, which means that if
41 / 43
CGW-601 User Manual
you dial 075786390888 and CGW-601 will send 8675786390888 to your server.
*T rule: Dial the * and the line with switch to PSTN. Note that you need to set another rule
“Prefix Number: *; Length: 1” in the Digital Map. (Refer “How to use CGW-601’s Lifeline
Function?”)
179 rule: when you dial 179, the call with send to 192.168.1.179, suit for LAN application
without set up a SIP server.
How to use speed dial function?
Please refer to “How to use dial rule?”.
How to configure digital map?
Please refer digit map settings.
How to use Call Forward, Call Transfer and 3-way Conference
calls?
User may set up the configuration in the Call Service page to use these value add service.
¾
Call Forward:
----Forward when busy: select Busy in the Call Forward Field, and Key in the destination
phone number in the Forward Number. If some one calls you when you are having a call,
the caller will be forward to the destination number.
----Forward no answer: Select No Answer in the Call Forward Field, and Key in the
destination phone number in the Forward Number, fill the time in the No Answer Time. If
some one calls you and no one answer the caller during the No Answer Time, the call will
be forward to the destination number.
42 / 43
CGW-601 User Manual
----Forward Always: Select Always in the Call Forward Field, and Key in the destination
phone number in the Forward Number, then anybody calls this gateway will be forward to
the destination number.
¾ Call Transfer:
Select the Enable Call Transfer.
If A is the CGW-601 user, and B calls and talking with A through VoIP. A can press the
Hook-Flash to hold the call with B, and then press * and then enter C’s number. B will be
transferred to C and can talk with C.
¾ 3-Way Conference Calls
Select Enable Three Way Call
Assume A is the CGW-601 user, and B calls and talking with A through VoIP. A can press
Hook-Flash to hold the call with B, then enter C’s number to talk with C, and then press
Hook-Flash again switch back to user B, then A can press * to make 3-way conference
calls.
Notice: A can press Hook-Flash to switch between B and C, or press # to cancel the
current call and switch to the other user.
43 / 43