1
3. FLARING WORK AND PIPE CONNECTION
3-1.FLARING WORK
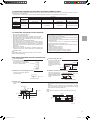
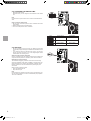
1)Cut the copper pipe correctly with pipe cutter. (Fig. 1, 2)
2)Completely remove all burrs from the cut cross section of pipe. (Fig. 3)
• Put the end of the copper pipe to downward direction as you
remove burrs in order to avoid to let burrs drop in the piping.
3)Remove flare nuts attached to indoor and outdoor units, then put them
on pipe having completed burr removal. (Not possible to put them on
after flaring work.)
4)Flaring work (Fig. 4, 5). Firmly hold copper pipe in the dimension
shown in the table. Select A mm from the table according to the tool
you use.
5)Check
• Compare the flared work with Fig. 6.
• If flare is noted to be defective, cut off the flared section and do
flaring work again.
A (mm)
Pipe diameter Nut
Clutch
Clutch Wing nut
(mm)
(mm) type tool type tool type tool for R410A for R22
for R22
ø6.35 (1/4”) 17
1.5 to 2.0
ø9.52 (3/8”) 22
0 to 0.5 1.0 to 1.5
2.0 to 2.5
ø12.7 (1/2”) 26
ø15.88 (5/8”) 29
No good
Good
Copper
pipe
Tilted Uneven Burred
Fig. 1
Fig. 2
Flaring tool
Burr
Copper pipe
Spare reamer
Pipe cutter
Tightening torque
Clutch type
Wing nut type
Fig. 3
N•m
kgf•cm
13.7 to 17.7
34.3 to 41.2
49.0 to 56.4
73.5 to 78.4
140 to 180
350 to 420
500 to 575
750 to 800
Fig. 4
Smooth all
around
Die
Copper pipe
Even length
all around
Flare nut
3-2.PIPE CONNECTION
Inside is shining without any
scratches.
Fig. 5
• Fasten flare nut with a torque wrench as specified in the table.
• When fastened too tight, flare nut may brake after a long period and
cause refrigerant leakage.
Outdoor unit connection
Connect pipes to stop valve pipe joint of the outdoor unit in the same
manner applied for indoor unit.
• For tightening, use a torque wrench or spanner and use the same
tightening torque applied for indoor unit.
Fig. 6
3-3.INSULATION AND TAPING
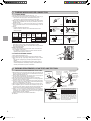
1)Cover piping joints with pipe cover.
2)For outdoor unit side, surely insulate every piping including valves.
3)Using piping tape (E), apply taping starting from the entry of outdoor
unit.
• Stop the end of piping tape (E) with tape (with adhesive agent attached).
• When piping have to be arranged through above ceiling, closet or
where the temperature and humidity are high, wind additional commercially sold insulation to prevent condensation.
4. PURGING PROCEDURES, LEAK TEST, AND TEST RUN
4-1.PURGING PROCEDURES AND LEAK TEST
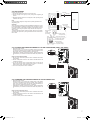
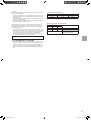
1)Remove service port cap of stop valve on the side of the outdoor unit
gas pipe. (The stop valve will not work in its initial state fresh out of the
factory, totally closed with cap on.)
2)Connect gauge manifold valve and vacuum pump to service port of
stop valve on the gas pipe side of the outdoor unit.
3)Run the vacuum pump. (Vacuumize for more than 15 minutes.)
4)Check the vacuum with gauge manifold valve, then close gauge manifold valve, and stop the vacuum pump.
5)Leave as it is for one or two minutes. Make sure pointer gauge manifold valve remains in the same position. Confirm that pressure gauge
shows –0.101 Mpa [Gauge] (–760 mmHg).
6)Remove gauge manifold valve quickly from service port of stop valve.
7)After refrigerant pipes are connected and evacuated, fully open all
stop valves on both sides of gas pipe and liquid pipe. Operating without fully opening lowers the performance and this causes trouble.
8)Refer to 1-4., and charge the prescribed amount of refrigerant if
needed. Be sure to charge slowly with liquid refrigerant. Otherwise,
composition of the refrigerant in the system may be changed and affect performance of the air conditioner.
9)Tighten cap of service port to obtain the initial status.
10) Leak test
*4 to 5 turns
*Close
*Open
Stop valve cap
(Torque 19.6 to
29.4 N•m, 200
to 300 kgf•cm)
Compound pressure
–0.101MPa gauge (for R410A)
(–760 mmHg)
Pressure gauge
(for R410A)
Stop valve
for GAS Handle
Low
Hexagonal wrench
Service port cap
(Torque 13.7 to
17.7 N•m, 140 to
180 kgf•cm)
Stop valve
for LIQUID
Handle High
Charge hose
(for R410A)
Vacuum pump
(for R410A)
When attaching the control valve to
the service port, valve core may deform or loosen if excess pressure is
applied. This may cause gas leak.
Precautions when using
the control valve
A
Control
valve
Open
Gauge manifold
valve (for R410A)
When attaching the control valve to
the service port, make sure that the
valve core is in closed position, and
then tighten part A. Do not tighten
part
A or turn the body when valve
Charge hose
core is in open position.
(for R410A)
Service port
Close
Body
SG79Y865H01_En.indd
6
2007/02/01
15:54:00