1
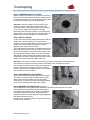
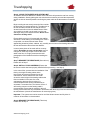
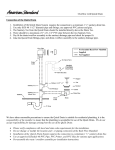
Offering a wide selection of products at competitive prices
Trueshopping Underfloor
nderfloor
Heating System
Installation Manual
Trueshopping
Important Safeguards and Warnings
WARNING: Shock and fire hazard
If the Underfloor Heating System is damaged or not installed properly, fire or shock could occur
resulting in serious personal injuries or damage to property. You must carefully follow the
warnings and instructions contained in this manual.
· The thermostat must be used.
· It is important that this equipment is installed only by qualified electricians who are familiar with
the proper sizing, installation, construction and operation of floor warming systems and the
hazards involved. The installation must comply with all national and local electrical codes. If you
are unfamiliar with these requirements, contact an electrician.
· This system is designed for under floor heating purposes only. Be sure that the floor is
not penetrated by nails, screws, or similar devices that can cause damage on first installation
or during subsequent floor repairs in the future.
· If the Underfloor Heating System is damaged, it must be replaced. Do not attempt to splice or
repair any part of the system.
Pay special attention to the following:
· Instructions marked ‘Important’.
· Safety warnings identified as ‘WARNING’.
1 General Information
1.1 Use of the Manual
This manual describes the Trueshopping floor heating system - how to design the room, select
the product, and install the system. It is important to thoroughly review this manual and the
following document prior to installation: Thermostat Installation and Operation Manual.
1.2 Safety Guidelines
The safety and reliability of any floor heating system depends on proper design, installation, and
testing. Incorrect installation or mishandling of the product can cause damage to the heating
cable, system components and property, and can create a risk of fire or shock. The guidelines
and instructions contained in this guide are important. Follow them carefully to minimize these
risks and to ensure that the Trueshopping system performs reliably.
1.3 Remember to Measure Resistance
The resistance should be measured between the two conductors, white and black. Compare this
resistance reading to the resistance specified in the product selection table (Table 1). The value
should be within -5% to +10%. Also, measure the resistance between the white, black and
shielding/ground wire. Both should read infinity.
Important · Measure the resistance three times during the installation process.
· Remember to always measure, verify and record the actual resistance throughout the
installation process.
1.4 Twenty-five Years Limited Warranty
For a period of 25 years from the date of purchase the manufacturer warrants that the
Trueshopping heating cable is free from defects in material, design and workmanship.
www.trueshopping.co.uk
Trueshopping
2 Underfloor Heating System
2.1 Mat Specifications
Cable Construction: Twin conductor
Rated Voltage: 230V
Output: 150W/m2
Cable Spacing: 80mm
Cable Diameter: 3.6mm
Conductor Insulation: Fluoropolymer
Outer Insulation: PVC
Max. Ambient Temp: 85 (30 )
Min. Installation Temp: 40 (5 )
Cold Lead 2-wire Plus Ground Braid: 2.5m length
2.2 Thermostat Specifications
Functions: On/Off control, digital display, 7-day programmable
Supply Voltage: 120/240 V ±15%, 50/60 Hz
Maximum Switching Current: 16 Amp
Temperature Control Range: 40 to 104°F (5 to 40°C)
Ambient Range: 32 to 104°F (0 to 40°C)
Floor Temperature Sensor: 2-wire, 3.0m lead wire
2.3 Underfloor Heating Typical Installations and Applications
Alternative method: self-leveling cement is recommended for large surfaces and the following
floor materials: engineered wood, laminate, floating floors, vinyl, linoleum and carpet.
WARNING: Consult the manufacturer for information on special installation requirements for
wood, laminate, vinyl or linoleum flooring.
Important · Read the instructions carefully before installing heating system.
· Remember to measure the resistance three times.
· Only for indoor installation. Do not install in walls or ceilings.
· The cable must be embedded in mortar, thinset, concrete or similar material.
· The minimum installation temperature is 40 (5 ).
· The heating cable cannot be cut to length, crossed over itself, or installed too close.
· It is recommended to use copper wire only.
· Remember to check that the supply voltage matches the voltage of the mat.
· Remember to place the labels as written in this instruction.
· Please consult Trueshopping for any other questions or advice.
www.trueshopping.co.uk
Trueshopping
3 Floor Heating Design and Product Selection
3.1 Design the Installation
Step 1: Measure the heated area
Determine the heated area of the floor where there are no permanent fixtures or furniture such as
showers, toilets, vanities, or cabinets. Measure the heated area of the floor.
Step 2: Determine the power supply voltage
Make sure the supply voltage is 230V.
Step 3: Plan the design
Determine the optimum floor heating mat layout for your heated area to ensure coverage. Select
a spot for the thermostat in the wall above the heated area where it can be reached by the 2.5m
cold lead on the mat, and the 3.0m floor temperature sensor.
Important - The predetermined mat spacing must be maintained to ensure proper floor heating.
Do not change the heating cable spacing when you lay out the cable or the floor may have cold
spots.
3.2 Confirm Your Product Selection
Confirm that your underfloor heating mat is no larger than the heated area.
Important - When installing mat, all “cold tails” (blue/black wires) must be taken back to the
connection point/controller.
4 Installation
Important - You will require the following items to install and test the floor heating system:
· Scissors
· Utility knife
· Wire strippers
· Tape measure
· Screwdriver
· Multimeter
You will also need the appropriate tools and materials to install your particular floor. These will
likely include products like self-leveling mortar, thin-set mortar, backer board, tile, a notched
trowel, and any other tools for your specific floor.
To ensure a successful installation follow these
steps:
Step 1: PLAN LAYOUT
Make a sketch layout or a floor plan of the room; include
all permanent furnishings such as toilets, bathtubs,
appliances, cabinetry, etc. Indicate all dimensions
required to determine the available floor area and the
position of the thermostat.
Important - Trueshopping recommends that the
installation is documented with photos to note the
location of connections and the sensor.
www.trueshopping.co.uk
Trueshopping
Step 2: TRANSFER LAYOUT TO FLOOR
Draw an outline of the layout on the room floor including a
foot print of all furnishings that are not yet installed. Unroll
the first few feet of the mat. The starting point of the cable
must be placed within 2.5m from the thermostat.
Important - Mark the position of the connection point
between the power lead and the heating cable. This
connection must be concealed in thinset or self-leveling
cement. When using a floor temperature sensing
thermostat, mark the sensor position in the middle of two
heating cables, about 25cm away from the wall (within the
heated area), as close as possible to the thermostat.
Step 3: INSTALL SENSOR
If using a floor temperature sensing thermostat, install the
sensor now, either in conduit tube, or directly to the
subfloor. It is recommended that the sensor be installed in
conduit tube. This will allow the sensor to be easily
replaced in the unlikely event of failure.
The sensor and/or tube needs to be installed between the
thermostat wall box and the sensor position. The conduit
tube must be partially countersunk into the subfloor. Cut a
channel approximately 8cm deep × 8cm wide in the floor
and wall up to the thermostat for the sensor conduit. The
conduit has to go from the thermostat a minimum of 25cm
away from the wall towards the middle of the floor.
Important - The sensor conduit must be centred in the cable loop (between two heating wires).
Use duct tape to close the end of the conduit so that thinset can't penetrate the conduit.
Use duct tape to hold the sensor conduit into the groove to
prevent it from floating up when the mortar or thinset is
poured. If the sensor is installed directly in the mortar bed,
use duct tape to secure to subfloor.
Step 4: PREPARE SUBFLOOR SURFACE
Clean and vacuum the floor thoroughly and remove dust
and debris from the floor that may damage the heating
cable. Ensure that the subfloor is secure and stable.
Carefully fill in all cracks to prevent any potential damage
to the new tiles resulting from shifts in the subfloor.
Step 5: MEASURE THE RESISTANCE (First time)
Use a digital ohm meter to measure the resistance of the Minimat and compare it to Table1.
Record the measured resistance on the warranty card.
Documenting the resistance at each stage of installation
is required for warranty purposes. Also, measure the
resistance between the white, black and shielding/ground
wire. Both should read infinity.
Please refer to “5 Commissioning” for instructions on how
to measure the resistance.
www.trueshopping.co.uk
Trueshopping
Step 6: LAYING THE UNDERFLOOR HEATING MAT
An adhesive has been added to the bottom of the mat which will prevent the mat from moving
during installation. Start by placing the mat such that the connection point and the temperature
sensor are in their intended positions and bring the power cable to the thermostat or connection
box.
Begin unrolling the mat evenly across the floor outside
the areas that you marked previously. The adhesive on
the mat is made such that the mat may be moved
several times before it loses its adhesiveness. When
you reach the next wall, cut the mesh, turn the mat,
and begin rolling in the desired direction. Never cut or
shorten the heating cable!
Ensure that the mat is in full contact with the subfloor
at all times. Avoid walking on the heating mat. If this is
not possible, use shoes with soft soles. When
approaching obstacles (toilets, cabinets, etc), carefully remove some of the heating cable from
the mat and lead the cable around the obstacle.
In some cases pieces of the mesh will be cut away
entirely. Remember to never cut the cable. Use hot
melt glue or a thin strip of tape to secure the loose
cable to the floor. It is highly recommend to take
photographs of the installed mat before installing the
flooring.
Step 7: MEASURE THE RESISTANCE (Second time)
Please refer to Step 5.
Step 8: INSTALL FLOOR COVERING (Ensure that
the sensor conduit has been properly installed before proceeding - see Step 3)
In the case of tiles, proceed with the installation of the
tiles by covering the heating cables with a
layer of thin-set cement as directed by the tile
manufacturer. Ensure that the thin-set mortar
covers the entire height of the heating cable as the
tiles are installed. In the case of a wood,
engineered or laminate floor covering, it is
recommended that the flooring manufacturer be
contacted. For wooden floors, a minimum of 5cm of
self-leveling cement over the heating cable is
recommended. Ensure that all moisture in the selfleveling cement has been fully eliminated in accordance with the drying times recommended by
the manufacturer (consult the manufacturer for exact drying time).
Important - The system must not be turned on until the thinset cement has fully dried. A
minimum of two weeks is recommended.
Step 9: MEASURE THE RESISTANCE (Third time)
Please refer to Step 5.
www.trueshopping.co.uk
Trueshopping
Step 10: INSTALL THE TILE
To install the tile, apply a layer of acrylic or latex modified thin-set using the ridged side of your
10 trowel. Tile and grout the floor using best industry practices and in accordance with
instructions provided by the manufacturer of the tile.
Step 11: CONNECT POWER SUPPLY AND THERMOSTAT
The connection of the power supply and the thermostat must be done by a qualified electrician.
The electrician should connect the floor sensor to the thermostat and take the final resistance
reading, see Step 5.
Step 12: ENJOY THE COMFORT OF BESTBATHROOMS’ UNDERFLOOR HEATING
The Trueshopping heating system is now ready to use. Increase the floor temperature gradually
and adjust it until it reaches a comfortable level depending on the type of room and your personal
preferences.
Table 1
· Please consult Trueshopping for any questions or advice.
www.trueshopping.co.uk