1
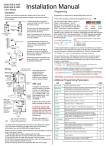
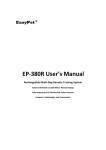
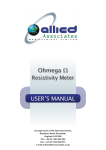
SPECIALISTS IN SECURITY SYSTEMS SINCE 1974
www.dorcom.co.uk
[email protected]
0800 068 5447
INSTALLATION
PROGRAMMING
& MAINTENANCE
MANUAL
Unit 3
St Josephs Business Park
St Josephs Close
Hove, East Sussex, BN3 7HG
T: 0800 068 5447
F: 01273 220108
E: [email protected]
W: www.dorcom.co.uk
2000 DFS1TP
[email protected]
SPECIALISTS IN SECURITY SYSTEMS SINCE 1974
0800 068 5447
Dorfone 2000
Telephone Programmable
Door Entry System
(Dual Lock) with Dual Relay Control Telephone Programmable
Installation, Programming & Cleaning Instructions
Please read these instructions carefully before you commence installation.
KIT CONTENTS
1 x Dorfone 2000 External Intercom Six Wire
1 x Dorfone 2000 Electronic Interface
1 x Internal Dorfone 2000 module
1 x Power Supply
1 x BT Master Socket
1 x Cable A (Approx 9 Metres of 6 core with one connector) or Junction Box & short lead
1 x Cable B (Approx 0.5 Metre of 4 core with two connectors)
1 x Cable C (Approx 0.5 Metre of 4 core with one connector)
1 x Fixing Pack
1 x Installation Instructions
DORFONE 2000 INSTALLATION INSTRUCTIONS V2
1.
© DORCOM LTD JUNE 2009
[email protected]
SPECIALISTS IN SECURITY SYSTEMS SINCE 1974
0800 068 5447
INSTALLATION
External Intercom Installation
1.
Select the best location for the external intercom itself that best suits your needs. We suggest the
ideal location is to the wall nearest to your door lock at a convenient height. This will make it
easier if you wish to fit a lock release.
2.
Using the external unit as a template, hold in the required position and mark out.
3.
Drill the hole for the cable.
4.
Feed the cable through the hole and secure the intercom to your required position with the screws
provided. Taking care not to over tighten the screws.
5.
The Dorfone 2000 Electronic Interface (DEI) can be sited, ideally near to the door as this will
reduce the cable run for the lock release but anywhere between the intercom and the master
phone socket is fine. The intercom comes with 3m of cable we do not recommend this is extended
as it could affect the audio quality. The cable should be cut to the required length and connected
as per wiring diagram inside lid.
6.
The cable from the Dorfone 2000 can now be connected to the (DEI), the connections are made
for the red and black wires (red = 5 audio positive) (black = 6 audio negative).
7.
Run the end with the connector to your existing BT Master socket.
8.
The cable should now be secured using cable clips.
DORFONE 2000 INSTALLATION INSTRUCTIONS V2
2.
© DORCOM LTD JUNE 2009
[email protected]
SPECIALISTS IN SECURITY SYSTEMS SINCE 1974
0800 068 5447
Installation of the Dorfone 2000
1.
Unplug the Telephone from the master socket.
2.
Attach the Dorfone 2000 module to the wall next to the existing master socket with screws and
plugs provided see drawing on page 5 and Dip Switch settings as above.
3.
Attach the new BT Master socket to the wall next to the Dorfone 2000 module with the screws and
plugs provided.
4.
The lead from the DEI (Cable “A”) can now be plugged into the first socket from the left marked
intercom. This should run to the DEI and the black and red cables terminated as shown in wiring
diagram.
5.
Using Cable “B” connect from the existing Master socket to the line in on the Dorfone 2000 module
(2nd socket from the left).
6.
Using Cable “C”, plug in the connector to the line out socket (3rd socket from the left) and terminate
the 2 cores. RED to terminal A (or number 5) & BLACK to terminal B (or number 2).
7.
If you require all extensions to ring when the intercom is in use (maximum 3 REN) then the
extension connections in the existing BT socket need to be transferred to the New BT master
socket. These should be transferred using exactly the same connections from the old to the new
Master socket.
8.
Plug the telephone to the new Master socket.
9.
Plug the power supply to the Dorfone 2000 module (1st socket on the right), plug the Power supply
into the mains and switch on.
10.
The Dorfone 2000 should now be operational, secure the intercom to the doorframe with the
screws provided, neatly secure the cables to the wall or skirting with cable clips.
11.
Press the button and the phone should ring. When the handset is lifted, communication can
commence.
12.
Your unit has been fully tested and no further adjustments should be required. However, due to
the telephone type you are using it may be necessary to make some adjustments. If feedback is
experienced adjust the potentiometer in the DEI.
13.
If you wish to fit an electronic lock release it is best fitted at this time.
14.
Fit the required lock release in place and connect the necessary length of 2 core bell wire to the
terminals at the bottom of the lock release. The two cores should then be connected in the DEI
as shown in wiring diagram (it does not matter which way round you connect the two wires).
DORFONE 2000 INSTALLATION INSTRUCTIONS V2
3.
© DORCOM LTD JUNE 2009
[email protected]
SPECIALISTS IN SECURITY SYSTEMS SINCE 1974
0800 068 5447
PROGRAMMING
To enter programming mode you must turn off the power to the interface unit, wait at least 10 seconds
before powering on again, with your telephone handset press ### within 30 seconds – you will hear
three short beeps from the external unit to confirm you are in programming mode.
Enter any required programming commands as follows, any command can be done in any order, for
example you may only require one of the features to be changed. After completing all your programming
simply hang up the telephone this will exit programming mode and your system will be fully operational.
A. Number of Rings – from your telephone after external intercom button is pressed this can be
from 1 to 99. Press #1 xx (where xx = number of rings). For example for 15 rings you will press
#115. At the moment the unit is factory set to 10 rings.
B. Dorfone 2000 Call Advice Tones (this feature may be useful with DECT phones) – This feature
enables the user to distinguish between an external telephone call and an intercom call. When
the Dorfone 2000 is activated from outside the telephone will ring, when you lift the receiver you
will hear five short beeps to indicate that this is an intercom call (caller at the door – not a
telephone call). You must wait until the beeps have ceased to talk to the caller. To turn this
feature on press #40 to turn this feature off press #4. At the moment the unit is factory set to off.
C. Maximum Intercom Call Time – To enter the maximum call time (for talking through the phone
to callers at the door) Press #3XX (XX = time limit in seconds), this can be 15 – 99 seconds).
Press #360 for 1 minutes talk time to the caller at the door, At the moment the unit is factory set
to 99 seconds.
D. Lock 2 Setup – To set lock 2 to control a second lock press #200.
E. Lock 2 Setup as device controller - To set lock 2 to control an ON/OFF device (i.e. camera
which will turn on when intercom button is pressed) Press 2XX (XX = time limit in seconds that
attached device remains on after terminating call). Time can be set from 01 – 99 seconds for
example press #230 for 30 seconds. At the moment the unit is factory set to #200 (to control
second lock as D above.
DORFONE 2000 INSTALLATION INSTRUCTIONS V2
4.
© DORCOM LTD JUNE 2009
[email protected]
SPECIALISTS IN SECURITY SYSTEMS SINCE 1974
0800 068 5447
OPERATION 1
When the Dorfone 2000 button is pressed, the internal phone(s) will ring. By answering the call you can
communicate with the visitor.
If the telephone is in use a bleeping sound will alert the phone user that he has a visitor at the door. The
phone user can then put the call on hold by pressing the hash button twice and then speak with the visitor.
To return to your original telephone call, press the hash button twice.
If you have an electronic lock release fitted and wish to let your visitors in, whilst you are talking to your
visitors press ** for relay 1 (lock 1) and *2 for lock 2 (relay 2). If you need to release the lock at any other
time lift the phone press ** for relay 1 and *2 for relay 2. The lock release output is via a volt free relay.
The relays will remain open until the telephone receiver is replaced.
Lock 2 (relay 2) can also be used (just like a manual switch) to turn a device on (such as outside light, camera
etc). Lift handset press *3 to turn relay on, your device, that you have now switched on will remain on even
the handset is replaced, *4 will turn the device off and it will remain off (even when handset is replaced) until
you lift the handset and *3 is pressed this will turn your device on.
QUICK GUIDE TO FEATURES
##
Switches between phone line and Dorfone 2000 line
**
Opens relay/lock 1 until call is terminated (rated at 1amp/12 Volts)
*2
Opens relay/lock 2 until call is terminated (rated at 1amp/12 Volts)
*3
Activates relay/lock 2 and remains ON
*4
De-activates relay/lock 2 and remains OFF
PLEASE NOTE: #3 Resets the system after using telephone for other functions such as internet banking,
call divert etc that use the # key. After using these services you must ALWAYS reset the system with #3 or
your Dorfone 2000 system may not work as it should.
In some instances not all telephones work in the same way, the star and hash keys may well be programmed
for different functions. In these instances it may be necessary to change your telephone.
In the event of a domestic power cut having a Dorfone 2000 system fitted will not affect the normal operation
of your telephone line which should still be working, however, without power your intercom system will not
operate.
DORFONE 2000 INSTALLATION INSTRUCTIONS V2
5.
© DORCOM LTD JUNE 2009
[email protected]
SPECIALISTS IN SECURITY SYSTEMS SINCE 1974
0800 068 5447
Dorfone 2000 Wiring Diagram
This diagram is purely for representational purposes, equipment may differ slightly.
Existing
Master Socket
INTERCOM
Connect
Internet, Fax,
Alarm or
Broadband
Connection
here.
If using
Broadband
plug Cable B
into filter.
New
Master Socket
Dorfone
2000
Module
LINE
IN
LINE
OUT
Connect Cable A Red and Black
Wires to large terminals on PCB
marked Red & Black.
POWER
IN
Cable C
Cable B
DEI
Telephone
Ext
Intercom
Dorfone
2000
Yellow & Blue Wires inside Cable A
are for electronic lock release (relay
1 **).
Green & White Wires inside Cable A
are for security camera or 2nd lock
release (relay 2 *2). See dipswitch
setting on Page 4.
Cable A
Lock Release
or relay
Dorfone Electronic Interface
Connections (DEI)
Power
Supply
Connect the six core cable from the
external unit (wire colours to match
the colours as per the connections on
the six way connector block) to the
interface.
A sounder can be fitted across the
electronic lock release connections if
required.
New Master Socket
Wiring to Cable C in new Master Socket
Red wire to A (5)
Black wire to B (2)
Yellow & Blue not used
Plug connector on end
of Cable C to socket
marked Line Out on
Dorfone 2000 Module
as in drawing above
DORFONE 2000 INSTALLATION INSTRUCTIONS V2
6.
Cable C
© DORCOM LTD JUNE 2009
[email protected]
SPECIALISTS IN SECURITY SYSTEMS SINCE 1974
0800 068 5447
Dial Out Facility
This model is fitted with a DIAL OUT facility. This facility will automatically
connect a visitor at your Dorfone 2000 to your mobile or any other user
programmed telephone number, if you are not at home.
DIAL OUT FACILITY
Enter programming mode, down power unit for 30 to 45 seconds, power up unit, lift handset, press ###. This
will be confirmed by 3 short beeps in the handset.
To enter the DIAL OUT TELEPHONE NUMBER press **x**
(x = complete phone number – for example if the Dial Out Telephone Number
is 07732363448 you should press **07732363448**
As you enter the final star you will hear a beep in the earpiece to confirm that the phone number you have
programmed has been accepted.
This can be a mobile telephone number or a landline.
Dual Lock Facility
This model is also fitted with a DUAL LOCK facility
Lock 1 is designed to allow you to unlock your door or gate with any attached telephone
Lock 2 can be used to independently control a second lock or it can be used to TURN ON A LIGHT or VIDEO
CAMERA for the duration of the call at your door.
LOCK 1 FACILITY
To OPEN the door lock after answering a call from your intercom you need to press ** (twice) on your
telephone. The lock will remain open until you HANG UP your telephone
Your door lock can also be opened at any time by picking up any telephone on your system and dialing **.
The door lock will be LOCKED as soon as you hang up. You do not need to receive a call from your Dorfone
2000 first.
LOCK 2 FACILITY
To open the alternative door lock after answering a call from your intercom you need to press *2. The door
lock will remain open until you HANG UP your phone.
Your alternative door lock can also be OPENED at any time by picking up any telephone on your system and
dialling *2. The door lock will be LOCKED as soon as you hang up. You do NOT need to receive a call from
your Dorfone 2000 first.
DORFONE 2000 INSTALLATION INSTRUCTIONS V2
7.
© DORCOM LTD JUNE 2009
[email protected]
SPECIALISTS IN SECURITY SYSTEMS SINCE 1974
0800 068 5447
OPERATION 2
When a visitor at your door or gate presses the call button on your external Dorfone 2000 unit your telephones
connected to your line will ring up to 10 times (the number of rings can be changed). By simply answering
any ringing telephone on your line, you will immediately be connected to your visitor, so that you can talk to
them.
If you are already on a telephone call you will hear a faint “Beeping Tone” in the background of your call to
alert you to a caller at your Dorfone 2000. You will then be able to place your existing call ON HOLD and
switch to the Dorfone 2000 by simply pressing the ## key (twice) on your telephone.
If you have the SECOND LOCK CONTROL FACILITY fitted, you can also open an alternative gate or door
lock during this call, by simply pressing *2 on your telephone.
Alternatively the SECOND LOCK option can be used to START and STOP a VIDEO CAMERA and/or
RECORDER or to TURN ON and then TURN OFF a 12V LIGHT (or a 240v Light with the Power Control Unit
Accessory).
The Light or recording device will be SWITCHED ON as soon as the Call Button is pressed on the supplied
intercom and will be SWITCHED OFF, 15 seconds after the intercom call has terminated.
The Second Lock facility is configured for either method in the Programming Section of this guide.
If your site is unattended when a visitor arrives, the unit can be programmed to DIAL OUT and CONNECT
THE DORFONE 2000 CALLER to another telephone number including a mobile telephone number, after a
user programmable number of rings.
Alternatively, when leaving your site the unit can be quickly and easily switched to “Unattended Mode” from
any telephone on your system. In this mode the unit will DIAL OUT immediately upon detection of a Dorfone
2000 call, rather than doing so after the pre-programmed ring count.
To set “Unattended Mode” (Dial out immediately)
Pick up any telephone and press #1 and then hang up - you will hear 1 beep to confirm setting
Note: This facility can be used to prevent your answering machine from answering a Dorfone 2000 call, but
continue to allow it to answer incoming telephone calls. Some Answering Machines may not answer an
incoming call from your Dorfone 2000 due to the DIFFERENT ring pattern that it generates).
When returning to your site, the unit can then be quickly and easily switched to “Attended Mode” from any
telephone on your line. In this Mode the unit will only DIAL OUT if the Dorfone 2000 is not answered after
the pre-programmed ring count.
To set “Attended Mode” (Only dials out after ring count)
Pick up any telephone and press #2 and then hang up – you will hear 2 beeps to confirm setting.
To set “Disable Dial Out” (will not dial out)
Pick up any telephone, press #3 and then hang up – you will hear 3 beeps to confirm setting.
DORFONE 2000 INSTALLATION INSTRUCTIONS V2
8.
© DORCOM LTD JUNE 2009
[email protected]
SPECIALISTS IN SECURITY SYSTEMS SINCE 1974
0800 068 5447
To Clean
Occasionally wipe over the equipment with a clean dry cloth. Do not use sprays or abrasive cleaners as these may damage the casing and interior components.
On no account should harsh abrasives be used on the Dorfone 2000 system.
Warranty
This product is guaranteed against defects from workmanship for a period of 12 months from date
of purchase. In the event of failure, you should return the product, along with proof of purchase date,
and a written statement about the nature of the problem for replacement.
This warranty extends only to the original purchaser and is not transferable.
This warranty shall not apply to any unit which has been subject to alteration, modification, abuse,
negligence, accident, external voltage/lightning surge or used in any manner contrary to these
instructions. The user is responsible for freight costs to the repair point. Warrantor will be
responsible for freighting the replacement unit back to the user.
This warranty gives you specific legal rights. The obligation is solely to repair or replace the product.
The warrantor is not liable for any incidental or consequential damages due to such defects.
Damage caused to the Dorfone 2000 or attached equipment, by lightning strikes or over voltage
surge is not covered under the terms and conditions of your warranty.
The product must have been used only for the intended purpose and not been subjected to wilful or
accidental damage. This warranty does not cover damage caused by excessive voltage, lightning
or faults on the telephone line. If the product has been tampered with in any way, or repairs
attempted, the warranty shall be considered null and void.
This guarantee does not affect your statutory rights.
Disposal
Contact your local council to find the current options for the disposal of household electrical
equipment with reference to EU Directive 2002/96/EC
DORFONE 2000 INSTALLATION INSTRUCTIONS V2
9.
© DORCOM LTD JUNE 2009