1
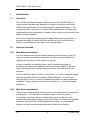
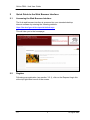
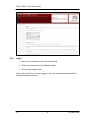
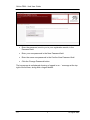
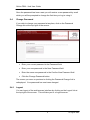
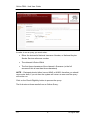
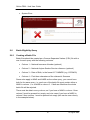
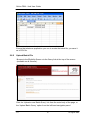
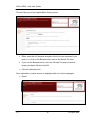
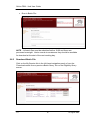
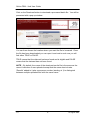
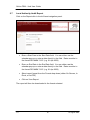
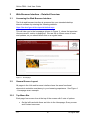
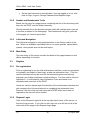
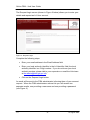
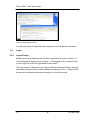
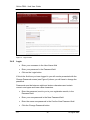
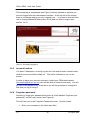
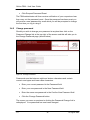
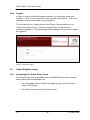
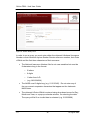
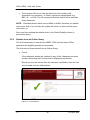
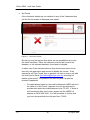
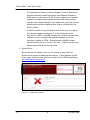
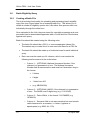
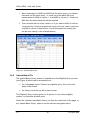
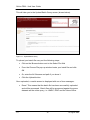
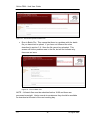
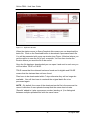
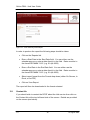
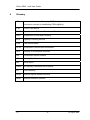
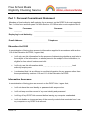
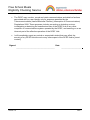
Online Free School Meals Project Hub User Guide Version 1.0 dated 27 August 2009 Status: Final 1.0 1 27 August 2009 Online FSM – Hub User Guide Contents 1 Introduction............................................................................................... 3 1.1 Overview ........................................................................................... 3 1.2 Services Provided ............................................................................. 3 2 Quick Guide to the Web Browser Interface .............................................. 4 2.1 Accessing the Web Browser Interface............................................... 4 2.2 Register............................................................................................. 4 2.3 Login ................................................................................................. 5 2.4 Change Password ............................................................................. 9 2.5 Online Eligibility Query .................................................................... 10 2.6 Batch Eligibility Query ..................................................................... 13 2.7 Local Authority Audit Report............................................................ 18 3 Web Browser Interface – Detailed Overview .......................................... 19 3.1 Accessing the Web Browser Interface............................................. 19 3.2 General Screen Layout ................................................................... 19 3.3 Register........................................................................................... 20 3.4 Login ............................................................................................... 22 3.5 Online Eligibility Query .................................................................... 26 3.6 Batch Eligibility Query ..................................................................... 32 3.7 Local Authority Audit Report............................................................ 38 3.8 Contact Us ...................................................................................... 39 4 Glossary ................................................................................................. 41 5 Contacts ................................................................................................. 42 Appendix A – Local Authority User Declaration Form.................................... 43 1.0 2 27 August 2009 Online FSM – Hub User Guide 1 Introduction 1.1 Overview The Free School Meals Eligibility Checking Service (the DCSF Hub) is a unique system that has been designed to streamline the free school meal (FSM) checking process for local authorities (LA) and parents/carers. The overarching aim of the Hub is to confirm FSM entitlement for the majority of claimants as quickly as possible, to enable LAs to quickly provide meals to the children of these families. The Hub is a significant improvement on paper based checking systems. It provides the facility to check individual records on-line in real time and a facility to check batches of records on an overnight basis. 1.2 Services Provided 1.2.1 Web Browser Interface The Hub web browser interface allows registered local authority users (LA users) to browse to a website where they can carry out online and batch eligibility queries and run audit reports on queries. In order to perform an eligibility check, the LA needs three pieces of information: the claimant’s National Insurance Number (NINO) or National Asylum Seeker Service (NASS) reference number, the date of birth, and surname. The Hub will return either ‘Found’ or ‘Not Found’. A ‘Found’ response means that the individual meets the criteria for FSM entitlement. A ‘Not Found’ response can occur for a variety of reasons and should not be interpreted as ‘ineligible’. Further guidance can be found in Section 4 – Frequently Asked Questions. 1.2.2 Web Services Interface There is also a web services interface which local authorities can register for a connection to. The web service exposes access to the online query functionality of the Hub, which local authorities can build into their own websites allowing regular (public) users of their sites to run their own eligibility checks as part of the Online FSM application process. In a subsequent release it will also make available the batch checking functionality. 1.0 3 27 August 2009 Online FSM – Hub User Guide 2 Quick Guide to the Web Browser Interface 2.1 Accessing the Web Browser Interface The Hub web browser interface is accessed via your standard desktop internet software by entering the following address: https://fsm.dcsf.gov.uk/fsm.laportal/default.aspx This will take you to the homepage: 2.2 Register Following pre-registration (see section 3.3.1), click on the Request Login link at the top right hand corner of the screen. 1.0 4 27 August 2009 Online FSM – Hub User Guide Complete the following steps: • Enter your email address in the Email Address field • Enter your local authority identifier in the LA Identifier field (the local authority identifier is a 3 digit number. If you do not know your local authority number, please talk to your supervisor or email the Hub team at [email protected]) • Click on the Request Login button You will receive two separate emails, one providing a username and one providing a password within a day or two. 2.3 Login Click on the Login link at the top right hand of the screen. The login screen is displayed: 1.0 5 27 August 2009 Online FSM – Hub User Guide 2.3.1 Login • Enter your username in the User Name field • Enter your password in the Password field • Click on the Login button If this is the first time you have logged in you will now be presented with the Change Password screen. 1.0 6 27 August 2009 Online FSM – Hub User Guide • Enter the password, sent to you in your registration emails, in the Password field • Enter your new password in the New Password field • Enter the same new password in the Confirm New Password field • Click the Change Password button The homepage is redisplayed showing a ‘logged in as…’ message at the top right of the screen, along with a Logout button. 1.0 7 27 August 2009 Online FSM – Hub User Guide 2.3.2 Forgotten password Click the link labelled ‘Forgotten your password?’ on the Login screen. This will take you to the Forgotten Password screen. 1.0 • Enter your username in the Username field • Click Request Password Reset 8 27 August 2009 Online FSM – Hub User Guide Once the password has been reset you will receive a new password by email which you will be prompted to change the first time you log in using it. 2.4 Change Password If you wish to change your password at anytime, click on the Password Change link at the top right of the screen. • Enter your current password in the Password field • Enter your new password in the New Password field • Enter the same new password in the Confirm New Password field • Click the Change Password button The screen you were on previous to clicking the Password Change link is redisplayed. Your password has now been changed. 2.4.1 Logout You can logout of the web browser interface by clicking on the Logout link at the top right of the screen. This will take you to a Logout screen. 1.0 9 27 August 2009 Online FSM – Hub User Guide Click the Logout button on this screen to complete logging out. The homepage will be displayed but you will no longer be logged in. 2.5 Online Eligibility Query Browse to the Eligibility Query Screen via the Query link at the top of the screen, or from the ‘Perform an eligibility query’ link in the main body of the homepage. Click the ‘Perform an Online Query’ link from the main body of the page, or the ‘Online Query’ option from the left-hand navigation panel. This will take you to the Online Query form. 1.0 10 27 August 2009 Online FSM – Hub User Guide In order to run a query you must enter: • Either the claimant’s National Insurance Number, or National Asylum Seeker Service reference number • The claimant’s Date of Birth • The first three characters of the claimant’s Surname (or the full surname if this is less than three characters) NOTE – Claimants should either have a NINO or NASS; therefore you should never enter both, if you do then the system will return an error and the query will not be run. Click on the Check Eligibility button to process the query. The Hub returns three results from an Online Query: 1.0 11 27 August 2009 Online FSM – Hub User Guide 1.0 • Found • Not Found 12 27 August 2009 Online FSM – Hub User Guide • System Error 2.6 Batch Eligibility Query 2.6.1 Creating a Batch File Batch files should be created as a Comma Separated Values (CSV) file with a row for each query with the following columns: • Column 1 – National Insurance Number (optional) • Column 2 – National Asylum Seeker Service reference (optional) • Column 3 – Date of Birth, in the format YYYYMMDD (e.g. 19790430) • Column 4 – First three characters of the claimant’s Surname Same rules apply to NINO and NASS as the online query, you cannot have both for the same query, i.e. each row of the batch file must contain either a NINO in column 1, or a NASS in column 2. If both are filled then the whole batch file will be rejected. There must be data in every column, so if you have a NINO in column 1 then column 2 must be present but empty, and vice versa if you have a NASS in column 2 then column 1 must be present but empty (this can be seen clearly in the example below): 1.0 13 27 August 2009 Online FSM – Hub User Guide Ensure that whatever application you use to create the batch file, you save it as a CSV file. 2.6.2 Upload Batch File Browse to the Eligibility Screen via the Query link at the top of the screen (available on all screens). Click the ‘Upload a new Batch Query’ link from the main body of the page, or the ‘Upload Batch Query’ option from the left-hand navigation panel. 1.0 14 27 August 2009 Online FSM – Hub User Guide This will take you to the Upload Batch Query screen. • Either enter the full filename and path of the file to be uploaded if you know it, or click on the Browse button next to the Select File field • If you use the Browse button, from the Choose File pop-up window locate your batch file and click OK • Click the Upload button Once uploaded, a results screen is displayed with one of two messages: • 1.0 Done! 15 27 August 2009 Online FSM – Hub User Guide • Error in Batch File NOTE – All batch files must be submitted before 18.00 and these are processed overnight. Under normal circumstances they should be available for download at the start of the next working day. 2.6.3 Download Batch File Click on the My Queries link in the left-hand navigation panel or from the ‘Download results from a previous Batch Query’ link on the Eligibility Query screen. 1.0 16 27 August 2009 Online FSM – Hub User Guide Click on the Download button to download a processed batch file. You will be presented with a pop-up window. You can then choose the location where you want the file to be saved. Once the file has been downloaded you can open it and next to each row you will find either TRUE or FALSE. TRUE means that the claimant has been found and is eligible and FALSE means that the claimant has not been found. NOTE – By default, the name of the download results file is the same as the name it had when it was uploaded except that the name also includes “Results” added to it plus a sequence number (starting at 1) to distinguish between multiple uploaded files with the same name. 1.0 17 27 August 2009 Online FSM – Hub User Guide 2.7 Local Authority Audit Report Click on the Reports link in the left hand navigation panel. • Enter a Start Date in the Start Date field. You can either use the calendar pop-up or enter a date directly in the field. Dates must be in the format DD MMM YYYY (e.g. 01 Apr 2009) • Enter an End Date in the End Date field. You can either use the calendar pop-up or enter a date directly in the field. Dates must be in the format DD MMM YYYY (e.g. 01 Apr 2009) • Select report format from the Format drop-down (either On Screen, In Excel, or As PDF) • Click on View Report The report will then be downloaded in the format selected. 1.0 18 27 August 2009 Online FSM – Hub User Guide 3 Web Browser Interface – Detailed Overview 3.1 Accessing the Web Browser Interface The Hub web browser interface is accessed via your standard desktop internet software by entering the following address: https://fsm.dcsf.gov.uk/fsm.laportal/default.aspx This will take you to the homepage (shown in Figure 1), where the important ‘Announcement’ section is displayed. We use this to inform users of news and updates, so you should check this on a regular basis. Figure 1 - Homepage 3.2 General Screen Layout All pages in the Hub web browser interface have the same functional elements to maintain consistency in your browsing experience. See Figure 1 - Homepage as an example. 3.2.1 Top Menu Bar Each page has a menu bar at the top of the screen with 2 sets of options: • 1.0 On the left-hand side there are links to the Homepage, Query screen and Contact us screen 19 27 August 2009 Online FSM – Hub User Guide • 3.2.2 On the right-hand side is an indication if you are logged in or not, with links to Login, Logout, Change Password and Request Login Header and Breadcrumb Trails Below the top menu is a large banner containing the title of the site along with logos for the DCSF and the Welsh Assembly. Directly beneath this is the breadcrumb trail which will indicate where you are in the site in relation to the homepage. The breadcrumb trail gives you links to the pages you have browsed from. 3.2.3 Left-hand Navigation The left-hand navigation is only populated when in the Query section of the site. When it is available it provides links to run online queries, upload batch queries, view queries and run the audit report. 3.2.4 Main Body The main body of the screen contains the detail of the page browsed to and differs depending on function. 3.3 Register 3.3.1 Pre-registration Prior to registering to use the Hub web browser interface, users are requested to complete, and submit in hard copy, a data use declaration form. This is to confirm that data will only be used for the intended purpose and that any improper use of data constitutes a criminal offence. The form can be found in Appendix A – Local Authority User Declaration Form and needs to be completed and sent back to the DCSF. Users can use the request login functionality of the web browser interface and gain access to the Hub services prior to completing the declaration form, however if the form has not been returned to DCSF within two weeks of registration the account will be locked. 3.3.2 Request Login Click on the Request Login link at the top right hand corner of the screen, or from the Login screen. If you click on the Login link you will find a link in the main body of the page to the Request Login page. 1.0 20 27 August 2009 Online FSM – Hub User Guide The Request Login screen (shown in Figure 2 below) allows you to enter your details and request an LA User account. Figure 2 - Request Login Complete the following steps: • Enter your email address in the Email Address field • Enter your local authority identifier in the LA Identifier field (the local authority identifier is a 3 digit number. If you do not know your local authority number, please talk to your supervisor or email the Hub team at [email protected]) • Click on the Request Login button An email will be sent to the FSM administrator informing them of your account request. When the FSM administrator actions this you will receive two separate emails, one providing a username and one providing a password (see Figure 3). 1.0 21 27 August 2009 Online FSM – Hub User Guide Figure 3 - Registration Emails You are now ready to Login and start using the Hub web browser interface. 3.4 Login 3.4.1 Login Screen Browse to the Hub web browser interface as per the link given in section 3.1. The homepage is displayed (see Figure 1 - Homepage) and you should click on the Login link at the top right hand of the screen. The login screen is displayed (see Figure 2 below) showing fields for entering username and password as well as detailed conditions of use. These should be read and understood before proceeding to log into the portal. 1.0 22 27 August 2009 Online FSM – Hub User Guide Figure 4 - Login Screen 3.4.2 Login • Enter your username in the User Name field • Enter your password in the Password field • Click on the Login button If this is the first time you have logged in you will now be presented with the Change Password screen (see Figure 6) where you will have to change the password. Passwords must be between eight and sixteen characters and contain numeric and upper and lower case characters. 1.0 • Enter the password, sent to you in your registration emails, in the Password field • Enter your new password in the New Password field • Enter the same new password in the Confirm New Password field • Click the Change Password button 23 27 August 2009 Online FSM – Hub User Guide The homepage is redisplayed (see Figure 5 below) updated to indicate you are now logged into the web browser interface. At the top left of the screen there is a message saying you are ‘Logged in as …’ and next to that two links, one to change password (see section 3.4.5) and the other to logout (see section 3.4.6). Figure 5 - Homepage (logged in) 3.4.3 Account Lockout You have 5 attempts to correctly log into the Hub web browser interface after which the account will be locked out. This will be indicated to you on the screen. In order to have your account unlocked, contact your FSM administrator ([email protected]) who will be able to unlock the account. You will be sent a new password by email which you will be prompted to change the first time you log in using it. 3.4.4 Forgotten password Should you forget your password then there is a link labelled ‘Forgotten your password?’ on the Login screen (see Figure 4). This will take you to the Forgotten Password screen. On this screen: • 1.0 Enter your username in the Username field 24 27 August 2009 Online FSM – Hub User Guide • Click Request Password Reset The FSM administrator will then receive notification of your request and can then carry out the password reset. Once the password has been reset you will receive a new password by email which you will be prompted to change the first time you log in using it. 3.4.5 Change password Should you wish to change your password at anytime then click on the Password Change link at the top right of the screen and this will take you to the Change Password page (shown below). Figure 6 - Change Password Passwords must be between eight and sixteen characters and contain numeric and upper and lower case characters. • Enter your current password in the Password field • Enter your new password in the New Password field • Enter the same new password in the Confirm New Password field • Click the Change Password button The screen you were on previous to clicking the Password Change link is redisplayed. Your password has now been changed. 1.0 25 27 August 2009 Online FSM – Hub User Guide 3.4.6 Logout In order to logout of the web browser interface, you can either close your browser, or click on the Logout link at the top right of the screen. This link is available on all screens when you are logged in. This will take you to a Logout screen (see Figure 6 below) asking you to confirm you want to logout. Click the Logout button on this screen to complete logging out. The homepage will be displayed but you will no longer be logged in. Figure 7 - Confirm Logout 3.5 Online Eligibility Query 3.5.1 Accessing the Online Query Form The Online Query form is available from the Eligibility Query screen (shown below) which can be accessed from: 1.0 • the Homepage via the ‘Perform an eligibility query’ link in the main body of the screen • the Query link at the top left of each screen 26 27 August 2009 Online FSM – Hub User Guide Figure 8 - Eligibility Query Screen The Eligibility Query screen gives you 2 options, to run online eligibility queries, or to perform a batch query. The left-hand navigation panel is now populated with options related to performing eligibility queries. Select the ‘Perform an Online Query’ link from the main body of the page, or the ‘Online Query’ option from the left-hand navigation panel. This will take you to the Online Query form. 3.5.2 Performing an Online Query The Online Query form (shown below) presents you with fields for entering details of the claimant you are running the query for. 1.0 27 27 August 2009 Online FSM – Hub User Guide Figure 9 - Online Query Form In order to run a query you must enter either the claimant’s National Insurance Number or their National Asylum Seeker Service reference number, their Date of Birth and the first three characters of their surname. • The National Insurance Number field is not case-sensitive but must be 8 characters long in the format: o 2 letters o 6 digits o 1 letter from A-D o (e.g. AB123456A) 1.0 • The NASS must 9 digits long (e.g. 011212345). Do not enter any of the non-numeric separator characters that appear on the claimants NASS letter • The claimant’s Date of Birth is entered using drop-down boxes for Day, Month and Year, or a pop-up calendar window, for selecting the date. The query will fail if an invalid date is selected (e.g. 31/02/2008) 28 27 August 2009 Online FSM – Hub User Guide • The surname field is not case-sensitive but must contain valid characters for a surname, i.e. letters, hyphens or apostrophes (e.g. ABC, AL-, or O’M). The full surname should be used if this is less than three characters. NOTE – Claimants should either have a NINO or NASS; therefore you should never enter both, if you do then the system will return an error and the query will not be run. Once you have entered the details click on the Check Eligibility button to process the query. 3.5.3 Results from an Online Query The Hub has access to records from HMRC, DWP and the Home Office against which eligibility queries are processed. The Hub returns three results from an Online Query: • Found If the claimant’s details are matched in any of the 3 datasets and meet certain criteria then the Found screen is displayed (see below). Should you see this screen then the claimant is entitled to claim for free school meals for their child/children. Figure 10 - Found Screen 1.0 29 27 August 2009 Online FSM – Hub User Guide • Not Found If the claimant’s details are not matched in any of the 3 datasets then the Not Found screen is displayed (see below). Figure 11 - Not Found Screen Should you see this screen then there are two possibilities as to why the claim has failed. Either the claimant could not be found in the datasets, or the claimant has been found and is ineligible. In either case if the claimant believes they should have been found then retry the application and ensure all details are correct. If the claimant is still “Not Found” then in general it is best to raise a call with the Hub Service Desk ([email protected]) providing full details of the record. The problem can then be taken up with the relevant Department. o For applications based on tax credit entitlement HMRC advice in the case of a ‘Not Found’ response is to ask the claimant to provide their latest tax credit statement form TC 602. If there is still uncertainty after this is seen, please call the HMRC LA helpline on 0845 300 3944. You will be asked to confirm that you have checked both the Hub and form TC602. 1.0 30 27 August 2009 Online FSM – Hub User Guide o For applications based on Income Support, Income Based Job Seekers Allowance and Employment and Support Allowance, DWP advice in the case of a ‘Not Found’ response is to ask the claimant to produce their paperwork that confirms they are in receipt of the relevant benefit. If the paperwork (such as a recent Award letter) confirms eligibility then raise a call with the Hub Service Desk. o A NASS number is only allocated to those who are in receipt of the relevant support under part VI of the Immigration and Asylum Act 1999. If a NASS number has not been allocated the claimant is not in receipt of the relevant support and is not, therefore, eligible for FSM. Claimants with a NASS number should be returned as ‘Found’ by the Hub. If this is not the case please report this to the Service Desk. • System Error Should there be a system error, e.g. no access to data, then the System Error screen is displayed (see below). If this happens try the query again and if the error reoccurs contact to the FSM administrator ([email protected]). Figure 12 - System Error Screen 1.0 31 27 August 2009 Online FSM – Hub User Guide 3.6 Batch Eligibility Query 3.6.1 Creating a Batch File The Hub includes functionality for uploading and processing batch eligibility query files (see Figure below for an example batch file). This allows you to collate a number of eligibility queries into a file rather than process each one individually through the online form. Once uploaded to the Hub, they are stored for overnight processing and once processed can be downloaded appended with a Found and Not Found status against each query. Batch files should be created using the following rules: • The batch file should be a CSV (i.e. comma separated values) file. The easiest way to create this is to use excel and Save As a CSV file • The batch file should be made up of individual rows for each individual query • Each row must be made up of 4 columns, which must contain the following and be entered in the order below: o Column 1 – (OPTIONAL) National Insurance Number, if the claimant is in possession of one. The National Insurance Number field is case-sensitive and must be 8 characters long in the format: 2 letters 6 digits 1 letter from A-D (e.g. AB123456A) o Column 2 – (OPTIONAL) NASS, if the claimant is in possession of one. The NASS must 9 digits long (e.g. 011212345) o Column 3 – Date of Birth, in the format YYYYMMDD (e.g. 19790430) o Column 4 – Surname field is not case-sensitive but must contain valid characters for a surname, i.e. letters, hyphens or apostrophes (e.g. MAR, AL-, D’A) 1.0 32 27 August 2009 Online FSM – Hub User Guide • Same rules apply to NINO and NASS as the online query, you cannot have both for the same query, i.e. each row of the batch file must contain either a NINO in column 1, or a NASS in column 2. If both are filled then the whole batch file will be rejected • There must be data in every column, so if you have a NINO in column 1 then column 2 must be present but empty, and vice versa if you have a NASS in column 2 then column 1 must be present but empty (this can be seen clearly in the example below) Figure 13 - Example Batch File 3.6.2 Upload Batch File The Upload Batch Query screen is available from the Eligibility Query screen (see Figure 8) which can be accessed from: • the Homepage via the ‘Perform an eligibility query’ link in the main body of the screen • the Query link at the top left of each screen The Eligibility Query screen gives you 2 options, to run online eligibility queries, or to perform a batch query. Select the ‘Upload a new Batch Query’ link from the main body of the page, or the ‘Upload Batch Query’ option from the left-hand navigation panel. 1.0 33 27 August 2009 Online FSM – Hub User Guide This will take you to the Upload Batch Query screen (shown below). Figure 14 - Upload Batch Query To upload your batch file carry out the following steps: • Click on the Browse button next to the Select File field • From the Choose File pop-up window locate your batch file and click OK • Or, enter the full filename and path if you know it • Click the Upload button Once uploaded, a results screen is displayed with one of two messages: • 1.0 Done! This means that the batch file has been successfully uploaded and will be processed. Batch files will be processed against the same datasets as the online query, i.e. HMRC, DWP and the Home Office. 34 27 August 2009 Online FSM – Hub User Guide Figure 15 - Successful Upload of Batch File • Error in Batch File. This means that there is a problem with the batch file you have tried to upload. If you have not followed the rules described in section 3.6.1 then the file cannot be uploaded. This screen will list the problem rows in the file, but will not indicate why there was an issue. Figure 16 - Error in Batch File NOTE – All batch files must be submitted before 18.00 and these are processed overnight. Under normal circumstances they should be available for download at the start of the next working day. 1.0 35 27 August 2009 Online FSM – Hub User Guide 3.6.3 Download Batch File You can monitor the progress of your batch file by accessing the My Queries screen. The My Queries screen is accessed from the link in the left-hand navigation panel or from the ‘Download results from a previous Batch Query’ link on the Eligibility Query screen (see Figure 8). The My Queries screen displays all batch files that have been uploaded by yourself or other LA Users of your Local Authority. As seen in Figure 17 - My Batch Queries, the screen displays the following information against each batch file: • Query Date and Time – showing when the batch file was uploaded • Filename – showing the filename of the uploaded batch file • Number of Rows – once processed this will display the number of rows that have been processed in the file. Until processed this will say ‘Unknown’ • Status – there are a number of statuses returned: o Submitted – indicates that the batch has just been uploaded o ImportInProgress – indicates that the batch file is been processed o QueryComplete – indicates that the batch file has been successfully processed o ErrorInFile – indicates that an error occurred during processing 1.0 • Processed Date Time – showing when the batch file was processed • Action – blank unless QueryComplete and then a Download button is shown 36 27 August 2009 Online FSM – Hub User Guide Figure 17 - My Batch Queries When the status moves to QueryComplete this means you can download the batch file. Click on the Download button to download a processed batch file. You will be presented with a pop-up window (see Figure 18 below) where you get the option to save the file to your computer. You can then choose the location where you want the file to be saved. Once the file has been downloaded you can open it and next to each row you will find either TRUE or FALSE. TRUE means that the claimant has been found and is eligible and FALSE means that the claimant has not been found. Files have to be downloaded within 7 days otherwise they will no longer be available. You will then have to resubmit the original batch file to be processed again. NOTE – By default, the name of the download results file is the same as the name it had when it was uploaded except that the name also includes “Results” added to it plus a sequence number (starting at 1) to distinguish between multiple uploaded files with the same name. 1.0 37 27 August 2009 Online FSM – Hub User Guide Figure 18 - Download Batch File 3.7 Local Authority Audit Report There is an audit report available; it is located from the left hand navigation, available in the Query section of the site. The Local Authority Audit Report screen (see below) allows you to query between two dates the total queries run by yourself, and any other user from your Local Authority, and the results found. The report can be displayed on screen or downloaded as an Excel or PDF file. 1.0 38 27 August 2009 Online FSM – Hub User Guide Figure 19 - Local Authority Audit Report In order to produce the report the following steps should be taken: • Click on the Reports link • Enter a Start Date in the Start Date field. You can either use the calendar pop-up or enter a date directly in the field. Dates must be in the format DD MMM YYYY (e.g. 01 Apr 2009) • Enter a End Date in the End Date field. You can either use the calendar pop-up or enter a date directly in the field. Dates must be in the format DD MMM YYYY (e.g. 01 Apr 2009) • Select report format from the Format drop-down (either On Screen, In Excel, or As PDF) • Click on View Report The report will then be downloaded in the format selected. 3.8 Contact Us If you should wish to contact the DCSF about the Hub service then click on the Contact link at the top left-hand side of the screen. Details are provided on the screen (see below). 1.0 39 27 August 2009 Online FSM – Hub User Guide Figure 20 - Contact Us 1.0 40 27 August 2009 Online FSM – Hub User Guide 4 Glossary CIS Customer Information System (a DWP facility that includes benefit information relevant to establishing FSM eligibility) CTB Council Tax Benefit DCSF Department for Children, Schools and Families DWP Department of Work and Pensions ECS Eligibility Checking Service FSM Free School Meals GCSx Government Connect Secure extranet GES Gateway to Educational Services GSi Government Secure intranet HB Housing Benefit HO Home Office HMRC Her Majesty’s Revenue and Customs LA Local Authority NASS National Asylum Seekers Service NINO National Insurance Number 1.0 41 27 August 2009 Online FSM – Hub User Guide 5 Contacts DCSF FSM Administrator Email: [email protected] Postal Address: DCSF FSM Administrator c/o Capgemini 77-79 Cross Street Sale Cheshire M33 7HG 1.0 42 27 August 2009 Online FSM – Hub User Guide Appendix A – Local Authority User Declaration Form 1.0 43 27 August 2009 Free School Meals Eligibility Checking Service Part 1: Personal Commitment Statement Members of local authority staff applying for an account on the DCSF Hub must complete Part 1 of this form and then pass it to their Section 151 Officer who must complete Part 2. Title: Forename: Surname: Employing Local Authority: E-mail Address: Telephone: Education Act 2005 In consideration of being given access to information supplied in accordance with section 110 of the Education Act 2005, I agree that; • I will only use this information for the purpose of determining whether a pupil who is the subject of the information, or whose parent is the subject of the information, is eligible for free school lunches and milk. • I will only use this information whilst _ _ _ _ _ _ _ _ _ _ _ _ _ _ _ _ _ _ _ local authority employs me. • I understand that it is an offence to use this information for any purpose other than those permitted by sections 110 and 111 of the Education Act 2005. Information Assurance In consideration of being given an account on the DCSF Hub, I agree that; • I will not share the user identity or password with anyone else. • I will not keep a written record of my user identity and password. • I will log-off my DCSF Hub account before leaving my computer unattended. • I will not disable or circumvent any of the security controls that constrain how I use my computer or my DCSF Hub account. Version 1.0 Part 1 Free School Meals Eligibility Checking Service • The DCSF may, monitor, record and retain communications and details of actions associated with my user identity only for purposes permitted by the Telecommunications (Lawful Business Practice) (Interception of Communications) Regulations 2000. These purposes include; preventing or detecting a crime; investigating or detecting the unauthorised use of the DCSF Hub or any other computer or communications system operated by the DCSF; and securing or as an inherent part of the effective operation of the DCSF Hub. • I will immediately report any actual or suspected incident that may affect the security of my DCSF Hub account or any other aspect of the DCSF Hub to [insert contact] Signed: Version 1.0 Date: Part 1 Free School Meals Eligibility Checking Service Part 2: Section 151 Officer’s Confirmatory Statement The Section 151 Officer must check the information entered in Part 1 of this form, complete Part 2 and return a hardcopy of both completed parts to the DCSF at the address in Part 3. I confirm that _ _ _ _ _ _ _ _ _ _ _ _ _ _ _ _ _ works for _ _ _ _ _ _ _ _ _ _ _ _ _ _ _ _ _ _ local authority and requires access to the DCSF Hub to check eligibility for free school meals and milk. I confirm that my organisation has undertaken the following basic checks for this employee as part of our pre-employment checks: • verification of identity, • taking up of references, • nationality check, • self-declaration of criminal record. I confirm that my organisation will brief, train or otherwise formally disseminate information that instructs this employee on how to use the DCSF Hub and the computer system that provides access to the DCSF Hub securely. I confirm that I will review this employee’s requirement to access the DCSF Hub for legitimate business purposes at least every six months and that I will inform the Hub Service Desk as soon as I determine that access is no longer necessary. Signed: Date: Print Name: Version 1.0 Part 2 Free School Meals Eligibility Checking Service Section 3: Return Address for Completed Form The Section 151 Officer must return a completed hardcopy of Part 1 and Part 2 to: DCSF FSM Administrator c/o Capgemini 77-79 Cross Street Sale Cheshire M33 7HG Version 1.0 Part 3