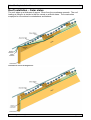
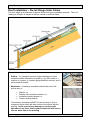
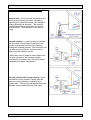
1
Solex Roofing Installation Manual
Revised 9th February 2010
Subject to ongoing revision – latest copy available online
© Solex Energy Ltd 2009
Solex Roofing Installation Manual
1
Contents
Overview
Operation summary
Roof orientation and pitch
Performance
System sizing
Design and Layout
Planning considerations (UK)
Choice of products
Installation skills
Tools
Materials delivery and handling
Sitework – info for main contractor
Health and safety considerations
Page
2
2
2
2
2
3
3
4
4
5
5
6
7
Roof installation – Solar slates
- Roof construction
- Absorbers
- Slates
-- Whole roof
-- Patch
-- Strip
- Specifications
8
10
13
14
16
16
17
Roof installation – Nu-lok slates
- Roof construction
- Absorbers
- Nu-lok battens
- Slates
-- Whole roof
-- Patch
-- Strip
- Specifications
19
21
23
24
24
25
25
26
Solex Energy Ltd +44(0)1305 837223
Page
Plumbing Installation
- Basic system
- Hot water systems
- Space heating & hot water
- Pool heating
- Thermal stores
- Retrofit coils
- Multiple roofs
27
31
33
34
34
37
38
Electrical Installation
- Controller types
- Controller wiring
- Pump & valve wiring
- Sensor wiring
- Wiring for pumped circuits
- Controller programming
38
39
39
39
40
40
Maintenance
- Roof maintenance
- Annual maintenance
41
42
www.solexenergy.co.uk
Solex Roofing Installation Manual
2
Overview
Solar roofing offers an alternative to solar traditional solar thermal panels or tubes. Its
main advantages are those of cost, aesthetics, and the ability to provide larger solar
collecting areas on a given roof slope. The efficiency per m2 is around 80% that of
traditional flat panels.
The output of the solar roofing is heated water, which may be used for hot water, space
heating, pool heating or any other water heating application.
Operation Summary
A solar fluid circulates through black silicone rubber absorber strips on the roof and is
heated by the sun. Solar glazing in the form of glass or plastic slates, tiles or sheets
covers and insulates these strips, and forms the roof surface. An insulation layer behind
the strips also reduces heat loss.
The rubber will cope with freezing conditions, and in overheat situations the fluid will drop
back into a holding tank below. The fluid is circulated by a solar pump/controller unit which
transfers the heat through pipes to where it is required.
Roof Orientation and Pitch
•
•
•
The roof to be covered should ideally face south.
Orientations from SE to SW are fine with performance around -12% at the extremes.
Orientations as far as E or W still perform okay, with performance at around -25%.
Given the choice, and all other considerations being equal, W or SW should be chosen
over E or SE, as ambient temperatures are higher in the afternoon increasing
performance, and also hot water and heating demand is usually higher in the evening.
The ideal pitch is 30o to 50o for year round performance. Steeper pitches up to 60o favour
winter performance which is important for space heating. The slates have a minimum
pitch of 25o and a maximum of 90o. For pitches under 25o or over 70o contact us for
additional installation instructions.
Performance
The average annual output (south facing, 30o-50o) is in the range 400 - 425kwh/m2/annum
when used to provide hot water, and somewhat more than this when used to provide lower
temperature output e.g. for space and pool heating. Instantaneous output under full sun is
up to 720w/m2.
Use the spreadsheet at www.solexenergy.co.uk to calculate roof outputs, energy savings
and system costs.
System Sizing
•
Hot water systems – the recommended sizing is 2m2 solar roof/person, with a
minimum size of 6m2. The recommended sizing is generally:
Typical 3 bedroom house – 8m2
Typical 4 bedroom house – 10m2
Typical 5 bedroom house – 12m2
Solex Energy Ltd +44(0)1305 837223
www.solexenergy.co.uk
Solex Roofing Installation Manual
3
•
Space heating systems – with underfloor heating the recommended minimum size is
at least half the floor area in solar roofing, although ideally the solar roof will be at least
equal in area to the heated floor area.
•
Pool heating systems – the recommended size is 60% of the pool area in solar
roofing for outdoor pools, and 85% of the pool area for indoor pools (on the assumption
that indoor pools are used all year.)
•
Combined systems – the recommended size is generally the larger of any of the
individual parts of the system. E.g. for water and space heating systems, the system is
sized to the space heating requirements.
Design and Layout
Solar roofing may be installed
• To the extremities of the roof, or
• As a patch surrounded by a
compatible roofing material, or
• As a strip between other non
compatible roofing materials.
The visual effect of the solar roofing is a combination of the reflection from the surface, and
the black colour of the absorbers beneath. Overall a uniform medium to light grey is
observed which changes depending on weather conditions.
Planning Permission (UK)
1. Retrofit to dwelling house – applies to:
•
•
All buildings except I, II* and II listed buildings,
All areas except some conservation areas where specific permitted development
rights have been removed by the LPA,
Installing solar roofing is considered permitted development and so does not require
planning permission – GPDO, Schedule2, Part1, Class C
2. Retrofit to dwelling house – applies to:
• All buildings except I, II* and II listed buildings,
• Conservation areas where specific permitted development rights have been
removed by the LPA under GPDO Section 4.2
Installing solar roofing is permitted unless it is to a roof slope which fronts a highway,
waterway or open space (‘relevant location’). – GPDO Section 4.2
3. Listed buildings
Apply for listed building consent, and planning permission if situation 2 above applies
and the roof fronts a relevant location.
4. New build houses / extensions
Submit details of the solar roofing materials with the planning application. Bring the
above permitted development rights to the attention of the LPA if they are minded not
to approve this type of material.
Solex Energy Ltd +44(0)1305 837223
www.solexenergy.co.uk
Solex Roofing Installation Manual
4
5. Agricultural and forestry buildings
Installing solar roofing is considered permitted development and so does not require
planning permission – GPDO, Schedule2, Parts 6 & 7
6. Industrial and warehouse buildings
Installing solar roofing is considered permitted development and so does not require
planning permission – GPDO, Schedule2, Part 8
Choice of products
We make a range of different types of solar roofing to suit various applications:
Solar Slates
These are glass traditional style double lap solar slates, which
are compatible with traditional 500 and 600mm (20” and 24”) size
slates. They are installed onto a normal felted and battened roof
structure.
Nu-lok Slates
These are glass single lap slates with a unique easy to fit metal
battening system. The glass slates are compatible with Nu-Lok
heavy-duty ceramic and natural slates, and also with PV slates.
This is an easy to fit, low labour requirement system.
Solar Tiles
These polycarbonate single lap tiles are compatible with Marley
Modern/Redland Mini-stonewold concrete tiles. They are ideal for
fitting into an existing concrete tiled roof.
Solar Cladding
This is a lightweight solar cladding system for use over existing
profile metal roofing. Ideal for industrial applications, it utilises
existing profile roof insulation for low imposed weight, low cost,
high output systems.
Installation Skills
The system may be fitted by M&E contractors and roofers working together
•
•
•
•
•
•
Generally an M&E qualified person should oversee the whole installation
The battens, insulation, rubber absorber, EPDM membrane may be installed by
roofers, under the guidance of M&E
The manifolds, supply pipes, roof sensor and joints in the absorber by M&E
Installation of the tiles/slates by the roofers
Installation of the internal system components by M&E
Electrical installation of the controller, pump and motorised valves (where
applicable) by M&E / qualified electrician
Solex Energy Ltd +44(0)1305 837223
www.solexenergy.co.uk
Solex Roofing Installation Manual
5
Tools
Required in addition to normal roofing tools:
• Scissors for cutting the absorber strip (not a knife)
• Staple gun / hand tacker for fixing the absorber strip and EPDM
• Crimping pliers (supplied) for the absorber pipe clips
• Silicone oil (supplied) for lubricating absorber joiners and manifolds
• First fix type nail gun and hardened nails (Nu-lok systems only)
• Cordless driver and Pozidrive bits for slate clip screws (solar slate systems only)
• Pump / compressor and fittings for pressure testing
Materials – Calculating Quantities
Quantities may be worked out manually, or calculated using our roof calculator
spreadsheet at www.solexenergy.co.uk. This program also outputs a roof specification
page which may be useful for the roofers as it summarises key dimensions and figures.
Materials – Delivery and Storage
Solar roof materials and components are usually delivered on a pallet. Provisions must be
made for handling this on-site. The delivery driver may have tail lift (if requested) and
pallet truck, so the pallet may be moved as far as the concrete or tarmac surface will allow.
A delivery note will be included with the consignment, and the materials should be checked
against this as soon as practical, and in any event within 2 working days of delivery. Any
shortages or damage must be notified within 2 working days of delivery.
Thermal stores are either delivered from stock via a pallet carrier, or direct from the
manufacturer. When delivered direct from the manufacturer, the lorry will have no
offloading facilities unless requested, and the store must either be forklifted off, or craned
off. There is a lifting eye provided in the packaging, which screws into the central top port.
When on a level surface stores may be easily moved with a pallet truck. The label on
thermal stores must be checked on delivery, to ensure that the correct model has been
supplied.
Solar roof components should be protected from the weather before installation. If packets
of solar slates become wet the packaging will disintegrate, with the possibility of resulting
damage and health and safety issues from falling slates when being handled. Packets or
loose stacks of solar slates which become wet will draw in water causing them to stick
together. They may be parted using the end of a slate clip or any similar flat object which
does not damage the slate edge.
Wetting of the insulation should be avoided if possible, although it will not be damaged by
wetting. If exposed to the weather on the roof before slating, most water will drain out
down the membrane, and the remainder will evaporate when the roof is watertight.
Solex Energy Ltd +44(0)1305 837223
www.solexenergy.co.uk
Solex Roofing Installation Manual
6
Sitework – Information for Site Foreman / Main Contractors
Some of the key points regarding the installation:
•
•
•
•
•
•
•
•
•
•
•
•
The solar roof requires both vertical counterbattens, and horizontal battens (25 x 50)
The vertical counterbattens must be laid over the breather membrane
Insulation is laid between the counterbattens before nailing the horizontal battens
Special attention must be paid to the eaves detail where the solar slates start at the
eaves – see relevant diagram
Solex or our contractors do not supply batten – this must be provided on-site
When Solex or our contractors arrive on-site we expect the roof to be complete to the
membrane and counterbatten stage (i.e. watertight)
Absorbers must be pressure tested with air before and during fitting the slates/tiles
Ridges and hips may be wet or dry fitted against the solar slates, and are usually
installed when finishing the conventional roofing, after the solar roof has been finished
Mortared ridges/hips sometimes leach lime or salts which stain the glass. This may be
removed with dilute hydrochloric acid, although it will weather off within 6 months
The system requires pipes (generally 2x 22mm for systems <70m2) and a cable
(generally 1x 2 core) running to the roof
The system requires a vented expansion tank (supplied by Solex) located at least
500mm below the level of the bottom of the solar roof, and not more than 4m from the
top of the solar roof. Brackets are available for wall mounting.
Sizing is usually as follows:
Roof area
up to 8m2
up to 25m2
up to 40m2
up to 70m2
up to 85m2
up to 115m2
up to 200m2
•
•
•
•
L
350
600
1100
1100
920
1100
1250
W
270
300
290
290
420
320
360
H
370
450
460
620
630
825
1010
Kg
35
80
135
185
220
265
420
The expansion tank requires a cold fill supply, an overflow and must be accessible for
maintenance
Thermal stores, where supplied, are generally large, so provisions must be made for
handling (see delivery information above)
Consideration must be given to access arrangements for thermal stores, and weight
loadings of floors (they stand on three metal feet). See the thermal store specifications
toward end of this guide.
Thermal stores (1.5 bar) require a feed & expansion tank (not supplied by Solex). 3.0
bar stores may also be installed as a pressurised system subject to meeting
regulations.
Solex Energy Ltd +44(0)1305 837223
www.solexenergy.co.uk
Solex Roofing Installation Manual
7
Health and Safety Considerations
These are given in addition to all other health and safety guidelines and regulations
relevant to roofing, plumbing and general site work, which the tradesmen involved should
already be aware of.
• Boxes of glass slates are heavy, ranging in weight up to 40kg per pack. Suitable
handling practices should be adopted. If possible they should be lifted to the
scaffold with a forklift.
• Slate boxes which have become wet may disintegrate leading to the possibility of
sliding and/or falling slates
• Where glass slates are being handled there is the possibility of breakage, resulting
in numerous small glass fragments. If this happens gloves must be worn during
cleaning up, which is best done using a dustpan and brush.
• When stacking loose slates vertically against an object, e.g. scaffolding, the edge of
the first one should be protected with something soft.
• When stacking loose slates horizontally ensure that no dirt or fragments are trapped
between sheets which may cause damage. Slates stacked loose horizontally are
liable to slide sideways off the stack without warning, causing damage and hazards.
• Rubber absorber strips are supplied on large rolls which may weigh over 25kg.
Suitable handling practices should be adopted.
• Legionella – water stored in hot water cylinders between 20oC and 45oC may breed
legionella bacteria. Provision must be made to prevent this, for example by heating
the entire cylinder to above 60oC at least once a week.
Vermin
The silicone absorber strip and supply pipes are susceptible to attack by vermin.
Adequate precautions should be taken to ensure vermin, especially mice, are not able to
access the roof between the breather membrane and slates/tiles.
Solex Energy Ltd +44(0)1305 837223
www.solexenergy.co.uk
Solex Roofing Installation Manual
8
Roof Installation – Solar slates
The roof takes up a thickness of approx 70mm from the membrane upwards. The roof
loading at 34kg/m2 is similar to that for natural or artificial slates. The construction
employed is conventional counterbattens and battens:
Alternative eaves arrangement:
Solex Energy Ltd +44(0)1305 837223
www.solexenergy.co.uk
Solex Roofing Installation Manual
9
The roof is built up as follows:
1. Rafters – for complete eaves to ridge installation of solar
slates the rafters should be of length (c x g)+50-f where c =
number of courses, g = batten gauge between centres, and f =
facia board thickness
2. Membrane – a breather membrane should be used, laid
across any of the following roof constructions:
• Rafters, or
• Rafters with insulation between, or
• Insulation sarking boards, or
• Timber sarking boards.
The breather membrane MUST be laid correctly to form a
waterproof layer which will drain water to the eaves without
pooling. In the event of any damage occurring to the
absorber at any time, this breather membrane will ensure
that no water enters the building.
3. Facia and eaves – where the solar slates go right to the
eaves one of the arrangements shown in the diagrams above
should be suitable. A tilting fillet or ply may be used, but
plastic eaves carriers will melt in the heat under the glass tiles.
The membrane can also be dressed down behind the facia,
although care must be taken over the fate of water running
behind the facia. (picture – eaves before installation of facia)
4. Counterbattens – 25mm thick counterbattens must be used.
These must go on top of the membrane, and start from under
the second batten as shown above.
5. Insulation – 25mm mineral fibre batts are cut to fit snugly
between the counterbattens, over the whole roof except the
far left and far right ‘channels’ between the counterbattens,
which are left open to allow space for the absorber loops,
manifolds and pipes.
The easiest way to cut the batts is to place one against a
counterbatten, and cut down with a knife using the opposite
counterbatten as a guide. Use a blunt tipped knife to avoid
damaging the membrane.
Wetting of the insulation should be avoided if possible,
although it will not be damaged by water. If exposed to the
weather most water will drain out down the membrane, and
the remainder will evaporate when the roof is watertight.
Note that the insulation supplied is the minimum
recommended for the system. Extra insulation, especially in
the form of foam insulation boards over the rafters, will
increase the efficiency of the system.
Solex Energy Ltd +44(0)1305 837223
www.solexenergy.co.uk
Solex Roofing Installation Manual
10
6. EPDM – the left and right channels are covered with an EPDM
membrane, which is stapled to the counterbattens and
dressed neatly into the channel. This has three purposes – it
protects the breather membrane from UV, it prevents the
colour of the membrane from showing through the slates, and
in the unlikely event of a leak from a manifold or pipe it offers
added protection to the building. The EPDM must therefore
be dressed over the eaves to allow run off.
The EPDM should also be used to cover any roof membrane,
insulation, battens etc. which will show through the glass tiles
if left uncovered.
7. Battens – 25mm x 50mm battens are used, which should be
treated or naturally durable, e.g. western red cedar. The
batten spacing can be in the range:
• 500 series 200 - 212mm between centres
• 600 series 250 - 262mm between centres
If the solar slate area starts at the eaves the eaves batten
must be 10mm thicker – 35mm. A bigger kick-up is possible
up to +25mm, but not recommended (50 or 60mm screws for
the slate clips may be required).
Note that as the glass slates cannot be cut, the battens for the
eaves course must be spaced the same as for the subsequent
courses. The only exception is where longer eaves clips are
used for a larger gutter overhang, when the first two battens
may be closer together. The space between the first two
battens must be kept clear for the absorber strip. Similarly,
the battens should be gauged out so that there is a complete
course at the ridge.
The absorber strips will loop under the battens at the ends, so
small sections of batten should be left out to allow this, which
may be nailed in after the installation of the absorber. The
omitted sections will generally be on every other course,
although the route of the absorber should be planned before
the battening process and the battens installed to suit.
8. Absorber strips, supply – these are supplied on 25m rolls.
For longer lengths joiner kits are supplied, consisting of short
pipe segments and O clips.
The roof calculator spreadsheet will output the length of
absorber required. Alternatively, it may be necessary to work
it out manually – the length of the course where the absorber
will lay is measured, and the loop factor is added for every
end of course – 500 series loop=120mm / 600 series
loop=150mm. The usual measuring points are the outer
edges of the EPDM covered channels detailed above.
Solex Energy Ltd +44(0)1305 837223
www.solexenergy.co.uk
Solex Roofing Installation Manual
11
Where the roof is sufficiently large, it is necessary to divide it
into parallel absorber circuits, which should be as close to
equal lengths as possible. For example a roof of 15 courses
may be divided into three courses of 5, or a roof of 12 courses
may be divided into circuits of 6, 4, 3 or exceptionally 2
courses depending on the overall length of the roof and
therefore the length of absorber strip in each circuit.
The Roof Calculator will give some guidance, although
generally we recommend that each circuit does not exceed
40m in length, which equates to around 8m2 of 500 series
roofing or 10m2 of 600 series roofing. There is no minimum
length of circuits, although having many smaller circuits will
result in more manifolds and connections.
9. Absorber strips, installation – when installing the rubber
absorber, it is advisable to start at the top of the roof, so that
there is less foot traffic on the installed rubber.
Starting at the end where the top manifold is required, the
absorber is unrolled along the batten with the flange at the
top. The flange is positioned to cover the batten and staple
gunned to it at 300mm intervals. Standard staples may be
used, as the absorber will be held in place by slate fixings
which pierce the flange.
At the end of the course, in the channel where the EPDM has
been positioned, the absorber is folded back on itself, still
keeping the flange at the top. The individual tubes are then
split away from each other so that each tube follows a natural
curve down to the second course.
When splitting the tubes apart, great care must be taken not to
damage the surface of any of the tubes. A pair of scissors
(not a Stanley knife) should be used. The point of the scissors
is pushed through all the tear lines of the strip, and the tubes
pulled apart in both directions as far as necessary. This
should be done with care, as sometimes the split can start to
run off toward a tube wall. If this happens, use the scissors
again to re-start the tear.
The tubes should be arranged neatly so that there are no
kinks which could disrupt the flow of water. The redundant
centre and bottom strips may get in the way and can be
removed at this point if desired. The top flange should be cut
at its midpoint and stapled along the battens, extending if
necessary with some spare flange which is supplied.
The absorber is then run out along the next course and fixed
as before.
In situations where the roof has already been battened, a
problem occurs at the course ends where the absorber has to
Solex Energy Ltd +44(0)1305 837223
www.solexenergy.co.uk
Solex Roofing Installation Manual
12
loop under the batten. In these cases the choice is to either
thread the absorber under the batten, or to cut out a section of
batten and re-fix it. If it is chosen to thread the absorber under
the batten, then the section of split tubes must be arranged
very carefully to prevent any of them kinking or squashing.
If it is necessary to join the strip, the ends are trimmed off
square using a pair of scissors, and the ‘wings’ on the tubes
cut back for about 50mm. A little silicone oil is sprayed on
both the copper joining tubes and the insides of the manifold
tubes. The joining tubes are inserted, and the O clips put on
and crimped using the pliers supplied.
10. Manifolds – copper manifolds are used to terminate the
absorber strips. The manifolds have 22mm open ends for the
connection of the flow and return pipes. The manifolds are
connected with silicone tubing, and O clips similar to those
used on the absorbers. The manifolds are short enough to
not be damaged by freezing water. Where any copper
components are used on the roof there must be at least 50mm
of supply pipe each side of them to allow for ice expansion.
The pipes and manifolds should lie in the EPDM covered
channel, under the battens. The top of the inlet manifold or
chain of manifolds is capped with a short length of silicone
tube and a plug, as is the bottom of the outlet manifold or
manifold chain.
Where the roof is sufficiently large to necessitate dividing it
into parallel absorber circuits, all the inlet manifolds are piped
in line up one side, and the outlets up the same or opposite
side (depending on an even or odd number of courses.
Sometimes it is necessary to return a pipe from an inlet or
outlet across the roof, for instance when dividing a roof of 7
courses into 3 and 4 course circuits. Half manifolds are
available for use in special circumstances.
The cold inlet pipe must flow in a generally upwards direction
from the pump to the bottom of the lowest inlet manifold. The
hot outlet pipe must connect to the top of the highest outlet
manifold even if the outlet pipe subsequently runs down the
roof. This must be done to ensure an even flow throughout
the circuits, and to ensure that air is purged from the top
circuits.
The inlet and outlet pipes should be taken into the loft or roof
space for connecting onto the normal plumbing pipe used
internally, ideally under a lap in the roofing membrane, which
may be aided by the use of copper U pieces and elbows
(supplied). Where it is not possible to pass the tubes under a
lap, any penetration through the membrane should be made
waterproof. Silicone rubber may be used and sticks well to
the silicone tube, although its adhesion to the particular
Solex Energy Ltd +44(0)1305 837223
www.solexenergy.co.uk
Solex Roofing Installation Manual
13
membrane being used should be checked.
The ends of the absorber strips are separated into individual
tubes, and the wings trimmed off by about 50mm with
scissors. Clips are put on the tubes and the tubes are
connected to the manifolds using a silicone lubricant and
crimp clips as detailed above.
11. Pressure testing – the system must be pressure tested with
air to 2.0 bar. At this pressure any incorrectly made joints
should leak or blow off. The system should be left under
pressure during the installation of the slates, so that any
absorber damage will immediately become evident. Note, air
will diffuse through the silicone absorber, so the pressure will
decrease over a period – e.g. overnight the pressure may
drop from 2.0 to 1.5 bar.
12. Sensor – a roof temperature sensor is used to measure the
temperature at the hottest point on the roof. It is fitted
beneath the absorber strip, generally at a position at least 1 m
from the top outlet manifold, near the centre of the absorber,
and not close to any area obscured by conventional slates. It
should be positioned so that it will lie between two of the
absorber tubes, and not next to any dead area of the strip.
The sensor is secured to a counterbatten with a small fencing
staple or similar, and covered with some silicone rubber. The
absorber strip is laid in position over it so a good thermal and
mechanical connection is formed.
The wire is passed through the roofing membrane, ideally at
an overlap. This high temperature wire with this sensor is
1.5m long and so will almost certainly need to be lengthened
using conventional 0.75mm2 two core lighting flex and a
connector block, which should both be located under the
rockwool insulation or away from the absorber area to prevent
heat damage. The sensor wires carry low voltage so an
electrician is not required.
Solex Energy Ltd +44(0)1305 837223
www.solexenergy.co.uk
Solex Roofing Installation Manual
14
13. Glass slates
Location
Standard
Eaves
Ridge
Verge, odds
Verge, evens
Verge-ridge corner
Verge-eaves corner
Hips
500 series, mm
500 x 500
500 x 285
500 x 285
250 x 500
500 x 500 holed
250 x 285
250 x 285
500 x 500 cut
corner, 6 sizes
Valleys and other
Polycarbonate 750 x
cut areas
500
Matching slate
375 x 500
Horizontal coverage
505
600 series, mm
300 x 600
300 x 335
300 x 335
450 x 600 holed
300 x 600
450 x 335
450 x 335
300 x 600 cut corner
6 sizes
Polycarbonate 600 x
600
305
The glass solar slates are installed over the absorber strips.
When installing the slates care must be taken not to damage
the absorbers. The glass slates are toughened and so cannot
be cut. The roof calculator at www.solexenergy.co.uk can
help with sizing a roof to an exact number of slates. The
range of sizes supplied is shown in the table.
In general most normal slating practices are followed when
using the solar slates, the main difference being in the method
of fixing.
Hook length
mm
70
75
80
85
90
95
100
105
Batten
spacing 500
series
218
215
213
210
208
205
203
200
Batten
spacing 600
series
268
265
263
260
258
255
253
250
Headlap
mm
70
75
80
85
90
95
100
105
14. Slates hooks – the slates are fixed to the battens with
blackened stainless steel hooks and screws. Use of a
lightweight cordless driver here is recommended. Two
horizontal lines on the flange of the absorber indicate the
correct position for the screws. When screwing in the clips
they should be tightened just enough to hold the sides of the
slates below, but must not be allowed to stress the glass,
which could lead to breakage later. Pushing gently on the
glass slate below the clip should release the tension.
The glass slates should be installed next to each other, with a
small gap 1mm between the slates and the screw of the hook
Solex Energy Ltd +44(0)1305 837223
www.solexenergy.co.uk
Solex Roofing Installation Manual
15
in the row above. If they are pushed up hard to the screws
shattered slates can result due to thermal expansion.
The hook length required is related to the batten spacing.
Note that the length of a clip is measured from the bottom of
the clip to the bottom of the screw hole.
IF A PATCH IS BEING INSTALLED PLEASE JUMP TO 21
15. Eaves – slating is started at the eaves, from a verge if
present, with a line of the clips screwed to the first batten at
the slate width interval, and a line of eaves slates hung on
these. A row of clips are then screwed to the first batten
between these eaves slates and the first row of standard
slates hung.
½ size eaves slates (500 series, 250x285mm) and 1½ size
eaves slates (600 series, 450x335mm) are available.
The eaves will overhang the first batten by the clip length
minus 25mm. Where this overhang is too small, longer clips
may be used if available, although then the batten spacing on
the first course may need to be reduced.
16. Verge – If the roof runs from one verge to another it is an
advantage to design the roof to fit an exact number of slates,
to the nearest half slate, using the slating interval given. The
slates should overhang the verge wall by around 50-75mm,
taking account of whether a bargeboard will be used. The
verge can be finished using an undercloak of conventional
slates in the normal manner or a dry fix verge can be installed.
Alternatively, depending on local regulations, the edges of the
slates can be left as they are with just some cement or a
bargeboard to fill the gap above the wall top.
Unless secured with a dry fix verge, the edges of the verge
slates must be secured to the battens with verge clips
(supplied). These are screwed to the lower edge of the
battens so that each secures three layers of slates, and the
end should be bent in slightly so that it grips the slates. These
clips may be installed before slating commences, using a line
to get a neat edge.
The first full height verge slate from the eaves will be a 250 x
500 slate (500 series) or a 450 x 600 holed slate (600 series).
The 250 wide slate will require a clip modified to go around
the thickness of both the eaves and verge slates – this is
easily achieved with a pair of pliers. The 450 wide slate-anda-half has a hole for the clip in the row above. This must be
positioned correctly, and with the clip screwed through the
lower hole where possible.
If running out to a second verge, which does not fit to the
Solex Energy Ltd +44(0)1305 837223
www.solexenergy.co.uk
Solex Roofing Installation Manual
16
nearest ½ slate, polycarbonate slates will need to be cut to fit.
17. Abutments – these are slated in the same manner as verges,
but omitting the verge clips unless there is a gap for a lead
valley etc. Lead soakers are used in the usual manner.
18. Ridge – the battens should be gauged out so that a full
course is present at the ridge. The ridge slates are hung on
slate hooks which where possible are 15mm shorter than
standard. A screw and plastic retaining ring screwed between
the slates and into the top batten prevents sideways slippage,
and secures the slates until the ridge tiles are fitted.
A verge-to-ridge corner, depending on whether it is on an odd
or even course, may require a ½ verge-eaves/ridge slate (500
series, 250x285mm) or a 1½ verge-eaves/ridge slate (600
series, 450x335mm).
19. Hip – a range of cut corner slates are available to use at a hip.
They fit in many places, but not all, so some polycarbonate
slates will be required as well. Generally we recommend 70%
cut corner slates (mixed) and 40% polycarbonate slates (10%
leeway on quantity). A normal cemented or dry fix ridge can
be used over the glass solar slates.
20. Valley – polycarbonate slates are used up the edge of a
valley.
21. Polycarbonate slates – these are easily cut with a jigsaw or
handsaw over the edge of something solid – e.g. using the
gap between two scaffold boards. They may be fixed using
standard slate clips, and/or drilled and screwed. When drilling
take account of where the holes will fall in relation to the
weather lapping of other slates around it.
IF A WHOLE ROOF IS BEING INSTALLED SKIP 21 AND 22
22. Slating a patch – a patch of solar slates may be installed
surrounded by compatible natural or artificial slates. These
conventional slates must be 250 x 500 to match the 500
series solar slates, or 300 x 600 to match the 600 series.
Note, there will be one more course of glass slates than there
are courses of absorbers.
When using 500 series slates, the first row of glass 500 x 500
slates is laid over the first course of absorbers, using a glass
250 x 500 slate if necessary to get the correct width of cover.
The second row will then start and finish with a 375 x 500
glass slate, to maintain the correct bond. As long as there is
an even number of courses of absorbers there will no problem
at the top of the solar area reverting back to the conventional
slates – if there is an odd number of courses of absorbers the
slate bond will be disrupted.
Solex Energy Ltd +44(0)1305 837223
www.solexenergy.co.uk
Solex Roofing Installation Manual
17
When using 600 series slates, the glass slates are simply
substituted for the conventional slates over the absorber area.
23. Slating a strip – when installing the solar slates into a roof
covered with an incompatible material – e.g. clay tiles – the
easiest method is to install the solar slates as a strip. This
method is the most suitable for retrofit situations, as the
existing roof can be stripped off from the top down.
If the conventional tiles or slates are considerably thicker than
the solar slates, the solar area will need to be raised. As a
counterbatten is required anyway, this may go part of the way
to achieving this extra height. Any extra height may be
provided by thicker slating battens, or thicker counterbattens
with thicker insulation between them. The top of the insulation
should still be flush with the tops of the counterbattens.
At the bottom of the strip a row of glass eaves slates is used,
lapping over the other roofing material. Usually a strip of lead
flashing 150-200mm wide is required to obtain an adequate
overlap. This may be nailed to the first batten, which should
be +10mm (max+25mm) thicker to give a slight kick up.
At the top a row of glass ridge slates is used, again with lead
flashing, attached to the batten above, to make the transition
back to the incompatible material. Alternatively, if the solar
slates go right to the ridge, then finish with ridge tiles as
detailed in the whole roof section above.
At the sides, it is easiest if the strip runs out to hips, valleys
and/or verges, where it is finished as detailed above.
Alternatively, if the strip meets the incompatible material at
one or other side, a decision will need to be taken on-site as
to the best interface method, which will usually involve some
form of lead flashing.
When estimating materials using the website roof calculator,
treat this strip area as a whole roof.
Solex Energy Ltd +44(0)1305 837223
www.solexenergy.co.uk
Solex Roofing Installation Manual
18
Specifications
Slate system
Material
Standard slate size
Headlap
Laying gauge
Coverage
Loading
Minimum pitch
Maximum pitch
Battens
Fixings
ABSORBERS Material
Expected life
Width
Water channels
Channel diameter
Fluid volume
Max length one piece
Loading
Maximum fluid pressure
Average annual output
Type
INSULATION R value
Loading
SLATES
Solex Energy Ltd +44(0)1305 837223
500 series
600 series
4mm float glass, toughened to BS 6206
500mm x 500mm
300 x 600mm
75-100mm
75-100mm
200-212mm
250-262mm
9.76/m2
13.1/m2
25kg/m2 (34kg/m2 with absorbers & insul)
25° (30° sev.exp.)
23.5° (30° sev.exp.)
70°
70°
25 x 50mm +/-2mm, durable timber
Stainless steel slate hooks and screws
Silicone
25+ years
212mm
262mm
6
8
8mm id / 12mm od
300ml/m 1450ml/m2 400ml/m 1550ml/m2
25m (for 25-50m lengths contact Solex)
6kg/m2, with fluid
1 bar
410 kwh/m2
25mm mineral fibre batt, 105kg/m3
0.037 Km2/W
2.5kg/m2
www.solexenergy.co.uk
Solex Roofing Installation Manual
19
Roof Installation – Nu-lok Range Solar Slates
The roof takes up a thickness of approx 80mm from the membrane upwards. The roof
loading at 22kg/m2 is similar to that for natural or artificial slates.
The roof is built up as follows:
1. Rafters – for complete eaves to ridge installation of solar
slates the rafters should be of length (c x g)+50-f where c =
number of courses, g = batten gauge between centres, and f =
facia board thickness
2. Membrane – a breather membrane should be used, laid
across any of:
•
•
•
•
Rafters, or
Rafters with insulation between, or
Insulation sarking boards, or
Timber sarking boards.
The breather membrane MUST be laid correctly to form a
waterproof layer which will drain water to the eaves without
pooling. In the event of any damage occurring to the
absorber at any time, this breather membrane will ensure
that no water enters the building.
Solex Energy Ltd +44(0)1305 837223
www.solexenergy.co.uk
Solex Roofing Installation Manual
20
3. Facia and eaves – where the solar slates go right to the
eaves the arrangement shown in the diagram above may be
suitable, as long as care is taken over the fate of water
running behind the facia. Alternatively other methods may be
used, as long as the membrane is supported to prevent
pooling. Note that plastic eaves carriers will melt in the heat
created behind the glass slates.
4. Counterbattens – 25mm thick counterbattens must be used.
These must go on top of the membrane, and start from under
the second batten as shown.
5. Insulation – 25mm mineral fibre batts are cut to fit snugly
between the counterbattens, over the whole roof except the
far left and far right ‘channels’ between the counterbattens,
which are left open to allow space for the absorber loops,
manifolds and pipes.
The easiest way to cut the batts is to place one against a
counterbatten, and cut down with a knife using the opposite
counterbatten as a guide. Use a blunt tipped knife to avoid
damaging the membrane.
Wetting of the insulation should be avoided if possible,
although it will not be damaged by water. If exposed to the
weather most water will drain out down the membrane, and
the remainder will evaporate when the roof is watertight.
Note that the insulation supplied is the minimum
recommended for the system. Extra insulation, especially
in the form of foam insulation boards over the rafters, will
increase the efficiency of the system.
6. EPDM – the left and right channels are covered with an EPDM
membrane, which is stapled to the counterbattens and
dressed neatly into the channel. This has three purposes – it
protects the breather membrane from UV, it prevents the
colour of the membrane from showing through the slates, and
in the unlikely event of a leak from a manifold or pipe it offers
added protection to the building. The EPDM must therefore
be dressed over the eaves to allow run off.
The EPDM should also be used to cover any roof membrane,
insulation, battens etc. which will show through the glass tiles
if left uncovered.
7. Spacing battens – the metal Nu-lok battens used for this roof
must be spaced away from the counterbattens by 10-12mm.
This is achieved using thin laths nailed horizontally across the
counterbattens at the Nu-lok batten interval (308 +/-2mm).
These spacing battens must be positioned accurately, as the
galvanised battens are fitted over them at this fixed spacing
interval.
Solex Energy Ltd +44(0)1305 837223
www.solexenergy.co.uk
Solex Roofing Installation Manual
21
The spacing battens are stopped at the inside edge of the
EPDM covered channel, and continued on the far side either
horizontally or vertically (or thicker counterbattens used).
8. Absorber strips, supply – these are supplied on 25m rolls.
For longer lengths joiner kits are supplied, consisting of short
pipe segments and O clips.
To find the length of absorber strip required, the length of the
course where the absorber will lay is measured, and the loop
factor is added for every end of course The roof calculator
spreadsheet will output the length of absorber required.
Alternatively, it may be necessary to work it out manually – the
length of the course where the absorber will lay is measured,
and the loop factor is added for every end of course – Nu-lok
standard 310 gauge loop=200mm / Nu-lok narrow 210 gauge
loop=130mm. The usual measuring points are the outer
edges of the EPDM covered channels detailed above.
Where the roof is sufficiently large, it is necessary to divide it
into parallel absorber circuits, which should be as close to
equal lengths as possible. For example a roof of 15 courses
may be divided into three courses of 5, or a roof of 12 courses
may be divided into circuits of 6, 4, 3 or exceptionally 2
courses depending on the overall length of the roof and
therefore the length of absorber strip in each circuit.
The Roof Calculator will give some guidance, although
generally we recommend that each circuit does not exceed
40m in length, which equates to around 12.5m2 of Nu-lok
standard roofing or 8.5m2 of Nu-lok narrow gauge roofing.
There is no minimum length of circuits, although having many
smaller circuits will result in more manifolds and connections.
9. Absorber strips, installation – when installing the rubber
absorber, it is advisable to start at the top of the roof, so that
there is less foot traffic on the installed rubber.
Starting at the end where the top manifold is required, the
absorber is unrolled along the spacing batten with the flange
at the top. The flange is positioned over the bottom edge of
the batten, and staple gunned to it at 300mm intervals.
Standard staples may be used, as the absorber will be held in
place later by the galvanised batten. Care must be taken that
the staples do not damage the top tube.
At the end of the course, in the channel where the EPDM has
been positioned, the absorber is folded back on itself, still
keeping the flange at the top. The individual tubes are then
split away from each other so that each tube follows a natural
curve down to the second course.
Solex Energy Ltd +44(0)1305 837223
www.solexenergy.co.uk
Solex Roofing Installation Manual
22
When splitting the tubes apart, great care must be taken not to
damage the surface of any of the tubes. A pair of scissors
(not a stanley knife) should be used. The point of the scissors
is pushed through all the tear lines of the strip, and the tubes
pulled apart in both directions as far as necessary. This
should be done with care, as sometimes the split can start to
run off toward a tube wall. If this happens, use the scissors
again to re-start the tear.
The tubes should be arranged neatly so that there are no
kinks which could disrupt the flow of water. The redundant top
flange and centre strips may get in the way and can be
removed at this point if desired.
The absorber is then run out along the next course as before.
In situations where the roof has already been battened, a
problem occurs at the course ends where the absorber has to
loop under the galvanised batten. In these cases the choice is
to either thread the absorber under the batten, or to cut out a
section of batten and re-fix it. If it is chosen to thread the
absorber under the batten, then the section of split tubes must
be arranged very carefully to prevent any of them kinking or
squashing.
If it is necessary to join the strip, the ends are trimmed off
square using a pair of scissors, and the ‘wings’ on the tubes
cut back for about 50mm. A little silicone oil is sprayed on
both the copper joining tubes and the insides of the manifold
tubes. The joining tubes are inserted, and the O clips put on
and crimped using the pliers supplied.
10. Manifolds – copper manifolds are used to terminate the
absorber strips. The manifolds have 22mm open ends for the
connection of the flow and return pipes. The manifolds are
connected with silicone tubing, and O clips similar to those
used on the absorbers. The manifolds are short enough to
not be damaged by freezing water. Where any copper
components are used on the roof there must be at least 50mm
of supply pipe each side of them to allow for ice expansion.
The pipes and manifolds should lie in the EPDM covered
channel, under the battens. The top of the inlet manifold or
chain of manifolds is capped with a short length of silicone
tube and a plug, as is the bottom of the outlet manifold or
manifold chain.
Where the roof is sufficiently large to necessitate dividing it
into parallel absorber circuits, all the inlet manifolds are piped
in line up one side, and the outlets up the same or opposite
side (depending on an even or odd number of courses.
Sometimes it is necessary to return a pipe from an inlet or
outlet across the roof, for instance when dividing a roof of 7
Solex Energy Ltd +44(0)1305 837223
www.solexenergy.co.uk
Solex Roofing Installation Manual
23
courses into 3 and 4 course circuits. Half manifolds are
available for use in special circumstances.
The cold inlet pipe must flow in a generally upwards direction
from the pump to the bottom of the lowest inlet manifold. The
hot outlet pipe must connect to the top of the highest outlet
manifold even if the outlet pipe subsequently runs down the
roof. This must be done to ensure an even flow throughout
the circuits, and to ensure that air is purged from the top
circuits.
The inlet and outlet pipes should be taken into the loft or roof
space for connecting onto the normal plumbing pipe used
internally, ideally under a lap in the roofing membrane, which
may be aided by the use of copper U pieces and elbows
(supplied). Where it is not possible to pass the tubes under a
lap, any penetration through the membrane should be made
waterproof. Silicone rubber may be used and sticks well to
the silicone tube, although its adhesion to the particular
membrane being used should be checked.
The ends of the absorber strips are separated into individual
tubes, and the wings trimmed off by about 50mm with
scissors. Clips are put on the tubes and the tubes are
connected to the manifolds using a silicone lubricant and
crimp clips as detailed above.
11. Pressure testing – the system must be pressure tested with
air to 2.0 bar. At this pressure any incorrectly made joints
should leak or blow off. The system should be left under
pressure during the installation of the slates, so that any
absorber damage will immediately become evident. Note, air
will diffuse through the silicone absorber, so the pressure will
decrease over a period – e.g. overnight the pressure may
drop from 2.0 to 1.5 bar.
12. Sensor – a roof temperature sensor is used to measure the
temperature at the hottest point on the roof. It is fitted
beneath the absorber strip, generally at a position at least 1 m
from the top outlet manifold, near the centre of the absorber,
and not close to any area obscured by conventional slates.
It should be positioned so that it will lie between two of the
absorber tubes, and not next to any dead area of the strip.
The sensor is secured to a counterbatten with a small fencing
staple or similar, and covered with some silicone rubber. The
absorber strip is laid in position over it so a good thermal and
mechanical connection is formed.
The wire is passed through the roofing membrane, ideally at
an overlap. This high temperature wire with this sensor is
1.5m long and so will almost certainly need to be lengthened
using conventional 0.75mm2 two core lighting flex and a
Solex Energy Ltd +44(0)1305 837223
www.solexenergy.co.uk
Solex Roofing Installation Manual
24
connector block, which should both be located under the
rockwool insulation or away from the absorber area to prevent
heat damage. The sensor wires carry low voltage so an
electrician is not required.
13. Battens – these are special galvanised battens supplied
direct from Nu-lok. They are ideally fixed to the roof using a
Paslode first-fix nailgun or similar, with hardened 60mm
stainless steel nails, starting at the eaves. They are fixed in
place so that the base of the batten holds the absorber flange
against the spacing batten.
The batten spacing is fixed at 308 +/-2mm, and the battens
should be checked as they are installed to make sure that the
link channels fit properly.
14. Batten sealing strip – a silicone rubber seal strip is supplied
to fit over the Nu-lok battens to seal the gap between the
glass slates against air movement and windblown moisture.
This strip is fitted to the battens as glazing commences,
starting with the first batten.
15. Link channels – a first row of link channels is installed on the
first batten at the interval of the slate width. The link channels
must be fairly central under the gaps between the slates so as
to drain the water between the slates efficiently.
16. Glass slates – the glass solar slates are installed on these
link channels. When installing the slates great care must be
taken not to damage the absorbers.
The glass stales are toughened and so cannot be cut. The
roof calculator at www.solexenergy.co.uk can help with sizing
a roof to an exact number of slates. The range of sizes
supplied is:
Location
Standard
Standard, optional
Verge
Verge, optional
Hips, valleys & cuts
Horizontal coverage
Nu-lok standard
400 x 400
600 x 400
600 x 400
300 x 400
Polycarb 1200 x 400
402 / 602
Nu-lok narrow
300 x 600
300 x 300
Polycarb 600 x 300
602
The glass slates are simply inserted in the stainless hooks of
the link channels and laid down. About 1-2mm should be left
between them to allow for thermal expansion.
Solex Energy Ltd +44(0)1305 837223
www.solexenergy.co.uk
Solex Roofing Installation Manual
25
IF A PATCH OF ROOF IS BEING COVERED JUMP TO 21
17. Eaves – the eaves will overhang the first batten by 90mm
18. Verge – If the roof runs from one verge to another it is an
advantage to design the roof to fit an exact number of slates,
to the nearest half slate, using the slating interval given. The
slates should be finished with a dry fit verge system, as
recommended by Nu-lok. If running out to a second verge,
which does not fit to the nearest ½ slate, polycarbonate slates
will need to be cut to fit.
19. Ridge – the battens should be gauged out so that a full
course is present at the ridge. Finish with a dry fix ridge.
20. Hip – polycarbonate slates are cut to size for use at a hip.
Refer to the Nu-lok installation guide to see details of
installation at hips. It is not recommended that a mitred finish
is used with polycarbonate slates.
21. Valley – polycarbonate slates are used up the edge of a
valley. Again, refer to the Nu-lok guide for more valleys
details.
IF A WHOLE ROOF IS BEING COVERED SKIP 21 AND 22
22. Slating a patch – a patch of Nu-lok solar slates may be
installed surrounded by compatible Nu-lok natural (300 x 400)
or ceramic (400 x 400) slates. Due to the unique nature of the
Nu-lok system, it is possible to achieve a straight vertical join
between the different materials as the link channels make the
joins weatherproof.
Use verge slates (600x400mm) to obtain the straight line with
the glass slates, and cut the natural or ceramic slates to
match.
23. Slating a strip – when installing the solar slates into a roof
covered with an incompatible material – e.g. clay tiles – the
easiest method is to install the solar slates as a strip. This
method is the most suitable for retrofit situations, as the
existing roof can be stripped off from the top down.
If the conventional tiles or slates are considerably thicker than
the solar slates, the solar area will need to be raised. As a
counterbatten is required anyway, this may go part of the way
to achieving this extra height. Any extra height may be
provided by thicker spacing battens, or thicker counterbattens
with thicker insulation between them. The top of the insulation
should still be flush with the tops of the counterbattens.
At the bottom of the strip the glass slates will lap over the
existing material. Usually a strip of lead flashing 150-200mm
Solex Energy Ltd +44(0)1305 837223
www.solexenergy.co.uk
Solex Roofing Installation Manual
26
wide is required to obtain an adequate overlap, which is best
installed before the first batten is fixed.
At the top the other roofing material may be lapped over the
top edge of the glass slates, again with lead flashing attached
to the batten above, to make the transition back to the other
material. Alternatively, if the solar slates go right to the ridge,
then finish with ridge tiles as detailed above.
At the sides, it is easiest if the strip runs out to hips, valleys
and/or verges, where it is finished as detailed above.
Alternatively, if the strip meets the incompatible material at
one or other side, a decision will need to be taken on-site as
to the best interface method, which will usually involve some
form of lead flashing.
When estimating materials using the website roof calculator,
treat this strip area as a whole roof.
Specifications
Slate system
Material
Standard slate size
Headlap (fixed)
Laying gauge (fixed)
Coverage
Loading
Minimum pitch
Maximum pitch
Battens
Link channels
Guarantee on fixings
ABSORBERS Material
Expected life
Width
Water channels
Channel diameter
Fluid volume
Max length one piece
Loading
Maximum fluid pressure
Average annual output
Type
INSULATION R value
Loading
SLATES
Solex Energy Ltd +44(0)1305 837223
Nu-lok standard
Nu-lok narrow
4mm float glass, toughened to BS 6206
400mm x 400mm
600 x 300mm
90mm
90mm
308 +/-2mm
208 +/-2mm
2
8.09/m
8.00/m2
2
2
17kg/m (25kg/m with absorbers & insul)
22° (for 15°-22° contact Nu-lok)
90°
90°
Galvanised steel
Galvanised steel, stainless steel clips
50 years
Silicone
25+ years
212mm
262mm
10
6
8mm id / 12mm od
500ml/m 1600ml/m2 300ml/m 1450ml/m2
25m (for 25-50m lengths contact Solex)
5.5kg/m2, with fluid
1 bar
410 kwh/m2
25mm mineral fibre batt, 105kg/m3
0.037 Km2/W
2.5kg/m2
www.solexenergy.co.uk
Solex Roofing Installation Manual
27
Plumbing Installation – basic system
1. Expansion tank – this tank holds a reservoir of water for the system, and provides
space for the water in the solar roof which may drop back into the tank in the event of
an overheat situation when the roof exceeds about 90oC, or in the event of a leak
admitting air into the absorber, supply pipe or manifolds.
The expansion tank is sized to the capacity of the system - the Roof Calculator
spreadsheet may be used to calculate the tank size required exactly, however it is
usually approximately as follows:
Roof area
up to 8m2
up to 25m2
up to 40m2
up to 70m2
up to 85m2
up to 115m2
up to 200m2
L
350
600
1100
1100
920
1100
1250
W
270
300
290
290
420
320
360
H
370
450
460
620
630
825
1010
Kg
35
80
135
185
220
265
420
The tank operates at ambient pressure, and the lid of the tank is vented to the air. The
solar circuit flows through the tank, venting any air in the system as it passes.
Solex Energy Ltd +44(0)1305 837223
www.solexenergy.co.uk
Solex Roofing Installation Manual
28
The solar circuit connections are pre-installed into the tank on the short side. The float
valve supplied must be installed through a hole 200mm above the tank base. This float
valve is plumbed to mains water (via an isolating valve and double check valve, also
supplied) to keep the tank topped up and to replace any water lost by vapour diffusion
through the silicone absorber. An overflow is required (22mm tank fitting supplied)
which must be installed right at the top of the tank, using copper pipe.
The tank should be located so that the working level line of the tank is a minimum of
500mm below the bottom of the solar roof, so that the water in the roof may easily flow
back into the tank. (A label showing the working level is supplied with the tank.)
The tank should also be not more than 4m below the highest point of the solar roof
area. This is so that the pump is able to pump the water efficiently to the top of the roof
when priming the system. Systems where this measurement is exceeded will not
prime. It is acceptable to use two pumps in series to increase the head in systems
where this 4m is exceeded, or in systems where the pipe layout leads to airlocks. For
future reliability, systems must always be able to self-prime without intervention.
2. Pump – a bronze type pump is used to move the water in the solar circuit. Cheaper
standard central heating circulators may be used, but their life will be reduced by
corrosion due to air diffusing into the water through the silicone absorber.
The pump may be installed either in the flow or return pipework. It must be installed as
per the manufacturer’s instructions, which almost always means with the rotor axis
horizontal and the electrical connection box at the top. Munsen ring pipe clips are
supplied to aid mounting the pump if necessary. The pump electrical supply is taken
from the controller. The pump should generally be set to maximum speed.
One standard pump is sufficient to supply 30m2 of roof. Where the roof exceeds this,
two or more pumps operating in parallel may be used. This is more reliable and less
expensive than using a single larger pump. A flow rate of at least 0.5 LPM/m2 of solar
roof needs to be achieved.
Systems which will not prime due to the 4m height (above) being exceeded, or where
the layout of the pipes is not ideal and leads to airlocks, may be fitted if necessary with
two pumps in series (or 2x2 pumps for systems >30m2).
3. Plumbing pipe – the solar circuit may be plumbed in any normal pipe system,
including copper with soldered, compression or pushfit joints, or in flexible PEX pipe.
The reason that any pipe material can be used is that the system is unable to pump
water exceeding 100oC. The use of polybutylene pipe is not recommended as the
temperature rating for this type of pipe is usually lower than for PEX pipe. 22mm
plastic PEX pipe will supply up to around 40m2 of solar roof, depending on pipe runs.
Normal pipe lagging may be used outside the roof area, and must be used where the
pipes are subject to freezing. Within the hot zone, if lagging is used it must be the high
temperature solar rated type.
4. Roof inlet – the transition to the silicone tube for the roof inlet is made by crimping the
silicone tube onto either 22mm plastic pipe with a pipe insert, or onto metal pipe. If
connecting to plastic, there should be a minimum of 500mm of silicone tube outside of
the hot zone of the solar roof.
Solex Energy Ltd +44(0)1305 837223
www.solexenergy.co.uk
Solex Roofing Installation Manual
29
The silicone tube may be protected from vermin by sheathing it in an outer tube or
conduit, and it should run in a generally upwards direction to the bottom of the roof.
The silicone pipe should connect to the bottom of the inlet manifold, or the bottom of
the chain of inlet manifolds.
5. Roof outlet – this is connected to the top of the outlet manifold or manifold chain. As
long as it starts from the top of the manifold(s), it may run downwards either within the
solar roof, or within the roof space. Like the inlet pipe, it may be protected from vermin,
and there must be a minimum of 500mm outside the hot zone before connecting to
plastic pipe.
Note: manual and auto air vents do not function in this type of system and must not be
used
6. Cylinder – the hot flow from the solar roof should go via the expansion tank to the top
of the dedicated solar coil in the hot water cylinder or thermal store.
A sensor for the solar controller must be placed on or in the cylinder/store, at a height
level with the top of the solar coil. See more on cylinders and thermal stores below.
7. Check valve – this is used to prevent convective circulation at night. It must go
between the solar roof top outlet and the expansion tank. No other check valves
should be fitted in the solar circuit.
8. Pressure testing – it is assumed that the system has been pressure tested with air to
1.5 bar during installation. Note that it is not sufficient to assume that leaks will be
apparent when the system is filled with water, as leaks towards the top of the roof and
in the outlet tube will draw in air and so may go unrecognised while still affecting
system performance. Note, air will diffuse through the silicone absorber, so the
pressure will decrease over time – e.g. overnight the it may drop from 1.5 to 1.0 bar.
9. Filling and commissioning – the expansion tank water supply is switched on and the
float valve adjusted to fill the tank to the working level, which should be a depth of
150mm, and the label placed on the outside of the tank.
The pump is set to its maximum setting, and is switched on using the Manual Mode
setting on the controller (below), or by temporarily hard-wiring it if the controller isn’t
installed yet. Check that the pump valves are both on. Water should flow from the
expansion tank, down to the cylinder, up through the roof and back to the expansion
tank. Air will be expelled into the expansion tank.
In the event that the circulation fails and the system does not fill completely, switch the
pump off and on a couple of times to move trapped air. Some systems, especially with
longer cylinder pipe routes may develop an air lock. This may be rectified by bleeding
off near the cylinder, although it must be remembered that if the system will not selfprime, then there may be occasions in the future when the circulation airlocks.
The water level will rise slightly when the pump is switched off. Any significant and
sustained rise above the working level indicates a leak admitting air into the roof or roof
supply pipes, and should be investigated. Otherwise, the only time the water level
should rise significantly is in an overheat situation, when steam in the absorber will
Solex Energy Ltd +44(0)1305 837223
www.solexenergy.co.uk
Solex Roofing Installation Manual
30
replace the water, allowing the water to drop back into the tank.
10. Antifreeze – the roof absorber, manifolds and silicone supply pipes are resistant to
freeze damage, so generally just water is used in the system. However, if the solar
flow and return pipes are of a type that may be damaged by freezing (e.g. copper), and
they are used outside the thermal envelope of the building (e.g. in a cold loftspace),
then antifreeze should be used. In such cases we recommend the propylene glycol
type of antifreeze, which should be used at a concentration of around 30% glycol to
70% water (depending on local conditions).
Solex Energy Ltd +44(0)1305 837223
www.solexenergy.co.uk
Solex Roofing Installation Manual
31
Plumbing Installation – solar hot water systems
Hot water systems store solar heated water in a hot water cylinder. The cylinder itself may
be either the pressurised/unvented/mains pressure type, or it may be the less
expensive vented type fed from a cold water tank in the loft. This choice does not affect
the operation of the solar heating.
Whatever arrangement is used, provision must be made to kill off legionella bacteria
(which can grow in temperatures between 20oC and 45oC) for example by heating the
water up to 60oC at least once a week. One method to achieve this is by means of an
immersion heater with a suitable controller unit – e.g. a simple timer and cylinder stat.
Systems using a new solar cylinder:
System boiler – a new twin coil cylinder is fitted
to replace the existing single coil one, with the
solar collector heating the whole cylinder from
the bottom, and the boiler topping up the
temperature in the upper section when required.
1) Twin coil cylinder, 200 - 300 litres capacity
2) Solar pump circulates water from tank
3) Solar roof, heats water
4) Cylinder coil heats cylinder from bottom
5) Boiler coil tops up if necessary
6) Hot water out
Combination boiler – a single coil cylinder is
installed with the solar connected to its coil. If
the boiler is ‘solar compatible’ and thus accepts
pre-heated hot water, then the output from the
cylinder may be fed through the boiler to the
taps. A cylinder of 120 - 150 litres is usually
used for this purpose. [2x combi diagrams]
Where a combination boiler is not ‘solar
compatible’, then a three port valve is used to
select water from either the boiler or from the
cylinder. The three port valve is controlled by a
tank thermostat at the top of the cylinder, which
is set to the minimum acceptable temperature
for hot water use.
Solex Energy Ltd +44(0)1305 837223
www.solexenergy.co.uk
Solex Roofing Installation Manual
32
Systems retaining the existing cylinder
Retro-fit coil – a retro-fit heat exchange coil is
fitted into the existing hot water cylinder by
removing the immersion heater. No change to
existing plumbing is required. The existing
cylinder should be of adequate size, and in
good condition. See the retro-fit coil section
below.
Second cylinder – a new cylinder is installed,
with the solar roof indirectly heating the new
cylinder and another heat source indirectly
heating the existing cylinder. The cold feed is to
the solar preheat cylinder, and hot water is
taken from the second cylinder.
A three way valve is used to select water from
the solar cylinder or the existing cylinder,
controlled by a cylinder stat, set to the lowest
acceptable hot water temperature.
Second cylinder with pump mixing – as an
alternative to valve control, a pump may be
used to mix the cylinders, controlled by a
cylinder stat. This has the advantage that both
cylinders can be heated by the solar input.
Solex Energy Ltd +44(0)1305 837223
www.solexenergy.co.uk
Solex Roofing Installation Manual
33
Plumbing Installation – combined space and water heating
There are several methods of using
solar heat for both water and space
heating:
The simplest way of combining solar
water and space heating is to use a
thermal store as the central element of
the system. All heat inputs are put into
this, and all heat requirements,
including hot water, taken from it. See
the section on installing thermal stores
for more information.
An alternative to this is to use a flat
plate heat exchanger to put the solar
heat into a pumped radiator or
underfloor heating circuit. Underfloor
heating is the delivery method of
choice, as it can operate effectively in
some cases with supply temperatures
down to 25oC. With this method of
ustilising solar heating, it should be
noted that the only heat storage
available is where the underfloor
heating is installed in a concrete floor
slab or screed with a reasonable
thermal mass.
A hot water cylinder is also required,
installed as for the hot water systems
shown above. A three port valve on
the outlet of the solar roof selects the
hot water cylinder coil or the flat plate
heat exchanger as necessary, under
the control of the solar controller.
More on installing flat plate heat
exchangers may be found below.
A third method is to use a convector
radiator to distribute the solar heat.
This uses a three port valve to switch
the solar heat, as in the system above.
Solex Energy Ltd +44(0)1305 837223
www.solexenergy.co.uk
Solex Roofing Installation Manual
34
Plumbing Installation – pool heating systems
Where a solar roof heats a pool, spa or
hot tub, the heat usually is input via a
pool heat exchanger. This is fitted
after the pool pump and filter, and
before the boiler supplied heat
exchanger, if fitted.
Where hot water is also required from
the system, the solar flow may be
diverted with a three port valve as for
the space heating systems above.
The heat exchangers supplied by us
are cylindrical, with pool water
connections via 1½” female
connections on the ends. One end has
a pocket for a thermosensor, and this
should go at the pool inlet end – the
cold end. Connections for the solar
flow are via ¾” female connections on
the top. Note that the heat exchangers
are resistant to chlorine in the water, as
long as water chemistry (pH) is correct.
Incorrect chemistry will cause corrosion
of the exchanger.
If the system will be dedicated to pool heating, with no hot water or other heating
requirement, then it is possible to pass pool water directly through the roof, subject to
using a suitable pump, and stainless steel absorber manifolds.
Plumbing Installation – thermal stores
Solar stores do the same job as a hot water cylinder, but they are generally larger, ranging
upwards of 300 litres. The major difference is that the body of water in the store is heating
system water. This has several benefits:
• Many inputs and outputs can be connected without having to
use separate coils for each.
• There is little risk of legionella in the hot water circuit, as only the contents of the coil
is heated at any one time.
Location – these stores are usually located on the ground floor, as they are heavy when
full. They stand about 150mm off the floor on 3 metal feet. Typically they are located in a
garage or plant room, although for best efficiency the store should be located within the
thermally insulated envelope of the building so that any inevitable heat losses from the
store and pipework are not lost.
Thermal stores are large so provision must be made for physically getting them to the
intended location. They are optionally available with detachable insulation reducing the
Solex Energy Ltd +44(0)1305 837223
www.solexenergy.co.uk
Solex Roofing Installation Manual
35
diameter by 200mm. To remove the insulation, loosen the small bolts holding the external
metal covering and remove it. The insulation can then be easily removed.
System design – the pressure rating of these stores is 1.5 bar (optionally 3.0 bar), and
they are generally installed with a feed and expansion tank. Where a boiler, heat pump or
other plant feed directly into the store, then the minimum pressure rating of all the
components must be looked at.
When used with a solar input, care must be taken that the thermal stratification, of cold at
the bottom and hot at the top, is not disrupted. This enables the solar system to input heat
to the coolest part of the store, and thus extract the maximum potential from the solar roof.
Heat exchange coils – there are two
finned copper heat exchange coils rated
at 10 bar. The connections are ¾ male
for the standard sized exchangers.
Generally these are arranged:
•
Upper coil – this is used to heat hot
water as required. It is
recommended that a suitably sized
mixing valve is used on the hot water
output. The mixing valve increases
the system efficiency, as it means a)
the store can hold more heat without
the risk of scalding, and b) water can
be distributed at a lower temperature
so reducing heat losses.
•
Lower coil – this is generally used
for the solar input.
The heat exchangers are bolted into the
stores with 20x M10 bolts. When installing a coil into a store the weight of the coil
hanging on the flange makes this a difficult operation. It is facilitated by the use of a
couple of lengths of M10 studding as guide rods.
If necessary, the bottom solar coil may be bent down so that it heats right to the bottom of
the store, increasing the system efficiency. This is also necessary on some stores where
the ¾“ port for the sensor is located below the level of the solar coil hatch.
Store connections – all the ports feed directly into the body of water in the store. These
ports are all female threads, and are:
•
Central top 1” – this is usually used for the pipe to the F&E tank.
•
Central bottom 1” – this is used as a drain point.
•
Top left & right 1¼”, bottom left & right 1¼” – these are usually used for the main
boiler, radiator and underfloor heating connections. They have guide pipes to the
extreme top and extreme bottom of the store, respectively.
Solex Energy Ltd +44(0)1305 837223
www.solexenergy.co.uk
Solex Roofing Installation Manual
36
•
2” ports – these are designed for the installation of (European size) immersion
heaters, although they may be bushed down to accept other connections. A note on
immersions heaters: the units which we supply have 3x elements and so may be wired
for single or three phase. The thermostat will control single of three phase, and is a
dual unit having an overheat cutout. This is reset using the small black button, which
must be pressed hard to reset.
•
¾” ports (4) – these may be used for thermosensor pockets, or for any miscellaneous
inlets or outlets.
Unused ports are blanked with iron plugs.
Solar heating connections – when used for combined solar water and space heating
systems, the connections should be as follows:
•
Boiler flow to top 1¼” port, boiler return to mid point up the store. The boiler circuit
needs a pump, with both the pump and boiler being switched on by a stat on the
thermal store, ideally linked to a time switch which restricts boiler input during the peak
solar heating hours of 10am to 3 pm.
•
Radiator supply from top 1¼” port, radiator return to bottom 1¼” port. The radiator
circuit needs its own pump, switched by a room stat and timeswitch.
•
Underfloor heating, Option 1 – dedicated supply from thermal store, supply from mid
point on store, return to lower 1¼” port. This is the most efficient option, especially
when using solar heat. Option 2 – connect the UFH manifold(s) across the radiator
supply circuit. With this method the solar cannot input so much heat to the UFH.
•
Hot water from upper heat exchanger
•
Solar heat into lower heat exchanger
•
Wood burning stove, if present, into top 1¼” port, return from bottom 1¼” port. The
system may use gravity feed as long as the pipe runs, height difference etc is suitable
for this. Where a pumped system is used, a mixing manifold is available which
includes a pump for the stove circuit. This manifold only inputs water above 80oC into
the store, which ensures that the stratification of the store is maintained – cold at the
bottom and hot at the top.
Biomass connections – when used with a biomass boiler, without solar, the connections
should be as follows:
•
Boiler flow to top 1¼” port, boiler return to bottom 1¼” port. The boiler circuit will
usually require a pump.
•
Heating supply (radiators and underfloor heating) from top 1¼” port, return to bottom
1¼” port. The heating circuit needs its own pump, switched by a room stat and
timeswitch.
•
Hot water from upper heat exchanger
•
The lower heat exchange coil is not required.
Solex Energy Ltd +44(0)1305 837223
www.solexenergy.co.uk
Solex Roofing Installation Manual
37
Specifications
•
•
•
•
2050
2050
2050
2100
2150
2200
2250
2300
2350
2500
Weight empty,
1.5 bar, kg
130
155
200
230
280
330
360
400
480
600
Weight full,
1.5 bar, kg
430
655
950
1230
1780
2330
2860
3400
4480
5600
1550
2050
130
160
630
860
1660
1840
2160
420
500
560
1820
2500
2960
Litres
Diameter
Height
ROUND
300
500
750
1000
1500
2000
2500
3000
4000
5000
710
800
950
1050
1250
1400
1500
1600
1800
2000
RETROFIT
500
700
OVAL
1400
2000
2400
810
810
Depth/Width
810/1630
810/2060
810/2060
Option – any of the round stores can be supplied with removable insulation. This
reduces their diameter by 200mm.
Option – all standard stores can be supplied with 2, 1 or no heat exchange coils.
Option – all stores can be supplied with 3 bar rating.
Option – more than two heat exchange coils to order
Plumbing Installation – retrofit
cylinder coils
The kit contains a screw in header, and 4m or 6m
of DN12 flexible stainless steel pipe with fittings.
Installation
When fitting, the pipe is first formed into a coil of
the required size and shape to fit the cylinder. This
coil must be small enough in diameter to clear any
existing coil if present. Note the narrow bottom
loop to enable insertion through the 2¼“ immersion
port. When the coil is being used for a solar input,
it should be made to fit as low down in the cylinder
as possible.
After forming the basic shape, the ends of the tube
are if necessary cut to the same length with a
normal pipe cutter.
Next fit the backnuts to the tube, and fit the split
circlip washers to the first corrugations. Then
screw the backnuts onto the header unit, without
the washers, and tighten them up to flatten the end of the tube. Remove the backnuts, fit
the ½” fibre washers to the backnuts, the 2¼ “ washer to the header, and refit the stainless
coil to the header, tightening up the nuts fairly firmly.
Solex Energy Ltd +44(0)1305 837223
www.solexenergy.co.uk
Solex Roofing Installation Manual
38
The completed retro-fit coil can now be screwed into the cylinder through the immersion
port. A standard UK 8 sided immersion spanner will fit the header.
The inlet and outlet pipes are then fitted
to the header with standard 22mm
solder or compression fittings, or 22mm
push fit subject to the maximum
temperature of the circuit.
Header material
Pipe material
Header fitting
Inlet/outlet
Pipe length
Surface area
Brass
Stainless steel, DN12
2¼ “ male thread
22mm
4m
6m
0.31m2
0.47m2
Plumbing Installation – multiple solar roofs
Same orientation – where two or more solar roofs are installed with the same orientation,
they may be fed from the same solar pump, subject to sizing the pump to the total roof
area. It may be necessary to install isolating valves to each roof to enable priming and air
flushing of the system. It may also be necessary to use valves to balance the flow through
the roofs.
Where the roofs are substantially different in size and/or height, then it may be advisable to
install a pump for each roof. Both or all the pumps can be controlled together.
Different orientations – where two or more differently orientated roofs are installed, then
each must have its own pump, individually controlled by an upgraded controller. Each roof
must also have a check valve located between the hot roof outlet and the cylinder/heat
exchanger.
Electrical Installation
See the system diagram on page 25 for the basic electrical layout.
Solar Controllers
•
Deltasol A and AX – controls 1 roof and 1 store (no display). One relay output.
•
Deltasol BS3 – controls 1 roof and 1 store. Has thermostat function for backup
heating. 2 relay outputs.
•
Deltasol BS4 – controls 1 roof and 1 store, with variable pump speed. Has
thermostat function. 2 relay outputs.
•
Deltasol BS Plus – controls 1 roof and 2 stores, or 2 roofs and 1 store, or 1 roof 1
store and thermostat function. Variable pump speed. 2 relay outputs.
•
Deltasol ES – controls up to 2 roofs and 2 stores with backup heating and other
functions. 5 relay outputs and one floating relay. See the manual for more details.
•
Deltasol E – more advanced than the ES. See the manual for more details.
•
Deltasol M – more advanced than the E. See the manual for more details.
All controller manuals are available at www.solexenergy.co.uk
Solex Energy Ltd +44(0)1305 837223
www.solexenergy.co.uk
Solex Roofing Installation Manual
39
Solar controller wiring, 230vac – the solar controller should be fitted somewhere where it
can be seen and operated by the building occupiers. An airing cupboard is often suitable.
It must have a 230vac supply via a fused spur (3A), or it can be fitted with a 13A plug. The
incoming mains is wired as shown behind the controller front panel.
Solar pump, 230vac – the controller is connected to the pump with 3 core cable or flex.
Where the wiring is fixed adjacent to the solar plumbing, then it should be high
temperature rated.
The pump is connected to relay R1. On BS4 and more advanced controllers this is a solid
state relay, which can control the pump speed.
Where several pumps are fitted for roofs orientated in the same direction, then they may all
be connected together to R1.
Where two pumps are fitted for differently orientated roofs, then the pump for Roof1 is
controlled by R1, and the pump for Roof2 is controlled by R2.
Solar controller & pump, 12v – a 12v controller is available. This may be supplied using
a solar PV panel with a wattage in the range 30-50w. A 12v pump designed for use with
PV panels is available, which may be supplied either directly from the panel without using
a controller, or using a controller and with a small lead acid battery and charge controller to
stabilise the supply. The advantage of using the controller is more accurate control of the
pump, and therefore higher system efficiency.
3 port valve – this controls the solar flow on systems with more than one store or heat
exchanger, and directs it to the required location. It is wired to relay R2 on BS Plus
controllers and R4 on higher spec controllers. Note any heat input device, e.g. cylinder
coil, pool heat exchanger, flat plate heat exchanger etc is termed a store in relation to
controller wiring and system layouts. See the controller manuals for specific system
layouts and connections.
On standard mid position valves with five wires, the controller relay output is connected to
the White and Grey wires together. The other connections are Blue to neutral and Green
to earth – Orange is not used. The valve therefore switches from one position to the other,
as there is no facility on the controllers to use it in the mid position state. These valves
typically only come with 1m of flex, so a junction box will usually be required.
Sensors – the roof sensor has a black silicone sheathed lead and is mounted on the roof
as detailed in the roof section above. If there is any likelihood of lightening induced
surges, then a protection device is available.
The cylinder sensor has a light grey sheathed lead, 2.5m long. It should be located in a
sensor pocket, or touching the cylinder wall, at a height level with the top of the solar coil.
Where this is not possible it is acceptable to position it anywhere down to the height of the
centre of the coil. If it is placed too low, the system could overheat the cylinder. If it is
placed too high the system will function with reduced efficiency.
A sensor for a flat plate heat exchanger should be mounted with a good thermal
connection to the cold inlet pipe on the non-solar side of the exchanger. It may be
mounted with a jubilee clip or similar, and it is recommended that it is lagged so as to get
an accurate reading. A standard cylinder sensor may be used, or special pipe sensors are
available with a flange and clip for fitting.
Solex Energy Ltd +44(0)1305 837223
www.solexenergy.co.uk
Solex Roofing Installation Manual
40
The sensor for a pool heat exchanger should be located in the exchanger sensor pocket,
which should be on the cold pool water inlet side of the exchanger. If no pocket is
available, it may be mounted on the pipe as above.
The sensor wires only carry low voltage, and may be extended if necessary using
conventional 0.75mm2 two core lighting flex and connector blocks.
Sensor faults – sensor line break or short is indicated on the controller (see below). The
correct sensor values are: 1000ohms@0oC / 1078@20oC / 1155@40oC / 1232@60oC
Systems inputting heat into a pumped circuit
Where the solar roof is required to input heat into a pumped circuit, for example a heat
exchanger in a pumped pool water circuit, or a flat plate exchanger in a heating circuit,
then generally a mains 2 way relay (SPDT) will need to be used to force on the pumped
circuit circulation pump. This must be wired so as to switch the pool or heating circulation
pump from external (e.g. boiler) control, to ON (live, from the same circuit), when the solar
roof is inputting heat.
Where the there is only one store, e.g. dedicated pool systems, then the relay should
switch on with the solar pump. To do this the relay coil should be connected to the solar
pump relay R1 on the controller. In addition where the controller varies the pump speed
(BS4 and above) then the minimum pump speed on the controller must be set at 100%.
Failure to set the minimum pump speed may result in a buzzing and malfunctioning relay.
Where there are two roof pumps controlled separately, then two relays must be used with
the contacts in series, so that either R1 or R2 can switch the pumped circuit pump on
independently, without reverse feeding the external control.
Where there are two stores, and the pumped circuit is the one switched in by a motorised
valve, then the relay can be operated by the power to the valve.
Where there are two stores, and the pumped circuit is the default store with the
motorised valve at rest, then two relays will need to be used as above, with one operated
by the solar pump R1, and one operated by power to the valve, but so when the valve is
powered it puts the pumped circuit pump back under external control.
Where there are two pumped circuits, then the circulation pump of each must be
individually forced on when the solar pump is running, AND that circuit is switched in.
Controller programming
These controllers have three buttons, LEFT and RIGHT to scroll through functions, and a
middle SET button to change a function. To set a parameter, scroll through LEFT or
RIGHT to find the correct place, press SET, use LEFT and RIGHT to adjust the value, and
then press SET.
Solex Energy Ltd +44(0)1305 837223
www.solexenergy.co.uk
Solex Roofing Installation Manual
41
Controller display
Faults
Readings
Controller LED
Indicated by flashing symbols on the display
888.8 = sensor line break -88.8 = sensor line short
Red=standby / Green=pump operating / Flashing=malfunction
First parameters:
COL, COL1, COL2
TST, TST1, TST2
n%, n1%, n2%
hP
Faults
Collector temperature(s)
Store temperature(s)
Pump speed
System operating hours
Indicated by flashing symbols on the display
To move beyond these keep RIGHT pressed for 2 seconds. Factory default settings should be
used, except for the following:
Parameter
Arr
DT O
DT F
S MX
PRIO
nMN
HND1, HND2
Meaning
Program for different system layouts
Switch on temperature difference
Switch off temperature difference
Maximum store temperature (Hot water should be 55-65oC)
Store priority. Set to hot water store on 2 store systems
Minimum pump speed. Default setting 30%
Manual mode R1,R2. Use to test system, then set to auto
Set to
As required
4.5oC
2.5oC
As required
1,2 etc
As required
Auto
For other parameters refer to the instruction book supplied or at www.solexenergy.co.uk,
or www.resol.de.
Maintenance
Generally, very little maintenance is required.
Roof maintenance
•
•
•
•
Cleaning – these roofs do not need routine cleaning. There has been no history of
moss or lichen build up on these roofs, due to the natural weathering, and the
temperatures the glazing reaches in the sun.
Breakages – glass roof slates are very robust, being stronger than natural slates.
They are edge sensitive however, and a lucky strike by a large stone or similar hard
object could break one. When broken they disintegrate into small fragments like
automobile glass
Removal & replacement, Solar Slates – if broken, clean out the remaining fragments,
and bend the slate clip down. If intact, bend the clip down and ease the slate out
downwards. Push in a new slate, watching that it does not catch on the adjacent
screws. Silicone oil lubricant may be used to ease installation. Bend the clip back with
care to hold it in place.
Removal & replacement, Nu-lok Slates – if broken, clean out the remaining
fragments. If intact, push the slate up by about 5mm, push the wire clips to the sides
and drop the slate out. To replace, move the stainless wire clips to the sides and push
up a new slate. Silicone oil lubricant may be used to ease installation.
Solex Energy Ltd +44(0)1305 837223
www.solexenergy.co.uk
Solex Roofing Installation Manual
42
System maintenance – annual
•
Water level – check that this is at the working level, and adjust the float valve if
necessary. In normal operation the level should only be higher than the working level if
all the stores are up to their maximum temperatures, and the roof temperature exceeds
95oC. If it rises under other conditions suspect a leak.
•
System function – check that the system is functioning and circulating. This is best
done by feeling the pipe temperatures, taking account of the prevailing conditions. If
necessary use the manual mode of the controller to force on pumps/valves etc and feel
the pipe temperatures to check circulation.
•
Pump – if the pump is hot, but the pipes some distance from it are not, then either the
pump may have failed, or there may be a system airlock. First, remove the screw from
the end of the pump and check/restart rotation. If this is operating, the fault is probably
an airlock.
•
Motorised valves – check these operate by using the controller manual mode to force
them on/off.
•
Integrity of roof – any problem with a leak in the roof or supply/return pipes is usually
evidenced by frequent air in the system exiting into the expansion tank. To check, turn
the pump off and observe the tank level. Any sustained rise indicates a leak. The tank
level should not rise, even after 12 hours or more (with the exception of overheat
conditions when the roof temperature exceeds about 90oC.)
•
Controller and sensors – any fault state is shown by a flashing LED, and a spanner
symbol on the display. See the controller section for more details.
Solex Energy Ltd +44(0)1305 837223
www.solexenergy.co.uk