1
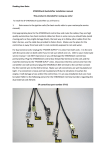
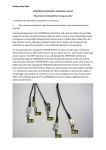
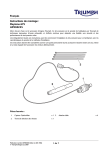
Reading time 8min. SYNCROtech Quickshifter installation manual This product is intended for racing use only! To install the SP SYNCROtech Quickshifter you will have to: 1. Gain access to the ignition coils-(for best results refer to your motorcycle service manual). For stick type (integrated) coils: Unplug the OEM connectors from the ignition coils. Plug in the SYNCROtech control box female connectors to the ignition coils and the male connectors to the bike's harness. You can connect the SYNCROtech control box wiring starting left to right cylinder or right to left makes no difference as long as each male and female pair connectors are connected to the same corresponding cylinder! IMPORTANT NOTE: Make sure when plugging the connectors that you press them well enough to lock, as this will provide sealed and reliable electrical connection, vital for the function of the SYNCROtech Quickshifter. Find appropriate place for the SYNCROtech control box and route the cables, they are high quality automotive class heat resistant cables but there is some care you should take-(avoid moving parts as they might damage them), the best way is to follow other cables from the bike's harnes, use the cable ties provided to fasten them. Make sure the place for the control box is away from heat and it is not constantly exposed to rain and water. For dual external (nonintegrated) coils: Unplug the "POWER SUPPLY" (+) wires on both coilsit is the wire with the same color on both coils! If you’re not sure which one is it, refer to your motorcycle service manual – (do NOT improvise or you will damage the SYNCROtech control box permanently). Plug the SYNCROtech control box female №2 terminal to the coils and the male №1 terminal to the “POWER SUPLY” wires. Disconnect the ECU control wire on the coil (either one will work) and plug the SYNCROtech №3 terminal to the coil then connect the ECU control wire to the №3 terminal. Make sure all connections are well insulated and tight - if a connection is loose and not insulated and if due to vibrations it touches the engine, it will damage a fuse and/or the control box. It is an easy installation but care must be taken! Refer to the following picture for the SYNCROtech terminal numbers regarding the dual external cols fitment: 2 The SYNCROtech control box requires negative (ground) connection to power up, connect the single black wire to the battery NEGATIVE (-) lead! 3 Remove your original shift rod and install the shift sensor with the fitting rod(s) provided to its place. Route the wire to the SYNCROtech control box and plug it in. When installing the sensor, make sure all counter nuts are locked and the sensor wire is not under tension when pressing the gear lever all the way up and down. The rod and sensor provided are made with DUAL THREADS so fitting is universal. NOTE: Never use the plastic hub on the shift sensor to hold the sensor body! Use the notches in the steel top side and a (10mm) open end wrench - spanner to hold the sensor when tightening counter locking nuts! NOTE: The gearbox pivot arm must extend to 90 degrees with the shift rod in order to receive an equal force in both directions, if not set corectly, the gearbox may not react accordingly and miss gears when using the quickshifter! After this is done, turn the ignition key ON, make sure the engine kill switch is in “RUN” position and the gearbox is in neutral, at this time the red “POWER” light on the SYNCROtech control box must be ON, (if not recheck connections and particularly the single black wire for the ground connection). After the “POWER” light is ON, press the gear lever in the direction of UP-shifting, observe the blue “SHIFT” light must turn on for a short period every time you press it. IMPORTANT NOTE: Do NOT check “SHIFT” light when the engine is running! By pressing the gear lever UP, you will engage the bike on gear and it is possible to injure yourself or someone else! The SYNCROtech quickshifter will work to the make and model of motorcycle it is intended, do not install it on another make and model of motorcycles before checking for compatibility as you might damage the ECU or the control box permanently! If you want to fine tune it to suit your specific riding stile and/or modified bike, use the following: ST(Shift Time) adjusts the engine interrupt time for which the gearbox must engage the next gear after you apply enough pressure to the gear lever: Turn it clockwise for more time or anticlockwise for less time. The adjuster starts from 50ms(milliseconds ), each setting is recognized by a light code on the blue “SHIFT” light. Light codes are implemented to ensure exact settings are selected. The following table shows the time settings with the corresponding light codes: 50ms-one short blink "-" 55ms-two long blinks "_ _" 60ms-three long blinks "_ _ _ " 62,5ms-one long blink "___" 65ms-two long blinks "___ ___" 67,5ms-three long blinks "___ ___ ___" 70ms-one continuous blink "_________" 75ms-one short and one continuous blinks "__ ________" 80ms-one continuous and one short blinks "________ __" Tips on adjusting your Quickshifter! The SYNCROtech quickshifter comes with best overall setting for your motorcycle make and model but because each motorcycle sprocket ratio, chain free-play, suspension settings and riding style are different, fine tuning is often necessary for best results and seamless upshifts. Use the following as a general guide when adjusting your Quickshifter: If when using the Quickshifter the gearbox seems to push back the shift lever, the shift feels rough and you have experienced missed gears-this means that the gearbox needs more time to react-turn the adjuster clockwise. If when using the Quickshfiter the motorcycle front dives for too long and the shift seems slow-this means that you have to lower the shift time-turn the adjuster anticlockwise. Best results for most motorcycles are achieved with the following time settings(60ms/62,5ms/65ms/67,5ms/70ms). NOTE: : Before changing the factory setting make sure to remember the length of the shift time “ST”, so that you will be able to set it back and have a good starting point. Do not attempt to insert a larger screwdriver and never force the adjuster beyond MIN and MAX levels, the turning cycle is 270 degrees. If you want to switch it OFF for some reason, unplug the shift sensor from the control box. The SYNCROtech Quickshifter has threshold RPM, which means that the engine speed must exceed the minimum threshold in order to activate the Quickshifter function. The factory setting is over 3000RPM-(Revolutions Per Minute) and this can be adjusted through the following programming procedure. Threshold programming procedure: 1. Turn the ignition key on and make sure the engine kill switch is in RUN position. The engine must NOT be running! 2. Press and hold continuously the shift lever in the direction of UP-shifting for 10 seconds, after the 10th second the blue “SHIFT” light will flash 20 times to indicate that you have entered the programming mode. 3. Release the shift lever and observe the blue “SHIFT” light, it will flash through the current settings: 1-blink -minimum engine speed 3000/RPM -this is the factory setting 2-blinks-minimum engine speed 6000/RPM 3-blinks-minimum engine speed 8000/RPM 4-blinks-minimum engine speed 10000/RPM Now press the shift lever once to select the next range, programming mode will cycle through the settings with each press. Once you have selected the desired range and the control box is showing the corresponding flash pattern the settings are memorized and you can exit the programming mode by starting the engine or turning the ignition key off. NOTE: The SYNCROtech control box will flash continuously the blue “SHIFT” light every time the engine speed exceeds the minimum threshold selected so you can check the Quickshifter active range by revving the engine and observing the “SHIFT” light! NOTE: It is important that your motorcycle spark plugs are within the manufacturer service limit and specifications, otherwise the operation of the SYNCROtech Quickshifter system will be compromised! If for some reason you're experiencing difficulties with adjusting your Shift Power product, you think it is not functioning as expected or you would like to share your opinion, please contact your dealer - he will support you with a professional help or contact us online. Web: www.ShiftPower.co.uk Email: [email protected] This product is covered by one year warranty against malfunctions from the original date of purchase under the following conditions: 1. If any of the components are physically damaged by an external force and/or improper installation, the warranty will be voided, so please make sure it is installed by a professional as most, if not all malfunctions will result from an improper installation. 2. If any malfunction occurs, the faulty component will be exchanged with a new one if repair Is not possible: the buyer must send it back to the dealer and he/she is responsible for covering all shipping costs. 3. Warranty will be given to the buyer himself/herself and it begins from the original date of the purchase. Terms of use: The specifications of this product and the contents of this manual can be subject to modification without notice. The manufacturer and its suppliers do not assume any responsibility towards the purchaser or towards anyone else in relation to any damages, expenses, loss of profits or any other loss resulting from the use of this product. Thank you for using the SP-SYNCROtech Quickshifter!