1
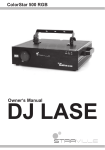
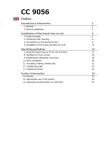
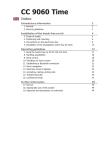
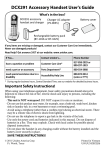
BURY ChargingCradle
Universal
Installation manual
BURY ChargingCradle Universal
Index
Introductory information
1. General
2. Security guidelines
Installation of the system
3. Scope of supply
4. Installation of the system
5. Installing the BURY ChargingCradle Universal in the vehicle
6. Inserting and removing the mobile phone 7. Rotating the cradle
8. Charging the phone in the cradle
9. Initialising the BURY ChargingCradle Universal
Further information
10. Service
11. Appropriate use of this system
12. Approvals and declaration of conformity
2
2
2
4
4
6
9
12
14
15
15
16
16
17
17
Introductory information
2
1. General
Dear customer,
Congratulations on purchasing a BURY telephone holder for cellular phones. You have chosen a high
quality product that is extremely easy to use. Please read the installation manual carefully so that you
can fully enjoy your BURY product.
If you have any further questions concerning installation or operation of this device, please contact your
dealer. He will be happy to give you reliable advice. You can also contact our hotline. Our phone and fax
numbers are listed in the chapter Service.
Have a good trip!
2. Security guidelines
Power supply
The power usage of the cradle has been designed for the use in vehicles
with an on-board supply system of 12 volts (passenger car). If you intend
to install the device in a vehicle with an on-board supply system
of 24 volts (lorry), please use a voltage converter. If you have queries
regarding this subject, please contact our hotline.
Position
Install the cradle in the vehicle so that your field of vision is not impaired
and the components are not mounted in the impact zone of the passenger compartment or in the airbag inflation zones. Very important: please
observe the car manufacturer’s information (operating manual) as regards “accessories”. If in doubt, please contact a specialist workshop to
get information on the correct position for installation in the vehicle.
Intended use
We shall not be liable for damages or malfunctions due to improper use
of the hands-free system. Therefore, do not expose the device to moisture, extreme temperatures or shocks and follow the procedure described in the installation manual carefully.
3
Use while driving
Operate the smartphone in the holder only when the situation allows it and when you do not endanger,
harm, constrain, or annoy other road users. The volume of the smartphone has to be set in a way that
exterior noise is still audible.
Important:
XXThe driver is ultimately responsible for the safe operation and control of their vehicle
at all times.
XXResearch indicates that there is a risk to safety when the driver of a motor vehicle is
distracted and using a mobile phone while driving can be a distraction.
XXThe manufacturer strongly recommends that you use a hands-free solution for a phone
call when driving.
Faults
Do not use the telephone holder if you detect or assume a defect. In this case, contact a BURY specialised dealer or our hotline. Improper repairs can be dangerous for you. Therefore, only skilled personnel
may perform inspections.
Installation of the system
4
3. Scope of supply
8
9
10
5
The BURY ChargingCradle Universal is supplied with different combinations of components, depending
on the sales regions (countries). The operating manual refers to all versions.
Description of the components:
1) Cradle
2) Set of tips for specific mobile phone models
3) Dash Mount Adapter for installation on the dashboard or console
4) Little Flat antenna with fakra-connection
5) Charging cable (Micro USB)
6) Charging cable (Mini-USB) for electronic box or charger
7) Installation manual
Accessories - available separately / including, if applicable:
8) Five (different) charging cables (Micro-USB, Mini-USB, Nokia Pin 2mm, iPhone, Sony Ericsson)
9) Window Mount
10) Power supply - via electronic box or charger
Note:
XXIf certain components are added or omitted you will receive the corresponding
information on a separate enclosure.
Connection options:
Power supply
1. Connection of the mobile phone‘s charging cable (also possible in connection 2).
2. Connection of the charger‘s charging cable.
The conduction of the power supply occurs via the electronic box or the charger.
1
2
6
Installation of the system
4. Installation of the system
Important:
XXWhen positioning the cradle please take care that the device does not impair the view
onto the road, that it will not be installed in the impact zone of the passenger compartment (amongst others in the airbag inflation zones) and that the cable may be laid without
any problems.
XXPlease avoid direct sunlight on the device or high internal temperatures, which can be
rapidly reached in parked vehicles. In such cases, remove the cradle and put it in the car
glove pocket or glove box for instance.
Step 1:
Adjusting corner fasteners to wide ranging models of mobile phone.
To be able to select the suitable type of corner fastener for a certain
model of mobile phone / smartphone, please familiarize yourself with
the corresponding compatibility list. This list is available on our internet
site in the download area for the product at www.bury.com.
Important:
XXEvery corner fastener set is equipped with a letter notation which is positioned on the interior side of the corner
fastener.
2
1
1. Turn the corner fastener with the rotary knob (1) in a clockwise
direction.
2. Detach the corner fastener in the direction of the arrow (2).
3. Fit the correct ending for the corner fastener and tighten it by
turning it anticlockwise.
4. Repeat the above steps with the remaining three corner fasteners.
7
Step 2:
Adapting the BURY ChargingCradle Universal to the size of the mobile phone.
Important:
XXBefore you begin to adjust the cradle to fit your particular mobile phone, it is important
that you set the cradle to the closed position. This can be done by pushing the top of
the cradle down until the locking button on the right side of the cradle, pops out with an
audible “click”.
To be able to adapt the cradle to the size of the mobile phone lift all of the adjustment locks by pressing the release buttons 1, 2, 3.
Option
Nokia Pin 2mm
Micro USB
8
Installation of the system
Insert the mobile phone into the cradle.
Firstly, adjust the lower width of the cradle to the width of the mobile phone and press button 1 in
order to block the set position. Next adjust the height and the upper width of the cradle to the height
and width of the phone and press in keys 2 and 3 in order to block the set positions.
Please note:
XXIt is possible to set all positons of the cradle at the same time by lightly pressing button 1, 2 or 3.
9
Step 3:
Adjusting the corner fastener.
4
3
1
2
Adjust the corner fastener to the thickness of the phone – increase the depth by turning it in a clockwise direction, tighten it by turning it anticlockwise.
5. Installing the BURY ChargingCradle Universal in the vehicle
First of all, please choose the most convenient position for the BURY ChargingCradle Universal by
checking different positions in the vehicle. The mounting of the Dash Mount Adapter may be different,
depending on the vehicle. In this context, it may be necessary to purchase additional tools such as
a console or a mounting bracket separately through your specialist retailer.
After having found a suitable position for the BURY ChargingCradle Universal in the vehicle you can
now mount the device.
Important:
XXWhen positioning the BURY ChargingCradle Universal please take care that the device
does not impair the view onto the road, that it will not be installed in the impact zone of
the passenger compartment (amongst others in the airbag inflation zones) and that the
cable may be laid without any problems.
XXPlease avoid direct sunlight on the device or high internal temperatures, which can be
rapidly reached in parked vehicles. In such cases, remove the BURY ChargingCradle Universal and put it in the car glove pocket or glove box for instance.
10
Installation of the system
Step 1:
Attaching the Dash Mount Adapter.
Variant A:
Variant B:
For the fixing of the Dash Mount Adapter, depending on the type and brand of your car, specific attachment systems (consoles or other assembly aids) can be purchased from local retailers.
11
Step 2:
Connecting the BURY ChargingCradle Universal with the Dash
Mount Adapter.
Push the BURY ChargingCradle Universal in the Dash Mount Adapter
until you can feel it click into place.
Note:
XXYou will find the same snap-in mechanism on the Window
Mount as you do on the Dash Mount Adapter.
Step 3:
The preferred position for on-glass antenna is either on the upper right
side or upper left side of the windshield, opposite from the driver´s
seat.
Important:
XXEnsure the antenna is located at least 20 cm away from
driver and passengers.
XXTo avoid audio interference, do not thread the antenna
cable close to the microphone cable.
12
Installation of the system
6. Inserting and removing the mobile phone
Insert the smartphone in the BURY ChargingCradle Universal.
Before you insert the smartphone in the cradle, release the holding mechanism by pressing the locking
button in. The locking button is situated on the right hand side of the cradle.
If necessary, remove the protective cover from your smartphone. Place the smartphone in the cradle from
above.
Press the top part of the cradle downwards and you will hear the smartphone click into the cradle.
The correct positioning of the smartphone in the cradle is signalled by a perceptible ‘clicking’ sound.
13
Removing the smartphone from the BURY ChargingCradle Universal.
To release the locking mechanism press the button on the right hand side of the cradle.
Now remove the smartphone by lifting it out of the cradle.
14
Installation of the system
7. Rotating the cradle
You can turn the smartphone by 180 degrees (90 degrees to the left or right accordingly) together with
the cradle. Rotate your device to best suite the application you are using. Used in the landscape
(horizontal) format, most smartphones will adjust the text size and websites images automatically
making them easier to read. Using the cradle to the landscape format also gives more space for the
onscreen keyboard making it easier to enter text data.
Important Safety Notice:
XXEntering text or viewing websites on your smartphone whilst driving is extremely dangerous and illegal in most countries. Always ensure your vehicle is stationary and safely
parked before using your smartphone for these activities. Setting your cradle or phone
screen format should be done before commencing your journey.
Navigation applications especially benefit from the landscape format view because all the operational
elements of the software are positioned clearly. Due to the reduced horizon in the landscape format,
the 3D map presentation will probably contain significantly more detailed information.
15
8. Charging the phone in the cradle
If a corresponding cable is connected to the telephone, the smartphone that is positioned in the BURY
ChargingCradle Universal cradle will be supplied with electrical power (please refer to the picture). The
conduction of the electricity supply occurs from the electronic box or the charger.
9. Initialising the BURY ChargingCradle Universal
After the power supply of the electronic box or the charger is successfully connected, the BURY ChargingCradle Universal is activated when you have started the vehicle.
The BURY ChargingCradle Universal has an inductive antenna coupling. This means that the functioning of the integrated antenna in the corresponding smartphone is transferred to an external antenna.
This also means that a GSM antenna must be connected to the BURY ChargingCradle Universal which
is being used, otherwise the send-receive performance will be restricted.
16
Further information
10. Service
In case of general or technical queries, suggestions and comments, please do not hesitate to contact
our team at any time. Suggestions and feedback are always welcomed:
Administration:
BURY GmbH & Co. KG
Robert-Koch-Straße 1-7
D-32584 Löhne
Germany
Producer:
BURY Spółka z o.o.
ul. Wojska Polskiego 4
39-300 Mielec
Poland
Hotline: +49(0)180 5 - 842 468*
Faxline: +49(0)180 5 - 842 329*
* 0.14 €/min. Deutsche Telekom AG landline,
the costs of international telephone calls which are made from abroad can vary.
E-Mail: [email protected]
Warranty / Service desk:
The duration of the warranty for the components of this product totals two years subsequent to the
date of sale to the end customer. Any warranty claims you may have as an end customer are to be
asserted towards your contractual partner. If the corresponding contractual partner is not able to
rectify a corresponding fault, please exercise your rights of purchase. If subsequent to agreement with
your contractual partner the product is to be sent directly to the manufacturer, then please send it,
along with a detailed description of the fault in the German or English language and a copy of the proof
of purchase, directly to our service team:
BURY GmbH & Co. KG
Im Hause DPD Depot 103
Robinienweg
D-03222 Lübbenau
Germany
Specific explanations regarding the assertion of claims based on defects of the product (warranty /
guarantee / service) for certain countries can be found at the end of these instructions.
Information on the disposal of electrical goods in the EU
The crossed out wheelie bin symbol means that electrical and electronic products, batteries and accumulators must be disposed of separately in the European Union. Please do not dispose of any such
products in your normal household waste. As the owner of a product of this sort you are legally obliged
to dispose of it at your local dumping site or recycling centre, where you are able to leave your waste
electrical goods free of charge.
17
11. Appropriate use of this system
The BURY ChargingCradle Universal is only intended for use in motor vehicles. When using this system,
please comply with the regulations and laws specific to the country in which you are driving and the
instructions provided in the guidebook for the mobile telephone that you are using.
12. Approvals and declaration of conformity
Purchase and production as well as service and sales at BURY are subject to tough quality and environmental management conditions according to ISO 9001 and ISO 14001. The device has
the CE approval pursuant to the R&TTE 1999/5/EC regulation
You can request a conformity declaration from the manufacturer of this product by post under the
manufacturer‘s address which is stated above, or by writing to the following email address:
[email protected]
Please provide your email request in either English or German.
Version: 05/2012
25.1472.0-01-240512
Errors and omissions excepted.
© 2012 by BURY. All rights reserved.
18
EXPRESS WARRANTY AGAINST DEFECTS – AUSTRALIA
EFFECTIVE 1 st JANUARY, 2012
This product if imported by Point to Point Technology Pty Ltd is warranted in Australia to be free from
any defect in material and workmanship, subject to the following terms and conditions.
Who provides this warranty:
POINT TO POINT TECHNOLOGY PTY LTD
2/2 KEYSBOROUGH CLOSE, KEYSBOROUGH VIC 3173
TOLL FREE: 1300 550 720
EMAIL: [email protected]
Geographical Region:
PRODUCTS PURCHASED IN AUSTRALIA imported by
Point to Point Technology Pty Ltd
Warranty Period:
2 YEARS FROM DATE OF PURCHASE (please retain your receipt as your proof of purchase will be required to valid warranty claim)
WARRANTY CLAIM PROCESS
In the unfortunate event of a failure of your product, please contact Point to Point Technology Pty Ltd
(PTP) on our Toll Free number: 1300 550 720.
PTP will ask you to provide evidence of your purchase receipt to establish the warranty claim is within
the 2 year warranty period. Failure to provide your purchase receipt will result in PTP rejecting your
warranty claim.
PTP offers an advance replacement of your faulty product. Please note our advance replacement units
are a like-for-like product and may be refurbished units that are of the exact same model and version.
Goods presented for repair may be replaced by refurbished goods of the same type rather than being
repaired. Refurbished parts may be used to repair the goods.
Upon validation of your warranty claim, PTP will send your replacement unit freight-paid and include
a pre-paid return bag for the return of the faulty product. If you choose do not wish to proceed with the
warranty claim, you must return the replacement unit to us using the pre-paid return bag. Failure by the
customer to return either unit within 14 days may incur a charge for the cost of the replacement unit.
Warranty Exclusions
Failure to provide a proof of purchase will result in your warranty claim being rejected.
Product failure due to customer misuse, abuse or abnormal use.
Failure by the customer to take reasonable care.
Failure due to not using the product in accordance with instructions stated in the manufactures user
guide.
Product failure due to recommended installation procedures not being followed as stated in the
manufacturer’s user guide.
YOUR RIGHTS UNDER THE AUSTRALIAN CONSUMER LAW
Our goods come with guarantees that cannot be excluded under the Australian Consumer Law.
You are entitled to a replacement or refund for a major failure and for compensation for any other
reasonably foreseeable loss or damage. You are entitled to have goods repaired or replaced if the goods
fail to be of acceptable quality and the failure does not amount to a major failure.