1
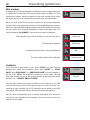
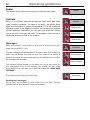
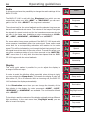
BURY CP 1100
Index
Introductory information
1. General
2. Security guidelines
Installation of the system
3.
4.
5.
6.
Scope of supply
Positioning and mounting
Plug the cable for the BURY CP 1100 into the electronic box
Connections on the electronics box
Operating guidelines
7. Using the BURY CP 1100 for the first time
8. Handling possibilities
9. Voice control
10. Operating the menu using the keypad
11. Menu navigation
12. Accepting, making, ending calls
Further Information
13. Service
14. Approvals and declaration of conformity
2
2
2
6
6
8
11
12
15
15
17
17
18
19
29
30
30
31
Introductory information
2
1. General
Dear customer,
Congratulations on purchasing the BURY CP 1100. You have chosen a high quality product that is extremely easy to use.
Please read the operating manual carefully so that you can fully enjoy your BURY CP 1100. If you have
any further questions concerning installation or operation of your car telephone, please contact your
dealer. He will be happy to give you reliable advice.
You can also contact our hotline. Our phone and fax numbers are listed in the chapter Service at the
end of the operating instructions.
Have a good trip!
2. Security guidelines
XXRead the Safety Information on this guide on page 2-5
XXSmall parts may cause a choking hazard
XXThis device may produce a loud sound
XXSwitch off in explosive environments
XXIn locations with potentially explosive atmospheres, obey
all posted signs to turn off devices such as your phone or
other radio equipment
XXDo not dispose of in a fire
XXDo not expose your phone or its accessories to open
flames or lit tobacco products
3
XXAvoid contact with magnetic media
XXTo avoid the risk of demagnetisation, do not allow electronic devices or magnetic media close to your phone for
a long time
XXAvoid Extreme Temperatures
XXDo not expose your phone or its accessories to extreme
temperatures, minimum – 10 and maximum + 55 degrees
Celsius
XXAvoid contact with liquid, keep dry
XXDo not expose your phone or its accessories to liquid,
moisture or high humidity
XXDo not use harsh chemicals, cleaning solvents, or aerosols
to clean the device or its accessories
XXDo not try and dissamble
XXOnly qualified personnel must service or repair the phone
or its accessory.
XXDo not rely
communications
on
this
device
for
XXOnly use approved accessories
XXDo not connect with incompatible
accessories.
emergency
products
or
4
Introductory information
RF Exposure
Your phone contains a transmitter and a receiver. When it is ON, it receives and transmits RF energy. When you communicate with your
phone, the system handling your call controls the power level at which
your phone transmits. To ensure compliance with RF exposure guidelines the phone must be used with a minimum of 30 cm separation from
the body.
Specific Absorption Rate (SAR)
Your device is a radio transmitter and receiver. It is designed not to
exceed the limits for exposure to radio waves recommended by international guidelines. These guidelines were developed by the independent scientific organisation ICNIRP and include safety margins designed
to assure the protection of all persons, regardless of age and health.
The guidelines use a unit of measurement known as the Specific Absorption Rate, or SAR. The SAR limit for car phones is 2 W/kg. The
highest SAR value for this device when tested complied with this limit.
Installation - who should do it
The installation of this system can be carried out by yourself but please
observe the installation requirements of the automotive manufacturer.
During the installation, park the car at a place where the road traffic is
not impaired. We recommend to let a specialised workshop perform the
installation.
Power supply
The system is designed for use in both passenger vehicles and heavy
goods vehicles (HGVs). The operating voltage spans the 12 to 24 volts
range. If you have queries regarding this subject, please contact our
hotline.
Position, volume
Install the components of the device in the vehicle so that your field of
vision is not impaired and the components are not mounted in the impact zone of the passenger compartment or in the airbag inflation
zones. The removal of coverings (with and without airbags) or components of the dashboard requires – in some cases – special tools and
special knowledge.
5
Intended use
We shall not be liable for damages or malfunctions due to improper use
of the BURY CP 1100. Therefore, do not expose the device to moisture,
extreme temperatures or shocks and carefully follow the procedure
described in the installation and operating guidelines.
Use while driving
Operate the system only when the situation allows it and when you do
not endanger, harm, constrain, or annoy other road users. The volume
of the device has to be set in a way that exterior noise is still audible.
Faults
Do not commission the device if you detect or assume a defect. In this
case, contact a BURY specialised dealer or our hotline. Improper repair
efforts can be dangerous for you. Therefore, only skilled personnel may
perform inspections.
Product handling
You alone are responsible for how to use your phone and any consequences of ist use.
Important:
XXThe manufacturer strongly recommends that you use
the handsfree functionality of the BURY CP 1100 at all
times.
XXThe driver is ultimately responsible for the safe operation
and control of their vehicle at all times. You should never
use a hand held phone, including sending or reading text or
picture messages, while driving.
XXResearch indicates that there is a risk to safety when the
driver of a motor vehicle is distracted and using a mobile
phone while driving can be a distraction.
XXFull attention must be given to driving at all times in order
to reduce the risk of an accident.
XXAlways treat your phone and its accessories with care and
keep it in a clean and dust-free place.
XXPlease comply with the country-specific laws concerning
in-car telephone calls.
Avoid exposure to long periods of direct sunlight when
vehicle is parked as this can
cause, among others, damage to the readability of the
display. The sound functioning of the display is guaranteed up to a maximum temperature of 55° C.
6
Installation of the system
3. Scope of supply
8
7
The BURY CP 1100 is supplied with different combinations of components, depending on the sales
regions (countries). The operating manual refers to all versions.
Description of the components:
1) BURY CP 1100 with Vehicle Mount
2) Electronic box
3) Microphone
4) External loudspeaker
5) Antenna adapter
6) Power supply cable with fuses
7) Mounting accessories
8) Printed installation and operating manual, Quick user guide
Note:
XXIf certain components are added or omitted you will receive the corresponding information on a separate enclosure.
Optional accessories:
Loudspeaker switch box AC 5120
8
Installation of the system
4. Positioning and mounting
Step 1:
First of all, please choose the most convenient position for the
BURY CP 1100 in your vehicle by checking different positions in the vehicle.
When installing the BURY CP 1100 avoid positioning the system where
it may disrupt the proper operation of the vehicle and its components,
such as car stereo, air bags, cubbyhole, glove compartment, ashtray,
lighter, gear stick or hand brake.
If you would like to use the device during your journey, positioning it in
the front area on the driver’s side is advisable. Sit in the vehicle and
check whether you can reach the device without difficulty.
After having found a suitable position for the BURY CP 1100 in the vehicle you can now mount the BURY CP 1100 with the Vehicle Mount.
The end of the cable with the small Molex connector is ideally suited for
placing through small openings in the dashboard area. This facilitates a
practically invisible installation of the cable. Take the length of the cable
into account and make sure that it is of sufficient length to reach the
intended location of the electronics box.
Important:
XXWhen positioning the BURY CP 1100 please take care that
the BURY CP 1100 does not impair the view onto the road,
that it will not be installed in the impact zone of the passenger compartment (amongst others in the airbag inflation
zones) and that the cable may be laid without any problems.
XXPlease avoid direct sunlight on the BURY CP 1100 or high
internal temperatures, which can be rapidly reached in
parked vehicles.
9
Example of installation in the car:
Overview of all components:
You will receive a separate manual when you purchase the handset shown.
10
Installation of the system
Step 2:
Depending on the vehicle type and its equipment (e.g. airbags), it is
reasonable to install the microphone either at the A-pillar, at the sun
shield or at the roof interior. For details about the equipment features
please refer to the vehicle documents.
Step 3:
Remove or loosen up cladding and covers to be able to install all of the
cables in the vehicle as comfortably as possible. Please lay the cables
in a way that they do not lie/hang unsecured in the vehicle and that
they may not influence the conducting of the vehicle. When laying
a cable, please take care that it is not under traction stress but that it
has some tolerance. Avoid crushing the cable as damages of the insulation can be caused by friction/rubbing.
Step 4:
Install the electronics box at a convenient place in the vehicle. This can
e.g. be behind the radio, in the glove box, or in the centre console.
Please mind that you can access the connections of the box without
difficulty. It is possible that you will have to connect the components
before attaching the electronics box, if it isn’t possible to do this afterwards due to a lack of space. A description of the connections is provided in the next section.
Step 5:
The preferred position for on-glass antenna is either on the upper right
side or upper left side of the windshield, opposite from the driver´s
seat.
Important:
XXEnsure the antenna is located at least 20 cm away from
driver and passengers.
XXTo avoid audio interference, do not thread the antenna
cable close to the microphone cable.
Before connecting the components to the electronics box you should
branch off the battery for safety reasons. In doing so, take into account
that there might be a radio coding (confer radio manual).
Important:
XXPlease install the electronics box behind a cover or somewhere you can only reach by opening or unfastening a protective cover / a cover. The elctronics box must not hang
loosely in the vehicle.
11
5. Plug the cable for the BURY CP 1100 into the electronic box
Step 1:
Open the top
electronic box
cover
of
the
Step 3:
Check that all components have
snapped firmly into place and gently
push down ensuring they are below
the level of the top cover position
Step 2:
Plug both jacks into the circuit board
XXNote the coding on the jack
XXEnsure the jacks snap firmly
into place
Step 4:
Carefully close the top cover of the
electronic box, ensuring no wires
get trapped in the process
Installation of the system
12
6. Connections on the electronics box
The additional components of the BURY CP 1100 are connected to the electronics box.
The following connections are provided:
Connection options:
1 Power supply
2 External loudspeaker
3 Microphone
4 BURY CP 1100
4
1
2
1 - Power supply
The power supply of the BURY CP 1100 is established via a 4-core cable. Connect the black (clamp 31 – minus), the red (clamp 30 – steady
plus) and the blue cable (clamp 15 – ignition plus) to the power supply
of your radio (where required via the cigarette lighter or the fuse box).
After connection to the counterpart, the yellow cable provides for radio
muting during a phone conversation. Please connect the white Molex
connector with connection 1.
Note:
XXDo not connect your device to the power supply or switch
it on until instructed to do so in the installation instructions.
Attention:
XXIf you also connect the blue cable to clamp 30 (steady
positive), the BURY CP 1100 will be permanently supplied
with power. If the vehicle is not running for a longer period,
this could lead to a discharge of the car battery.
XXIf you deviate from the specified connection descriptions it may be the case that certain functions on the BURY
CP 1100 (e.g. the on-call duty) will not function correctly.
3
13
Installation instructions for the fuses
Please cut through the red, the black and the blue cable by means of a wire cutter. Now insert the two
endings of the red cable resulting from the cut into one of the binders, then close it.
If you hear two clicking noises, the clamp snapped in properly. Now insert one of the fuses and then
repeat the procedure with the other cables.
2 - External loudspeaker
Connect the external loudspeaker here if you do not want to or are not
able to make use of the vehicle’s own sound system. When installing
the loudspeaker, make sure it is positioned the correct distance from
the microphone.
3 - Microphone input
This is where you plug in the microphone jack.
14
Installation of the system
4 - BURY CP 1100
This is where you connect the BURY CP 1100.
SIM card protection
The plastic cap that is used to protect your SIM card can be used once
only.
Note:
XXThe device may be damaged if you try to remove the plastic cap.
Optionally, you can also protect your SIM card with a removable rubber cap.
Operating guidelines
15
7. Using the BURY CP 1100 for the first time
The BURY CP 1100 offers you an extremely convenient in-car telephone solution. A well as a 2.8 inch
display and a well-spaced keypad, the clear and easy-to-read car phone also has SIM card slot which
allows it to function as a fully stand-alone communication system.
Description of the main system:
Mini USB
Display 2,8“
SOS Button
Volume control
Left Menu Button
Right Menu Button
End Button
4 Way Navigation Key Scroll
through menus and lists
Start Call / Redial Button
SIM Card slot
Keypad – Large illuminated, well-spaced,
tactile buttons ensure accuracy and speed
Voice control activation button
Activating your SIM card
Insert the SIM card into the SIM card slot while the BURY CP 1100 is
switched off.
XXAvoid touching the SIM card’s metal surface
Switching the BURY CP 1100 on and off
After the power supply of the BURY CP 1100 is successfully connected,
the system is activated when you have started the vehicle. The car phone
can be switched on and off manually by pressing the End button.
16
Operating guidelines
Adjusting the volume
Use the volume control to adjust the ring volume when no calls are active. Use the volume control to adjust the call volume during a call.
Entering your PIN
Now enter your PIN. Your PIN (Personal Identification Number) protects you against unauthorised use of your telephone card by third
parties.
Note:
XXIf you enter the wrong PIN three times you will need your
PUK number to unlock your card.
Afterwards you will reach the head menu. Different symbols will appear
in the top row. These symbols have following meaning:
•
•
•
Missed calls / New messages
Signal strength of the telephone network
Activation of voice control
The symbols on the display have the following meanings:
• Day/Night mode
• Call lists
• Contacts
• Messages
• Settings
• Date/Time
• Memo
Choose language
After this, you have to select the menu language if several are available
for you to select. Regional differences may occur in this context. If the
system is only equipped with one language then this should load automatically. You can change the menu language again by selecting Settings in the Head menu, and then changing the Language in the
Phone menu item.
17
8. Handling possibilities
The system can be operated in two ways:
1. Operation using voice control
The „VOICE COMMANDS“ are highlighted
in the further explanatory notes.
2. Operating the menu using the keypad
9. Voice control
The menu items of the system can be selected using voice commands
once this function has been activated. There are exceptions, however,
when you still have to use navigation key scroll. During an active telephone call, for instance, you can’t use voice commands. You have to
select any additional functions using the keypad.
To start the voice control feature, press this button. If the Magic Word
function is activated, you can also start the voice control by stating the
„ACTIVATE VOICE DIAL“ command. In certain situations, however,
with an incoming call and activated voice recognition for instance, the
BURY CP 1100 will start the voice control system automatically. The
system signals that it is ready to receive a command by emitting an
acoustic signal.
If you aren’t sure of the right command to use, then simply state „HELP
/ WHAT CAN I SAY“. The BURY CP 1100 will then read out the commands available for the particular menu in which you currently find
yourself. If the BURY CP 1100 fails to understand one of your commands, or the particular option isn’t available, the help function will
start automatically and list the possible commands. When entering
voice commands, please ensure you speak naturally, clearly and at
a regular speed.
Note:
XXWith the use of the voice control it is recommended to
turn down the volume of components which are independent of the audio system (e.g. a navigation system) or to
switch off the broadcast of traffic jam warnings in order to
avoid unintended voice entries.
Voice control
Operating guidelines
18
In addition to these commands, the BURY CP 1100 recognises the numbers from zero to nine. Numbers which are larger than nine must be spoken individually (e.g. 10 = one, zero). To search in the
contacts, the BURY CP 1100 recognises the letters „A“ to „Z“ as well as the NATO alphabet. For the
entry of telephone numbers abroad, the command „PLUS“ is also available.
When using voice control, in all menus these four commands are always available:
Cancel
Head menu
breaks off the current action
back to head menu
Back
one step back
Help
names all commands which are available
10. Operating the menu using the keypad
You can also operate the BURY CP 1100 using the illuminated and wellspaced keypad. The keypad offers the following options:
Use the End button to end a call or leave the selected menu page.
Use the Start call button to accept a call or to redial.
Use the menu buttons on the left and right hand sides to open the corresponding menu displayed.
Use the navigation button in like a joystick to navigate through the
menu system and to change settings.
Use the SOS button to make an emergency call. You can pre-set the
number to call in an emergency in the menu settings.
19
11. Menu navigation
Here you will find all menus which are necessary for the operation and
configuration of the system. These can be selected through the keyboard or using voice control.
You are also able to select additional frequently used commands via
voice control which otherwise first appear later in the menu tree. These
are as follows:
„DIAL JOE BLOGGS“,
„READ NEW TEXT MESSAGE“.
If the voice control function is active then the corresponding menu appears in the display, or the details of the particular function that has
been activated. In the following the individual menu points will be explained.
Dial Joe Bloggs
With this voice command (is not shown on the display) you can immediately call a contact from your telephone book with active voice control.
Note:
XXWhen doing so, it is important that the stated name exactly corresponds with the entry stored in the phonebook.
Please note that telephone book entries, which are only
shown in capital letters must be spelt out. Example: ADAC.
If the names have been reversed then the command changes to:
„DIAL BLOGGS JOE“.
Dial Joe Bloggs
Operating guidelines
20
Dial number
It makes sense to divide telephone numbers in short number blocks of
3-4 digits and to say them this way. At each break, the BURY CP 1100
repeats the number block and waits for the next number block. After
the signal tone you can respectively continue your announcement.
Dial number
Enter the area code. Enter the first numbers of the actual telephone
number. Enter the remaining numbers of the actual telephone number.
When you have entered the last number block of the telephone number,
you can check the complete telephone number once again with the
voice command „PLAYBACK“. Here are some more commands:
The complete entry will be deleted, or the previous entry.
Delete all
The last digit is deleted.
Delete last
A telephone connection is being established.
The last number block will be deleted.
Dial
Delete group
Contacts
The entire list is read aloud to you. With „STOP“ you can stop the
process and select the respective entry. With „NEXT“ or „NEXT
PAGE“ and „PREVIOUS“ or „PREVIOUS PAGE“ you can navigate in
the list. With „DIAL“ the telephone connection will be made. You can
also jump directly to one of the entries shown by activating the entry
number. E.g.: „SELECT ENTRY THREE“.
You can save names and phone numbers to the memory of the SIM
card (SIM directory) and to the internal memory of the car phone. Depending on your provider, up to 250 contacts can be stored to the SIM
card, while 1500 contacts can be stored to the internal memory.
You can also subsequently save a number that called your phone or
from which you received a text message. You do not have to enter the
number all over again.
Contacts
Play list
21
<Joe Bloggs> is a placeholder for an entry from your contacts.
If you select a name, you go directly to the respective entry.
Here you can search for entries through a letter field. Read out the first
letters of the first name and surname (depending on the sort sequence)
which you want to find. The corresponding letter appears in the top line
and will also be read out to you again.
If several names are available in your contacts with the letter you entered, then you can limit your search further and enter up to three additional characters for the quick search. Via the display, you get the
information highlighting which additional letters the BURY CP 1100
finds in your contacts. The rest is correspondingly greyed out.
Via the „SELECT“ command you can confirm your input. The display
then shows you the contact with the entry which best matches your
input. With the commands „DELETE LAST“ or „DELETE ALL“ either
the last letter or all of the letters you entered are deleted.
Via the „GET DETAILS“ command, you will find all of the telephone
numbers that are listed under this contact.
In addition you can allocate a contact with an own voice command
(voice tag). This is recommended for names which are difficult to pronounce. In these instances, the use of nicknames or abbreviations is
recommended.
Clearly speak the command into the microphone, the BURY CP 1100 repeats this and you can then make a call to the desired discussion partner
from the head menu with e.g. „CALL CUSTOMER ONE“.
In all the BURY CP 1100 can store 150 voice commands. This voice
command (voice tag) is valid for all numbers which are allocated to this
contact name. A corresponding inquiry follows about which of these
numbers you want to call.
Note:
XXIn order to make voice recognition easier for the BURY
CP 1100, please do not use voice commands for your voice
commands (voice tags) which are also used by the system.
Dial Joe Bloggs
Fast search
Select
Delete last
Delete all
Get details
Voicetag
Store
Delete
22
Operating guidelines
Redial
The number which was last selected can be selected once again.
Call lists
Here in a chronologic sequence all calls are listed which have been
made, missed or accepted. The name of the caller / the person being
called and the telephone number are displayed. If it is not possible to
allocate a contact to the telephone number, the number alone appears
without additional information. You can have the telephone number
read to you and if you want call back. The navigation within the lists is
carried out analogue to that of the contacts.
Redial
Call lists
Dialled calls
Received calls
Missed calls
Messages
Using this function, you are able to show and to read out text messages via the BURY CP 1100.
The text messages will be displayed in the overview in the format with
which you are familiar from the call lists. The name of the sender is
shown in the upper line and underneath this, the date and time of when
the message was received.
Messages
All messages
New messages
The envelope symbol appears in the status bar of the main menu for
your information when a new message has arrived. You can select
these straight from the main menu with the commands „READ NEW
MESSAGE“.
If you want you can call the sender back.
Sending text messages
You can also use the BURY CP 1100 to send your own SMS. The text
message can be entered easily using the keyboard.
Dial sender
23
Settings
In this menu point, you can configure the BURY CP 1100 through four
further submenus. These are Voice dial, Audio, Display and
Phone.
Voice dial
In this submenu you can carry out the following settings:
Activation or deactivation of the magic word:
If you activate this function you can start the voice controlled operation
of the BURY CP 1100 straight from the main menu with the preset voice
command „ACTIVATE VOICE DIAL“. With this function, you are able
to leave both your hands on the wheel. To indicate that you are able to
activate the BURY CP 1100 using the magic word, the voice control
symbol appears in the display.
Settings
Voice dial
Activate voice dial
Note:
XXIf you state this command during a conversation with
a passenger or this passage should be read out over the radio for instance, it is possible that the voice control function
will be unintentionally activated.
Activating or deactivating the Advanced Help feature:
If you activate the advanced help, then in certain menus you receive
additional assistance during voice control operation about the commands which you are able to use. With other commands, the system
will ask you if you really want to complete them.
Activating or deactivating the Audio feedback:
If you activate the audio feedback, during the keypad operation you
receive voice support (e.g. the contacts entries and all of the message
windows are read aloud to you). Your selection is shown through an
information field.
The BURY CP 1100 works in general independent from the speaker,
that means it can immediately be operated without a ‚voice training‘.
Then user training is only needed if you speak a strong dialect. The
system reads twenty terms aloud to you which you have to repeat so
that the system can ‚get used to‘ your voice.
Here you will receive short instructions about the essential functions of
the BURY CP 1100.
Advanced help on
Audio Feedback on
Speaker
adaptation
Decription
24
Operating guidelines
Audio
In this area you have the possibility to change the audio settings of the
BURY CP 1100.
The BURY CP 1100 is sold with four Ringtones from which you can
respectively select one. With „NEXT“ or „PREVIOUS“ you can navigate in the list. With „SELECT“ the ring tone is selected.
The volume level for the voice feedback and the selected ring tone can
be set in an additional sub menu. The volume of the beeper that gives
the signals for speed control and for the hazardous zones can also be
set here in the same way. Available as voice commands are „LOUDER“, „LESS“, „MAXIMUM“, „MINIMUM“ and „ACCEPT“.
For some radios it may cause problems if the BURY CP 1100 starts with
voice response immediately after the mute signal. Some radios need
some time for a corresponding activation and reaction to the mute
signal. This will be indicated to you through the fact that you don’t hear
the signal tone at the start of the voice control. To avoid this effect, you
can enter a maximum delay of up to three seconds in the „MUTE DELAY“ menu item. It is only after this time has elapsed that the BURY
CP 1100 begins with the voice feedback.
Audio
Ringtones
Play
Select
Volume
Speech
Ringtone
Mute delay
Display
This menu point makes it possible for you to adjust the display in
a range of different ways.
In order to avoid the blinding effect especially when driving at night,
you can activate the Sleep mode. This causes the display to shut off
after either 15, 30 or 60 seconds. With an incoming call, the BURY CP
1100 activates the display automatically.
In the Illumination menu item you can change the intensity of the
light diodes in the display. As voice commands „MORE“, „LESS“,
„MINIMUM“ or „MAXIMUM“ are available. The confirmation follows
with „SELECT“.
To be able to read the contents of the display optimally during different
light conditions, in the next menu item, Day/Night mode, you are
able to invert the display.
Display
Sleep mode
Illumination
Day/Night mode
Auto mode
Day mode
Night mode
25
Phone
In the phone menu item, you can make the settings concerning the
answering of calls, the menu languages, the PIN code, the number
presentation, the GSM, the settings of date and time, for the system
itself, and for the willingness to answer calls.
With the call answering function you can specify as to whether you
want to answer an incoming call manually via the keypad, by voice
command, or automatically. If you select automatic call answering, the
call will be answered automatically after two rings. You can then not
decide to decline the call.
Depending on the sales regions (countries) the BURY CP 1100 includes
one or several language packages. If several are available you can
select the suitable Language which you want.
Phone
Call answering
Language
Note:
XXThe BURY Service offers the possibility change or add language packages. This service is available for an additional
charge. You can get more information via the BURY hotline.
Their contact details are provided at www.bury.com.
You have to set the language when you use the device for the first time
and after updating the firmware.
Pin code
You are able to assign an individual „PIN CODE“ in the next menu
item. Your own code must be at least four figures long – with a maximum of eight being allowed.
Pin code
Note:
XXIf an error message with the note regarding an incorrect
PIN entry appears, the cause--apart from the possibility of
the incorrect input--could lie with the SIM card itself. SIM
cards of many network providers do not allow the deactivation of the PIN code prompt. This can be because they are
older or because this function was blocked at the request
of the network provider.
Here you can activate the fixed dialling function. If the FDN mode
(FDN = Fixed Dialling Numbers) is activated, only previously defined
phone numbers from the SIM card can be dialled. The PIN2 code which
you have received from your provider is required to activate this function. Direct dialling from the contacts list is no longer possible when
the FDN function is activated.
Fixed dialling
26
Operating guidelines
The phone list for the FDN function can be reviewed and activated /
deactivated by using the PIN 2 code. The number of FDN contacts you
can store to the SIM memory depends on the SIM card (at least 9 and
up to 50 contacts).
You can then assign the numbers 0-9 to the defined phone numbers
and you can call the contact simply by pressing the corresponding
number.
Note:
XXIf the FDN mode is activated, you can only send an SMS
to a number that is stored in the FDN contacts.
XXTo send text messages to the SIM contacts while the fixed
dialling service is active, you need to add the text message
centre number to the fixed dialling list.
Short dialling
Short dialling enables you to make phone calls at the touch of a button
and to send short messages. There are eight numeric keys (keys 2 to
9), which can be assigned a short dialling number.
Short dial
Tip:
XXSet the short dialling keys on the basis of your own preferences. One preference might be, for instance, the younger
the person, the lower the value of the numeric key to which
the speed dial is allocated.
The BURY CP 1100 has an integrated digital signal processor (DSP).
This serves the functions of voice recognition and voice synthesis and
is activated as standard. Together with the suppression of background
noise and echoes, the DSP guarantees optimum conversational sound
quality. You can completely deactivate the DSP.
Number presentation
Using the Number presentation menu item, you are able to select as
to whether the BURY CP 1100 sends the details of your own number
along during an outgoing telephone call or not. Here, you have a choice
of two options: Show number and Hide number. Your telephone
number will then consistently either be hidden or sent.
GSM power off
In this menu you can adjust the GSM.
DSP
Number
presentation
GSM power off
27
Date/Time
Here you can set the date and time. You can choose between different
formats.
Under the System heading, you receive information about the software and hardware installed in the BURY CP 1100 under Version info.
If a new item of firmware should become available for the BURY CP
1100, then under the menu item Software update and using the
BURY Update Suite, you are able to update the system.
Note:
XXDo not interrupt the power supply of the BURY CP 1100
during an update.
XXWe recommend to let the firmware update be carried out
by a BURY specialist retailer. Details of your nearest specialist retailer are provided at www.bury.com.
If you have changed certain settings but the BURY CP 1100 doesn’t
work in the way in which you wanted it to, then you can reset the BURY
CP 1100 to the settings which were stored in it when you received it
using the Factory setting function.
Using the On-call duty menu item, you are able to activate the BURY
CP 1100´s internal standby switch. When activated for the first time, this
is set at 5 minutes. It can be changed to 10 or 15 minutes, however.
Date/Time
System
Version info
Software update
Factory setting
On-call duty
On-call duty is useful if you stay in your vehicle after reaching your
destination or switch the engine off when waiting at level crossing, for
instance. The BURY CP 1100 remains active for a set period of time, and
you can still conduct telephone conversations. In the event of no active
phone call, the BURY CP 1100 will then switch off automatically after
the set time has elapsed.
In this menu you can enter the number for the emergency call.
This phone operates using radio signals, which cannot guarantee connection in all conditions. Therefore, you must never rely solely on any
phone for emergency communications.
SOS
Operating guidelines
28
Memo
If you want to make a note of something important either after or during a trip or maybe during a telephone call, it is often the case that you
don’t have anything to write with at hand or the traffic situation prevents you from doing so. With this function you are able to save information that is important to you without posing a risk to yourself or
others.
A voice memo can be saved directly from the main menu or during
a telephone call. Private and general voice memos are differentiated
between.
It is possible to save up to 10 voice memos. The column that moves
from left to right during the recording indicates the remaining recording
time that is available. The current recording time is also displayed in the
same way. The maximum possible length of the memos totals two minutes. If the recording time has run out, this will be displayed accordingly. To be able to record additional memos, you then have to delete
the old ones.
In the list, the memos are numerated from 1 to 10 so you can initialise
them with the voice control feature using the command „NOTICE 1“
or simply „1“. Underneath this, you can see the recording time that this
memo takes up. Any memo that is made during a telephone call is always a private memo.
Note:
XXWhen recording telephone calls, please take the privacy of
your conversational partner into consideration and tell them
that you would like to record parts of the telephone call.
Examples of private memos are addresses, telephone numbers or internet sites which you want to make a note of for later during your
journey or during telephone calls.
You can also create a general voice memo. The maximum recording
time totals two minutes. If the memo is not listened to before the BURY
CP 1100 is switched off, then after it is switched on, a message appears
via a pop-up stating that a voice memo which has not yet been listened
to is available. If the Audio Feedback is activated this message is also
read out.
If a general voice memo is already available and you would like to
record a different one, you will be asked whether you would like to overwrite the old memo. The maximum recording time totals two minutes.
Memo
Private
Global
Store
Play
Delete
29
General voice memos are especially suited to vehicles which have continually alternating drivers, e.g.
delivery vehicles. This means that the next driver can be instructed accordingly if someone forgot to
refuel or the vehicle has a flat tyre, preventing it from being driven.
12. Accepting, making, ending calls
You will be alerted of an incoming call via the voice output and the ring tone. Your vehicle‘s sound
system will switch onto mute. If the caller sends their telephone number with the call, this will be
shown in the display unless the number is saved in your phone. If an entry for the number is saved in
your phone, then the name of the caller will be read out. If the caller hides their number, this will be
indicated in the display.
In the standard setting, you can only accept or decline an incoming call via the keypad. If you would
like to accept the call, simply press on the Start call button. If you don‘t want to accept the call, please
press the End button.
During the call, you have the possibility to regulate the volume of the voice of your discussion partner
through the volume control.
Note:
XXPlease comply with the country-specific laws concerning in-car telephone calls.
With the Memo sub menu, you are given the option of being able to record part of a telephone call.
Please refer to the relevant part of the operating instructions for a detailed description.
Use the End button to end a call.
If a telephone conversation is active when you switch off your vehicle’s engine, the BURY CP 1100 will
remain running until the call has been ended.
30
Further Information
13. Service
In case of general or technical queries, suggestions and comments, please do not hesitate to contact
our team at any time. Suggestions and feedback are always welcomed:
Administration:
BURY GmbH & Co. KG
Robert-Koch-Straße 1-7
D-32584 Löhne
GERMANY
Producer:
BURY Spółka z o.o.
ul. Wojska Polskiego 4
39-300 MIELEC
POLAND
Hotline: +49(0)180 5 - 842 468*
Faxline: +49(0)180 5 - 842 329*
* 0,14 €/min. from the Deutsche Telecom AG fixed line network.
The costs of international telephone calls which are made from abroad can vary.
E-mail: [email protected]
Warranty / Service desk:
The duration of the warranty for the components of this product totals two years subsequent to the
date of sale to the end customer. Any warranty claims you may have as an end customer are to be
asserted towards your contractual partner. If the corresponding contractual partner is not able to
rectify a corresponding fault, please exercise your rights of purchase. If subsequent to agreement with
your contractual partner the product is to be sent directly to the manufacturer, then please send it,
along with a detailed description of the fault in the German or English language and a copy of the proof
of purchase, directly to our service team:
BURY GmbH & Co. KG
Im Hause DPD Depot 103
Robinienweg
D-03222 Lübbenau
GERMANY
Information on the disposal of electrical goods in the EU
The crossed out wheelie bin symbol means that electrical and electronic products, batteries and accumulators must be disposed of separately in the European Union. Please do not dispose of any such
products in your normal household waste. As the owner of a product of this sort you are legally obliged
to dispose of it at your local dumping site or recycling centre, where you are able to leave your waste
electrical goods free of charge.
31
14. Approvals and declaration of conformity
Purchase and production as well as service and sales at BURY are subject to tough quality and environmental management conditions according to ISO 9001 and ISO 14001. The BURY CP 1100 has
the CE approval pursuant to the R&TTE 1999/5/EC regulation
e1
Technical type approval according to 2009/19/EC “Electromagnetic Compatibility in motor vehicles”
You can request a conformity declaration from the manufacturer of this product by post under the
manufacturer‘s address which is stated above, or by writing to the following email address:
[email protected]
Please provide your email request in either English or German.
Version: 09/2012
25.1508.0-03-100912
Subject to change. Errors and omissions excepted.
All use of these brands by BURY Technologies takes place within the scope of the corresponding
licence.
All of the other stated brands are owned by their corresponding owner. All rights reserved.
32
EXPRESS WARRANTY AGAINST DEFECTS – AUSTRALIA
EFFECTIVE 1 st JANUARY, 2012
This product if imported by Point to Point Technology Pty Ltd is warranted in Australia to be free from
any defect in material and workmanship, subject to the following terms and conditions.
Who provides this warranty:
POINT TO POINT TECHNOLOGY PTY LTD
2/2 KEYSBOROUGH CLOSE, KEYSBOROUGH VIC 3173
TOLL FREE: 1300 550 720
EMAIL: [email protected]
Geographical Region:
PRODUCTS PURCHASED IN AUSTRALIA imported by
Point to Point Technology Pty Ltd
Warranty Period:
2 YEARS FROM DATE OF PURCHASE (please retain your receipt as your proof of purchase will be required to valid warranty claim)
WARRANTY CLAIM PROCESS
In the unfortunate event of a failure of your product, please contact Point to Point Technology Pty Ltd
(PTP) on our Toll Free number: 1300 550 720.
PTP will ask you to provide evidence of your purchase receipt to establish the warranty claim is within
the 2 year warranty period. Failure to provide your purchase receipt will result in PTP rejecting your
warranty claim.
PTP offers an advance replacement of your faulty product. Please note our advance replacement units
are a like-for-like product and may be refurbished units that are of the exact same model and version.
Goods presented for repair may be replaced by refurbished goods of the same type rather than being
repaired. Refurbished parts may be used to repair the goods.
Upon validation of your warranty claim, PTP will send your replacement unit freight-paid and include
a pre-paid return bag for the return of the faulty product. If you choose do not wish to proceed with the
warranty claim, you must return the replacement unit to us using the pre-paid return bag. Failure by the
customer to return either unit within 14 days may incur a charge for the cost of the replacement unit.
Warranty Exclusions
Failure to provide a proof of purchase will result in your warranty claim being rejected.
Product failure due to customer misuse, abuse or abnormal use.
Failure by the customer to take reasonable care.
Failure due to not using the product in accordance with instructions stated in the manufactures user
guide.
Product failure due to recommended installation procedures not being followed as stated in the
manufacturer’s user guide.
YOUR RIGHTS UNDER THE AUSTRALIAN CONSUMER LAW
Our goods come with guarantees that cannot be excluded under the Australian Consumer Law.
You are entitled to a replacement or refund for a major failure and for compensation for any other
reasonably foreseeable loss or damage. You are entitled to have goods repaired or replaced if the goods
fail to be of acceptable quality and the failure does not amount to a major failure.